我们首先了解一下什么是像素,计算机中是如何存储图像,以及opencv是如何表示图像的。
像素:
像素是指由图像的小方格即所谓的像素(pixel)组成的,这些小方块都有一个明确的位置和被分配的色彩数值,而这些一小方格的颜色和位置就决定该图像所呈现出来的样子。可以将像素视为整个图像中不可分割的单位或者是元素,不可分割的意思是它不能够再切割成更小单位抑或是元素,它是以一个单一颜色的小格存在。每一个点阵图像包含了一定量的像素,这些像素决定图像在屏幕上所呈现的大小
计算机存储图像:
图像文件存储的都是每一个像素对应的颜色值。
1、位图文件有两种存储像素数据的格式。16777216色(真彩色)的图像,一个像素的颜色可以用24位数据表示。256色的图像可以用调色板对颜色的信息进行编码,一个像素的值对应的是调色板的索引,而不是直接对应一个像素的颜色,调色板的索引映射为像素的颜色。
2、以一百万个像素,256种颜色的BMP文件在电脑上的存储为例。这个文件包括一个十四字节的文件首部,一个四十字节的信息首部,一个1024字节的颜色表,一兆字节的位图数据。文件首部的前两个字节由字符BM组成,还包括了文件长度和位图数据在文件中的起始位置。
3、文件的信息首部包含了图像的高、宽、颜色数等非图形数据。
这个图像共有一百万个像素,一个像素需要八位的颜色信息,文件的这一部分的长度是一百万个字节,字节排放的顺序是自左到右从图像的最下面那行开始,这个文件的总大小是1001078字节。
opencv表示图像:
opencv中很多数据结构为了达到內存使用的最优化,通常都会用它最小上限的空间来分配变量,有的数据结构也会因为图像文件格式的关系而给予适当的变量,因此需要知道它们声明的空间大小来配置适当的变量。一
般标准的图片,为RGB格式它们的大小为8bits格式,范围为0~255,对一个int空间的类型来说实在是太小,整整浪费了24bits的空间,假设有个640*480的BMP文件空间存储內存,那整整浪费了640*480*3*(32-8)bits的內存空间,总共浪费了2.6MB!,也就是那
2.6MB内什么东西都没存储,如果今天以8bits的格式来存储则只使用到0.6MB的內存而已(640*480*3*(8)+54
bits),因此,对于文件格式的对应是一件很重要的事.。
访问像素的三种方法:
- 指针访问
- 迭代器iterator
- 动态地址计算
首先我们来看一段代码:
#include<opencv2/opencv.hpp>
#include<iostream>
using namespace std;
using namespace cv;
//指针操作访问像素
void colorReduce(Mat& img,int div=64)
{
    int nl = img.rows;
    int nc = img.cols*img.channels();
    for(int i = 0;i < nl;i++)
    {
        uchar* data = img.ptr<uchar>(i);
        for(int j = 0 ; j < nc;j++)
        {
            data[j] = data[j]/div*div + div/2;
        }
    }

}
//迭代器模式
void ColorReduce(Mat& img,int div = 64)
{
	Mat_<Vec3b>::iterator it = img.begin<Vec3b>();
	Mat_<Vec3b>::iterator itend = img.end<Vec3b>();
	for (; it != itend; it++)
	{
		(*it)[0] = (*it)[0] / div * div + div / 2;
		(*it)[1] = (*it)[1] / div * div + div / 2;
		(*it)[2] = (*it)[2] / div * div + div / 2;
	}
	namedWindow("dst");
	imshow("dst", img);
}
//动态地址计算
void colorReduce2(Mat& img,int div = 64)
{
    int cols = img.cols;
    int rows = img.rows;
    for(int i= 0;i < rows;i++)
    {
        for(int j=0; j < cols;j++)
        {
            img.at<Vec3b>(i,j)[0] = img.at<Vec3b>(i,j)[0] / div * div +div /2;
            img.at<Vec3b>(i,j)[1] = img.at<Vec3b>(i,j)[1] / div * div +div /2;
            img.at<Vec3b>(i,j)[2] = img.at<Vec3b>(i,j)[2] / div * div +div /2;
        }
    }
}

int main(int argc,char** argv)
{
    Mat image = imread(argv[1]);
    imshow("input",image);
    colorReduce2(image,64);
    imshow("dst",image);
    waitKey(0);
    destroyAllWindows();

    return 0;
}
指针操作:
//指针操作访问像素
void colorReduce(Mat& img,int div=64)
{
    int nl = img.rows; // 行数
    int nc = img.cols*img.channels();//列数x通道数 = 每一行像素的个数
    for(int i = 0;i < nl;i++)
    {
     //Mat类提供了ptr函数可以得到任意行的首地址,ptr是一个模板函数
        uchar* data = img.ptr<uchar>(i); //获取第i行的首地址
        for(int j = 0 ; j < nc;j++)
        {
            data[j] = data[j]/div*div + div/2;
        }
    }

}
迭代器操作:
//迭代器模式
void ColorReduce(Mat& img,int div = 64)
{
	Mat_<Vec3b>::iterator it = img.begin<Vec3b>();
	Mat_<Vec3b>::iterator itend = img.end<Vec3b>();
	for (; it != itend; it++)
	{
		(*it)[0] = (*it)[0] / div * div + div / 2;
		(*it)[1] = (*it)[1] / div * div + div / 2;
		(*it)[2] = (*it)[2] / div * div + div / 2;
	}
	namedWindow("dst");
	imshow("dst", img);
}
如果不熟悉迭代器模式,可以阅读与STL中迭代器相关的资料。
动态地址计算:
//动态地址计算
void colorReduce2(Mat& img,int div = 64)
{
    int cols = img.cols; //列数
    int rows = img.rows; //行数
    for(int i= 0;i < rows;i++)
    {
        for(int j=0; j < cols;j++)
        {  //处理B蓝色通道
            img.at<Vec3b>(i,j)[0] = img.at<Vec3b>(i,j)[0] / div * div +div /2;
       //处理G绿色通道
            img.at<Vec3b>(i,j)[1] = img.at<Vec3b>(i,j)[1] / div * div +div /2;
       //处理R红色通道
            img.at<Vec3b>(i,j)[2] = img.at<Vec3b>(i,j)[2] / div * div +div /2;
        }
    }
}
对于彩色图像,每个像素由三个部分:蓝色通道,绿色通道,红色通道(BGR)。因此对于一个包含彩色图像的Mat,会返回一个8位数组组成的向量。OpenCV将此向量定义为Vec3b,即由usigned char 组成的向量。其访问像素通用表达式为:
image.at<Vec3b>(row,col)[channel] = value;其中索引值表示通道。
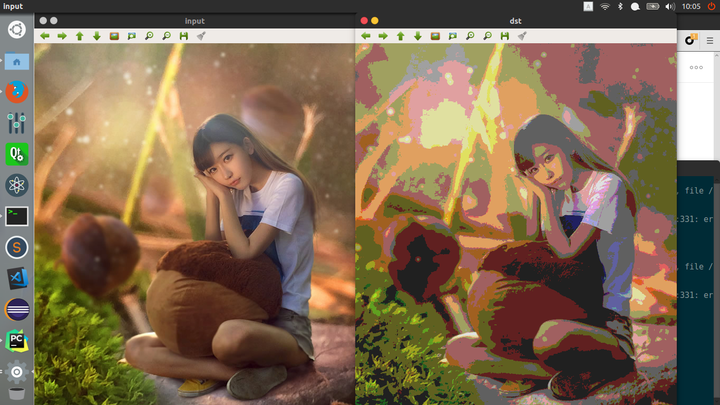
这就是访问像素的三种方法,我们看一下效果: