一 . RabbitMq的Topic Exchange 模式
生产者将消息发送给Exchange,依据是路由关键字 routingkey (如 : topic.message);
绑定Exchange与Queues队列的依据是bindingKey(如 :topic.#)
代码发送的时候还是一样,第一个参数表示交换机,第二个参数表示routing key,第三个参数即消息。如下:
rabbitTemplate.convertAndSend("testTopicExchange","key1.a.c.key2", " this is RabbitMQ!");
重新认识routingkey和bindingKey:
RabbitMq配置类:

发送消息类的时候:

发送消息时候的routingkey是topic.message,既满足 topic.message,又满足 topic.#, 所以两个消息队列都能收到消息;

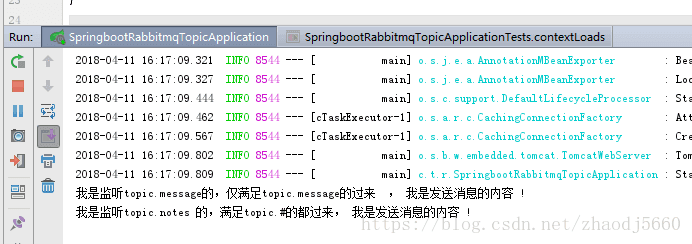
如改成routingkey是topic.messages, 则只满足topic.#而不满足topic.message,所以运行结果只有messages那一条:

二 . 代码
1.导包
        <dependency>
			<groupId>org.springframework.boot</groupId>
			<artifactId>spring-boot-starter-amqp</artifactId>
		</dependency>
2. 在yaml文件中配置rabbitMq的基本配置;
server:
  port: 8080
spring:
  application:
    name: springboot_rabbitmq_topic
  rabbitmq:
    host: localhost
    port: 5672
    username: guest
    password: guest
3. 书写RabbitMq的配置类:
a . 创建对类queue
b . 创建交换机TopicExchange
c . 根据相应的规则将队列绑定到交换机上
package com.titter.rabbitmq;

import org.springframework.amqp.core.Binding;
import org.springframework.amqp.core.BindingBuilder;
import org.springframework.amqp.core.Queue;
import org.springframework.amqp.core.TopicExchange;
import org.springframework.beans.factory.annotation.Qualifier;
import org.springframework.context.annotation.Bean;
import org.springframework.context.annotation.Configuration;

/**
 * Created by Administrator on 2018/4/10.
 * 1. yaml
 * 2. RabbitMqConfig
 *      a  创建queue
 *      b. 创建交换机TopicExchange
 *      c. 根据绑定规则将队列绑定到相应的交换机上
 * 3. sender
 * 4. test
 * 5. receiver
 */

@Configuration
public class RabbitMqConfig {

    //  a  创建queue
    @Bean(name = "message") //  指定该参数名是message  见下面Qualifier("message")
    public Queue queueMessage(){
        return new Queue("topic.message");  //  topic.message  是rounting-key,匹配规则
    }

    @Bean(name = "notes")
    public Queue queueMessages(){
        return new Queue("topic.notes");
    }

    //  b. 创建交换机TopicExchange
    @Bean
    public TopicExchange exchange(){
        return new TopicExchange("topicExchange");
    }

    /*
      c. 根据绑定规则将队列绑定到相应的交换机上(bindingKey)--Exchange Queues

     */
    @Bean
    public Binding bindingExchangeMessage(@Qualifier("message") Queue queueMessage,TopicExchange exchange){
        return BindingBuilder.bind(queueMessage).to(exchange).with("topic.message");
    }

    @Bean
    /**
     * 将队列"messages" 绑定到交换机上,绑定规则是 topic.messages
     *
     */
    public  Binding bindingExchangeMessages(@Qualifier("notes")Queue queueMessages,TopicExchange exchange){
        return BindingBuilder.bind(queueMessages).to(exchange).with("topic.#");
    }

}
4. 创建消息发送类 AmqpTempla
package com.titter.rabbitmq;

import org.springframework.amqp.core.AmqpTemplate;
import org.springframework.beans.factory.annotation.Autowired;
import org.springframework.stereotype.Component;

/**
 * Created by Administrator on 2018/4/10.
 */

@Component
public class TopicSender {

    @Autowired
    private AmqpTemplate amqpTemplate;
    // 交换机  rountingkey  发送的内容  发送消息到相应的Exchange
    public void sendMessage(){
        this.amqpTemplate.convertAndSend("topicExchange","topic.messages","我是发送消息的内容! ");
    }
        /*
         向   名称为 topicExchange 的交换机 发送满足routingkey规则为 "topic.messages " 的内容为 "我是发送消息的内容"  的消息
         */
}
5. 创建消息发送测试类
package com.titter.rabbitmq;

import org.junit.Test;
import org.junit.runner.RunWith;
import org.springframework.beans.factory.annotation.Autowired;
import org.springframework.boot.test.context.SpringBootTest;
import org.springframework.test.context.junit4.SpringRunner;

@RunWith(SpringRunner.class)
@SpringBootTest
public class SpringbootRabbitmqTopicApplicationTests {

	@Autowired
	private TopicSender topicSender;

	@Test
	public void contextLoads() {
		topicSender.sendMessage();
	}

}
6. 创建消息接收类
package com.titter.rabbitmq;

import org.springframework.amqp.rabbit.annotation.RabbitListener;
import org.springframework.stereotype.Component;

/**
 * Created by Administrator on 2018/4/10.
 */
@Component
public class TopicReceiver {

    @RabbitListener(queues ="topic.message" )
    public void receiveMessage1(String str){
        System.out.println("我是监听topic.message的,仅满足topic.message的过来 , "+str);
    }

    @RabbitListener(queues ="topic.notes" )
    public void receiveMessage2(String str){
        System.out.println("我是监听topic.# 的,满足 topic.# 的都过来 , "+str);
    }

}
7. 测试:
(1)启动消息接收类主应用
(2) 启动消息测试类发送消息
(3) 分析:
this.amqpTemplate.convertAndSend("topicExchange","topic.messages","this is message! ");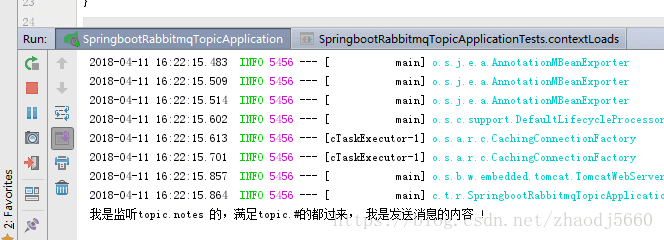 ;
;
如果改成
this.amqpTemplate.convertAndSend("topicExchange","topic.message","this is message! ");topic.message同时满足bindingkey为topic.message 和 topic.# ,
(因为匹配规则弄混淆了,所以专门再记一篇巩固一下)
三 . 经验:
众所周知,RabbitMq交换机和队列的绑定方式有3种
Fanout Exchange– 不处理路由键。你只需要简单的将队列绑定到交换机上。一个发送到交换机的消息都会被转发到与该交换机绑定的所有队列上。很像子网广播,每台子网内的主机都获得了一份复制的消息。Fanout交换机转发消息是最快的。
Direct Exchange– 处理路由键。需要将一个队列绑定到交换机上,要求该消息与一个特定的路由键完全匹配。这是一个完整的匹配。如果一个队列绑定到该交换机上要求路由键 “dog”,则只有被标记为“dog”的消息才被转发,不会转发dog.puppy,也不会转发dog.guard,只会转发dog。
Topic Exchange– 将路由键和某模式进行匹配。此时队列需要绑定要一个模式上。符号“#”匹配一个或多个词,符号“*”匹配不多不少一个词。因此“audit.#”能够匹配到“audit.irs.corporate”,但是“audit.*” 只会匹配到“audit.irs”。
具体介绍:
http://www.redhat.com/docs/en-US/Red_Hat_Enterprise_MRG/1.0/html/Messaging_Tutorial/sect-Messaging_Tutorial-Initial_Concepts-Fanout_Exchange.html
============================================================================
我现在的代码是使用fanout的,当我有多个绑定关系,多个队列的时候这个就不合适了,因为我就必须要申明多个交换机,这样当业务越来越大的时候会很吃力,所以我打算把它改造成topic
改造其实很简单,就把fanout改成topic,然后简单的改造一下交换机和队列的声明方式就行。
但是问题来了,当我改造的完以后死活都不能运行,老是报错:
cannot redeclare exchange 'x1' in vhost '/' with different type, durable or autodelete value", (40, 10), 'Channel.exchange_declare
这是为啥呢?我没有重复声明x1啊。挠头,纠结。。。。。
网上google了半天,没找出个所以然来,看代码也没发现问题,然后重看那篇文章 :
[RabbitMQ+Python入门经典] 兔子和兔子窝
当看到 “队列和交换机有一个创建时候指定的标志durable,直译叫做坚固的。durable的唯一含义就是具有这个标志的队列和交换机会在重启之后重新建立,它不表示说在队列当中的消息会在重启后恢复。” 时候有了想法。
是不是因为 我之前已经申明了x1,它的绑定关系是fanout了,并且由于是坚固模型,退出的时候也并没有删除这个名为x1的交换机,所以现在重新声明的时候就出错了呢?
于是用 管理RabbitMq的命令 rabbitmqctl list_exchanges 查看rabbitMQ里面已经声明的交换机,果然 出现了这么一行 : x1 fanout
问题找到了,那么我们下一步要做的就是先删除这个交换机,我们用 exchange_delete('x1'),然后再用rabbitmqctl list_exchanges 的时候已经是没有x1了,证明我们删除成功。
然后再运行改造完的代码,OK ,顺利执行