前言:
本人菜鸟程序员一枚,大学本是电子专业,也是学渣一枚。从两年前来到到上海,阴差阳错,从事起了android开发工作,从零开始自学从学习java到android已两年有余。受鸿洋弟弟大神的激励后启发(本人鸿神郭神粉 ),第一次尝试这在CSDN写一篇简单的博文(文章中如有错误,欢迎指正)。
废话少说,言归正传。最近去支援一个项目,其中分配到我的任务种其中一个页面涉及到一个图需要用一个自定义控件去实现(如图):

不怕诸神笑话,正如大家所见,就这么一个简单的饼状圆环比例比例图,我花了一下午加半个晚上(大概从下午1点钟到晚上1点钟)才完成。菜鸟之路荆棘满布,宝宝心里苦 。不过,好歹也算是完成了(最后还有点bug,还请诸神指点完善),也正因如此,对我个人而言,我觉得很有必要写篇博文好好纪念一下。好了,下面开始我编写该自定义控件的艰苦过程。
首先来总结下编写自定义控件的一般步骤:
1.自定义控件View的属性
2.创建自定义控件类继承View类,在构造方法中获取自定义属性
3.重写onMeasure方法,确定控件在布局中大小
4.重写onDraw方法,绘制控件
(5.应用到项目)
1.自定义控件属性
新建工程,在values目录下新建一个attrs.xml文件,在该文件下声明定义自定义控件的属性,如下(本人按照上图需求定义各属性):
     <span style="font-size:14px;"><declare-styleable name="RoundRateView">
          <attr name="lifeCostColor" format="color|reference" />
          <attr name="communicateCostColor" format="color|reference" />
          <attr name="trafficCostColor" format="color|reference" />
          <attr name="entertainmentCostColor" format="color|reference" />
          <attr name="circleWidth" format="dimension" />
          <attr name="radius" format="dimension" />
     </declare-styleable></span>
2.创建自定义控件类,获取自定义属性
上面自定义控件属性中的RoundRateView就是我们要自定义的饼状圆环比例展示图自定义控件,所以在工程中创建该类并继承View。在其构造方法中获取自定义属性:
<span style="font-size:12px;">        <span style="font-size:14px;">//从attrs中获取自定义属性对象
        TypedArray array = context.getTheme().obtainStyledAttributes(attrs,R.styleable.RoundRateView,defStyleAttr,0 );
        int n = array.getIndexCount();//自定义属性个数
        for (int i = 0;i<n;i++){
            int attr = array.getIndex(i);//通过索引获取具体属性
            switch (attr){
                case R.styleable.RoundRateView_lifeCostColor:
                    mLifeCostColor = array.getColor(attr, Color.parseColor("#fac62d"));
                    break;
                case R.styleable.RoundRateView_trafficCostColor:
                    trafficCostColor = array.getColor(attr, Color.parseColor("#65cff6"));
                    break;
                case R.styleable.RoundRateView_communicateCostColor:
                    mCommunicationCostColor = array.getColor(attr, Color.parseColor("#fe9a9c"));
                    break;
                case R.styleable.RoundRateView_entertainmentCostColor:
                    mEntertainmentColor = array.getColor(attr, Color.parseColor("#a286da"));
                    break;
                case R.styleable.RoundRateView_circleWidth:
                    mCircleWidth = array.getDimensionPixelSize(attr,dip2px(context,20));
                    break;
                case R.styleable.RoundRateView_radius:
                    mRadius = array.getDimensionPixelSize(attr,dip2px(context,20));
                    break;

            }
        }
        array.recycle();//定义完后属性对象回收</span>

</span>
3.重写onMeasure方法,设置控件在布局中大小
这里我直接用了一段鸿神一篇博文中的代码,然后稍加修改以适应我的自定义View,具体在代码中解析说明
    @Override
    protected void onMeasure(int widthMeasureSpec, int heightMeasureSpec) {
        /**
         * 设置宽度
         */
        int specMode = MeasureSpec.getMode(widthMeasureSpec); //获取控件中layout_width设定大小模式(有wrap_content,match_parent和具体数值)
        int specSize = MeasureSpec.getSize(widthMeasureSpec); //获取系统设定的控件宽度

        if (specMode == MeasureSpec.EXACTLY)//当控件大小设定为match_parent或者是具体值时
        {
            Log.e("xxx", "EXACTLY");
            mWidth = specSize;
        } else{

            if (specMode == MeasureSpec.AT_MOST)//控件layout_width设定为wrap_content,将控件宽度设置为圆环半径的两倍
            {
                mWidth = (int) (mRadius*2);
                Log.e("xxx", "AT_MOST");
            }
        }

        /***
         * 设置高度
         */
        specMode = MeasureSpec.getMode(heightMeasureSpec);
        specSize = MeasureSpec.getSize(heightMeasureSpec);
        if (specMode == MeasureSpec.EXACTLY)// match_parent , accurate
        {
            mHeight = specSize;
        } else{
            if (specMode == MeasureSpec.AT_MOST)//控件layou_hight设定为wrap_content,将控件高度设置为圆环半径的两倍
            {
                mHeight = (int) (mRadius*2);
            }
        }
        setMeasuredDimension(mWidth+10, mHeight+10);//最后应用到项目的时候发现圆饼有些超出控件定义的大小,所以将控件总大小稍微加大一点
    }
4.重写onDraw方法,绘制自定义控件
重写onDraw方法前,当然得先完成一些初始化工作:
    //初始化画笔
    private void initPaint(){
        mPaint = new Paint();  //创建画笔
        mPaint.setAntiAlias(true);  //设置绘制时抗锯齿
        mPaint.setStyle(Paint.Style.STROKE); //设置绘画空心(比如画圆时画的是空心圆而不是实心圆)
    }
重写onDraw方法,绘制控件
    @Override
    protected void onDraw(Canvas canvas) {
        mPaint.setStrokeWidth(mCircleWidth);//设置画笔线宽
        //创建矩形对象,关于RectF,androidAPI中有如下说明
        /**
     * Create a new rectangle with the specified coordinates. Note: no range
     * checking is performed, so the caller must ensure that left <= right and
     * top <= bottom.
     * public RectF(float left, float top, float right, float bottom)//这是我加进去的,本人英文水平有限,但大概知道它的意思是“根据指定的坐标点创建矩形对象,还有
         * 什么左边距值不能大于右边距值,上边距值不能大于下边距值不拉不拉不拉。。。”看了下面绘制圆环的代码之后大致知道这是干什么用的(应该是限定圆环所在位置吧),至
         * 于它底层究竟是什么原理,我没去深究,反正拿来主义吧<img alt="大笑" src="http://static.blog.csdn.net/xheditor/xheditor_emot/default/laugh.gif" />(话说就是这个东西,久久不能确定圆弧的圆点,花了好长一段时间试验了好久才找到圆点画出圆弧(泪崩))
         *
     * @param left   The X coordinate of the left side of the rectangle
     * @param top    The Y coordinate of the top of the rectangle
     * @param right  The X coordinate of the right side of the rectangle
     * @param bottom The Y coordinate of the bottom of the rectangle
     */
       mRectF = new RectF(mCircleWidth/2,mCircleWidth/2,mRadius*2-mCircleWidth/2,mRadius*2-mCircleWidth/2);//其实就是个绘制圆弧的规则
        float startAngle = -90;//经过试验,-90这个值就是12点方向的位置
        float lifeSweepAngle = 150;//圆弧弧度
        mPaint.setColor(mLifeCostColor);//设置画笔颜色
        canvas.drawArc(mRectF,startAngle,lifeSweepAngle,false,mPaint);//这里就是真正绘制圆弧的地方,从12点方向开始顺时针绘制150度弧度的圆弧
        //以下无需我来解释...
        startAngle = startAngle + lifeSweepAngle;
        float communicateSweep = 50;
        mPaint.setColor(mCommunicationCostColor);
        canvas.drawArc(mRectF,startAngle,communicateSweep,false,mPaint);

        startAngle = startAngle + communicateSweep;
        float trafficSweep = 95;
        mPaint.setColor(trafficCostColor);
        canvas.drawArc(mRectF,startAngle,trafficSweep,false,mPaint);

        startAngle = startAngle + trafficSweep;
        float entertainmentSweep = 65;
        mPaint.setColor(mEntertainmentColor);
        canvas.drawArc(mRectF,startAngle,entertainmentSweep,false,mPaint);

    }
5.应用到项目
最后把我们绘制好的自定义饼状圆环比例图应用到我们的布局文件里。注意加上命名空间xmlns:***="http://schemas.android.com/apk/res-auto"//"***"自己随便定义,如“shabi”,“erhuo”,“dashen”
<?xml version="1.0" encoding="utf-8"?>
<RelativeLayout xmlns:android="http://schemas.android.com/apk/res/android"
    xmlns:zhushp="http://schemas.android.com/apk/res-auto"
    android:layout_width="match_parent"
    android:layout_height="match_parent">

    <com.wondertek.mycolorrateview.RoundRateView
        android:layout_width="wrap_content"
        android:layout_height="wrap_content"
        zhushp:lifeCostColor="#fac62d"
        zhushp:communicateCostColor="#fe9a9c"
        zhushp:entertainmentCostColor="#a286da"
        zhushp:trafficCostColor="#65cff6"
        zhushp:radius="100dp"
        zhushp:circleWidth="60dp"/>

</RelativeLayout>
最后展示我们自己的效果图:
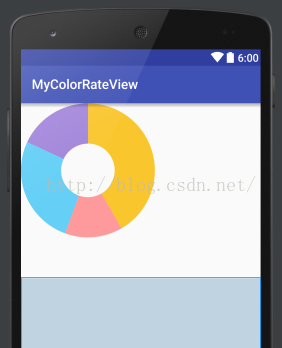
当然,就这样子肯定是不能用在项目上的,因为我们将比例展示数据都写死了,我们要从外部将这些数值引入到我们的控件中去,所以我们还要在控件中定义公共方法
<span style="font-size:14px;"> public void setPercent(float liftCost,float trafficCost,float communicateCost,float entertainmentCost)</span>尾声:
(⊙v⊙)嗯,好了,我的处女作原创博客到这里就结束了,不知道有没有人看 ,最后,如有错误,欢迎各路大神批评指正。
参考文献:来自鸿神的自定义View(一)