代码中写的很详细,直接上代码:
XML布局中;
<?xml version="1.0" encoding="utf-8"?>
<LinearLayout xmlns:android="http://schemas.android.com/apk/res/android"
    xmlns:app="http://schemas.android.com/apk/res-auto"
    xmlns:tools="http://schemas.android.com/tools"
    android:layout_width="match_parent"
    android:layout_height="match_parent"
    tools:context="com.sh.MainActivity"
    android:orientation="vertical"
    >

    <LinearLayout
        android:layout_width="match_parent"
        android:layout_height="0dp"
        android:layout_weight="1"
        android:orientation="vertical">
        <TextView
            android:id="@+id/tv1"
            android:layout_width="match_parent"
            android:layout_height="wrap_content"
            android:textSize="18sp"
            android:text="原图"/>
        <ImageView
            android:id="@+id/image1"
            android:layout_width="match_parent"
            android:layout_height="match_parent"/>

    </LinearLayout>
    <LinearLayout
        android:layout_width="match_parent"
        android:layout_height="0dp"
        android:layout_weight="1"
        android:orientation="vertical">
        <TextView
            android:id="@+id/tv2"
            android:layout_width="match_parent"
            android:layout_height="wrap_content"
            android:textSize="18sp"
            android:text="二次采样"/>
        <ImageView
            android:id="@+id/image2"
            android:layout_width="match_parent"
            android:layout_height="match_parent"/>
    </LinearLayout>
    <LinearLayout
        android:layout_width="match_parent"
        android:layout_height="0dp"
        android:layout_weight="1"
        android:orientation="vertical">
        <TextView
            android:id="@+id/tv3"
            android:layout_width="match_parent"
            android:layout_height="wrap_content"
            android:textSize="18sp"
            android:text="质量压缩"/>
        <ImageView
            android:id="@+id/image3"
            android:layout_width="match_parent"
            android:layout_height="match_parent"/>
    </LinearLayout>
</LinearLayout>
MainActivity中
public class MainActivity extends AppCompatActivity {
    private TextView tv1,tv2,tv3;
    private ImageView image1,image2,image3;
    @Override
    protected void onCreate(Bundle savedInstanceState) {
        super.onCreate(savedInstanceState);
        setContentView(R.layout.activity_main);
        initView();
        setImage1();//原图
        setImage2();//二次采样
        setImage3();//质量压缩
    }
    //质量压缩
    private void setImage3() {
        try {
            InputStream in = getAssets().open("ad.jpg");
            Bitmap bitmap = BitmapFactory.decodeStream(in);

            ByteArrayOutputStream bos =new ByteArrayOutputStream();
            // 质量压缩方法,这里100表示不压缩,把压缩后的数据存放到bos中
            bitmap.compress(Bitmap.CompressFormat.JPEG,100,bos);

         /*  bitmap.recycle();

            byte [] bytes = bos.toByteArray();
            Bitmap bitmap1 = BitmapFactory.decodeByteArray(bytes,0,bytes.length);

            image3.setImageBitmap(bitmap1);
            showBitmap(bitmap1,tv3);*/
         int options=100;
       //循环判断如果压缩后图片是否大于100kb,大于继续压缩
            while ( bos.toByteArray().length / 1024>100) {
        //重置bos即清空bos
                bos.reset();
        //这里压缩options%,把压缩后的数据存放到baos中
                bitmap.compress(Bitmap.CompressFormat.JPEG, options, bos);
              //每次都减少10
                options -= 10;
            }
           //把压缩后的数据bos存放到ByteArrayInputStream中
            ByteArrayInputStream isBm = new ByteArrayInputStream(bos.toByteArray());
            //把ByteArrayInputStream数据生成图片
            Bitmap bitmap1 = BitmapFactory.decodeStream(isBm, null, null);

            image3.setImageBitmap(bitmap1);
            showBitmap(bitmap1,tv3);

        } catch (IOException e) {
            e.printStackTrace();
        }

    }
    //二次采样
    private void setImage2() {
        try {
            //读取assets文件夹下的图片
            InputStream in = getAssets().open("ad.jpg");
          //第一次采样
            BitmapFactory.Options options=new BitmapFactory.Options();
            //该属性设置为true只会加载图片的边框进来,并不会加载图片具体的像素点
            options.inJustDecodeBounds = true;
            BitmapFactory.decodeStream(in,null,options);
            //定义缩放比例
            int inSampleSize = 1;
            //获得原图的宽和高
            int width = options.outWidth;
            int height = options.outHeight;

            //400*300
            //如果宽高的任意一方的缩放比例没有达到要求,都继续增大缩放比例
            //sampleSize应该为2的n次幂,如果给sampleSize设置的数字不是2的n次幂,那么系统会就近取值
            while (width/inSampleSize>400||height/inSampleSize>300){
                inSampleSize*=2;
            }
            //至此,第一次采样已经结束,我们已经成功的计算出了inSampleSize的大小

            //二次采样开始
            //二次采样时我需要将图片加载出来显示,不能只加载图片的框架,因此inJustDecodeBounds属性要设置为false
            options.inJustDecodeBounds=false;
            //设置缩放比例
            options.inSampleSize=inSampleSize;
            Bitmap bitmap = BitmapFactory.decodeStream(in,null,options);

            //将二次采样后的图片放在image2上
            image2.setImageBitmap(bitmap);
            showBitmap(bitmap,tv2);

        } catch (IOException e) {
            e.printStackTrace();
        }

    }
    //原图
//获得assets文件夹下的图片资源并将该图片放在image1布局处,并调用showBitmap()方法,将图片宽高大小在TextView上展示出来
    private void setImage1() {
        try {
            InputStream in = getAssets().open("ad.jpg");
            Bitmap bitmap = BitmapFactory.decodeStream(in);
            image1.setImageBitmap(bitmap);

            showBitmap(bitmap,tv1);
        } catch (IOException e) {
            e.printStackTrace();
        }

    }

   //获得图片宽高大小并在TextView上展示出来
    private void showBitmap(Bitmap bitmap, TextView tv) {
        //图片的宽和高
        int width = bitmap.getWidth();
        int height = bitmap.getHeight();
        //位图所占用的内存空间数等于位图的每一行所占用的空间数乘以位图的行数。
        int size = bitmap.getRowBytes()*bitmap.getHeight();
       //图片的内存大小
        String strSize = Formatter.formatFileSize(this,size);

        tv.setText(tv.getText()+"---"+width+"*"+height+"---"+size+"---"+strSize);
    }
    //初始化各个控件
    private void initView() {
        tv1= (TextView) findViewById(R.id.tv1);
        image1= (ImageView) findViewById(R.id.image1);
        tv2= (TextView) findViewById(R.id.tv2);
        image2= (ImageView) findViewById(R.id.image2);
        tv3= (TextView) findViewById(R.id.tv3);
        image3= (ImageView) findViewById(R.id.image3);
    }
}
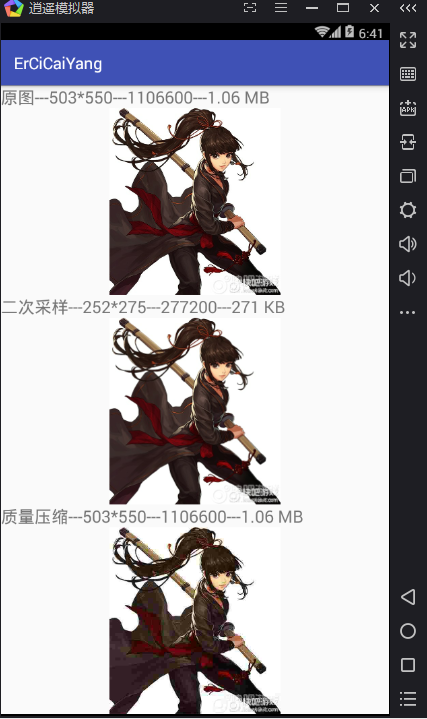
最后效果图:
版权声明:本文为博主原创文章,未经博主允许不得转载。 https://blog.csdn.net/leehbhs/article/details/78207444