在自动化测试过程中,通过selenium启动浏览器时,可能需要加载插件(如测试用的firebug、或产品中要求必须添加某插件等)、读取用户数据(自己浏览器的配置文件/别人直接给的浏览器配置文件)、设置浏览器(不加载图片等)。
由于我们通过selenium启动的浏览器页面,是完全干净的页面,如果想要让该页面带上我们需要的信息,则需要自己设置。
下面讲一下Firefox和Chrome浏览器的各种启动方式:
一:Firefox
1.启动浏览器,使用浏览器上保存的所有用户数据。
用户数据是从Firefox的配置文件中读取的,首先看下自己电脑的配置文件,在cmd上进入Firefox的安装路径下,运行firefox.exe -ProfileManger命令,会弹出自己电脑火狐浏览器的所有配置文件。如下图。
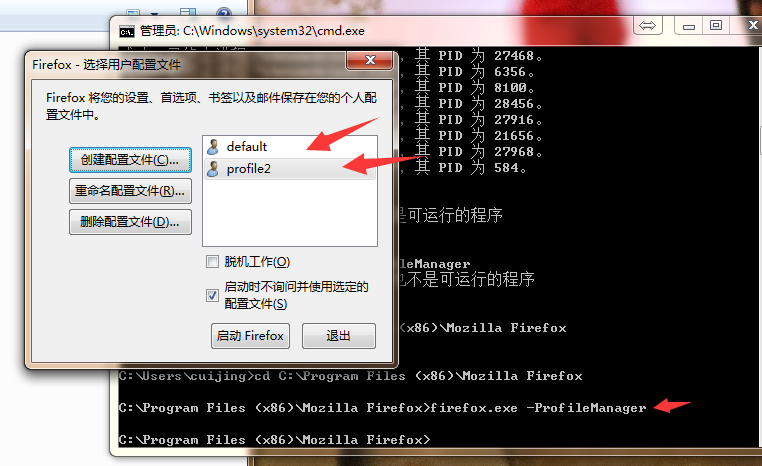
        //创建profileIni对象
        ProfilesIni ini = new ProfilesIni();
        //通过名字来获取到相应的配置文件,如上图所示,也可以写“profile2”
        FirefoxProfile profile = ini.getProfile("default");
        //创建浏览器驱动,并将profile传入,此时启动的时候,就会读取我们default配置文件来调用相应的火狐浏览器了
        WebDriver driver = new FirefoxDriver(profile);

        driver.get("https://www.cnblogs.com/");
如果是别人传过来的一个配置文件,你自己保存在了地址XXX下。(即使是读取自己本地浏览器配置文件,也可使用下面的方法,只要将路径写对就可以)
        //创建文件对象
        File file = new File("C:\\your\\path\\yourProfileName");
        FirefoxProfile profile = new FirefoxProfile(file);


        WebDriver driver = new FirefoxDriver(profile);

        driver.get("https://www.cnblogs.com/");
2.启动浏览器,设置代理
        FirefoxProfile profile = new FirefoxProfile();
        String proxyIp="192.168.2.111";
        int proxyPort = 6666;
        //开启代理模式
        profile.setPreference("network.proxy.type", 1);
        //设置代理服务器IP
        profile.setPreference("network.proxy.http", proxyIp);
        //设置代理服务器的端口
        profile.setPreference("network.proxy.http_port", proxyPort);

        WebDriver driver = new FirefoxDriver(profile);
        driver.get("http://www.baidu.com");
如果还想了解其他的设置,可以在火狐浏览器搜索就可以了。

3.启动浏览器,安装插件
        //设置自己所下载的插件的位置
        File file = new File("D:\\your\\xxx.xpi\\path");
        //创建火狐浏览器的profile对象
        FirefoxProfile profile = new FirefoxProfile(file);
        //调用addExtension方法,该方法将file路径中的插件名字提取出来,并将名字和new FileExtension 的对象添加到extensions中
        //private Map<String, Extension> extensions = Maps.newHashMap();
        profile.addExtension(file);

        WebDriver driver = new FirefoxDriver(profile);
        driver.get("https://www.cnblogs.com/");
二:Chrome
关于Chrome的比较简单,其API上写的都非常清楚。可以自行参考下:https://sites.google.com/a/chromium.org/chromedriver/capabilities。里面的例子都写的很明了。
下面简单举几个例子。
1.添加启动参数(下面是比较常用的字体设置、加载用户数据、模拟手机模式)---addArguments
    ChromeOptions options = new ChromeOptions();
        //读取用户参数,XX代表当前用户
        options.addArguments("--user-data-dir=C:\\Users\\XX\\AppData\\Local\\Google\\Chrome\\User Data");

        //设置语言
        options.addArguments("--lang=zh_CN.UTF-8");
        //模拟手机模式
        options.addArguments("--user-agent=iphone 7");

        WebDriver driver = new ChromeDriver(options);

        driver.get("http://www.baidu.com");
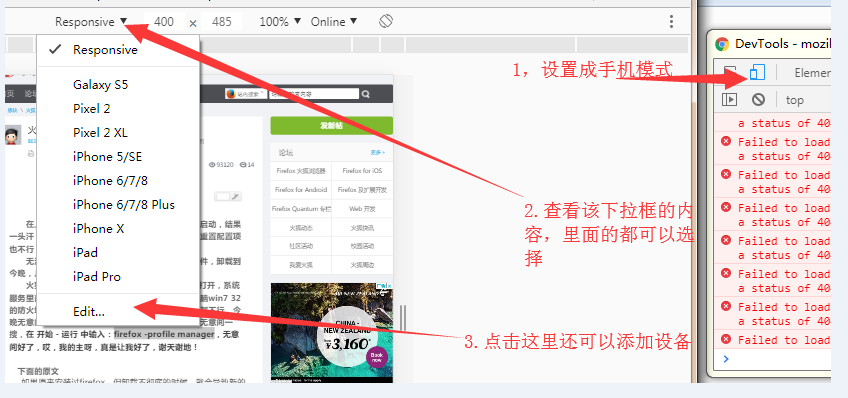
关于设置手机模式的,--user-agent对应的值应该怎么填写,在这说明下:
打开浏览器,按F12,手动设置成手机模式,之后:
关于Chrome浏览器启动参数,我们测试中常用的大概还有:
--disable-images(控制是否加载图片)
--start-maximized (启动时最大化)
download.default_directory": download_dir (设置下载保存路径)
2.修改设置----setExperimentalOption
        ChromeOptions options = new ChromeOptions();
        Map<String, Object> prefs = new HashMap<String, Object>();
        //禁止加载图片
        prefs.put("profile.default_content_setting_values.images", 2);
        options.setExperimentalOption("prefs", prefs);

        WebDriver driver= new ChromeDriver(options);
        driver.get("http://www.baidu.com");
3.安装插件---addExtensions
       /*
         * 安装插件
         */
        ChromeOptions options = new ChromeOptions();
        options.addExtensions(new File("you/path/XXX"));

        WebDriver driver = new ChromeDriver(options);
        driver.get("http://www.baidu.com");
4.设置代理---DesiredCapabilities
    //设置一个空的能力对象
        DesiredCapabilities caps = new DesiredCapabilities();
        //设置将要代理的IP和端口号
        String proxyIpPort="192.168.2.122:8088";
        //设置一个空的协议对象
        Proxy proxy=new Proxy();
        //设置对象支持http、ftp、ssl协议
        proxy.setHttpProxy(proxyIpPort).setFtpProxy(proxyIpPort).setSslProxy(proxyIpPort);


        //设置能力对象,将proxy对象设置为值
        caps.setCapability(CapabilityType.PROXY, proxy);

        WebDriver driver = new ChromeDriver(caps);
        driver.get("https://sites.google.com/a/chromium.org/chromedriver/capabilities");
关于Chrome的用户数据,可以到C:\Users\用户名\AppData\Local\Google\Chrome\User Data\Default\preferences文件中查看。想要设置的,里面都可以查到。