转载:http://blog.csdn.net/heyutao007/article/details/50131089
消息队列的两种模式
Java消息服务(Java Message Service,JMS)应用程序接口是一个Java平台中关于面向消息中间件(MOM)的API,用于在两个应用程序之间,或分布式系统中发送消息,进行异步通信。
点对点与发布订阅最初是由JMS定义的。这两种模式主要区别或解决的问题就是发送到队列的消息能否重复消费(多订阅)
1、定义
JMS规范目前支持两种消息模型:点对点(point to point, queue)和发布/订阅(publish/subscribe,topic)。
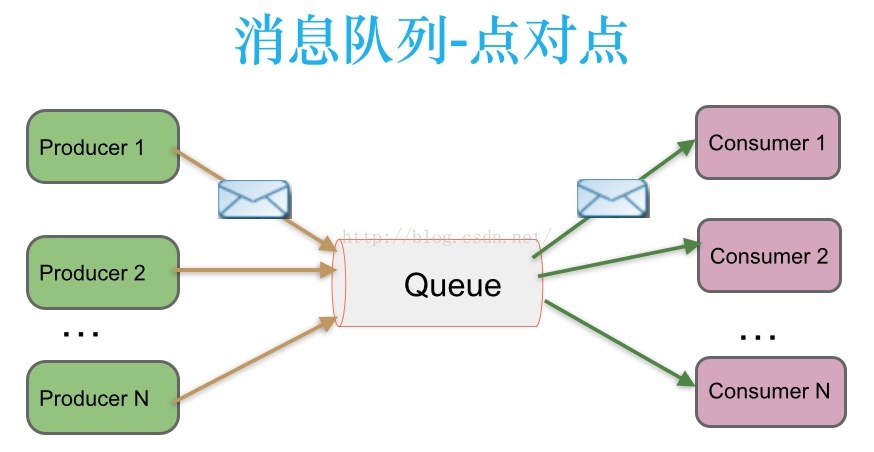
1.1、点对点:Queue,不可重复消费
消息生产者生产消息发送到queue中,然后消息消费者从queue中取出并且消费消息。
消息被消费以后,queue中不再有存储,所以消息消费者不可能消费到已经被消费的消息。Queue支持存在多个消费者,但是对一个消息而言,只会有一个消费者可以消费。
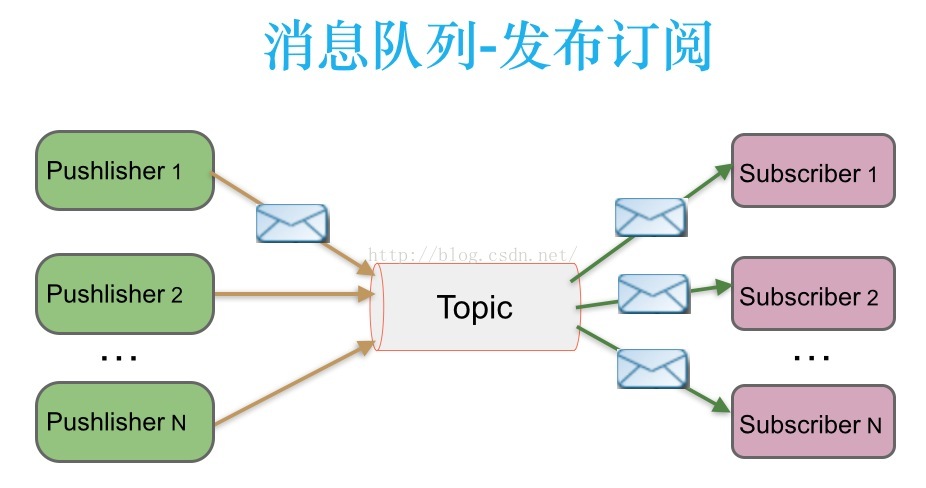
1.2、发布/订阅:Topic,可以重复消费
消息生产者(发布)将消息发布到topic中,同时有多个消息消费者(订阅)消费该消息。和点对点方式不同,发布到topic的消息会被所有订阅者消费。
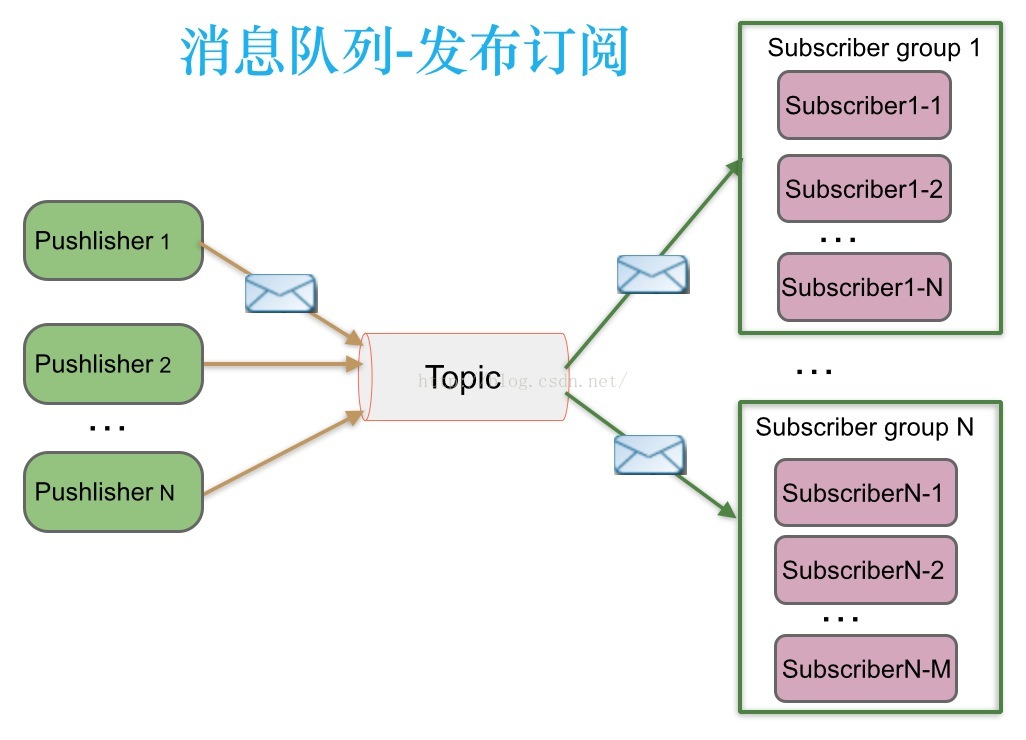
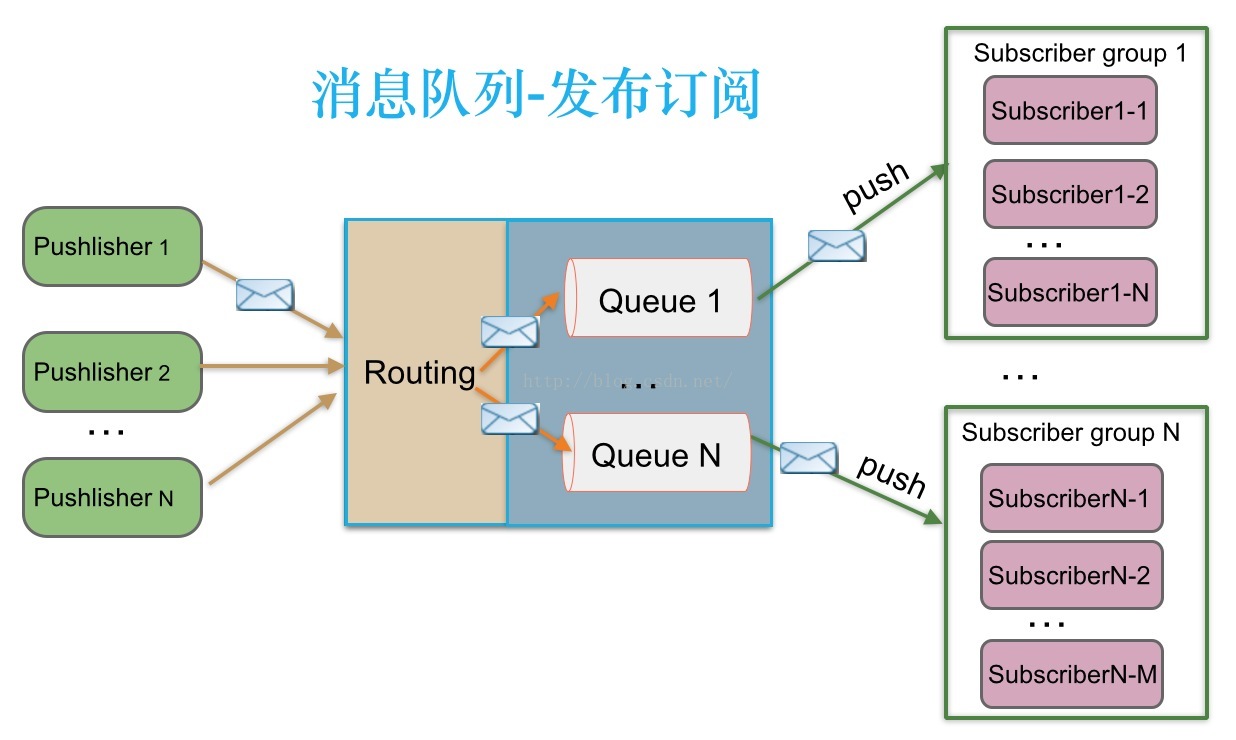
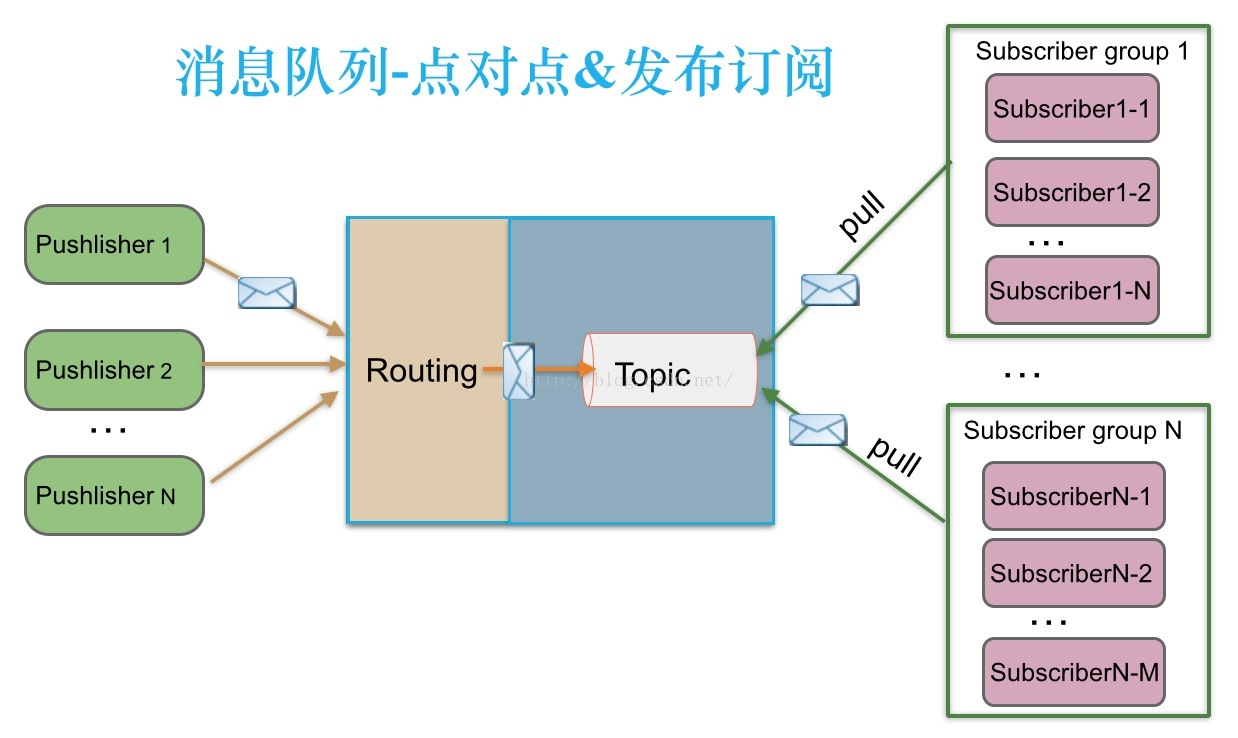
支持订阅组的发布订阅模式:
发布订阅模式下,当发布者消息量很大时,显然单个订阅者的处理能力是不足的。实际上现实场景中是多个订阅者节点组成一个订阅组负载均衡消费topic消息即分组订阅,这样订阅者很容易实现消费能力线性扩展。可以看成是一个topic下有多个Queue,每个Queue是点对点的方式,Queue之间是发布订阅方式。
2、区别
2.1、点对点模式
生产者发送一条消息到queue,一个queue可以有很多消费者,但是一个消息只能被一个消费者接受,当没有消费者可用时,这个消息会被保存直到有 一个可用的消费者,所以Queue实现了一个可靠的负载均衡。
2.2、发布订阅模式
发布者发送到topic的消息,只有订阅了topic的订阅者才会收到消息。topic实现了发布和订阅,当你发布一个消息,所有订阅这个topic的服务都能得到这个消息,所以从1到N个订阅者都能得到这个消息的拷贝。
3、流行模型比较
传统企业型消息队列ActiveMQ遵循了JMS规范,实现了点对点和发布订阅模型,但其他流行的消息队列RabbitMQ、Kafka并没有遵循JMS规范。
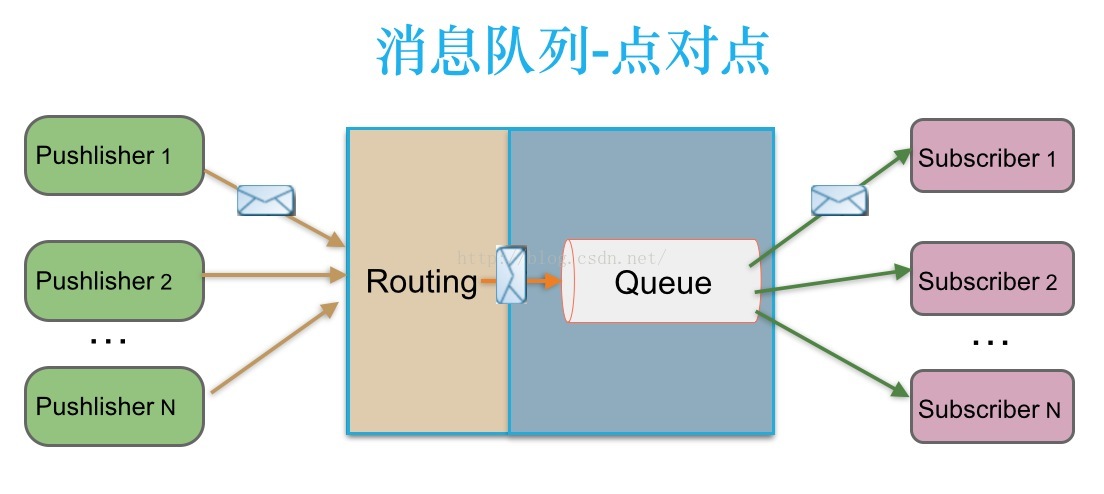
3.1、RabbitMQ
RabbitMQ实现了AQMP协议,AQMP协议定义了消息路由规则和方式。生产端通过路由规则发送消息到不同queue,消费端根据queue名称消费消息。
RabbitMQ既支持内存队列也支持持久化队列,消费端为推模型,消费状态和订阅关系由服务端负责维护,消息消费完后立即删除,不保留历史消息。
(1)点对点
生产端发送一条消息通过路由投递到Queue,只有一个消费者能消费到。
(2)多订阅
当RabbitMQ需要支持多订阅时,发布者发送的消息通过路由同时写到多个Queue,不同订阅组消费不同的Queue。所以支持多订阅时,消息会多个拷贝。
3.2、Kafka
Kafka只支持消息持久化,消费端为拉模型,消费状态和订阅关系由客户端端负责维护,消息消费完后不会立即删除,会保留历史消息。因此支持多订阅时,消息只会存储一份就可以了。但是可能产生重复消费的情况。
(1)点对点&多订阅
发布者生产一条消息到topic中,不同订阅组消费此消息。
-----------------------------------------------------------------------------------------------------------------------------------------------------------------------------------------
消息队列MQ实践----实现Queue(队列消息)和Topic(主题消息)两种模式的Java实现
之前有篇文件介绍了生产消费者模式(http://blog.csdn.net/canot/article/details/51541920),当时是通过BlockingQueue阻塞队列来实现,以及在Redis中使用pub/sub模式(http://blog.csdn.net/canot/article/details/51938955)。而实际项目中往往是通过JMS使用消息队列来实现这两种模式的。
JMS(Java Messaging Service)是Java平台上有关面向消息中间件的技术规范,它便于消息系统中的Java应用程序进行消息交换,并且通过提供标准的产生、发送、接收消息的接口简化企业应用的开发。
JMS类似与JDBC,sun提供接口,由各个厂商(provider)来进行具体的实现。市面上众多成熟的JMS规范实现的框架Kafk,RabbitMQ,ActiveMQ,ZeroMQ,RocketMQ等。
JMS的队列消息(Queue)传递过程如下图:
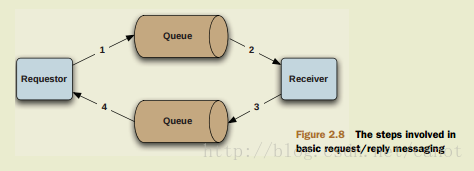
对于Queue模式,一个发布者发布消息,下面的接收者按队列顺序接收,比如发布了10个消息,两个接收者A,B那就是A,B总共会收到10条消息,不重复。
JMS的主题消息传递过程如下图:
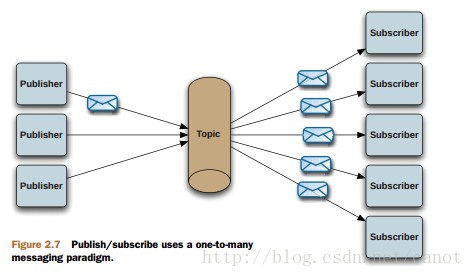
对于Topic模式,一个发布者发布消息,有两个接收者A,B来订阅,那么发布了10条消息,A,B各收到10条消息。
我们从ActiveMQ来实践:(安装部署省掉)
消息生产者:
-
public class Sender { -
public static void main(String[] args) throws JMSException, InterruptedException { -
// ConnectionFactory :连接工厂,JMS 用它创建连接 -
//61616是ActiveMQ默认端口 -
ConnectionFactory connectionFactory = new ActiveMQConnectionFactory( -
ActiveMQConnection.DEFAULT_USER, -
ActiveMQConnection.DEFAULT_PASSWORD, -
"tcp://localhost:61616"); -
// Connection :JMS 客户端到JMS Provider 的连接 -
Connection connection = connectionFactory.createConnection(); -
connection.start(); -
// Session: 一个发送或接收消息的线程 -
Session session = connection.createSession(true, Session.AUTO_ACKNOWLEDGE); -
// Destination :消息的目的地;消息发送给谁. -
Destination destination = session.createQueue("my-queue"); -
// MessageProducer:消息发送者 -
MessageProducer producer = session.createProducer(destination); -
// 设置不持久化,可以更改 -
producer.setDeliveryMode(DeliveryMode.NON_PERSISTENT); -
for(int i=0;i<10;i++){ -
//创建文本消息 -
TextMessage message = session.createTextMessage("hello.I am producer, this is a test message"+i); -
Thread.sleep(1000); -
//发送消息 -
producer.send(message); -
} -
session.commit(); -
session.close(); -
connection.close(); -
} -
}
- 1
- 2
- 3
- 4
- 5
- 6
- 7
- 8
- 9
- 10
- 11
- 12
- 13
- 14
- 15
- 16
- 17
- 18
- 19
- 20
- 21
- 22
- 23
- 24
- 25
- 26
- 27
- 28
- 29
- 30
- 31
- 32
- 33
- 34
- 35
- 36
- 37
- 38
- 39
- 40
- 41
- 42
- 1
- 2
- 3
- 4
- 5
- 6
- 7
- 8
- 9
- 10
- 11
- 12
- 13
- 14
- 15
- 16
- 17
- 18
- 19
- 20
- 21
- 22
- 23
- 24
- 25
- 26
- 27
- 28
- 29
- 30
- 31
- 32
- 33
- 34
- 35
- 36
- 37
- 38
- 39
- 40
- 41
- 42
消息接收者
-
// ConnectionFactory :连接工厂,JMS 用它创建连接 -
private static ConnectionFactory connectionFactory = new ActiveMQConnectionFactory(ActiveMQConnection.DEFAULT_USER, -
ActiveMQConnection.DEFAULT_PASSWORD, "tcp://localhost:61616"); -
public static void main(String[] args) throws JMSException { -
// Connection :JMS 客户端到JMS Provider 的连接 -
final Connection connection = connectionFactory.createConnection(); -
connection.start(); -
// Session: 一个发送或接收消息的线程 -
final Session session = connection.createSession(true, Session.AUTO_ACKNOWLEDGE); -
// Destination :消息的目的地;消息送谁那获取. -
Destination destination = session.createQueue("my-queue"); -
// 消费者,消息接收者 -
MessageConsumer consumer1 = session.createConsumer(destination); -
consumer1.setMessageListener(new MessageListener() { -
@Override -
public void onMessage(Message msg) { -
try { -
TextMessage message = (TextMessage)msg ; -
System.out.println("consumerOne收到消息: "+message.getText()); -
session.commit(); -
} catch (JMSException e) { -
e.printStackTrace(); -
} -
} -
}); -
}
- 1
- 2
- 3
- 4
- 5
- 6
- 7
- 8
- 9
- 10
- 11
- 12
- 13
- 14
- 15
- 16
- 17
- 18
- 19
- 20
- 21
- 22
- 23
- 24
- 25
- 26
- 27
- 28
- 29
- 30
- 31
- 32
- 1
- 2
- 3
- 4
- 5
- 6
- 7
- 8
- 9
- 10
- 11
- 12
- 13
- 14
- 15
- 16
- 17
- 18
- 19
- 20
- 21
- 22
- 23
- 24
- 25
- 26
- 27
- 28
- 29
- 30
- 31
- 32
运行之后控制台不会退出一直监听消息库,对于消息发送者的十条信息,控制输出:
consumerOne收到消息: hello.I am producer, this is a test message0
consumerOne收到消息: hello.I am producer, this is a test message1
consumerOne收到消息: hello.I am producer, this is a test message2
consumerOne收到消息: hello.I am producer, this is a test message3
consumerOne收到消息: hello.I am producer, this is a test message4
consumerOne收到消息: hello.I am producer, this is a test message5
consumerOne收到消息: hello.I am producer, this is a test message6
consumerOne收到消息: hello.I am producer, this is a test message7
consumerOne收到消息: hello.I am producer, this is a test message8
consumerOne收到消息: hello.I am producer, this is a test message9
如果此时另外一个线程也存在消费者监听该Queue,则两者交换输出,共输出10条
消息发布者
-
public static void main(String[] args) throws JMSException, InterruptedException { -
// ConnectionFactory :连接工厂,JMS 用它创建连接 -
//61616是ActiveMQ默认端口 -
ConnectionFactory connectionFactory = new ActiveMQConnectionFactory( -
ActiveMQConnection.DEFAULT_USER, -
ActiveMQConnection.DEFAULT_PASSWORD, -
"tcp://localhost:61616"); -
// Connection :JMS 客户端到JMS Provider 的连接 -
Connection connection = connectionFactory.createConnection(); -
connection.start(); -
// Session: 一个发送或接收消息的线程 -
Session session = connection.createSession(true, Session.AUTO_ACKNOWLEDGE); -
// Destination :消息的目的地;消息发送给谁. -
//Destination destination = session.createQueue("my-queue"); -
Destination destination = session.createTopic("STOCKS.myTopic"); //创建topic myTopic -
// MessageProducer:消息发送者 -
MessageProducer producer = session.createProducer(destination); -
// 设置不持久化,可以更改 -
producer.setDeliveryMode(DeliveryMode.NON_PERSISTENT); -
for(int i=0;i<10;i++){ -
//创建文本消息 -
TextMessage message = session.createTextMessage("hello.I am producer, this is a test message"+i); -
//发送消息 -
producer.send(message); -
} -
session.commit(); -
session.close(); -
connection.close(); -
}
- 1
- 2
- 3
- 4
- 5
- 6
- 7
- 8
- 9
- 10
- 11
- 12
- 13
- 14
- 15
- 16
- 17
- 18
- 19
- 20
- 21
- 22
- 23
- 24
- 25
- 26
- 27
- 28
- 29
- 30
- 31
- 32
- 33
- 34
- 35
- 1
- 2
- 3
- 4
- 5
- 6
- 7
- 8
- 9
- 10
- 11
- 12
- 13
- 14
- 15
- 16
- 17
- 18
- 19
- 20
- 21
- 22
- 23
- 24
- 25
- 26
- 27
- 28
- 29
- 30
- 31
- 32
- 33
- 34
- 35
消息订阅者
-
private static ConnectionFactory connectionFactory = new ActiveMQConnectionFactory(ActiveMQConnection.DEFAULT_USER, -
ActiveMQConnection.DEFAULT_PASSWORD, "tcp://localhost:61616"); -
public void run() { -
// Connection :JMS 客户端到JMS Provider 的连接 -
try { -
final Connection connection = connectionFactory.createConnection(); -
connection.start(); -
// Session: 一个发送或接收消息的线程 -
final Session session = connection.createSession(true, Session.AUTO_ACKNOWLEDGE); -
// Destination :消息的目的地;消息送谁那获取. -
// Destination destination = session.createQueue("my-queue"); -
Destination destination = session.createTopic("STOCKS.myTopic"); // 创建topic -
// myTopic -
// 消费者,消息接收者 -
MessageConsumer consumer1 = session.createConsumer(destination); -
consumer1.setMessageListener(new MessageListener() { -
public void onMessage(Message msg) { -
try { -
TextMessage message = (TextMessage) msg; -
System.out.println("consumerOne收到消息: " + message.getText()); -
session.commit(); -
} catch (JMSException e) { -
e.printStackTrace(); -
} -
} -
}); -
// 再来一个消费者,消息接收者 -
MessageConsumer consumer2 = session.createConsumer(destination); -
consumer2.setMessageListener(new MessageListener() { -
public void onMessage(Message msg) { -
try { -
TextMessage message = (TextMessage) msg; -
System.out.println("consumerTwo收到消息: " + message.getText()); -
session.commit(); -
} catch (JMSException e) { -
e.printStackTrace(); -
} -
} -
}); -
} catch (Exception e) { -
} -
}
- 1
- 2
- 3
- 4
- 5
- 6
- 7
- 8
- 9
- 10
- 11
- 12
- 13
- 14
- 15
- 16
- 17
- 18
- 19
- 20
- 21
- 22
- 23
- 24
- 25
- 26
- 27
- 28
- 29
- 30
- 31
- 32
- 33
- 34
- 35
- 36
- 37
- 38
- 39
- 40
- 41
- 42
- 43
- 44
- 45
- 46
- 47
- 48
- 49
- 50
- 51
- 52
- 53
- 54
- 1
- 2
- 3
- 4
- 5
- 6
- 7
- 8
- 9
- 10
- 11
- 12
- 13
- 14
- 15
- 16
- 17
- 18
- 19
- 20
- 21
- 22
- 23
- 24
- 25
- 26
- 27
- 28
- 29
- 30
- 31
- 32
- 33
- 34
- 35
- 36
- 37
- 38
- 39
- 40
- 41
- 42
- 43
- 44
- 45
- 46
- 47
- 48
- 49
- 50
- 51
- 52
- 53
- 54
最后消息会重复输出:
consumerOne收到消息: hello.I am producer, this is a test message0
consumerTwo收到消息: hello.I am producer, this is a test message0
consumerOne收到消息: hello.I am producer, this is a test message1
consumerTwo收到消息: hello.I am producer, this is a test message1
consumerOne收到消息: hello.I am producer, this is a test message2
consumerTwo收到消息: hello.I am producer, this is a test message2
consumerOne收到消息: hello.I am producer, this is a test message3
consumerTwo收到消息: hello.I am producer, this is a test message3
consumerOne收到消息: hello.I am producer, this is a test message4
consumerTwo收到消息: hello.I am producer, this is a test message4
consumerOne收到消息: hello.I am producer, this is a test message5
consumerTwo收到消息: hello.I am producer, this is a test message5
consumerOne收到消息: hello.I am producer, this is a test message6
consumerTwo收到消息: hello.I am producer, this is a test message6
consumerOne收到消息: hello.I am producer, this is a test message7
consumerTwo收到消息: hello.I am producer, this is a test message7
consumerOne收到消息: hello.I am producer, this is a test message8
consumerTwo收到消息: hello.I am producer, this is a test message8
consumerOne收到消息: hello.I am producer, this is a test message9
我们简单总结一下使用MQ的过程:
- 1.创建与MQ的链接
- 2.创建消息的目的地或者来原地即Destination
- 3.发送消息或者制定对应的MessageListener
上述就是关于MQ两种消息模型的简单应用,至于具体的细节。如在消费者监听消息时有哪些Listener类型,生产者发送消息时有哪些Message类型。生成Session时参数1表示是否开启事务,至于事务的处理,消息的持久化等等。后面慢慢介绍。
转载:http://blog.csdn.net/canot/article/details/53572400