一、访问控制
1.生成密码认证文件(htpasswd)
yum -y install httpd-tools //安装httpd-tools提供htpasswd命令htpasswd -c /usr/local/nginx/conf/.hehe hehe //生成密码认证文件,用户hehechown nginx /usr/local/nginx/conf/.hehe && chmod 400 /usr/local/nginx/conf/.hehe //设置文件权限2.修改配置文件,添加认证选项
vim /usr/local/nginx/conf/nginx.conf
location  /status {                 //Server配置项下增加
            stub_status on;
            access_log off;
            auth_basic "secret";            //基本认证
            auth_basic_user_file /usr/local/nginx/conf/.hehe;   //指定用户认证配置文件路径
        }
3.重启服务,测试
/etc/init.d/nginx restart二、Nginx虚拟主机
实现方式
-
基于域名:不同域名、相同IP、相同端口
-
基于IP:不同域名、不同IP、相同端口
- 基于端口:不同域名、不同IP、不同端口
1.基于域名
(1)新建测试文件
mkdir /usr/local/nginx/html/www && mkdir /usr/local/nginx/html/image
echo "www is www" >/usr/local/nginx/html/www/index.html
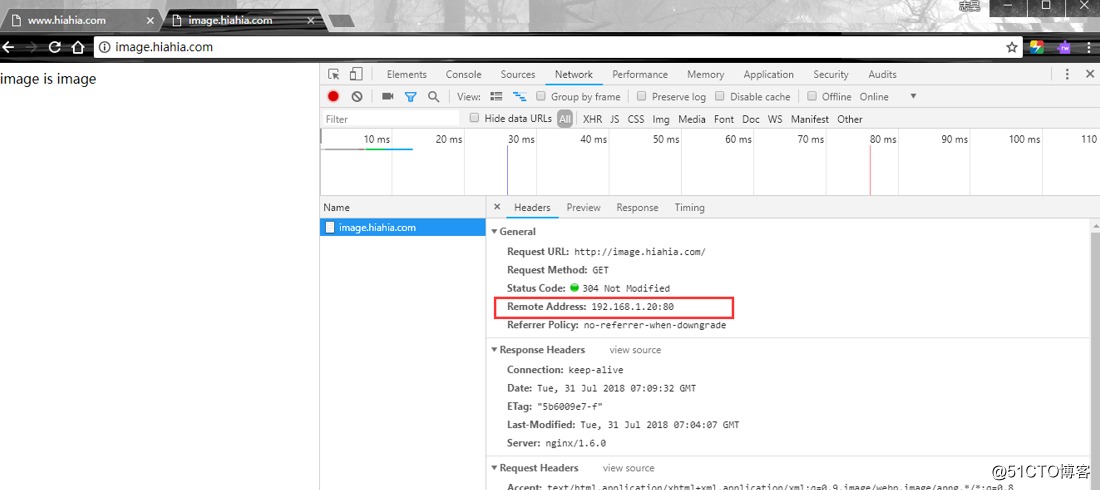
echo "image is image" >/usr/local/nginx/html/image/index.html(2)编辑nginx配置文件
vim /usr/local/nginx/conf/nginx.conf
111     server {
112         listen 80;
113         server_name www.hiahia.com;
115         location / {
116             root   /usr/local/nginx/html/www;
117             index index.html;
118             }
119         }
121     server {
122         listen 80;
123         server_name image.hiahia.com;
124
125         location / {
126             root   /usr/local/nginx/html/image;
127             index index.html;
128             }
129         }
(3)启动服务
nginx -t //验证配置文件是否有误/etc/init.d/nginx restart //重启Nginx服务2.基于IP
(1)新增网卡,设置IP,添加对应的DNS解析A记录
(2)编辑nginx配置文件
vim /usr/local/nginx/conf/nginx.conf
111     server {
112         listen 192.168.1.10:80;
113         server_name www.hiahia.com;
114
115         location / {
116             root   /usr/local/nginx/html/www;
117             index index.html;
118             }
119         }
121     server {
122         listen 192.168.1.20:80;
123         server_name image.hiahia.com;
124
125         location / {
126             root   /usr/local/nginx/html/image;
127             index index.html;
128             }
129         }
(3)启动服务
nginx -t //验证配置文件是否有误/etc/init.d/nginx restart //重启Nginx服务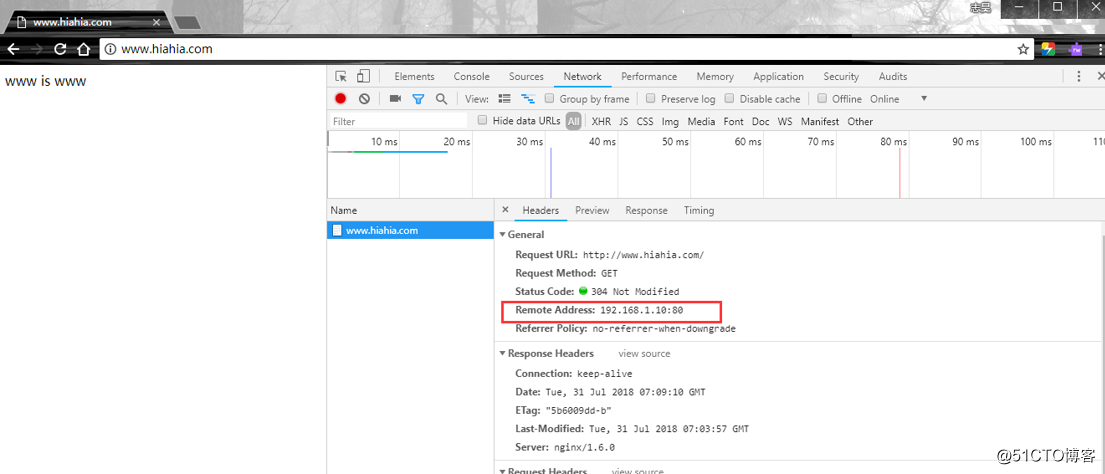
3.基于端口
(1)编辑nginx配置文件
vim /usr/local/nginx/conf/nginx.conf
111     server {
112         listen 192.168.1.10:82;
113         server_name www.xueluo.org;
114
115         location / {
116             root   /usr/local/nginx/html/www;
117             index index.html;
118             }
119         }
121     server {
122         listen 192.168.1.20:83;
123         server_name image.xueluo.org;
124
125         location / {
126             root   /usr/local/nginx/html/image;
127             index index.html;
128             }
129         }
(2)启动服务
nginx -t //验证配置文件是否有误/etc/init.d/nginx restart //重启Nginx服务