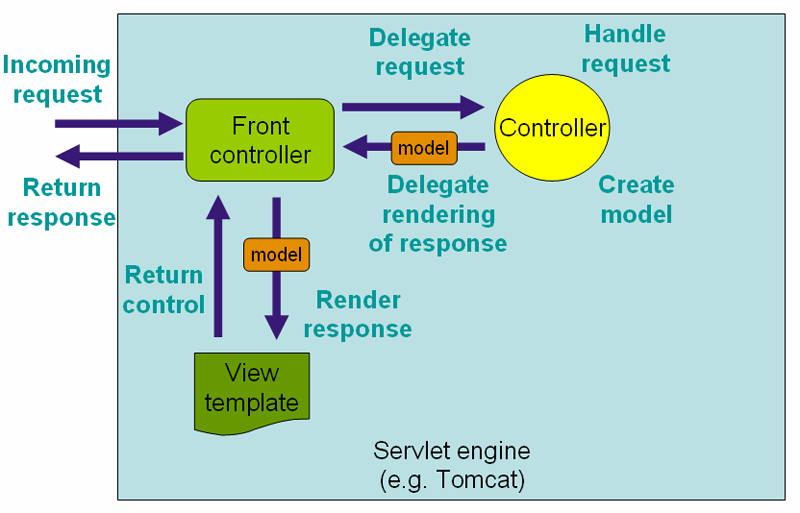
用SpringMVC是一个很强大的框架,官网上给的工作原理图如下:
mvc有很多深入的技术,这里我们来聊一下SpringMvc对servlet API的支持
来实现登录页面,浏览器缓存Cookie
1,控制层:
import javax.servlet.http.Cookie;
import javax.servlet.http.HttpServletRequest;
import javax.servlet.http.HttpServletResponse;
import javax.servlet.http.HttpSession;

import org.springframework.stereotype.Controller;
import org.springframework.web.bind.annotation.RequestMapping;
import org.springframework.web.bind.annotation.ResponseBody;

import com.java1234.model.User;

@Controller
@RequestMapping("/user")
public class UserController {

    @RequestMapping("/login")
    public String login(HttpServletRequest request,HttpServletResponse response){
        System.out.println("----登录验证---");
        String userName=request.getParameter("userName");
        String password=request.getParameter("password");
        //存取
        Cookie cookie=new Cookie("user",userName+"-"+password);
        //设置Cookie有效时间
        cookie.setMaxAge(1*60*60*24*7);
        User currentUser=new User(userName,password);
        //调用addCookie
        response.addCookie(cookie);
        HttpSession session=request.getSession();
        session.setAttribute("currentUser", currentUser);
        //登录完重定向
        return "redirect:/main.jsp";
    }

}
2,实体层:
package com.java1234.model;
public class User {

    private int id;
    private String userName;
    private String password;


    public User() {
        super();
        // TODO Auto-generated constructor stub
    }

    public User(String userName, String password) {
        super();
        this.userName = userName;
        this.password = password;
    }

    public int getId() {
        return id;
    }
    public void setId(int id) {
        this.id = id;
    }
    public String getUserName() {
        return userName;
    }
    public void setUserName(String userName) {
        this.userName = userName;
    }
    public String getPassword() {
        return password;
    }
    public void setPassword(String password) {
        this.password = password;
    }

}
3,前端页面:
login.jsp
<%@ page language="java" contentType="text/html; charset=utf-8"
    pageEncoding="utf-8"%>
<!DOCTYPE html PUBLIC "-//W3C//DTD HTML 4.01 Transitional//EN" "http://www.w3.org/TR/html4/loose.dtd">
<html>
<head>
<meta http-equiv="Content-Type" content="text/html; charset=utf-8">
<title>Insert title here</title>
</head>
<body>
<a href="user/ajax.do">测试ajax</a>
<form action="user/login.do" method="post">
    <table>
        <tr>
            <td>用户名:</td>
            <td><input type="text" name="userName"/></td>
        </tr>
        <tr>
            <td>密码:</td>
            <td><input type="password" name="password"/></td>
        </tr>
        <tr>
            <td>
                <input type="submit" value="登录"/>
            </td>
        </tr>
    </table>
</form>
</body>
</html>
main.jsp
<%@ page language="java" contentType="text/html; charset=ISO-8859-1"
    pageEncoding="ISO-8859-1"%>
<!DOCTYPE html PUBLIC "-//W3C//DTD HTML 4.01 Transitional//EN" "http://www.w3.org/TR/html4/loose.dtd">
<html>
<head>
<meta http-equiv="Content-Type" content="text/html; charset=ISO-8859-1">
<title>Insert title here</title>
</head>
<body>
Main.jsp  ${currentUser.userName }
</body>
</html>
最终实现:

对应的cookie