练习网址:
菜鸟教程CSS实例:http://www.runoob.com/css/css-examples.html
W3SCHOOL HTML参考手册:http://www.w3school.com.cn/tags/tag_a.asp
一、伪类、伪元素
练习题:
# 把<a href="http://www.baidu.com">中的URL用content属性插入到每个链接后面
a:after{
    content:"("attr(href)")";
}
# 使章节<h1>和分节<h2>的编号是"第1节","1.1","1.2"等
<!DOCTYPE html>
<html>
<head>
<style>
body {counter-reset:section;}
h1 {counter-reset:subsection;}
h1:before
{
	counter-increment:section;
	content:"Section " counter(section) ". ";
}
h2:before
{
	counter-increment:subsection;
	content:counter(section) "." counter(subsection) " ";
}
</style>
</head>

<body>

<p><b>注意:</b> 仅当 !DOCTYPE已经定义 IE8支持 这个属性.</p>

<h1>HTML tutorials</h1>
<h2>HTML Tutorial</h2>
<h2>XHTML Tutorial</h2>
<h2>CSS Tutorial</h2>

<h1>Scripting tutorials</h1>
<h2>JavaScript</h2>
<h2>VBScript</h2>

<h1>XML tutorials</h1>
<h2>XML</h2>
<h2>XSL</h2>

</body>
</html>
# quotes 属性指定了引号范围

q:lang(en)
{
quotes: "~" "~" "《" "》";
}
<p><q>This is a <q>big</q> quote.</q></p>
# 把文本的第一个字母设为特殊的字母 :first-letter
# 把第一行文字设置为特殊 :first-line
# 把第一行文字的第一个字母设置为特殊 :first-letter、:first-line
# 在一个元素之前插入一些内容 :before
# 在一个元素之后插入一些内容 :after
知识点:
* content属性
与 :before 及 :after 伪元素配合使用,来插入生成内容。
"string"、counter(x)、attr(attribute) ......
* counter-reset属性
counter-reset属性创建或重置一个或多个计数器。通常与counter-increment属性、content属性一起使用。
counter-reset:x;
* counter-increment属性
counter-increment属性递增一个或多个计数器值。
counter-increment属性通常与counter-reset属性和content属性一起使用。
* quote属性
quotes属性设置嵌套引用的引号类型。
二、导航栏设置
* 导航栏
练习题:
# 垂直导航栏
# 水平导航栏

注意:ul{padding:0;}a{display:block;}
ul{padding:0;}
a{display:block;}知识点:导航栏讲解 http://www.runoob.com/css/css-navbar.html
* 下拉菜单
实现效果如下:↓↓↓ 效果很简单,实现起来却有点点hold不住,一些关键性的内容没有掌握。

学习下拉菜单需要掌握定位的相关知识,对定位的position:absolute、position:relative一直是一知半解,看了下面的文章感觉明白了很多!案例写的很明了,走心!点赞!
通过案例理解position:relative与position:absolute https://segmentfault.com/a/1190000006924181
display:inline-block的使用方法、与float的区别:https://www.cnblogs.com/Ry-yuan/p/6848197.html
* 下拉菜单变形——提示工具tooltip
圆角? border-radius设置圆角。
箭头? border设置一个边的颜色,其他transparent;长度为0。
在不同位置显示? position:absolute;进行定位。
三、图片处理
* 改变图片透明度
方法一: opacity属性:取值0-1。1为不透明
方法二: filter属性:opacity(%) 该函数与已有的opacity属性很相似,不同之处在于通过filter,一些浏览器为了提升性能会提供硬件加速。
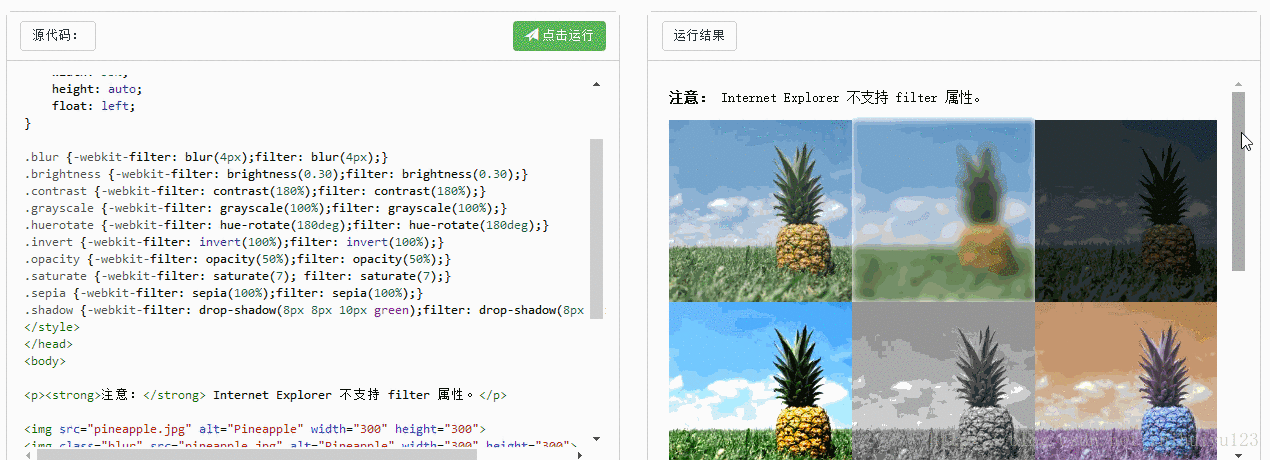
* 图片滤镜
filter属性定义了元素(通常是<img>)的可视效果(例如:模糊与饱和度)
filter: none | blur() | brightness() | contrast() | drop-shadow() | grayscale() | hue-rotate() | invert() | opacity() | saturate() | sepia() | url();具体看下面动图↓↓↓
到这里,CSS部分的基础学习暂时告一段落了。
草草过了一遍之后,其中还有很多内容无法很好掌握,后面CSS3之后再开综合练习的笔记!