[Android]【安卓】Service详解
本篇博客已收录到我的安卓开发小结中——点击【安卓开发小结】
参考资料:《Android总结篇系列:Android Service》 、《第一行代码》
《Android总结篇系列:Android Service》
Service通常总是称之为“后台服务”,其中“后台”一词是相对于前台而言的,具体是指其本身的运行并不依赖于用户可视的UI界面,因此,从实际业务需求上来理解,Service的适用场景应该具备以下条件:
1.并不依赖于用户可视的UI界面(当然,这一条其实也不是绝对的,如前台Service就是与Notification界面结合使用的);
2.具有较长时间的运行特性。
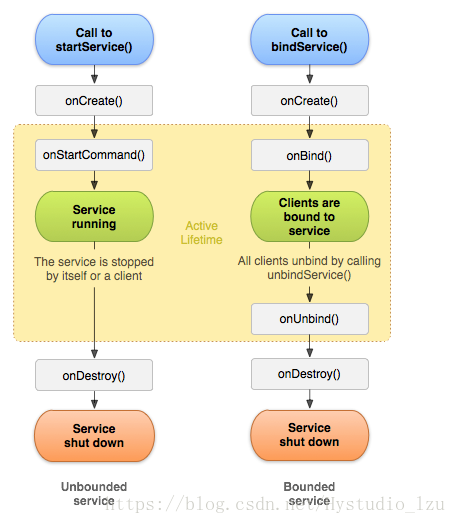
3.Service生命周期。
1.Service AndroidManifest.xml 声明
一般而言,从Service的启动方式上,可以将Service分为Started Service和Bound Service。无论哪种具体的Service启动类型,都是通过继承Service基类自定义而来。在使用Service时,要想系统能够找到此自义Service,无论哪种类型,都需要在AndroidManifest.xml中声明,语法格式如下:
<service android:enabled=["true" | "false"]
    android:exported=["true" | "false"]
    android:icon="drawable resource"
    android:isolatedProcess=["true" | "false"]
    android:label="string resource"
    android:name="string"
    android:permission="string"
    android:process="string" >
    . . .
</service>
其中,android:exported属性上一篇博文中对此已进行详尽描述,android:name对应Service类名,android:permission是权限声明,android:process设置具体的进程名称。需要注意的是Service能否单独使用一个进程与其启动方式有关,本后下面会给出具体说明。其他的属性此处与其他组件基本相同,不再过多描述。
注:如果自定义Service没有在AndroidManifest.xml中声明,当具体使用时,不会像Activity那样直接崩溃报错,对于显式Intent启动的Service,此时也会给出waring信息“IllegalArgumentException: Service not registered”,有时候不容易发现忘了声明而一时定位不到问题
2.Started Service
Started Service相对比较简单,通过context.startService(Intent serviceIntent)启动Service,context.stopService(Intent serviceIntent)停止此Service。当然,在Service内部,也可以通过stopSelf(…)方式停止其本身。
1)Started Service自定义
下面代码片段显示的是一个最基本的Started Service的自定义方式:
public class MyService extends Service {

    public static final String TAG = "MyService";

    @Override
    public IBinder onBind(Intent intent) {
        return null;
    }

    @Override
    public void onCreate() {
        super.onCreate();
        Log.w(TAG, "in onCreate");
    }

    @Override
    public int onStartCommand(Intent intent, int flags, int startId) {
        Log.w(TAG, "in onStartCommand");
        Log.w(TAG, "MyService:" + this);
        String name = intent.getStringExtra("name");
        Log.w(TAG, "name:" + name);
        return START_STICKY;
    }

    @Override
    public void onDestroy() {
        super.onDestroy();
        Log.w(TAG, "in onDestroy");
    }
}
其中,onBind(…)函数是Service基类中的唯一抽象方法,子类都必须重写实现,此函数的返回值是针对Bound Service类型的Service才有用的,在Started Service类型中,此函数直接返回null即可。onCreate(…)、onStartCommand(…)和onDestroy()都是Started Service相应生命周期阶段的回调函数。
2) Started Service使用
public class MainActivity extends Activity {

    public static final String TAG = "MainActivity";

    private Button startServiceBtn;
    private Button stopServideBtn;
    private Button goBtn;

    private Intent serviceIntent;

    @Override
    protected void onCreate(Bundle savedInstanceState) {
        super.onCreate(savedInstanceState);
        setContentView(R.layout.activity_main);

        startServiceBtn = (Button) findViewById(R.id.start_service);
        stopServideBtn = (Button) findViewById(R.id.stop_service);
        goBtn = (Button) findViewById(R.id.go);

        startServiceBtn.setOnClickListener(new View.OnClickListener() {
            @Override
            public void onClick(View v) {
                serviceIntent = new Intent(MainActivity.this, MyService.class);
                startService(serviceIntent);
            }
        });

        stopServideBtn.setOnClickListener(new View.OnClickListener() {
            @Override
            public void onClick(View v) {
                stopService(serviceIntent);
            }
        });

        goBtn.setOnClickListener(new View.OnClickListener() {
            @Override
            public void onClick(View v) {
                Intent intent = new Intent(MainActivity.this, BActivity.class);
                startActivity(intent);
            }
        });

    }

    @Override
    protected void onDestroy() {
        super.onDestroy();
        Log.w(TAG, "in onDestroy");
    }
}
如上代码片段,
当Client调用startService(Intent serviceIntent)后,如果MyService是第一次启动,首先会执行onCreate()回调,然后再执行onStartCommand(Intent intent, int flags, int startId),当Client再次调用startService(Intent serviceIntent),将只执行onStartCommand(Intent intent, int flags, int startId),因为此时Service已经创建了,无需执行onCreate()回调。无论多少次的startService,只需要一次stopService()即可将此Service终止,执行onDestroy()函数(其实很好理解,因为onDestroy()与onCreate()回调是相对的)。
下面重点关注下onStartCommand(Intent intent, int flags, int startId)方法。
其中参数flags默认情况下是0,对应的常量名为START_STICKY_COMPATIBILITY。startId是一个唯一的整型,用于表示此次Client执行startService(…)的请求请求标识,在多次startService(…)的情况下,呈现0,1,2….递增。另外,此函数具有一个int型的返回值,具体的可选值及含义如下:
START_NOT_STICKY:当Service因为内存不足而被系统kill后,接下来未来的某个时间内,即使系统内存足够可用,系统也不会尝试重新创建此Service。除非程序中Client明确再次调用startService(…)启动此Service。
START_STICKY:当Service因为内存不足而被系统kill后,接下来未来的某个时间内,当系统内存足够可用的情况下,系统将会尝试重新创建此Service,一旦创建成功后将回调onStartCommand(…)方法,但其中的Intent将是null,pendingintent除外。
START_REDELIVER_INTENT:与START_STICKY唯一不同的是,回调onStartCommand(…)方法时,其中的Intent将是非空,将是最后一次调用startService(…)中的intent。
START_STICKY_COMPATIBILITY:compatibility version of {@link #START_STICKY} that does not guarantee that {@link #onStartCommand} will be called again after being killed。此值一般不会使用,所以注意前面三种情形就好。
以上的描述中,”当Service因为内存不足而被系统kill后“一定要非常注意,因为此函数的返回值设定只是针对此种情况才有意义的,换言之,当认为的kill掉Service进程,此函数返回值无论怎么设定,接下来未来的某个时间内,即使系统内存足够可用,Service也不会重启。
小米手机针对此处做了变更:
另外,需要注意的是,小米手机针对此处做了一定的修改。在“自启动管理”中有一个自启动应用列表,默认情况下,只有少应用(如微信、QQ、YY、360等)默认是可以自启动的,其他应用默认都是禁止的。用户可以手动添加自启动应用,添加后的应用中如果Started Service onStartCommand(…)回调返回值是START_STICKY或START_REDELIVER_INTENT,当用户在小米手机上长按Home键结束App后,接下来未来的某个时间内,当系统内存足够可用时,Service依然可以按照上述规定重启。当然,如果用户在 设置 >> 应用 >> 强制kill掉App进程,此时Service是不会重启的。
注:以上实验结论基于小米2S亲测。
3) Started Service生命周期及进程相关
1.onCreate(Client首次startService(..)) >> onStartCommand >> onStartCommand - optional … >> onDestroy(Client调用stopService(..))
注:onStartCommand(..)可以多次被调用,onDestroy()与onCreate()想匹配,当用户强制kill掉进程时,onDestroy()是不会执行的。
2.对于同一类型的Service,Service实例一次永远只存在一个,而不管Client是否是相同的组件,也不管Client是否处于相同的进程中。
3.Service通过startService(..)启动Service后,此时Service的生命周期与Client本身的什么周期是没有任何关系的,只有Client调用stopService(..)或Service本身调用stopSelf(..)才能停止此Service。当然,当用户强制kill掉Service进程或系统因内存不足也可能kill掉此Service。
4.Client A 通过startService(..)启动Service后,可以在其他Client(如Client B、Client C)通过调用stopService(..)结束此Service。
5.Client调用stopService(..)时,如果当前Service没有启动,也不会出现任何报错或问题,也就是说,stopService(..)无需做当前Service是否有效的判断。
6.startService(Intent serviceIntent),其中的intent既可以是显式Intent,也可以是隐式Intent,当Client与Service同处于一个App时,一般推荐使用显示Intent。当处于不同App时,只能使用隐式Intent。
当Service需要运行在单独的进程中,AndroidManifest.xml声明时需要通过android:process指明此进程名称,当此Service需要对其他App开放时,android:exported属性值需要设置为true(当然,在有intent-filter时默认值就是true)。
<service
    android:name=".MyService"
    android:exported="true"
    android:process=":MyCorn" >
    <intent-filter>
        <action android:name="com.example.androidtest.myservice" />
    </intent-filter>
</service>
4)Started Service Client与Service通信相关
当Client调用startService(Intent serviceIntent)启动Service时,Client可以将参数通过Intent直接传递给Service。Service执行过程中,如果需要将参数传递给Client,一般可以通过借助于发送广播的方式(此时,Client需要注册此广播)。
3.Bound Service
相对于Started Service,Bound Service具有更多的知识点。Bound Service的主要特性在于Service的生命周期是依附于Client的生命周期的,当Client不存在时,Bound Service将执行onDestroy,同时通过Service中的Binder对象可以较为方便进行Client-Service通信。Bound Service一般使用过程如下:
1.自定义Service继承基类Service,并重写onBind(Intent intent)方法,此方法中需要返回具体的Binder对象;
2.Client通过实现ServiceConnection接口来自定义ServiceConnection,并通过bindService (Intent service, ServiceConnection sc, int flags)方法将Service绑定到此Client上;
3.自定义的ServiceConnection中实现onServiceConnected(ComponentName name, IBinder binder)方法,获取Service端Binder实例;
4.通过获取的Binder实例进行Service端其他公共方法的调用,以完成Client-Service通信;
5.当Client在恰当的生命周期(如onDestroy等)时,此时需要解绑之前已经绑定的Service,通过调用函数unbindService(ServiceConnection sc)。
在Bound Service具体使用过程中,根据onBind(Intent intent)方法放回的Binder对象的定义方式不同,又可以将其分为以下三种方式,且每种方式具有不同的特点和适用场景:
1).Extending the Binder class
这是Bound Service中最常见的一种使用方式,也是Bound Service中最简单的一种。
局限:Clinet与Service必须同属于同一个进程,不能实现进程间通信(IPC)。否则则会出现类似于“android.os.BinderProxy cannot be cast to xxx”错误。
下面通过代码片段看下具体的使用:
public class MyBindService extends Service {

    public static final String TAG = "MyBindService";

    private MyBinder mBinder = new MyBinder();

    public class MyBinder extends Binder {
        MyBindService getService() {
            return MyBindService.this;
        }
    }

    @Override
    public void onCreate() {
        super.onCreate();
        Log.w(TAG, "in onCreate");
    }

    @Override
    public IBinder onBind(Intent intent) {
        Log.w(TAG, "in onBind");
        return mBinder;
    }

    @Override
    public boolean onUnbind(Intent intent) {
        Log.w(TAG, "in onUnbind");
        return super.onUnbind(intent);
    }

    @Override
    public void onDestroy() {
        super.onDestroy();
        Log.w(TAG, "in onDestroy");
    }
}
public class BActivity extends Activity {
public static final String TAG = "BActivity";
private Button bindServiceBtn;
private Button unbindServiceBtn;
private Button startIntentService;
private Intent serviceIntent;
private ServiceConnection sc = new MyServiceConnection();
private MyBinder mBinder;
private MyBindService mBindService;
private boolean mBound;
private class MyServiceConnection implements ServiceConnection {
@Override
public void onServiceConnected(ComponentName name, IBinder binder) {
Log.w(TAG, "in MyServiceConnection onServiceConnected");
mBinder = (MyBinder) binder;
mBindService = mBinder.getService();
mBound = true;
}
@Override
public void onServiceDisconnected(ComponentName name) {
// This is called when the connection with the service has been
// unexpectedly disconnected -- that is, its process crashed.
Log.w(TAG, "in MyServiceConnection onServiceDisconnected");
mBound = false;
}
}
@Override
protected void onCreate(Bundle savedInstanceState) {
super.onCreate(savedInstanceState);
setContentView(R.layout.b);
bindServiceBtn = (Button) findViewById(R.id.bind_service);
unbindServiceBtn = (Button) findViewById(R.id.unbind_service);
startIntentService = (Button) findViewById(R.id.start_intentservice);
bindServiceBtn.setOnClickListener(new View.OnClickListener() {
@Override
public void onClick(View v) {
Intent intent = new Intent(BActivity.this, MyBindService.class);
bindService(intent, sc, Context.BIND_AUTO_CREATE);
}
});
unbindServiceBtn.setOnClickListener(new View.OnClickListener() {
@Override
public void onClick(View v) {
excuteUnbindService();
}
});
startIntentService.setOnClickListener(new View.OnClickListener() {
@Override
public void onClick(View v) {
Intent intent = new Intent(BActivity.this, MyIntentService.class);
startService(intent);
}
});
}
private void excuteUnbindService() {
if (mBound) {
unbindService(sc);
mBound = false;
}
}
@Override
protected void onDestroy() {
super.onDestroy();
Log.w(TAG, "in onDestroy");
excuteUnbindService();
}
}首次点击bindServiceBtn进行bindService(..)时,依次回调顺序如下:
1 MyBindService(13457): in onCreate
2 MyBindService(13457): in onBind
3 BActivity(13457): in MyServiceConnection onServiceConnected
再次点击bindServiceBtn按钮时,发现没有任何输出,说明MyBindService没有进行任何回调。
点击unbindServiceBtn进行unbindService(..)时,回调顺序为:
1 MyBindService(13457): in onUnbind
2 MyBindService(13457): in onDestroy
注:在四大基本组件中,需要注意的的是BroadcastReceiver不能作为Bound Service的Client,因为BroadcastReceiver的生命周期很短,当执行完onReceive(..)回调时,BroadcastReceiver生命周期完结。而Bound Service又与Client本身的生命周期相关,因此,Android中不允许BroadcastReceiver去bindService(..),当有此类需求时,可以考虑通过startService(..)替代。
2)Using a Messenger
Messenger,在此可以理解成”信使“,通过Messenger方式返回Binder对象可以不用考虑Clinet - Service是否属于同一个进程的问题,并且,可以实现Client - Service之间的双向通信。极大方便了此类业务需求的实现。
局限:不支持严格意义上的多线程并发处理,实际上是以队列去处理
下面直接看下具体的使用:
public class MyMessengerService extends Service {

    public static final String TAG = "MyMessengerService";

    public static final int MSG_FROM_CLIENT_TO_SERVER = 1;
    public static final int MSG_FROM_SERVER_TO_CLIENT = 2;

    private Messenger mClientMessenger;
    private Messenger mServerMessenger = new Messenger(new ServerHandler());

    @Override
    public IBinder onBind(Intent intent) {
        Log.w(TAG, "in onBind");
        return mServerMessenger.getBinder();
    }

    class ServerHandler extends Handler {
        @Override
        public void handleMessage(Message msg) {
            Log.w(TAG, "thread name:" + Thread.currentThread().getName());
            switch (msg.what) {
            case MSG_FROM_CLIENT_TO_SERVER:
                Log.w(TAG, "receive msg from client");
                mClientMessenger = msg.replyTo;

                // service发送消息给client
                Message toClientMsg = Message.obtain(null, MSG_FROM_SERVER_TO_CLIENT);
                try {
                    Log.w(TAG, "server begin send msg to client");
                    mClientMessenger.send(toClientMsg);
                } catch (RemoteException e) {
                    e.printStackTrace();
                }
                break;
            default:
                super.handleMessage(msg);
            }
        }
    }

    @Override
    public boolean onUnbind(Intent intent) {
        Log.w(TAG, "in onUnbind");
        return super.onUnbind(intent);
    }

    @Override
    public void onDestroy() {
        Log.w(TAG, "in onDestroy");
        super.onDestroy();
    }
}
public class CActivity extends Activity {
public static final String TAG = "CActivity";
private Button bindServiceBtn;
private Button unbindServiceBtn;
private Button sendMsgToServerBtn;
private ServiceConnection sc = new MyServiceConnection();
private boolean mBound;
private Messenger mServerMessenger;
private Handler mClientHandler = new MyClientHandler();
private Messenger mClientMessenger = new Messenger(mClientHandler);
private class MyClientHandler extends Handler {
@Override
public void handleMessage(Message msg) {
if (msg.what == MyMessengerService.MSG_FROM_SERVER_TO_CLIENT) {
Log.w(TAG, "reveive msg from server");
}
}
}
private class MyServiceConnection implements ServiceConnection {
@Override
public void onServiceConnected(ComponentName name, IBinder binder) {
Log.w(TAG, "in MyServiceConnection onServiceConnected");
mServerMessenger = new Messenger(binder);
mBound = true;
}
@Override
public void onServiceDisconnected(ComponentName name) {
// This is called when the connection with the service has been
// unexpectedly disconnected -- that is, its process crashed.
Log.w(TAG, "in MyServiceConnection onServiceDisconnected");
mBound = false;
}
}
@Override
protected void onCreate(Bundle savedInstanceState) {
super.onCreate(savedInstanceState);
setContentView(R.layout.c);
bindServiceBtn = (Button) findViewById(R.id.bind_service);
unbindServiceBtn = (Button) findViewById(R.id.unbind_service);
sendMsgToServerBtn = (Button) findViewById(R.id.send_msg_to_server);
bindServiceBtn.setOnClickListener(new View.OnClickListener() {
@Override
public void onClick(View v) {
Intent intent = new Intent(CActivity.this, MyMessengerService.class);
bindService(intent, sc, Context.BIND_AUTO_CREATE);
}
});
unbindServiceBtn.setOnClickListener(new View.OnClickListener() {
@Override
public void onClick(View v) {
excuteUnbindService();
}
});
sendMsgToServerBtn.setOnClickListener(new View.OnClickListener() {
@Override
public void onClick(View v) {
sayHello();
}
});
new Handler().postDelayed(new Runnable() {
@Override
public void run() {
Intent intent = new Intent(CActivity.this, MyAlarmBroadcastReceiver.class);
sendBroadcast(intent);
}
}, 3 * 1000);
}
public void sayHello() {
if (!mBound)
return;
// Create and send a message to the service, using a supported 'what' value
Message msg = Message.obtain(null, MyMessengerService.MSG_FROM_CLIENT_TO_SERVER, 0, 0);
// 通过replyTo把client端的Messenger(信使)传递给service
msg.replyTo = mClientMessenger;
try {
mServerMessenger.send(msg);
} catch (RemoteException e) {
e.printStackTrace();
}
}
private void excuteUnbindService() {
if (mBound) {
unbindService(sc);
mBound = false;
}
}
@Override
protected void onDestroy() {
super.onDestroy();
Log.w(TAG, "in onDestroy");
excuteUnbindService();
}
} 其中,需要注意的几点是:
1.MyMessengerService自定中,通过new Messenger(new ServerHandler())创建Messenger对象,在onBind(..)回调中,通过调用Messenger对象的getBinder()方法,将Binder返回;
2.Client在ServiceConnection的onServiceConnected(..)的回调中,通过new Messenger(binder)获取到Service传递过来的mServerMessenger;
3.接下来,就可以通过mServerMessenger.send(msg)方法向Service发送message,Service中的Messenger构造器中的Handler即可接收到此信息,在handleMessage(..)回调中处理;
4.至此只是完成了从Client发送消息到Service,同样的道理,想实现Service发送消息到Client,可以在客户端定义一个Handler,并得到相应的Messenger,在Clinet发送消息给Service时,通过msg.replyTo = mClientMessenger方式将Client信使传递给Service;
5.Service接收到Client信使后,获取此信使,并通过mClientMessenger.send(toClientMsg)方式将Service消息发送给Client。
至此,完成了Client - Service之间的双向通信流程。
3).AIDL(Android Interface Definition Language)
一般情况下,Messenger这种方式都是可以满足需求的,当然,通过自定义AIDL方式相对更加灵活。
这种方式需要自己在项目中自定义xxx.aidl文件,然后系统会自动在gen目录下生成相应的接口类文件,接下来整个的流程与Messenger方式差别不大,网上也有不少实例,在此不再具体给出。
注:无论哪种方式的Bound Service,在进行unbind(..)操作时,都需要注意当前Service是否处于已经绑定状态,否则可能会因为当前Service已经解绑后继续执行unbind(..)会导致崩溃。这点与Started Service区别很大(如前文所述:stopService(..)无需做当前Service是否有效的判断)。
4.Local Service VS Remote Service
Local Service:不少人又称之为”本地服务“,是指Client - Service同处于一个进程;
Remote Service:又称之为”远程服务“,一般是指Service处于单独的一个进程中。
其他使用上上文中基本上都有所述。
5.Service特性
1.Service本身都是运行在其所在进程的主线程(如果Service与Clinet同属于一个进程,则是运行于UI线程),但Service一般都是需要进行”长期“操作,所以经常写法是在自定义Service中处理”长期“操作时需要新建线程,以免阻塞UI线程或导致ANR;
2.Service一旦创建,需要停止时都需要显示调用相应的方法(Started Service需要调用stopService(..)或Service本身调用stopSelf(..), Bound Service需要调用unbindService(..)),否则对于Started Service将处于一直运行状态,对于Bound Service,当Client生命周期结束时也将因此问题。也就是说,Service执行完毕后,必须人为的去停止它。
6.IntentService
IntentService是系统提供给我们的一个已经继承自Service类的特殊类,IntentService特殊性是相对于Service本身的特性而言的:
1.默认直接实现了onBind(..)方法,直接返回null,并定义了抽象方法onHandlerIntent(..),用户自定义子类时,需要实现此方法;
2.onHandlerIntent(..)主要就是用来处于相应的”长期“任务的,并且已经自动在新的线程中,用户无语自定义新线程;
3.当”长期“任务执行完毕后(也就是onHandlerIntent(..)执行完毕后),此IntentService将自动结束,无需人为调用方法使其结束;
4.IntentService处于任务时,也是按照队列的方式一个个去处理,而非真正意义上的多线程并发方式。
下面是一个基本的继承自IntentService的自定义Service:
public class MyIntentService extends IntentService {

    public static final String TAG = "MyIntentService";

    public MyIntentService() {
        super(TAG);
    }

    public MyIntentService(String name) {
        super(name);
    }

    @Override
    protected void onHandleIntent(Intent intent) {
        Log.w(TAG, "in onHandleIntent");
        Log.w(TAG, "thread name:" + Thread.currentThread().getName());
    }

}
7.前台Service
Android中Service接口中还提供了一个称之为”前台Service“的概念。通过Service.startForeground (int id, Notification notification)方法可以将此Service设置为前台Service。在UI显示上,notification将是一个处于onGoing状态的通知,使得前台Service拥有更高的进程优先级,并且Service可以直接notification通信。
下面是一个简单的前台Service使用实例:
public class MyService extends Service {

    public static final String TAG = "MyService";

    @Override
    public IBinder onBind(Intent intent) {
        return null;
    }

    @Override
    public void onCreate() {
        super.onCreate();
        Log.w(TAG, "in onCreate");
    }

    @Override
    public int onStartCommand(Intent intent, int flags, int startId) {
        Log.w(TAG, "in onStartCommand");
        Log.w(TAG, "MyService:" + this);
        String name = intent.getStringExtra("name");
        Log.w(TAG, "name:" + name);


        Notification notification = new Notification(R.drawable.ic_launcher, "test", System.currentTimeMillis());
        Intent notificationIntent = new Intent(this, DActivity.class);
        PendingIntent pendingIntent = PendingIntent.getActivity(this, 0, notificationIntesnt, 0);
        notification.setLatestEventInfo(this, "title", "content", pendingIntent);
        startForeground(1, notification);


        return START_REDELIVER_INTENT;
    }

    @Override
    public void onDestroy() {
        super.onDestroy();
        Log.w(TAG, "in onDestroy");
    }
}
《第一行代码》
一、什么是Service
Service是Android的一种组件,它可以运行在后台,即当按home键或者启动其他应用时,Service组件依然可以运行,但它依赖于原应用的进程,原应用被杀死,Service也将被停止,且Service运行在原应用的UI线程当中。
二、Service的基本用法
1、定义一个Service
新建一个 ServiceTest 项目,然后在这个项目中新增一个名为 MyService 的类,并让它继承自 Service,完成后的代码如下所示:
    public class MyService extends Service {
        @Override
        public IBinder onBind(Intent intent) {
            return null;
        }
    }
onBind方法是Service 中唯一的一个抽象方法,所以必须要在子类里实现。
处理事务的逻辑可以通过重写Serveice的方法来实现:
    public class MyService extends Service {
        @Override
        public IBinder onBind(Intent intent) {
            return null;
        }
        @Override
        public void onCreate() {
            super.onCreate();
        }

        @Override
        public int onStartCommand(Intent intent, int flags, int startId) {
            return super.onStartCommand(intent, flags, startId);
        }
        @Override
        public void onDestroy() {
            super.onDestroy();
        }
    }
onCreate()方法会在服务创建的时候调用,onStartCommand()方法会在每次服务启动的时候调用, onDestroy()方法会在服务销毁的时候调用。
每一个服务都需要在 AndroidManifest.xml 文件中进行注册才能生效,这是 Android 四大组件共有的特点。
<manifest xmlns:android="http://schemas.android.com/apk/res/android"
    package="com.example.servicetest"
    android:versionCode="1"
    android:versionName="1.0" >
    ……
    <application
        android:allowBackup="true"
        android:icon="@drawable/ic_launcher"
        android:label="@string/app_name"
        android:theme="@style/AppTheme" >
        ……
        <service android:name=".MyService" >
        </service>
    </application>
</manifest>
2、启动和停止Service
启动和停止服务是通过Intent来实现的。
public class MainActivity extends Activity implements OnClickListener {
    private Button startService;
    private Button stopService;
    @Override
    protected void onCreate(Bundle savedInstanceState) {
        super.onCreate(savedInstanceState);
        setContentView(R.layout.activity_main);
        startService = (Button) findViewById(R.id.start_service);
        stopService = (Button) findViewById(R.id.stop_service);
        startService.setOnClickListener(this);
        stopService.setOnClickListener(this);
    }
    @Override
    public void onClick(View v) {
        switch (v.getId()) {
            case R.id.start_service:
                Intent startIntent = new Intent(this, MyService.class);
                startService(startIntent); // 启动服务
                break;
            case R.id.stop_service:
                Intent stopIntent = new Intent(this, MyService.class);
                stopService(stopIntent); // 停止服务
                break;
            default:
                break;
        }
    }
}
这是在Activity中停止服务,在MyService内部,只要调用stopSelf()方法即可停止自身。
3、Service和Activity通信
public class MyService extends Service {
    private DownloadBinder mBinder = new DownloadBinder();
    class DownloadBinder extends Binder {
        public void startDownload() {
            Log.d("MyService", "startDownload executed");
        }
        public int getProgress() {
            Log.d("MyService", "getProgress executed");
            return 0;
        }
    }
    @Override
    public IBinder onBind(Intent intent) {
        return mBinder;
    }
    ……
}
public class MainActivity extends Activity implements OnClickListener {
private Button startService;
private Button stopService;
private Button bindService;
private Button unbindService;
private MyService.DownloadBinder downloadBinder;
private ServiceConnection connection = new ServiceConnection() {
@Override
public void onServiceDisconnected(ComponentName name) {
}
@Override
public void onServiceConnected(ComponentName name, IBinder service) {
downloadBinder = (MyService.DownloadBinder) service;
downloadBinder.startDownload();
downloadBinder.getProgress();
}
};
@Override
protected void onCreate(Bundle savedInstanceState) {
super.onCreate(savedInstanceState);
setContentView(R.layout.activity_main);
……
bindService = (Button) findViewById(R.id.bind_service);
unbindService = (Button) findViewById(R.id.unbind_service);
bindService.setOnClickListener(this);
unbindService.setOnClickListener(this);
}
@Override
public void onClick(View v) {
switch (v.getId()) {
……
case R.id.bind_service:
Intent bindIntent = new Intent(this, MyService.class);
bindService(bindIntent, connection, BIND_AUTO_CREATE); // 绑定服务
break;
case R.id.unbind_service:
unbindService(connection); // 解绑服务
break;
default:
break;
}
}
} bindService()方法的第 三 个 参 数 则 是 一 个 标 志 位 , 这 里 传 入BIND_AUTO_CREATE 表示在活动和服务进行绑定后自动创建服务。这会使得MyService中的onCreate()方法得到执行,但onStartCommand()方法不会执行。
Service和Activity通信流程,Activity通过Intent、ServiceConnection和bindService()方法,将当前Activity和Service绑定,绑定后Service里的onBind方法会回调,可以返回一个Binder对象,而这个Binder对象是派生的子类,onBind方法回调后,Activity里的onServiceConnected会被回调,而此时IBinder service就是onBind方法返回的Binder对象,通过这个对象就可以对Service起作用。
另外需要注意,任何一个服务在整个应用程序范围内都是通用的,即 MyService 不仅可以和MainActivity绑定,还可以和任何一个其他的活动进行绑定,而且在绑定完成后它们都可以获取到相同的DownloadBinder实例。
三、Service的生命周期
一旦在项目的任何位置调用了Context的startService()方法,相应的服务就会启动起来,并回调 onStartCommand()方法。如果这个服务之前还没有创建过,onCreate()方法会先于onStartCommand()方法执行。服务启动了之后会一直保持运行状态,直到stopService()或stopSelf()方法被调用。注意虽然每调用一次 startService()方法,onStartCommand()就会执行一次,但实际上每个服务都只会存在一个实例。所以不管你调用了多少次 startService()方法,只需调用一次 stopService()或 stopSelf()方法,服务就会停止下来了。
另外,还可以调用 Context 的 bindService()来获取一个服务的持久连接,这时就会回调服务中的 onBind()方法。类似地,如果这个服务之前还没有创建过, onCreate()方法会先于 onBind()方法执行。之后,调用方可以获取到 onBind()方法里返回的 IBinder 对象的实例,这样就能自由地和服务进行通信了。只要调用方和服务之间的连接没有断开,服务就会一直保持运行状态。
当调用了 startService()方法后,又去调用 stopService()方法,这时服务中的onDestroy()方法就会执行,表示服务已经销毁了。类似地,当调用了 bindService()方法后,又去调用 unbindService()方法, onDestroy()方法也会执行,这两种情况都很好理解。但是需要注意,我们是完全有可能对一个服务既调用了 startService()方法,又调用了bindService()方法的,这种情况下该如何才能让服务销毁掉呢?根据 Android 系统的机制,一个服务只要被启动或者被绑定了之后,就会一直处于运行状态,必须要让以上两种条件同时不满足,服务才能被销毁。所以,这种情况下要同时调用stopService()和unbindService()方法,onDestroy()方法才会执行。
四、Service的更多用法
1、前台服务
服务几乎都是在后台运行的,一直以来它都是默默地做着辛苦的工作。但是服务的系统优先级还是比较低的,当系统出现内存不足的情况时,就有可能会回收掉正在后台运行的服务。如果你希望服务可以一直保持运行状态,而不会由于系统内存不足的原因导致被回收,
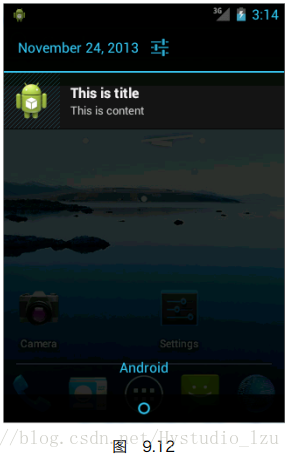
就可以考虑使用前台服务。前台服务和普通服务最大的区别就在于,它会一直有一个正在运行的图标在系统的状态栏显示,下拉状态栏后可以看到更加详细的信息,非常类似于通知的效果。当然有时候你也可能不仅仅是为了防止服务被回收掉才使用前台服务的,有些项目由于特殊的需求会要求必须使用前台服务,比如说墨迹天气,它的服务在后台更新天气数据的同时,还会在系统状态栏一直显示当前的天气信息,如图 9.11 所示。

那么我们就来看一下如何才能创建一个前台服务吧,其实并不复杂,修改 MyService中的代码,如下所示:
public class MyService extends Service {
    ……
    @Override
    public void onCreate() {
        super.onCreate();
        Notification notification = new Notification(R.drawable.ic_launcher, "Notification comes", System. currentTimeMillis());
        Intent notificationIntent = new Intent(this, MainActivity.class);
        PendingIntent pendingIntent = PendingIntent.getActivity(this, 0, notificationIntent, 0);
        notification.setLatestEventInfo(this, "This is title", "This is content", pendingIntent);
        startForeground(1, notification);
        Log.d("MyService", "onCreate executed");
    }
    ……
}
可以看到,这里只是修改了onCreate()方法中的代码,相信这部分的代码你会非常眼熟。没错!这就是我们在上一章中学习的创建通知的方法。只不过这次在构建出Notification对 象 后 并 没 有 使 用NotificationManager 来 将 通 知 显 示 出 来 , 而 是 调 用 了startForeground()方法。这个方法接收两个参数,第一个参数是通知的 id,类似于notify()方法的第一个参数,第二个参数则是构建出的 Notification 对象。调用startForeground()方法后就会让MyService 变成一个前台服务,并在系统状态栏显示出来。现在重新运行一下程序,并点击Start Service 或Bind Service 按钮,MyService 就会以前台服务的模式启动了,并且在系统状态栏会显示一个通知图标,下拉状态栏后可以看到该通知的详细内容,如图 9.12 所示。
2、使用IntentService
话说回来,在本章一开始的时候我们就已经知道,服务中的代码都是默认运行在主线程当中的,如果直接在服务里去处理一些耗时的逻辑,就很容易出现 ANR(Application Not Responding)的情况。
所以这个时候就需要用到 Android 多线程编程的技术了,我们应该在服务的每个具体的方法里开启一个子线程,然后在这里去处理那些耗时的逻辑。因此,一个比较标准的服务就可以写成如下形式:
public class MyService extends Service {
    @Override
    public IBinder onBind(Intent intent) {
        return null;
    }
    @Override
    public int onStartCommand(Intent intent, int flags, int startId) {
        new Thread(new Runnable() {
            @Override
            public void run() {
            // 处理具体的逻辑
            }
        }).start();
        return super.onStartCommand(intent, flags, startId);
    }
}
但是,这种服务一旦启动之后,就会一直处于运行状态,必须调用stopService()或者stopSelf()方法才能让服务停止下来。所以,如果想要实现让一个服务在执行完毕后自动停止的功能,就可以这样写:
public class MyService extends Service {
    @Override
    public IBinder onBind(Intent intent) {第 9 章 后台默默的劳动者,探究服务
        385
        return null;
    }
    @Override
    public int onStartCommand(Intent intent, int flags, int startId) {
        new Thread(new Runnable() {
            @Override
            public void run() {
            // 处理具体的逻辑
                stopSelf();
            }
        }).start();
        return super.onStartCommand(intent, flags, startId);
    }
}
虽说这种写法并不复杂,但是总会有一些程序员忘记开启线程,或者忘记调用 stopSelf()方法。为了可以简单地创建一个异步的、会自动停止的服务, Android 专门提供了一个IntentService 类,这个类就很好地解决了前面所提到的两种尴尬,下面我们就来看一下它的用法。
新建一个 MyIntentService 类继承自 IntentService,代码如下所示:
public class MyIntentService extends IntentService {
    public MyIntentService() {
        super("MyIntentService"); // 调用父类的有参构造函数
    }
    @Override
    protected void onHandleIntent(Intent intent) {
        // 打印当前线程的id
        Log.d("MyIntentService", "Thread id is " + Thread.currentThread(). getId());
    }
    @Override
    public void onDestroy() {
        super.onDestroy();
        Log.d("MyIntentService", "onDestroy executed");
    }
}
这里首先是要提供一个无参的构造函数,并且必须在其内部调用父类的有参构造函数。然后要在子类中去实现 onHandleIntent()这个抽象方法,在这个方法中可以去处理一些具体的逻辑,而且不用担心 ANR 的问题,因为这个方法已经是在子线程中运行的了。这里为了 证 实 一 下 , 我 们 在onHandleIntent() 方 法 中 打 印 了 当 前 线 程 的 id 。 另 外 根 据IntentService 的特性,这个服务在运行结束后应该是会自动停止的,所以我们又重写了onDestroy()方法,在这里也打印了一行日志,以证实服务是不是停止掉了。
接下来修改 activity_main.xml 中的代码,加入一个用于启动 MyIntentService 这个服务的按钮,如下所示:
<LinearLayout xmlns:android="http://schemas.android.com/apk/res/android"
    android:layout_width="match_parent"
    android:layout_height="match_parent"
    android:orientation="vertical" >
        ……
    <Button
         android:id="@+id/start_intent_service"
        android:layout_width="match_parent"
        android:layout_height="wrap_content"
        android:text="Start IntentService" />
</LinearLayout>
然后修改 MainActivity 中的代码,如下所示:
public class MainActivity extends Activity implements OnClickListener {
    ……
    private Button startIntentService;
    @Override
    protected void onCreate(Bundle savedInstanceState) {
        super.onCreate(savedInstanceState);
        setContentView(R.layout.activity_main);
        ……
        startIntentService = (Button) findViewById(R.id.start_intent_service);
        startIntentService.setOnClickListener(this);
    }
    @Override
    public void onClick(View v) {
            switch (v.getId()) {
            ……
            case R.id.start_intent_service:
                // 打印主线程的id
                Log.d("MainActivity", "Thread id is " + Thread.currentThread(). getId());
                Intent intentService = new Intent(this, MyIntentService.class);
                startService(intentService);
                break;
            default:
                break;
        }
    }
}
可以看到,我们在 Start IntentService 按钮的点击事件里面去启动 MyIntentService这个服务,并在这里打印了一下主线程的 id,稍后用于和 IntentService 进行比对。你会发现,其实 IntentService 的用法和普通的服务没什么两样。
最后仍然不要忘记,服务都是需要在 AndroidManifest.xml 里注册的,如下所示:
<manifest xmlns:android="http://schemas.android.com/apk/res/android"
package="com.example.servicetest"
android:versionCode="1"
android:versionName="1.0" >
……
<application
android:allowBackup="true"
android:icon="@drawable/ic_launcher"
android:label="@string/app_name"
android:theme="@style/AppTheme" >
……
<service android:name=".MyIntentService"></service>
</application>
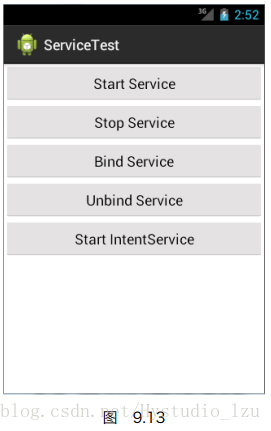
</manifest> 现在重新运行一下程序,界面如图 9.13 所示。
点击 Start IntentService 按钮后,观察 LogCat 中的打印日志,如图 9.14 所示。
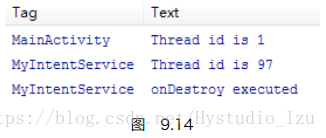
可以看到,不仅 MyIntentService 和 MainActivity 所在的线程 id 不一样,而且onDestroy()方法也得到了执行,说明 MyIntentService 在运行完毕后确实自动停止了。集开启线程和自动停止于一身, IntentService 还是博得了不少程序员的喜爱。