Spring MVC源码分析
本篇文章只讲源码分析,不讲spring mvc基础的东西,文章中部分理论部分为转载。
spring mvc概述
Spring MVC框架是一个基于请求驱动的Web框架,并且也使用了前端控制器模式来进行设计,再根据请求映射规则分发给相应的页面控制器(动作/处理器)进行处理。
先来看一下spring mvc的处理一个url的请求逻辑图
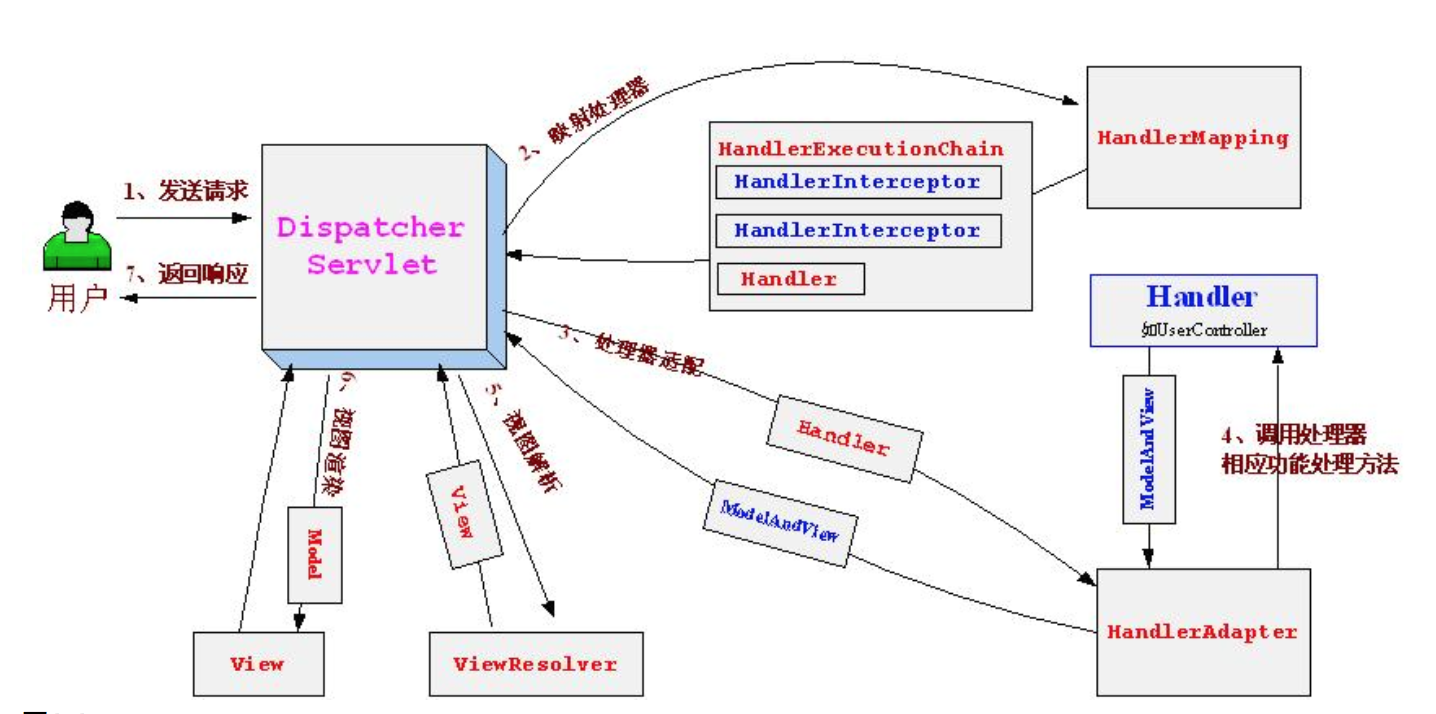
(图为转载)
请求旅程的第一站是Spring的DispatcherServlet。与大多数基于Java的Web框架一样,Spring MVC所有的请求都会通过一个前端控制器 (front controller)Servlet。前端控制器是常用的Web应用程序模式,在这里一个单实例的Servlet将请求委托给应用程序的其他组件来执行实际的处理。在Spring MVC中,DispatcherServlet就是前端控制器。
DispatcherServlet的任务是将请求发送给Spring MVC控制器(controller)。控制器是一个用于处理请求的Spring组件。在典型的应用程序中可能会有多个控制器,DispatcherServlet需要知道应该将请求发送给哪个控制器。所以DispatcherServlet以会查询一个或多个处理器映射(handler mapping) 来确定请求的下一站在哪里。处理器映射会根据请求所携带的URL信息来进行决策。
一旦选择了合适的控制器,DispatcherServlet会将请求发送给选中的控制器 耐心等待控制器处理这些信息。
控制器在完成逻辑处理后,通常会产生一些信息,这些信息需要返回给用户并在浏览器上显示。这些信息被称为模型(model)。不过仅仅给 用户返回原始的信息是不够的——这些信息需要以用户友好的方式进行格式化,一般会是HTML。所以,信息需要发送给一个视图(view), 通常会是JSP。
控制器所做的最后一件事就是将模型数据打包,并且标示出用于渲染输出的视图名。它接下来会将请求连同模型和视图名发送
回DispatcherServlet 。 这样,控制器就不会与特定的视图相耦合,传递给DispatcherServlet的视图名并不直接表示某个特定的JSP。
在整个过程中最重要的步骤就是映射处理器,处理适配器
映射处理器:根据请求的url映射到需要处理的Controller上。
处理适配器:根据映射处理器找到的Controller,在找到相应的Controller里面处理逻辑的方法。
spring mvc基本配置
说到底:DispatcherServlet也只不过是servlet中的一个servlet而已,所以初始化DispatcherServlet配置在web.xml中。
web.xml中的配置
方法一:
    <servlet>
        <servlet-name>springMvc</servlet-name>
        <servlet-class>org.springframework.web.servlet.DispatcherServlet</servlet-class>
        <init-param>
            <param-name>contextConfigLocation</param-name>
            <param-value>/WEB-INF/springMvc-servlet.xml</param-value>
        </init-param>
        <load-on-startup>1</load-on-startup>
    </servlet>
     <servlet-mapping>
        <servlet-name>springMvc</servlet-name>
        <url-pattern>/</url-pattern>
    </servlet-mapping>
load-on-startup:表示启动容器时初始化该Servlet;
url-pattern:表示哪些请求交给Spring Web MVC处理, “/” 是用来定义默认servlet映射的.
springMvc-servlet.xml这个是我们的springmvc的配置文件。
方法二:
    <context-param>
        <param-name>contextConfigLocation</param-name>
        <param-value>/WEB-INF/springMvc-servlet.xml</param-value>
    </context-param>

    <servlet>
        <servlet-name>springMvc</servlet-name>
        <servlet-class>org.springframework.web.servlet.DispatcherServlet</servlet-class>
         <load-on-startup>1</load-on-startup>
    </servlet>

    <servlet-mapping>
        <servlet-name>springMvc</servlet-name>
        <url-pattern>/</url-pattern>
    </servlet-mapping>
context-param这个里面配置的为servlet全局变量值。
方法三:
<context-param>
        <param-name>contextConfigLocation</param-name>
        <param-value>/WEB-INF/springMvc-servlet.xml</param-value>
    </context-param>

    <listener>
        <listener-class>org.springframework.web.context.ContextLoaderListener</listener-class>
    </listener>

    <servlet>
        <servlet-name>springMvc</servlet-name>
        <servlet-class>org.springframework.web.servlet.DispatcherServlet</servlet-class>
        <load-on-startup>1</load-on-startup>
    </servlet>

    <servlet-mapping>
        <servlet-name>springMvc</servlet-name>
        <url-pattern>/</url-pattern>
    </servlet-mapping>
在刚开始学习spring mvc时,会看到网上有各种各样的配置的,还有第三种方法的。
org.springframework.web.context.ContextLoaderListener配置这个监听器,由于ContextLoaderListener实现了ServletContextListener这个接口,所以servlet在启动时会调用ContextLoaderListener 中的contextInitialized方法进行初始化。
在web.xml中配置DispatcherServlet或ContextLoaderListener都是为了让servlet与spring的beans融合,在spring中能获取到servlet的上下文,如request和response。
如果只用到spring而没有用到spring mvc中的东西,其实配置ContextLoaderListener这个就OK了,这个的目的就是初始化spring
如同“ApplicationContext bf = new ClassPathXmlApplicationContext(“applicationContext.xml”);”这个一毛一样。
如果用到spring mvc中的东西,可以只配置DispatcherServlet这个就OK了。不用配置ContextLoaderListener这个也是可以的。因为DispatcherServlet也会初始化new ClassPathXmlApplicationContext(“applicationContext.xml”);这个东西。
但是它们两个都配置了也没关系,因为listener是监听器,是先执行的,而servlet是后执行的。DispatcherServlet在初始化new ClassPathXmlApplicationContext(“…”)这个时,会检测是否已经存在了,如果存在则会把它当父属性设置,它自己本身还会在初始化一个ClassPathXmlApplicationContext();它们之前不会互相冲突,而是上下级的关系。在使用时如果在当前的ClassPathXmlApplicationContext中没有找到,则会去父ClassPathXmlApplicationContext中查找。
DispatcherServlet与ContextLoaderListener对比
- 从DispatcherServlet和ContextLoaderListener的初始化过程可以看出,二者分别会生成一个WebApplicationContext,且以不同的attrName注册到web容器中
- 根据web.xml的加载顺序,listener总是先于servlet进行加载,因此虽然DispatcherServlet和ContextLoaderListener的WebApplicationContext不同,但是ContextLoaderListener的WebApplicationContext总是DispatcherServlet的父ApplicationContext
- 同一个web容器中,只允许存在一个ContextLoaderListener,但可以存在多个DispatcherServlet
- 由于二者生成的WebApplicationContext不同,因而这两个WebApplicationContext会分别去加载它们的配置,生成不同的BeanFactory;获取Spring Bean时,会先从DispatcherServlet的WebApplicationContext中查找,若不存在再通过父ApplicationContext,即ContextLoaderListener的WebApplicationContext,进行查找
- 若二者的配置文件对Bean的定义存在交叉(即二者的配置文件中都定义了相同class且相同beanName的bean),则两个WebApplicationContext中都会保存一份该bean,但实际调用中只会用到DispatcherServlet中的bean,ContextLoaderListener中的bean无法调用到,成为内存泄漏
- DispatcherServlet除了与ContextLoaderListener一样,会加载用户配置的bean以外,还会自动加载与web mvc相关的spring bean,如RequestMapping、ViewResolver、ExceptionHandler等
spring mvc初始化
先来看一组图:
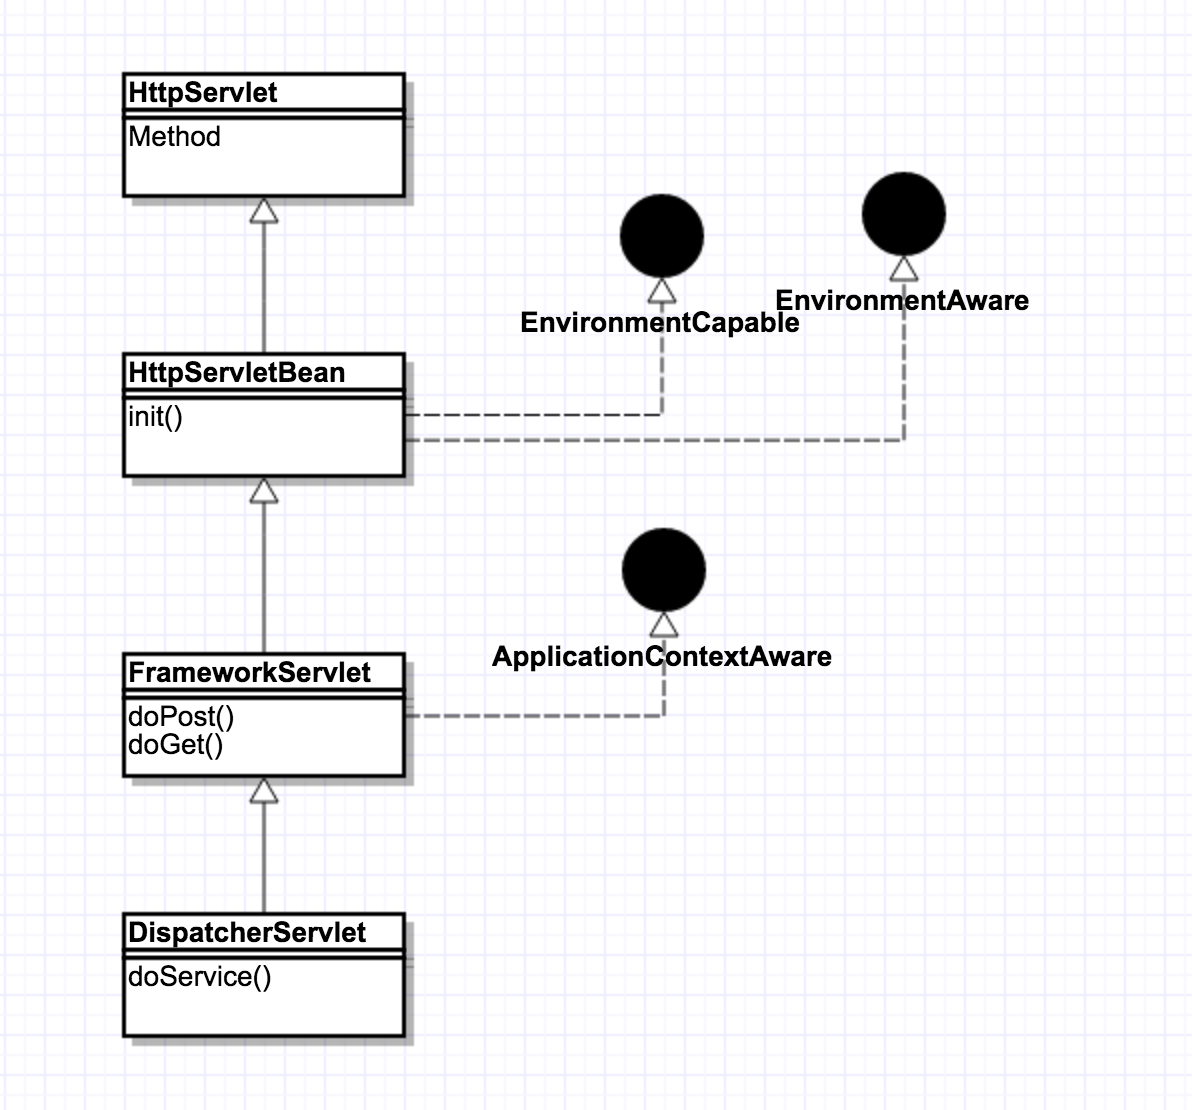
DispatcherServlet 的继承关系图,在servlet容器启动时,会先执行servlet接口中的init方法。而DispatcherServlet类的继承关系来看,它也实现了init方法,所以一切都从init()方法开始了。
DispatcherServlet整个初始化的时序图
按照时序图中的节奏走(代码只粘贴重要部分说明):
- init初始化
public final void init() throws ServletException {
        if (logger.isDebugEnabled()) {
            logger.debug("Initializing servlet '" + getServletName() + "'");
        }

        // Set bean properties from init parameters.
        try {   //读取配置文件init parameters
            PropertyValues pvs = new ServletConfigPropertyValues(getServletConfig(), this.requiredProperties);
            BeanWrapper bw = PropertyAccessorFactory.forBeanPropertyAccess(this); //将当前servlet转化为BeanWrapper,这样这个servlet就被spring接管了
            ResourceLoader resourceLoader = new ServletContextResourceLoader(getServletContext());
            bw.registerCustomEditor(Resource.class, new ResourceEditor(resourceLoader, getEnvironment()));
            initBeanWrapper(bw); //留给子类实现
            bw.setPropertyValues(pvs, true);   //设置属性
        }
        catch (BeansException ex) {
            logger.error("Failed to set bean properties on servlet '" + getServletName() + "'", ex);
            throw ex;
        }

        // Let subclasses do whatever initialization they like.
        initServletBean(); //子类实现

        if (logger.isDebugEnabled()) {
            logger.debug("Servlet '" + getServletName() + "' configured successfully");
        }
}- 初始化WebApplicationContext:initWebApplicationContext()
protected WebApplicationContext initWebApplicationContext() {
        WebApplicationContext rootContext =
                WebApplicationContextUtils.getWebApplicationContext(getServletContext());
        WebApplicationContext wac = null;

        if (this.webApplicationContext != null) {
            // A context instance was injected at construction time -> use it
            wac = this.webApplicationContext;
            if (wac instanceof ConfigurableWebApplicationContext) {
                ConfigurableWebApplicationContext cwac = (ConfigurableWebApplicationContext) wac;
                if (!cwac.isActive()) {
                    // The context has not yet been refreshed -> provide services such as
                    // setting the parent context, setting the application context id, etc
                    if (cwac.getParent() == null) {
                        // The context instance was injected without an explicit parent -> set
                        // the root application context (if any; may be null) as the parent
                        cwac.setParent(rootContext);
                    }  //刷新上下文环境 **重要configureAndRefreshWebApplicationContext**
                    configureAndRefreshWebApplicationContext(cwac);
                }
            }
        }
        if (wac == null) {
            // No context instance was injected at construction time -> see if one
            // has been registered in the servlet context. If one exists, it is assumed
            // that the parent context (if any) has already been set and that the
            // 根据ContextAttribute属性初始化wac
            wac = findWebApplicationContext();
        }
        if (wac == null) {
            // 上面都为空了,那么只能创建一个wac了-> create a local one
            wac = createWebApplicationContext(rootContext);
        }

        if (!this.refreshEventReceived) {
            // Either the context is not a ConfigurableApplicationContext with refresh
            // support or the context injected at construction time had already been
            // refreshed -> **重要onRefresh**
            onRefresh(wac);
        }

        if (this.publishContext) {
            // Publish the context as a servlet context attribute.
            String attrName = getServletContextAttributeName();
            getServletContext().setAttribute(attrName, wac);
            if (this.logger.isDebugEnabled()) {
                this.logger.debug("Published WebApplicationContext of servlet '" + getServletName() +
                        "' as ServletContext attribute with name [" + attrName + "]");
            }
        }

        return wac;
    }
看到rootContext这个了吗?如果在web.xml中配置了监听器ContextLoaderListener,此时的rootContext就不会为空,rootContext有且只能有一个。
如果rootContext不为null,进入第一个if里面,会再次初始化一个WebApplicationContext,同时会设置cwac.setParent(rootContext);
就相当于有两个WebApplicationContext,一个子的,一个父的。在调用过程中,如果在子WebApplicationContext中没有找到则会去父WebApplicationContext里面查找。
rootContext只能有一个,也就是说ContextLoaderListener只能有一个,但是DispatcherServlet可以有多个。
- 初始化spring容器中的beans
protected void configureAndRefreshWebApplicationContext(ConfigurableWebApplicationContext wac) {
        if (ObjectUtils.identityToString(wac).equals(wac.getId())) {
            // The application context id is still set to its original default value
            // -> assign a more useful id based on available information
            if (this.contextId != null) {
                wac.setId(this.contextId);
            }
            else {
                // Generate default id...
                wac.setId(ConfigurableWebApplicationContext.APPLICATION_CONTEXT_ID_PREFIX +
                        ObjectUtils.getDisplayString(getServletContext().getContextPath()) + "/" + getServletName());
            }
        }
        //设置servletContext上下文,配置文件,命名空间
        wac.setServletContext(getServletContext());
        wac.setServletConfig(getServletConfig());
        wac.setNamespace(getNamespace());
        wac.addApplicationListener(new SourceFilteringListener(wac, new ContextRefreshListener()));

        // The wac environment's #initPropertySources will be called in any case when the context
        // is refreshed; do it eagerly here to ensure servlet property sources are in place for
        // use in any post-processing or initialization that occurs below prior to #refresh
        ConfigurableEnvironment env = wac.getEnvironment();
        if (env instanceof ConfigurableWebEnvironment) {
            ((ConfigurableWebEnvironment) env).initPropertySources(getServletContext(), getServletConfig());
        }

        postProcessWebApplicationContext(wac);
        applyInitializers(wac);
        //这个就是初始化spring 中的beans了。请参考spring ioc的解说
        wac.refresh(); //最终调用父类的AbstractApplicationContext刷新上下文**refresh()重要**
}- 初始化spring mvc相关的东西
protected void initStrategies(ApplicationContext context) {
        initMultipartResolver(context);  //主要用来处理文件上传
        initLocaleResolver(context);  //国际化配置
        initThemeResolver(context);  //主题解析
        initHandlerMappings(context);  //将servlet的request请求提转给HandlerMapping,HandlerMapping在根据webApplication context的配置来回传给DispatcherServlet的相应的controller
        initHandlerAdapters(context);  //适配器,默认有三个是适配器:http适配器,简单适配器,注解方法适配器
        initHandlerExceptionResolvers(context); //基于HandlerExceptionResolver接口的异常处理
        initRequestToViewNameTranslator(context); //如果没有ModelAndView时根据请求返回试图名称
        initViewResolvers(context); //当Conroller将请求结果放入到ModelAndView中之后,spring会根据ModelAndView选择合适的试图进行渲染
        initFlashMapManager(context); //spring flashMapManager提供了一个请求存储属性,可供其他请求使用,在使用重定向的时候非常重要
    }
这里的初始化都是差不多的,首先进入方法里面,找到系统默认的一些配置,然后是自定义的一些配置,再然后就是开始通过spring的ioc来实例化bean。
所有的initXXXXX方法,都调用到了getDefaultStrategies这个方法,这个就是通过spring ioc来创建它们各自的bean了。
挑选一个initHandlerMappings来说明一下
因为在初始化HandlerMappings时,会扫描所有controller上面的url,所以这里单独讲解一些handlermapping的初始化。
private void initHandlerMappings(ApplicationContext context) {
        this.handlerMappings = null;

        if (this.detectAllHandlerMappings) {
            // Find all HandlerMappings in the ApplicationContext, including ancestor contexts.
            Map<String, HandlerMapping> matchingBeans =
                    BeanFactoryUtils.beansOfTypeIncludingAncestors(context, HandlerMapping.class, true, false);
            if (!matchingBeans.isEmpty()) {
                this.handlerMappings = new ArrayList<HandlerMapping>(matchingBeans.values());
                // We keep HandlerMappings in sorted order.
                AnnotationAwareOrderComparator.sort(this.handlerMappings);
            }
        }
        else {
            try {
                HandlerMapping hm = context.getBean(HANDLER_MAPPING_BEAN_NAME, HandlerMapping.class);
                this.handlerMappings = Collections.singletonList(hm);
            }
            catch (NoSuchBeanDefinitionException ex) {
                // Ignore, we'll add a default HandlerMapping later.
            }
        }

        // Ensure we have at least one HandlerMapping, by registering
        // a default HandlerMapping if no other mappings are found.
        if (this.handlerMappings == null) { //*getDefaultStrategies初始化**
            this.handlerMappings = getDefaultStrategies(context, HandlerMapping.class);
            if (logger.isDebugEnabled()) {
                logger.debug("No HandlerMappings found in servlet '" + getServletName() + "': using default");
            }
        }
    }
在扫描过程中,如果我没有指定handlerMapping,则系统会加载默认的handlerMapping。我们来看下默认的

这里有两个
BeanNameUrlHandlerMapping :通过对比url和bean的name找到对应的对象
<bean name="/name" class="cn.javass.chapter2.web.controller.HelloWorldController"/> 注意:/name就是请求它的url了。必须与“/”开头,在xml中规定,id中不能出现特殊字符,所以不能在id中使用/name,还好有备用方案,可以使用name属性来作为url请求路径
DefaultAnnotationHandlerMapping : 主要是针对注解配置@RequestMapping的url
@RequestMapping("name")
    @ResponseBody
    private String getUser() {
        userService.getUser();
        return "success";
    }
以这个为例子来说明:DefaultAnnotationHandlerMapping
protected <T> List<T> getDefaultStrategies(ApplicationContext context, Class<T> strategyInterface) {
        String key = strategyInterface.getName();
        String value = defaultStrategies.getProperty(key);
        if (value != null) {
            String[] classNames = StringUtils.commaDelimitedListToStringArray(value);
            List<T> strategies = new ArrayList<T>(classNames.length);
            for (String className : classNames) {
                try {
                    Class<?> clazz = ClassUtils.forName(className, DispatcherServlet.class.getClassLoader());
                    Object strategy = createDefaultStrategy(context, clazz);
                    strategies.add((T) strategy);
                }
                catch (ClassNotFoundException ex) {
                    throw new BeanInitializationException(
                            "Could not find DispatcherServlet's default strategy class [" + className +
                                    "] for interface [" + key + "]", ex);
                }
                catch (LinkageError err) {
                    throw new BeanInitializationException(
                            "Error loading DispatcherServlet's default strategy class [" + className +
                                    "] for interface [" + key + "]: problem with class file or dependent class", err);
                }
            }
            return strategies;
        }
        else {
            return new LinkedList<T>();
        }
    }

    protected Object createDefaultStrategy(ApplicationContext context, Class<?> clazz) {
        return context.getAutowireCapableBeanFactory().createBean(clazz); ** createBean**通过spring初始化bean
    }
上面最主要的就是context.getAutowireCapableBeanFactory().createBean(clazz),这个createBean,就开始使用springioc容器,开始创建bean了。
来看下流程图:
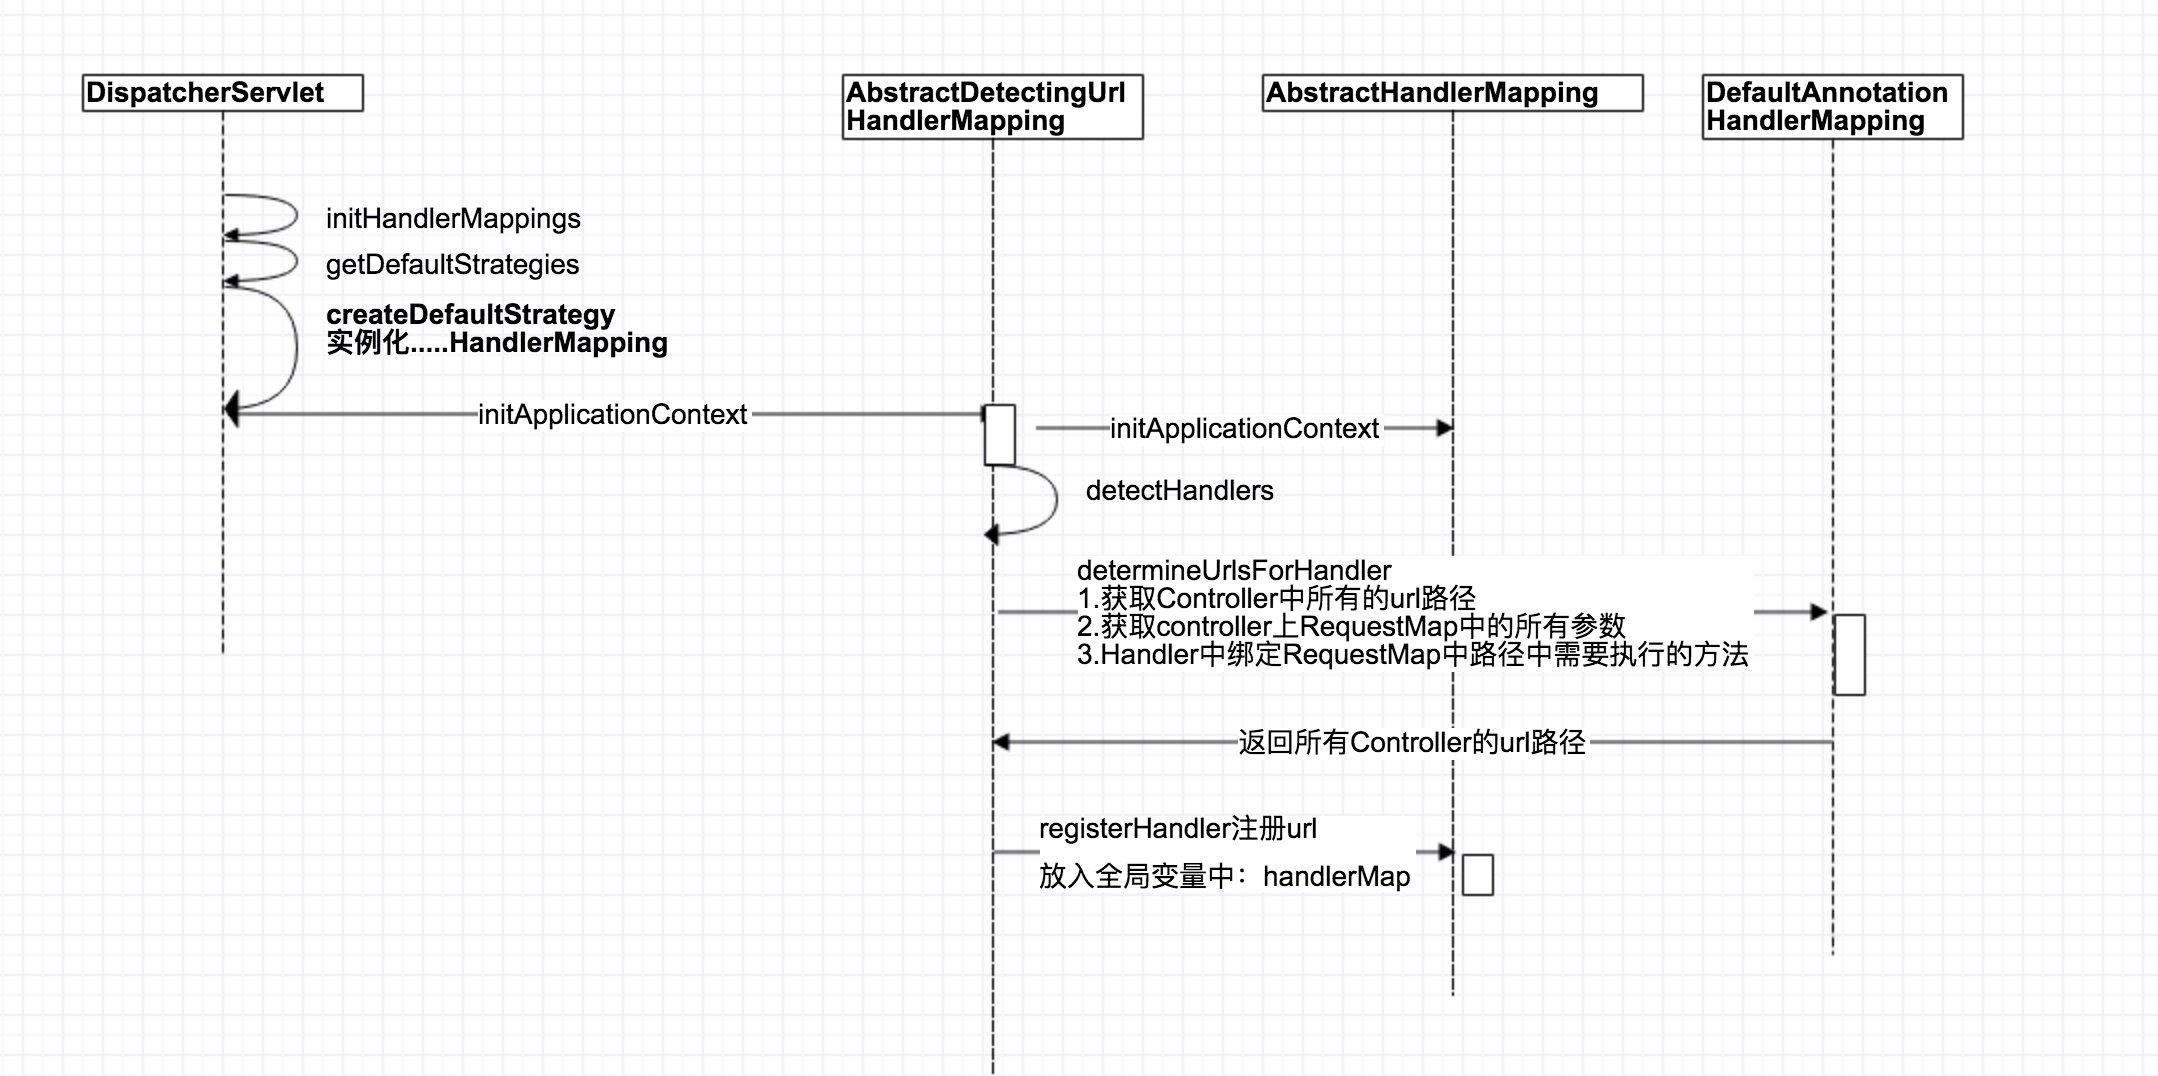
一看,蒙b了,创建一个handlermapping,为什么会调用到AbstractDetectingUrlHandlerMapping的initApplicationContext方法呢?
其他类通过spring ioc容器创建时,也没有这样啊。为什么到了handlerMapping时就出现这样的问题了呢?
来看下类图:
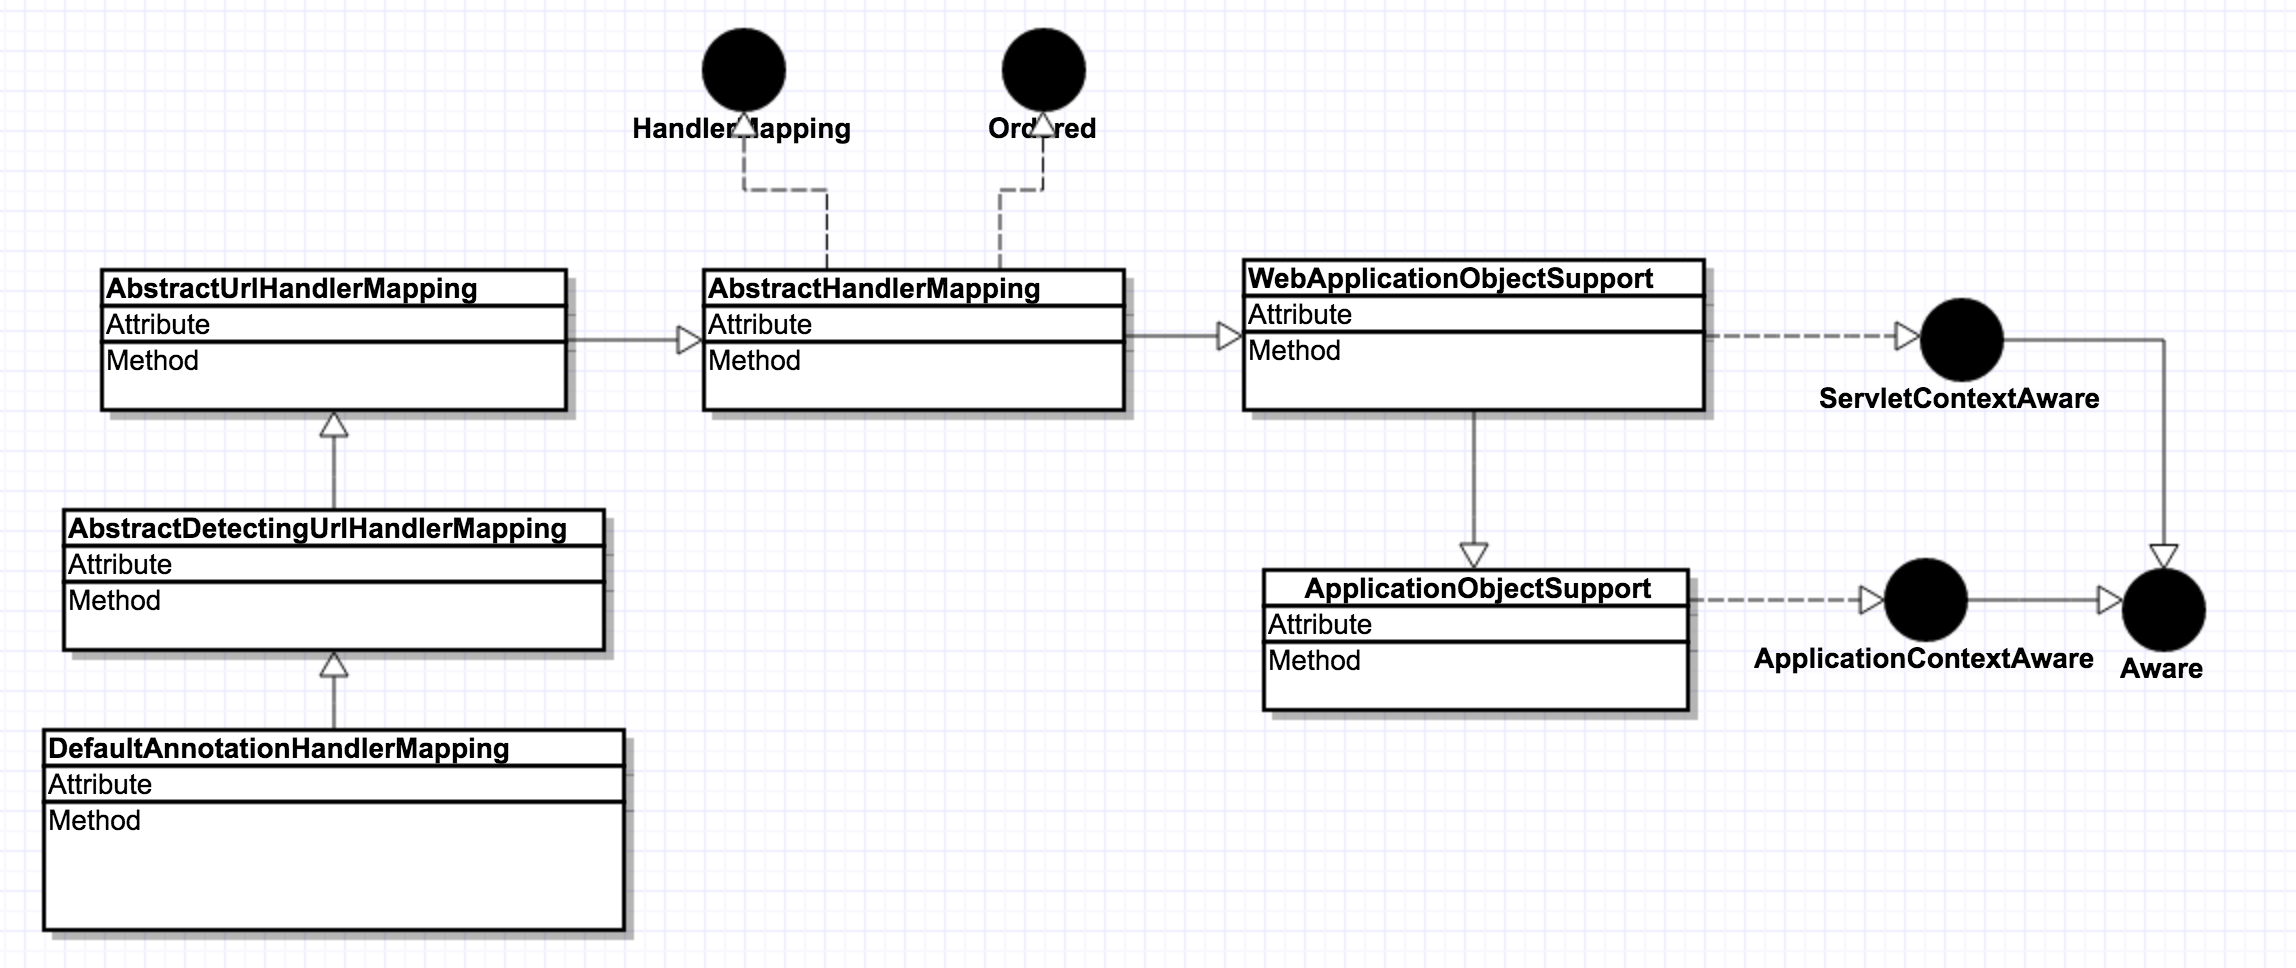
抽象类ApplicationObjectSupport实现了ApplicationContextAware,在创建bean时spring容器的后置处理器会调用setApplicationContext方法。
public final void setApplicationContext(ApplicationContext context) throws BeansException {
        if (context == null && !isContextRequired()) {
            // Reset internal context state.
            this.applicationContext = null;
            this.messageSourceAccessor = null;
        }
        else if (this.applicationContext == null) {
            // Initialize with passed-in context.
            if (!requiredContextClass().isInstance(context)) {
                throw new ApplicationContextException(
                        "Invalid application context: needs to be of type [" + requiredContextClass().getName() + "]");
            }
            this.applicationContext = context;
            this.messageSourceAccessor = new MessageSourceAccessor(context);
            /**这里会先执行子类WebApplicationObjectSupport的initApplicationContext方法,然后到initApplicationContext这个方法中又调用了supper.initApplicationContext(context).---> ApplicationObjectSupport自己的init方法,ApplicationObjectSupport本身的该方法没有任何处理,只是调用了一个空的方法initApplicationContext(),这个无参的重载方法被当作一个钩子供子类方法来实现。  **/
            initApplicationContext(context);
        }
        else {
            // Ignore reinitialization if same context passed in.
            if (this.applicationContext != context) {
                throw new ApplicationContextException(
                        "Cannot reinitialize with different application context: current one is [" +
                        this.applicationContext + "], passed-in one is [" + context + "]");
            }
        }
    }
为什么initApplicationContext方法不直接调用ApplicationObjectSupport这个里面的initApplicationContext方法而是要先调用WebApplicationObjectSupport这个中的initApplicationContext这个方法,然后在调用回来呢?因为WebApplicationObjectSupport类中的initApplicationContext方法覆盖了父类的initApplicationContext这个方法,所以啊。
总算找到一团乱线的头了,那么接下来就开始解线了。
AbstractDetectingUrlHandlerMapping
@Override
    public void initApplicationContext() throws ApplicationContextException {
        super.initApplicationContext();
        detectHandlers();
    }

    protected void detectHandlers() throws BeansException {
        if (logger.isDebugEnabled()) {
            logger.debug("Looking for URL mappings in application context: " + getApplicationContext());
        }
        String[] beanNames = (this.detectHandlersInAncestorContexts ?
                BeanFactoryUtils.beanNamesForTypeIncludingAncestors(getApplicationContext(), Object.class) :
                getApplicationContext().getBeanNamesForType(Object.class));

        // Take any bean name that we can determine URLs for.
        for (String beanName : beanNames) {
            String[] urls = determineUrlsForHandler(beanName); //** determineUrlsForHandler**根据bean的名字,查找到bean的url
            if (!ObjectUtils.isEmpty(urls)) {
                // URL paths found: Let's consider it a handler.
                registerHandler(urls, beanName); //** registerHandler**把url与beanName做一个映射关系
            }
            else {
                if (logger.isDebugEnabled()) {
                    logger.debug("Rejected bean name '" + beanName + "': no URL paths identified");
                }
            }
        }
    }
determineUrlsForHandler跳转到了DefaultAnnotationHandlerMapping类里面的determineUrlsForHandler();要知道他们的继承关系哦!
@Override
    protected String[] determineUrlsForHandler(String beanName) {
        ApplicationContext context = getApplicationContext();
        Class<?> handlerType = context.getType(beanName);
        RequestMapping mapping = context.findAnnotationOnBean(beanName, RequestMapping.class);
        if (mapping != null) {
            // @RequestMapping found at type level
            this.cachedMappings.put(handlerType, mapping);
            Set<String> urls = new LinkedHashSet<String>();
            String[] typeLevelPatterns = mapping.value();
            if (typeLevelPatterns.length > 0) {
                // @RequestMapping specifies paths at type level
                String[] methodLevelPatterns = determineUrlsForHandlerMethods(handlerType, true);
                for (String typeLevelPattern : typeLevelPatterns) {
                    if (!typeLevelPattern.startsWith("/")) {
                        typeLevelPattern = "/" + typeLevelPattern;
                    }
                    boolean hasEmptyMethodLevelMappings = false;
                    for (String methodLevelPattern : methodLevelPatterns) {
                        if (methodLevelPattern == null) {
                            hasEmptyMethodLevelMappings = true;
                        }
                        else {
                            String combinedPattern = getPathMatcher().combine(typeLevelPattern, methodLevelPattern);
                            addUrlsForPath(urls, combinedPattern);
                        }
                    }
                    if (hasEmptyMethodLevelMappings ||
                            org.springframework.web.servlet.mvc.Controller.class.isAssignableFrom(handlerType)) {
                        addUrlsForPath(urls, typeLevelPattern);
                    }
                }
                return StringUtils.toStringArray(urls);
            }
            else {
                // actual paths specified by @RequestMapping at method level
                return determineUrlsForHandlerMethods(handlerType, false);
            }
        }
        else if (AnnotationUtils.findAnnotation(handlerType, Controller.class) != null) {
            // @RequestMapping to be introspected at method level
            return determineUrlsForHandlerMethods(handlerType, false);
        }
        else {
            return null;
        }
    }


    protected String[] determineUrlsForHandlerMethods(Class<?> handlerType, final boolean hasTypeLevelMapping) {
        String[] subclassResult = determineUrlsForHandlerMethods(handlerType);
        if (subclassResult != null) {
            return subclassResult;
        }

        final Set<String> urls = new LinkedHashSet<String>();
        Set<Class<?>> handlerTypes = new LinkedHashSet<Class<?>>();
        handlerTypes.add(handlerType);
        handlerTypes.addAll(Arrays.asList(handlerType.getInterfaces()));
        for (Class<?> currentHandlerType : handlerTypes) {
            ReflectionUtils.doWithMethods(currentHandlerType, new ReflectionUtils.MethodCallback() {
                @Override
                public void doWith(Method method) {
                    RequestMapping mapping = AnnotationUtils.findAnnotation(method, RequestMapping.class);
                    if (mapping != null) {
                        String[] mappedPatterns = mapping.value();
                        if (mappedPatterns.length > 0) {
                            for (String mappedPattern : mappedPatterns) {
                                if (!hasTypeLevelMapping && !mappedPattern.startsWith("/")) {
                                    mappedPattern = "/" + mappedPattern;
                                }
                                addUrlsForPath(urls, mappedPattern);
                            }
                        }
                        else if (hasTypeLevelMapping) {
                            // empty method-level RequestMapping
                            urls.add(null);
                        }
                    }
                }
            }, ReflectionUtils.USER_DECLARED_METHODS);
        }
        return StringUtils.toStringArray(urls);
    }

    protected void addUrlsForPath(Set<String> urls, String path) {
        urls.add(path);
        if (this.useDefaultSuffixPattern && path.indexOf('.') == -1 && !path.endsWith("/")) {
            urls.add(path + ".*");
            urls.add(path + "/");
        }
    }
例子:
@RestController
@RequestMapping("user")
public class UserController {

    @Autowired
    private UserService userService;

    @RequestMapping("name")
    @ResponseBody
    private String getUser() {
        userService.getUser();
        return "success";
    }

    @RequestMapping("id")
    public String getUserName() {
        userService.getUser();
        return "success";
    }
}
DefaultAnnotationHandlerMapping类里面的determineUrlsForHandler和determineUrlsForHandlerMethods方法,主要的目的是干什么的呢?
就是把根据beanName:userContent 找到这个beanName上面的HandlerMapping啦,
那就是/user/name ; /user/name/ ; /user/name.*
/user/id ; /user/id/ ;/user/id.*
找到了之后就是注册了:
AbstractDetectingUrlHandlerMapping这个里面的registerHandler方法,点击后,将跳转到AbstractUrlHandlerMapping中的registerHandler方法中,注册交给了AbstractUrlHandlerMapping来处理了。
protected void registerHandler(String[] urlPaths, String beanName) throws BeansException, IllegalStateException {
        Assert.notNull(urlPaths, "URL path array must not be null");
        for (String urlPath : urlPaths) {
            registerHandler(urlPath, beanName);
        }
    }

protected void registerHandler(String urlPath, Object handler) throws BeansException, IllegalStateException {
        Assert.notNull(urlPath, "URL path must not be null");
        Assert.notNull(handler, "Handler object must not be null");
        Object resolvedHandler = handler;

        // Eagerly resolve handler if referencing singleton via name.
        if (!this.lazyInitHandlers && handler instanceof String) {
            String handlerName = (String) handler;
            if (getApplicationContext().isSingleton(handlerName)) {
                resolvedHandler = getApplicationContext().getBean(handlerName);
            }
        }

        Object mappedHandler = this.handlerMap.get(urlPath);
        if (mappedHandler != null) {
            if (mappedHandler != resolvedHandler) {
                throw new IllegalStateException(
                        "Cannot map " + getHandlerDescription(handler) + " to URL path [" + urlPath +
                        "]: There is already " + getHandlerDescription(mappedHandler) + " mapped.");
            }
        }
        else {
            if (urlPath.equals("/")) {
                if (logger.isInfoEnabled()) {
                    logger.info("Root mapping to " + getHandlerDescription(handler));
                }
                setRootHandler(resolvedHandler);
            }
            else if (urlPath.equals("/*")) {
                if (logger.isInfoEnabled()) {
                    logger.info("Default mapping to " + getHandlerDescription(handler));
                }
                setDefaultHandler(resolvedHandler);
            }
            else {
                this.handlerMap.put(urlPath, resolvedHandler);
                if (logger.isInfoEnabled()) {
                    logger.info("Mapped URL path [" + urlPath + "] onto " + getHandlerDescription(handler));
                }
            }
        }
    }
注意最后这句:this.handlerMap.put(urlPath, resolvedHandler);,上面找到的url都将将给同一个handler来处理哦。
先根据controller找到url,然后把url的处理交给controller来处理。
上面找到了那么多URL:/user/name ; /user/name/ ; /user/name.* ; /user/id ; /user/id/ ; /user/id.* ,他们将交给userController来处理。
this.handlerMap这个是一个全局Map参数,下面的mvc调用过程将使用到这个变量。
spring mvc调用过程
看图:
protected void doDispatch(HttpServletRequest request, HttpServletResponse response) throws Exception {
        HttpServletRequest processedRequest = request;
        HandlerExecutionChain mappedHandler = null;
        boolean multipartRequestParsed = false;

        WebAsyncManager asyncManager = WebAsyncUtils.getAsyncManager(request);

        try {
            ModelAndView mv = null;
            Exception dispatchException = null;

            try {  //如果是文件上传处理,则转换request为MultipartHttp....类型的request **checkMultipart**
                processedRequest = checkMultipart(request);
                multipartRequestParsed = (processedRequest != request);

                //1.第一步:获取url请求的处理类 寻找request对应的handler **getHandler**
                mappedHandler = getHandler(processedRequest);
                if (mappedHandler == null || mappedHandler.getHandler() == null) {
                    noHandlerFound(processedRequest, response); //如果没有找到handler则返回错误信息
                    return;
                }

                //2.第二步:获取url请求处理的方法 根据handler找到对应的 handlerAdapter,就是根据controller找到里面所有的RequestMapping方法。然后把方法和url做一个映射关系
                HandlerAdapter ha = getHandlerAdapter(mappedHandler.getHandler());

                // Process last-modified header, if supported by the handler.
                String method = request.getMethod();
                boolean isGet = "GET".equals(method);
                if (isGet || "HEAD".equals(method)) {
                    long lastModified = ha.getLastModified(request, mappedHandler.getHandler());
                    if (logger.isDebugEnabled()) {
                        logger.debug("Last-Modified value for [" + getRequestUri(request) + "] is: " + lastModified);
                    }
                    if (new ServletWebRequest(request, response).checkNotModified(lastModified) && isGet) {
                        return;
                    }
                }
                //**如果有拦截器,则先执行拦截器的preHandler方法,多个拦截器则顺序执行。拦截器的preHandler方法调用applyPreHandle**,从这里可以看出,如果某个拦截器返回false,则直接返回整个请求处理了,不会在往下处理
                if (!mappedHandler.applyPreHandle(processedRequest, response)) {
                    return;
                }

                //第三步:执行我们url请求的方法: 返回激活的handler并返回试图;这里就是开始执行url对应的方法了,//执行我们真正的请求处理,然后返回一个视图
                mv = ha.handle(processedRequest, response, mappedHandler.getHandler());

                if (asyncManager.isConcurrentHandlingStarted()) {
                    return;
                }
                //试图名称转换应用于需要添加前缀后缀的情况
                applyDefaultViewName(processedRequest, mv);
                mappedHandler.applyPostHandle(processedRequest, response, mv); //应用所有拦截器的postHandle方法
            }
            catch (Exception ex) {
                dispatchException = ex;
            }
            catch (Error err) {
                // As of 4.3, we're processing Errors thrown from handler methods as well,
                // making them available for @ExceptionHandler methods and other scenarios.
                dispatchException = new NestedServletException("Handler dispatch failed", err);
            } //4.第四步:返回页面,处理mvc页面跳转
            processDispatchResult(processedRequest, response, mappedHandler, mv, dispatchException);
        }
        catch (Exception ex) {
            triggerAfterCompletion(processedRequest, response, mappedHandler, ex);
        }
        catch (Error err) {
            triggerAfterCompletion(processedRequest, response, mappedHandler,
                    new NestedServletException("Handler processing failed", err));
        }
        finally {
            if (asyncManager.isConcurrentHandlingStarted()) {
                // Instead of postHandle and afterCompletion
                if (mappedHandler != null) {
                    mappedHandler.applyAfterConcurrentHandlingStarted(processedRequest, response);
                }
            }
            else {
                // Clean up any resources used by a multipart request.
                if (multipartRequestParsed) {
                    cleanupMultipart(processedRequest);
                }
            }
        }
    }
获取url执行的类与拦截器(handlerMapping)
getHandler(processedRequest);
初始化时介绍了所有url路径都注册到了AbstractUrlHandlerMapping中的this.handlerMap.put,所以按照时序图,我们直接来到了getHandler里面。
AbstractHandlerMapping.getHandler

@Override
    public final HandlerExecutionChain getHandler(HttpServletRequest request) throws Exception {
        Object handler = getHandlerInternal(request);//获取url对应的类
        if (handler == null) {
            handler = getDefaultHandler();
        }
        if (handler == null) {
            return null;
        }
        // Bean name or resolved handler?
        if (handler instanceof String) {
            String handlerName = (String) handler;
            handler = getApplicationContext().getBean(handlerName);
        }

        //获取所有拦截器
        HandlerExecutionChain executionChain = getHandlerExecutionChain(handler, request);
        if (CorsUtils.isCorsRequest(request)) {
            CorsConfiguration globalConfig = this.corsConfigSource.getCorsConfiguration(request);
            CorsConfiguration handlerConfig = getCorsConfiguration(handler, request);
            CorsConfiguration config = (globalConfig != null ? globalConfig.combine(handlerConfig) : handlerConfig);
            executionChain = getCorsHandlerExecutionChain(request, executionChain, config);
        }
        return executionChain;
    }

    //获取所有拦截器,然后根据handler+拦截器,把它全部封装在了HandlerExecutionChain这个里面,这样就构成了一个url请求后的一个执行链表。
    protected HandlerExecutionChain getHandlerExecutionChain(Object handler, HttpServletRequest request) {
        HandlerExecutionChain chain = (handler instanceof HandlerExecutionChain ?
                (HandlerExecutionChain) handler : new HandlerExecutionChain(handler));

        //获取请求的url
        String lookupPath = this.urlPathHelper.getLookupPathForRequest(request);
        for (HandlerInterceptor interceptor : this.adaptedInterceptors) {
            if (interceptor instanceof MappedInterceptor) {
                MappedInterceptor mappedInterceptor = (MappedInterceptor) interceptor;
                //根据url过滤规则,筛选出符合该url的拦截器,或者说筛选出作用于该url的拦截器
                if (mappedInterceptor.matches(lookupPath, this.pathMatcher)) {
                    chain.addInterceptor(mappedInterceptor.getInterceptor());
                }
            }
            else {
                chain.addInterceptor(interceptor);
            }
        }
        return chain;
}AbstractUrlHandlerMapping.getHandlerInternal中类中,查看它根据用户请求的url找到了handler,就是上图中的userController
protected Object getHandlerInternal(HttpServletRequest request) throws Exception {
        String lookupPath = getUrlPathHelper().getLookupPathForRequest(request); //获取url匹配的路径
        Object handler = lookupHandler(lookupPath, request); //根据路径查找handler,lookupHandler这个方法太长了,就不粘贴源码了,可以自己debug查看里面的逻辑
        if (handler == null) {
            // We need to care for the default handler directly, since we need to
            // expose the PATH_WITHIN_HANDLER_MAPPING_ATTRIBUTE for it as well.
            Object rawHandler = null;
            if ("/".equals(lookupPath)) { //如果路径仅仅只有/,那么就使用rootHandler处理
                rawHandler = getRootHandler();
            }
            if (rawHandler == null) { //没有找到则使用默认的handler
                rawHandler = getDefaultHandler();
            }
            if (rawHandler != null) {
                // 根据beanName获取对应的bean
                if (rawHandler instanceof String) {
                    String handlerName = (String) rawHandler;
                    rawHandler = getApplicationContext().getBean(handlerName);
                } //模版方法
                validateHandler(rawHandler, request); //**buildPathExposingHandler**把所有handler穿链起来
                handler = buildPathExposingHandler(rawHandler, lookupPath, lookupPath, null);
            }
        }
        if (handler != null && logger.isDebugEnabled()) {
            logger.debug("Mapping [" + lookupPath + "] to " + handler);
        }
        else if (handler == null && logger.isTraceEnabled()) {
            logger.trace("No handler mapping found for [" + lookupPath + "]");
        }
        return handler;
    }
HandlerExecutionChain类单独看一些:
public class HandlerExecutionChain {

    private static final Log logger = LogFactory.getLog(HandlerExecutionChain.class);

    private final Object handler;

    private HandlerInterceptor[] interceptors;

    private List<HandlerInterceptor> interceptorList;

    private int interceptorIndex = -1;
}
一个执行HandlerExecutionChain中包含一个handler(就是我们url处理请求的controller)还有一个interceptorList拦截器执行List。
看到这里就知道了,多个拦截器会被放到list中,所以多个拦截器是可以排序的。
获取url执行的方法(handlerAdapter)
getHandlerAdapter(mappedHandler.getHandler());
获取adapter就是获取执行的方法。
这里的handlerAdapters有三个系统默认的:AnnotationMethodHandlerAdapter,SimpleControllerHandlerAdapter
我用的是注解的,所以在遍历多个adapters时只有AnnotationMethodHandlerAdapter是匹配的。
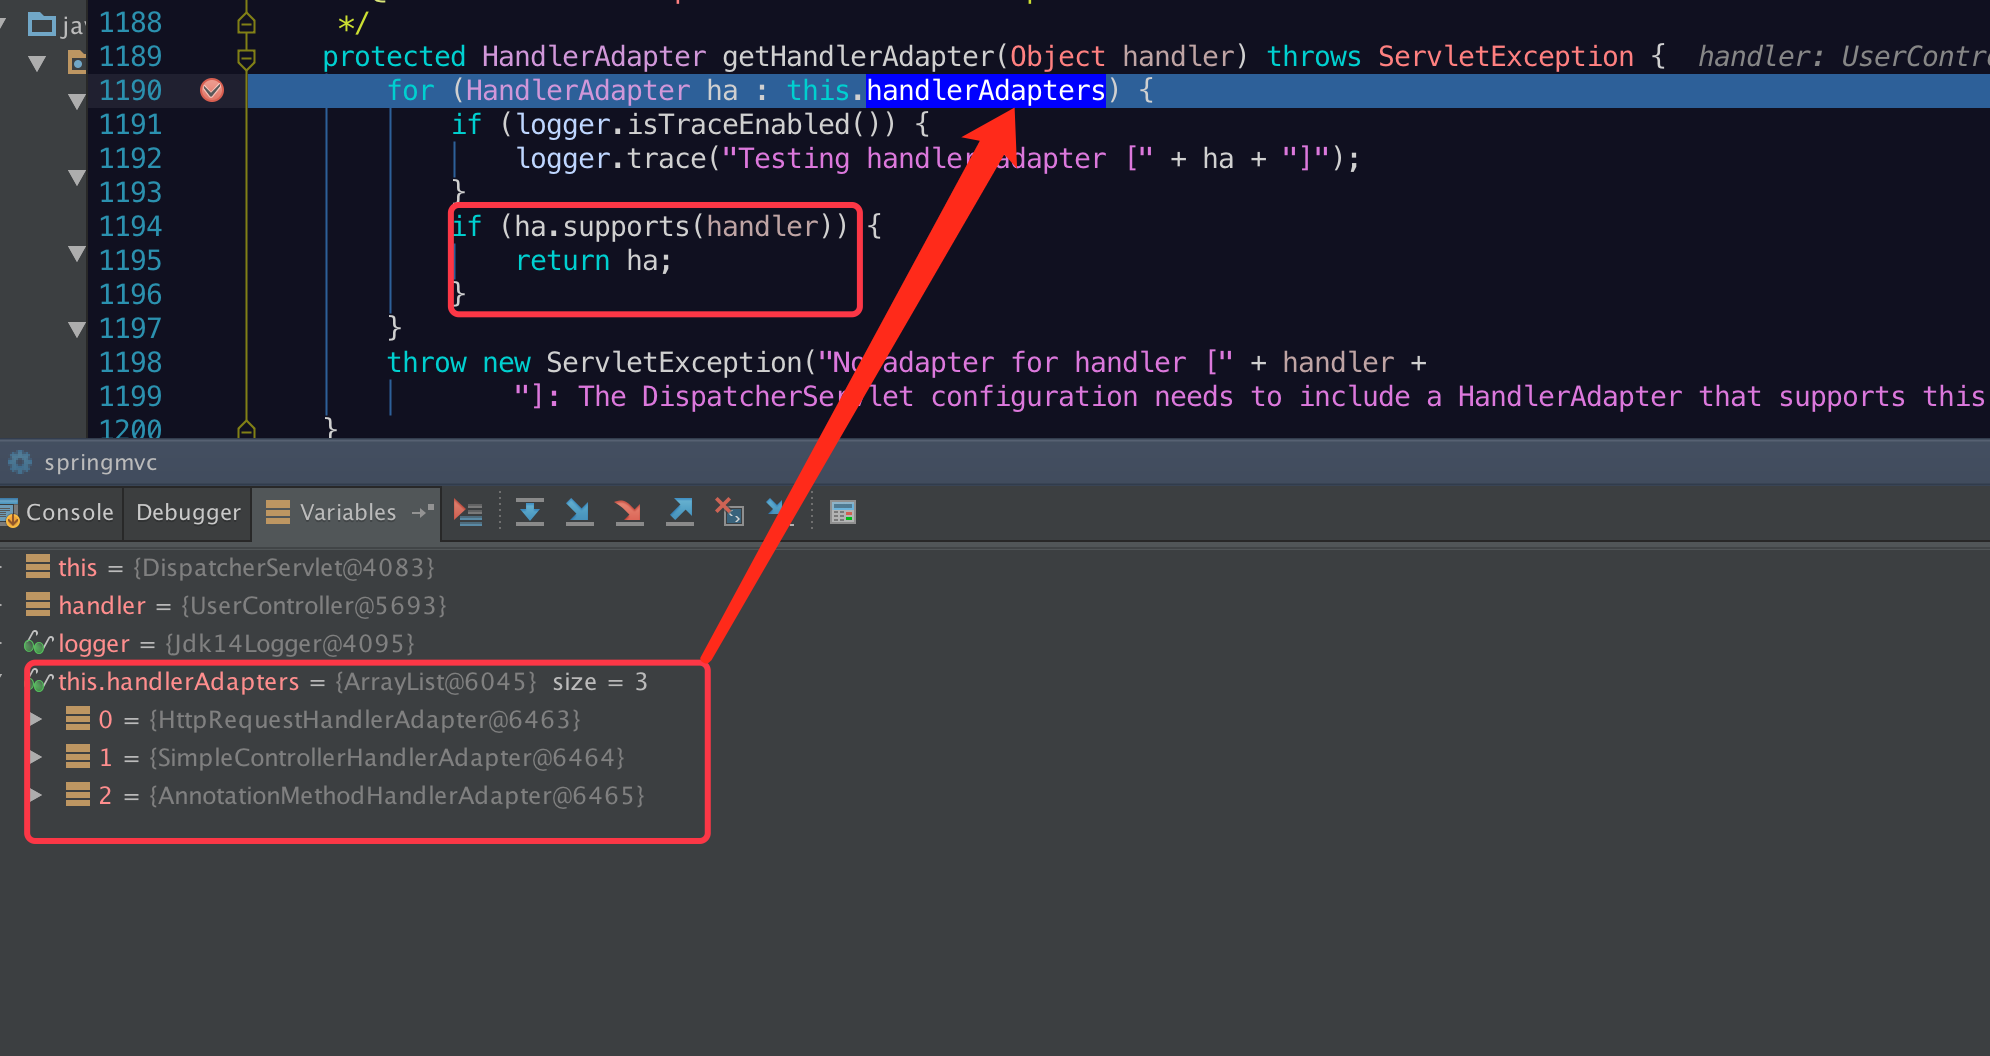
protected HandlerAdapter getHandlerAdapter(Object handler) throws ServletException {
        for (HandlerAdapter ha : this.handlerAdapters) {
            if (logger.isTraceEnabled()) {
                logger.trace("Testing handler adapter [" + ha + "]");
            }
            if (ha.supports(handler)) { //找到合适的adapter
                return ha;
            }
        }
        throw new ServletException("No adapter for handler [" + handler +
                "]: The DispatcherServlet configuration needs to include a HandlerAdapter that supports this handler");
    }
进入到AnnotationMethodHandlerAdapter.supports中。
@Override
    public boolean supports(Object handler) {
        return getMethodResolver(handler).hasHandlerMethods();
    }

     private ServletHandlerMethodResolver getMethodResolver(Object handler) {
        Class<?> handlerClass = ClassUtils.getUserClass(handler);
        ServletHandlerMethodResolver resolver = this.methodResolverCache.get(handlerClass);
        if (resolver == null) {
            synchronized (this.methodResolverCache) {
                resolver = this.methodResolverCache.get(handlerClass);
                if (resolver == null) {
                    resolver = new ServletHandlerMethodResolver(handlerClass); //**ServletHandlerMethodResolver**
                    this.methodResolverCache.put(handlerClass, resolver);
                }
            }
        }
        return resolver;
    }
通过类信息,反射获取到所有方法
class ServletHandlerMethodResolver extends HandlerMethodResolver

ServletHandlerMethodResolver(){
    init();//---> HandlerMethodResolver.init()
}
根据类的class,反射后获取到class里面的所有方法
根据userController的class,使用java的反射技术获取userController这个下面的所有方法。
HandlerMethodResolver.init()
public void init(final Class<?> handlerType) { //handlerType这个时候就是userController了,上面传递过来的。
        Set<Class<?>> handlerTypes = new LinkedHashSet<Class<?>>();
        Class<?> specificHandlerType = null;
        if (!Proxy.isProxyClass(handlerType)) {
            handlerTypes.add(handlerType);
            specificHandlerType = handlerType;
        }
        handlerTypes.addAll(Arrays.asList(handlerType.getInterfaces()));
        for (Class<?> currentHandlerType : handlerTypes) {
            final Class<?> targetClass = (specificHandlerType != null ? specificHandlerType : currentHandlerType);
            //进入到doWithMethods源码去,通过类的信息获取到了类的所有方法,然后才执行到下面这里
            ReflectionUtils.doWithMethods(currentHandlerType, new ReflectionUtils.MethodCallback() {
                @Override
                public void doWith(Method method) {
                    Method specificMethod = ClassUtils.getMostSpecificMethod(method, targetClass);
                    Method bridgedMethod = BridgeMethodResolver.findBridgedMethod(specificMethod);
                    if (isHandlerMethod(specificMethod) &&
                            (bridgedMethod == specificMethod || !isHandlerMethod(bridgedMethod))) {
                            //isHandlerMethod是否是handler方法,就是方法上面是否有HandlerMapping注解
                        handlerMethods.add(specificMethod);
                    }
                    else if (isInitBinderMethod(specificMethod) &&
                            (bridgedMethod == specificMethod || !isInitBinderMethod(bridgedMethod))) {
                        initBinderMethods.add(specificMethod);
                    }
                    else if (isModelAttributeMethod(specificMethod) &&
                            (bridgedMethod == specificMethod || !isModelAttributeMethod(bridgedMethod))) {
                        modelAttributeMethods.add(specificMethod);
                    }
                }
            }, ReflectionUtils.USER_DECLARED_METHODS);
        }
        this.typeLevelMapping = AnnotationUtils.findAnnotation(handlerType, RequestMapping.class);
        SessionAttributes sessionAttributes = AnnotationUtils.findAnnotation(handlerType, SessionAttributes.class);
        this.sessionAttributesFound = (sessionAttributes != null);
        if (this.sessionAttributesFound) {
            this.sessionAttributeNames.addAll(Arrays.asList(sessionAttributes.names()));
            this.sessionAttributeTypes.addAll(Arrays.asList(sessionAttributes.types()));
        }
    }
由于class ServletHandlerMethodResolver extends HandlerMethodResolver所有在调用到的HandlerMethodResolver.isHandlerMethod方法是ServletHandlerMethodResolver这个里面的方法isHandlerMethod();(覆盖了父类中的方法)
接下来来到了ServletHandlerMethodResolver.isHandlerMethod();
@Override
        protected boolean isHandlerMethod(Method method) {
            if (this.mappings.containsKey(method)) {
                return true;
            }
            RequestMapping mapping = AnnotationUtils.findAnnotation(method, RequestMapping.class);
            if (mapping != null) {
                String[] patterns = mapping.value();
                RequestMethod[] methods = new RequestMethod[0];
                String[] params = new String[0];
                String[] headers = new String[0];
                if (!hasTypeLevelMapping() || !Arrays.equals(mapping.method(), getTypeLevelMapping().method())) {
                    methods = mapping.method();
                }
                if (!hasTypeLevelMapping() || !Arrays.equals(mapping.params(), getTypeLevelMapping().params())) {
                    params = mapping.params();
                }
                if (!hasTypeLevelMapping() || !Arrays.equals(mapping.headers(), getTypeLevelMapping().headers())) {
                    headers = mapping.headers();
                }
                RequestMappingInfo mappingInfo = new RequestMappingInfo(patterns, methods, params, headers);
                this.mappings.put(method, mappingInfo);
                return true;
            }
            return false;
        }
根据方法名称获取它方法上面是否有RequestMapping注解,如果有,则说明它是我们要找的url处理方法。
执行url请求
上面几步都是为了找到/user/name对应的处理类,然后找到对应的处理mapping,那么现在就该执行请求的方法了。
根据上面的时序图直接来到AnnotationMethodHandlerAdapter.handle方法中
public ModelAndView handle(HttpServletRequest request, HttpServletResponse response, Object handler)
            throws Exception {

        Class<?> clazz = ClassUtils.getUserClass(handler);
        Boolean annotatedWithSessionAttributes = this.sessionAnnotatedClassesCache.get(clazz);
        if (annotatedWithSessionAttributes == null) {
            annotatedWithSessionAttributes = (AnnotationUtils.findAnnotation(clazz, SessionAttributes.class) != null);
            this.sessionAnnotatedClassesCache.put(clazz, annotatedWithSessionAttributes);
        }

        if (annotatedWithSessionAttributes) {
            checkAndPrepare(request, response, this.cacheSecondsForSessionAttributeHandlers, true);
        }
        else {
            checkAndPrepare(request, response, true);
        }

        // Execute invokeHandlerMethod in synchronized block if required.
        if (this.synchronizeOnSession) {
            HttpSession session = request.getSession(false);
            if (session != null) {
                Object mutex = WebUtils.getSessionMutex(session);
                synchronized (mutex) { //执行真正的请求方法
                    return invokeHandlerMethod(request, response, handler);
                }
            }
        }
                //执行真正的请求方法
        return invokeHandlerMethod(request, response, handler);
    }

    protected ModelAndView invokeHandlerMethod(HttpServletRequest request, HttpServletResponse response, Object handler)
            throws Exception {
        //**根据handler找到ServletHandlerMethodResolver(前面类的所有方法都封装在这个里面了的map里面,所以现在根据类get到它)
        ServletHandlerMethodResolver methodResolver = getMethodResolver(handler);  //** getMethodResolver**
        Method handlerMethod = methodResolver.resolveHandlerMethod(request); //找到请求的处理方法methodResolver,**resolveHandlerMethod**
        ServletHandlerMethodInvoker methodInvoker = new ServletHandlerMethodInvoker(methodResolver);
        ServletWebRequest webRequest = new ServletWebRequest(request, response);
        ExtendedModelMap implicitModel = new BindingAwareModelMap();
        //执行请求方法;invokeHandlerMethod开始执行方法了。
        Object result = methodInvoker.invokeHandlerMethod(handlerMethod, handler, webRequest, implicitModel);
        ModelAndView mav =
                methodInvoker.getModelAndView(handlerMethod, handler.getClass(), result, implicitModel, webRequest);
        methodInvoker.updateModelAttributes(handler, (mav != null ? mav.getModel() : null), implicitModel, webRequest);
        return mav;
    }
这个invokeHandlerMethod方法里面信息量巨大;
- 根据类找到之前遍历到的所有mapping方法。
- 筛选出真正处理url的mapping方法。
- 封装上面的处理信息。
- 开始真正执行了(这里也不是真的执行了,点击进去methodInvoker.invokeHandlerMethod这个方法,里面还有很多方法参数解析的拼装)
- 根据执行结果返回对应的视图。
这5步里面都有很多处理逻辑,由于篇幅,就不一一粘贴了。
完结
到这里用户的请求已经全部完成了,用户的视图也返回了,这个http请求处理完毕,页面已经请求完毕。
但是接下来还要执行拦截器后置处理器 >>>>> 执行拦截器after处理器
拦截器
spring mvc 拦截器接口:
public interface HandlerInterceptor {
    boolean preHandle(
            HttpServletRequest request, HttpServletResponse response,
            Object handler)
            throws Exception;

    void postHandle(
            HttpServletRequest request, HttpServletResponse response,
            Object handler, ModelAndView modelAndView)
            throws Exception;

    void afterCompletion(
            HttpServletRequest request, HttpServletResponse response,
            Object handler, Exception ex)
            throws Exception;
} - preHandle:预处理回调方法,实现处理器的预处理(如登录检查),第三个参数为响应的处理器;
返回值:true表示继续流程(如调用下一个拦截器或处理器);
false表示流程中断(如登录检查失败),不会继续调用其他的拦截器或处理器,此时我们需要通过response来产生响应; - postHandle:后处理回调方法,实现处理器的后处理(但在渲染视图之前),此时我们可以通过modelAndView(模型和视图对象)对模型数据进行处理或对视图进行处理,modelAndView也可能为null。
- afterCompletion:整个请求处理完毕回调方法,即在视图渲染完毕时回调,如性能监控中我们可以在此记录结束时间并输出消耗时间,还可以进行一些资源清理,类似于try-catch-finally中的finally,但仅调用处理器执行链中preHandle返回true的拦截器的afterCompletion。
实现
有时候我们可能只需要实现三个回调方法中的某一个,如果实现HandlerInterceptor接口的话,三个方法必须实现,不管你需不需要,此时spring提供了一个HandlerInterceptorAdapter适配器(一种适配器设计模式的实现),允许我们只实现需要的回调方法。
自定义拦截器
public class MyHandlerDemo implements HandlerInterceptor {

    public static final String SFDF = "sdfsdf";

    @Override
    public boolean preHandle(HttpServletRequest request, HttpServletResponse response, Object handler) throws Exception {
        System.out.println("preHandle......." + SFDF);
        return true;
    }

    @Override
    public void postHandle(HttpServletRequest request, HttpServletResponse response, Object handler, ModelAndView modelAndView) throws Exception {
        System.out.println("postHandle.......");
    }

    @Override
    public void afterCompletion(HttpServletRequest request, HttpServletResponse response, Object handler, Exception ex) throws Exception {
        System.out.println("afterCompletion.......");
    }
}
第二步:
<mvc:interceptors>
<!--<!–对所有的请求记性拦截–>-->
<!--<bean class="com.sunp.common.interceptor.Myinterceptor"/>-->
<!--<!–对特定的请求进行拦截–>-->
<mvc:interceptor>
<mvc:mapping path="/user/*/*"/>
<bean class="com.springmvc.demo.handler.MyHandlerDemo" />
</mvc:interceptor>
</mvc:interceptors>拦截器过滤规则
| Wildcard | Description |
|---|---|
| ? | 匹配任何单字符 |
| * | 匹配0或者任意数量的字符 |
| ** | 匹配0或者更多的目录 |
例如:
/app/*.x 匹配(Matches)所有在app路径下的.x文件
/app/p?ttern 匹配(Matches) /app/pattern 和 /app/pXttern,但是不包括/app/pttern
/**/example 匹配(Matches) /app/example, /app/foo/example, 和 /example
/app/**/dir/file. 匹配(Matches) /app/dir/file.jsp, /app/foo/dir/file.html,/app/foo/bar/dir/file.pdf, 和 /app/dir/file.java
/**/*.jsp 匹配(Matches)任何的.jsp 文件
拦截器与过滤器,监听器
| 过滤器(filter) | 拦截器(Interceptor) | 监听器(Listener) |
|---|---|---|
| 切入点 | 所有web请求 | action |
| 实现方式 | 函数回调 | java动态代理 |
| 依赖 | 依赖于servlet容器 | 应用框架自己实现 |
| 级别 | 系统级 | 框架级 |
从触发时间看区别
触发时间:监听器 > 过滤器 > 拦截器 > spring aop
- 监听器在servlet容器启动时跟着一起启动,过滤器是在用户请求url时首先出发,然后才到拦截器,最后才到spring aop。
- 在spring项目中,拦截器只能作用于controller层(就是上面说的action),而不能渗入到spring项目的其他层去,而aop可以在任何地方渗入。
- 拦截器和spring aop不能同时应用到controller层,如果同时出现,则spring aop的作用失效。
- 拦截器可以访问Action上下文和值栈中的对象,过滤器不能。
- 在Action的生命周期中,拦截器可以多次调用,而过滤器只能在容器初始化时调用一次。
HandlerMapping
一 个WEB应用程序基本上都要依赖于URL与请求处理器之间的映射,Spring MVC也是一样,但Spring MVC就像Spring所作的一切一样(译者:灵活,可以配置各种东西,但是也造成了很多复杂性),肯定不会只有一种方法来映射URL和 Controller之间的关系,并且在实际上,允许你自己创建映射规则和实现,而不仅仅依赖URL映射。
Spring提供了URL的映射处理, 并且处理路径模式的顺序和方法并没有限定到任何的接口上。Spring MVC的默认实现org.springframework.web.servlet.handler.AbstractUrlHandlerMapping, 会以最长符合路径模式来匹配一个路径。
例如:给定一个请求是 /app/dir/file.jsp 并且现在存在两个路径匹配模式/**/*.jsp 和/app/dir/*.jsp, 那么,URL会匹配那个模式呢?最后的那个模式/app/dir/*.jsp,会因为最长(has more characters)的原则被匹配,它比/**/*.jsp拥有更多的字符.注意的是,这个原则并没有在任何高级别的接口中指定,但却是一种实现细节。
下面看一下默认的两个HandlerMapping
BeanNameUrlHandlerMapping
默 认的映射策略实现是org.springframework.web. servlet.handler.BeanNameUrlHandlerMapping类. 这个类要求任何有可能处理请求的Bean都要起一个以反斜杠(/)字符开头的名称或者别名,这个名称或者别名可以是符合URL Path匹配原则中的任何名字。
<bean name="/home"  class="com.apress.expertspringmvc.flight.web.HomeController">
<property name="flightService" ref="flightService" />
</bean>
注意:你不能使用id这个属性来指定任何的URL路径,因为在XML规格定中禁止(/)字符来指定XML的id,不过你可以在一个Bean定义中同时拥有id和name属性
BeanNameUrlHandlerMapping 的缺点它非常便于使用的同时,也拥有一些缺点。它不能影射一个Prototype的Bean.换句话说,当使用 BeanNameUrlHandlerMapping时, 所有的请求处理类只能是单例的(singletons) . 一般来说,Controllers 都是按照单例建立的,所以这个并不是一个很严重的问题.
BeanNameUrlHandlerMapping的另外一个问题存在于在你的应用程序中 应用拦截(interceptor). 因为请求的映射(handler mapping )和Bean(beans imapping)的映射给绑定在一起了,没有分开,这样就不可能在Controller和拦截之间创建复杂的关系。如果有复杂的请求映射需求,你可以用SimpleUrlHandlerMapping 来代替BeanNameUrlHandlerMapping. SimpleUrlHandlerMapping作为BeanNameUrlHandlerMapping的另外一种选择, SimpleUrlHandlerMapping直指BeanNameUrlHandlerMapping的两大软肋.它可以映射 prototype类型的请求处理器,并且它允许你为处理器(handlers)和拦截器(interceptors)之间创建复杂灵活的映射路径的映射算法与BeanNameUrlHandlerMapping是 使用相同的基础组件,所以这个模式依然是映射URL到请求处理器的(request handler) ,你简单的在ApplicationContext中声明一下,就可以使用SimpleUrlHandlerMapping了. DispatcherServlet会根据类型找到的,并且不会创建默认的映射器了(BeanNameUrlHandlerMapping).意思就是, 如果你想两个都用,那么就要全部声明一下在ApplicationContext里.
DispatcherServlet会链式处理请求的这样允许按照你的要求处理映射,映射处理器(Handler mappings )实现了Orderedr接口.
如果有多个HandlerMapping,则会一个一个执行,不存在冲突。
因为处理url与controller映射关系时是存储到map中的:url是作为key的,controller处理类作为value,,用户请求的url是不变的,处理url的controller也是不变的,有多个handlerMapping时大不了就是互相覆盖而已,而不会互相冲突。handlerMapping最重要的职责就是找到url与controller的对应关系,所以不管用多少个handlerMapping,只要能找到请求对应的处理类就OK了。
项目测试源码
根据网上的一个例子,手写springmvc简单版源码。
[email protected]:henjuese/myspringmvc.git
测试项目源码
[email protected]:henjuese/springmvcdemo.git
参考
http://blog.csdn.net/sadfishsc/article/details/51027873
http://blog.csdn.net/rj042/article/details/23278337 (handlerMapping部分的转载地址)
http://fancyboy2050.iteye.com/blog/1335285 (初始化时调用问题)
http://blog.csdn.net/reggergdsg/article/details/52962774 (拦截器与过滤器的区别)
http://jinnianshilongnian.iteye.com/blog/1670856 (拦截器讲解)
《spring源码深度解析》,《spring4 实战》
http://blog.csdn.net/column/details/13023.html?&page=3 (spring mvc 源码分析博客)