前言
内容主要参考自《Spring源码深度解析》一书,算是读书笔记或是原书的补充。进入正文后可能会引来各种不适,毕竟阅读源码是件极其痛苦的事情。
本文主要涉及书中第十一章的部分,依照书中内容以及个人理解对Spring源码进行了注释,详见Github仓库:https://github.com/MrSorrow/spring-framework
Spring框架提供了构建Web应用程序的全功能MVC模块。Spring MVC分离了控制器、模型对象、分派器以及处理程序对象的角色,这种分离让它们更容易进行定制。
Spring的MVC是基于Servlet功能实现的,通过实现Servlet接口的DispatcherServlet来封装其核心功能实现,通过将请求分派给处理程序,同时带有可配置的处理程序映射、视图解析、本地语言、主题解析以及上传文件支持。默认的处理程序是非常简单的 Controller 接口,只有一个方法 ModelAndView handleRequest(request, response)。Spring提供了一个控制器层次结构,可以派生出许多子类。
SpringMVC解决的问题无外乎以下几点:
- 将Web页面的请求传给服务器
- 根据不同的请求利用不同的逻辑单元进行处理
- 返回处理的结果数据并跳转至响应的页面
本文源码分析部分也主要分为三块,分别研究Spring父容器的加载,DispatcherServlet 初始化 (包含Spring MVC子容器的加载) 以及 DispatcherServlet 处理Web请求的过程。
I. SpringMVC测试示例
这一部分由于坑比较多,又单独开了一篇文章,专门讲解Spring源码工程中如何搭建SpringMVC的测试模块的。详见:Spring源码——SpringMVC测试工程搭建。如果对SpringMVC不熟悉如何使用的,建议先查找相关资料学习一下,这里就不多提了。相信你都看源码了,SpringMVC肯定是会用的。
II. ContextLoaderListener
对于SpringMVC功能实现的分析,我们首先从 web.xml 开始,在 web.xml 文件中我们首先配置的就是 ContextLoaderListener,那么它所提供的功能有哪些又是如何实现的呢?
<listener>
   <listener-class>org.springframework.web.context.ContextLoaderListener</listener-class>
</listener>
当使用编程方式的时候我们可以直接将Spring配置文件路径作为参数传入Spring容器中,如下:
ApplicationContext context = new ClassPathXmlApplicationContext(“applicationContext.xml”);
但是我们在第一部分测试示例中,包括日常开发,并没有去将配置文件的路径参数显示的传递给容器。实际上是靠在 web.xml 配置 <context-param> 标签来进行设置路径的,那么可以推测Spring一定能够获得这个配置参数,去指定路径加载配置文件。
<!--Spring配置文件-->
<context-param>
   <param-name>contextConfigLocation</param-name>
   <param-value>classpath:spring-config.xml</param-value>
</context-param>
没错,做到这件事情的正是 org.springframework.web.context.ContextLoaderListener 监听器。ContextLoaderListener 的作用就是启动 Web 容器时,自动装配 ApplicationContext 的配置信息。因为 ContextLoaderListener 实现了 ServletContextListener 这个接口,在 web.xml 中配置了这个监听器,启动 Web 容器时,就会默认执行它实现的方法,使用 ServletContextListener 接口,开发者能够在为客户端请求提供服务之前向ServletContext中添加任意的对象。这个对象在ServletContext启动的时候被初始化,然后在ServletContext整个运行期间都是可见的。
每一个Web应用都有一个 ServletContext 与之相关联。``ServletContext对象在应用启动时被创建,在应用关闭的时候被销毁。ServletContext` 在全局范围内有效,类似于Web应用中的一个全局变量。
使用ServletContextListener
ContextLoaderListener 实现了 ServletContextListener 这个接口,我们具体看一下 ContextLoaderListener 的类继承结构。
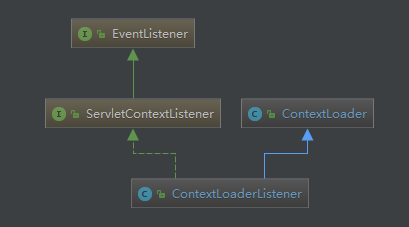
ServletContextListener 并不是Spring中的接口,而是 javax.servlet 包下的。它包含两个接口,分别在 Web 应用启动时执行和 ServletContext 将要关闭时执行。
public interface ServletContextListener extends EventListener {

    /**
     ** Notification that the web application initialization process is starting.
     * All ServletContextListeners are notified of context initialization before
     * any filter or servlet in the web application is initialized.
     * The default implementation is a NO-OP.
     * @param sce Information about the ServletContext that was initialized
     */
    public default void contextInitialized(ServletContextEvent sce) {
    }

    /**
     ** Notification that the servlet context is about to be shut down. All
     * servlets and filters have been destroy()ed before any
     * ServletContextListeners are notified of context destruction.
     * The default implementation is a NO-OP.
     * @param sce Information about the ServletContext that was destroyed
     */
    public default void contextDestroyed(ServletContextEvent sce) {
    }
}
而Spring通过实现 ServletContextListener 接口,核心目的便是系统启动时初始化 WebApplicationContext 实例并存放至 ServletContext 中。
正式分析Spring中的代码前我们同样还是首先具体了解 ServletContextListener 的使用。
① 创建自定义ServletContextListener
首先创建 ServletContextListener 实现类,目标是在系统启动时添加自定义的属性,以便于在全局范围内可以随时调用。系统启动的时候会调用 ServletContextListener 实现类的 contextInitialized() 方法,所以需要在这个方法中实现我们的初始化逻辑。
public class MyContextListener implements ServletContextListener {

   private ServletContext servletContext;

   // 该方法在ServletContext启动之后被调用,并准备好处理客户端请求
   @Override
   public void contextInitialized(ServletContextEvent sce) {
      servletContext = sce.getServletContext();
      servletContext.setAttribute("name", "=========wgp========");
      System.out.println("web application is starting...");
   }

   // 这个方法在ServletContext将要关闭的时候调用
   @Override
   public void contextDestroyed(ServletContextEvent sce) {
      System.out.println("servlet context is going to shut down...");
      System.out.println(servletContext.getAttribute("name"));
   }
}
② 注册监听器
在 web.xml 文件中需要注册自定义的监听器。
<listener>
   <listener-class>guo.ping.mvctest.context.MyContextListener</listener-class>
</listener>
③ 测试结果
启动项目可以看到 contextInitialized() 方法的执行。

当停止项目时,同样可以看到 contextDestroyed() 方法的执行,同时发现在 contextInitialized() 方法中设置给 ServletContext 的属性成功了。

Spring中的ContextLoaderListener
分析了 ServletContextListener 的使用方式后再来分析Spring中的 ContextLoaderListener 的实现就容易理解的多,虽然 ContextLoaderListener 实现的逻辑要复杂的多,但是大致的套路还是万变不离其宗。
查看 ContextLoaderListener 实现 ServletContextListener 接口的方法内容。可以看到,初始化主要就是为了初始化一个Spring IOC容器。
/**
 * Initialize the root web application context.
 * 该方法在ServletContext启动之后被调用,并准备好处理客户端请求
 */
@Override
public void contextInitialized(ServletContextEvent event) {
   // 初始化WebApplicationContext
   initWebApplicationContext(event.getServletContext());
}


/**
 * Close the root web application context.
 * 这个方法在ServletContext将要关闭的时候调用
 */
@Override
public void contextDestroyed(ServletContextEvent event) {
   closeWebApplicationContext(event.getServletContext());
   ContextCleanupListener.cleanupAttributes(event.getServletContext());
}
这里涉及了一个常用类 WebApplicationContext:在Web应用中,我们会用到 WebApplicationContext,WebApplicationContext 继承自 ApplicationContext,在 ApplicationContext 的基础上又追加了一些特定于 Web 的操作及属性,非常类似于我们通过编程方式使用Spring时使用的 ClassPathXmlApplicationContext 类提供的功能。我们查看一下 XmWebApplicationContext 的类继承结构,可以发现它和 ClassPathXmlApplicationContext 基本变化不会太大。

我们正式进入Spring的 ContextLoaderListener 中的 contextInitialized() 方法,内部调用了 initWebApplicationContext(event.getServletContext()) 方法初始化 WebApplicationContext 容器。
/**
 * 通过ServletContext对象初始化Spring的WebApplicationContext(父容器)
 * 该方法在ServletContext启动之后被调用,并准备好处理客户端请求
 * Initialize Spring's web application context for the given servlet context,
 * using the application context provided at construction time, or creating a new one
 * according to the "{@link #CONTEXT_CLASS_PARAM contextClass}" and
 * "{@link #CONFIG_LOCATION_PARAM contextConfigLocation}" context-params.
 * @param servletContext current servlet context
 * @return the new WebApplicationContext
 * @see #ContextLoader(WebApplicationContext)
 * @see #CONTEXT_CLASS_PARAM
 * @see #CONFIG_LOCATION_PARAM
 */
public WebApplicationContext initWebApplicationContext(ServletContext servletContext) {
    // web.xml中存在多次ContextLoader定义就会抛出异常
    // WebApplicationContext.ROOT_WEB_APPLICATION_CONTEXT_ATTRIBUTE=org.springframework.web.context.WebApplicationContext.ROOT
    if (servletContext.getAttribute(WebApplicationContext.ROOT_WEB_APPLICATION_CONTEXT_ATTRIBUTE) != null) {
        throw new IllegalStateException(
            "Cannot initialize context because there is already a root application context present - " +
            "check whether you have multiple ContextLoader* definitions in your web.xml!");
    }

    servletContext.log("Initializing Spring root WebApplicationContext");
    Log logger = LogFactory.getLog(ContextLoader.class);
    if (logger.isInfoEnabled()) {
        logger.info("Root WebApplicationContext: initialization started");
    }
    long startTime = System.currentTimeMillis();

    try {
        // Store context in local instance variable, to guarantee that it is available on ServletContext shutdown.
        if (this.context == null) {
            // 创建Spring的WebApplicationContext
            this.context = createWebApplicationContext(servletContext);
        }
        if (this.context instanceof ConfigurableWebApplicationContext) {
            ConfigurableWebApplicationContext cwac = (ConfigurableWebApplicationContext) this.context;
            if (!cwac.isActive()) {
                // The context has not yet been refreshed -> provide services such as
                // setting the parent context, setting the application context id, etc
                if (cwac.getParent() == null) {
                    // The context instance was injected without an explicit parent -> determine parent for root web application context, if any.
                    // 看看是否有父容器,有的话设置给当前创建的容器,DispatcherServlet没有重写方法,直接返回null
                    ApplicationContext parent = loadParentContext(servletContext);
                    cwac.setParent(parent);
                }
                // 设置cwac相关属性并调用refresh
                configureAndRefreshWebApplicationContext(cwac, servletContext);
            }
        }
        // 记录在servletContext中
        servletContext.setAttribute(WebApplicationContext.ROOT_WEB_APPLICATION_CONTEXT_ATTRIBUTE, this.context);

        ClassLoader ccl = Thread.currentThread().getContextClassLoader();
        if (ccl == ContextLoader.class.getClassLoader()) {
            currentContext = this.context;
        }
        else if (ccl != null) {
            // 映射当前的类加载器与创建的实例到全局变量currentContextPerThread中
            currentContextPerThread.put(ccl, this.context);
        }

        if (logger.isInfoEnabled()) {
            long elapsedTime = System.currentTimeMillis() - startTime;
            logger.info("Root WebApplicationContext: initialization completed in " + elapsedTime + " ms");
        }

        return this.context;
    }
    catch (RuntimeException | Error ex) {
        logger.error("Context initialization failed", ex);
        servletContext.setAttribute(WebApplicationContext.ROOT_WEB_APPLICATION_CONTEXT_ATTRIBUTE, ex);
        throw ex;
    }
}
initWebApplicationContext(event.getServletContext()) 方法主要是体现了创建 WebApplicationContext 实例的一个功能架构,从函数中我们看到了初始化的大致步骤。
① WebApplicationContext存在性验证
在配置中只允许声明一次 ServletContextListener,多次声明会扰乱Spring的执行逻辑,所以这里首先做的就是对此验证。在Spring中如果创建 WebApplicationContext 实例会记录在 ServletContext 中以方便全局调用,而使用的 key 就是 WebApplicationContext.ROOT_WEB_APPLICATION_CONTEXT_ATTRIBUTE,所以验证的方式就是查看 ServletContext 实例中是否有对应 key 的属性。
if (servletContext.getAttribute(WebApplicationContext.ROOT_WEB_APPLICATION_CONTEXT_ATTRIBUTE) != null) {
    throw new IllegalStateException(
        "Cannot initialize context because there is already a root application context present - " +
        "check whether you have multiple ContextLoader* definitions in your web.xml!");
}
② 创建WebApplicationContext实例
Spring通过 createWebApplicationContext(servletContext) 方法进行初始化一个 WebApplicationContext 实例。
/**
 * 创建WebApplicationContext
 * Instantiate the root WebApplicationContext for this loader, either the
 * default context class or a custom context class if specified.
 * <p>This implementation expects custom contexts to implement the
 * {@link ConfigurableWebApplicationContext} interface.
 * Can be overridden in subclasses.
 * <p>In addition, {@link #customizeContext} gets called prior to refreshing the
 * context, allowing subclasses to perform custom modifications to the context.
 * @param sc current servlet context
 * @return the root WebApplicationContext
 * @see ConfigurableWebApplicationContext
 */
protected WebApplicationContext createWebApplicationContext(ServletContext sc) {
   // 判断WebApplicationContext具体要创建的子类类型
   Class<?> contextClass = determineContextClass(sc);
   if (!ConfigurableWebApplicationContext.class.isAssignableFrom(contextClass)) {
      throw new ApplicationContextException("Custom context class [" + contextClass.getName() +
            "] is not of type [" + ConfigurableWebApplicationContext.class.getName() + "]");
   }
   return (ConfigurableWebApplicationContext) BeanUtils.instantiateClass(contextClass);
}
创建 WebApplicationContext 实例需要两个步骤,首先需要确定具体的实现类类型,毕竟 WebApplicationContext 仅仅只是一个上层接口,之后通过反射创建一个实例即可。
所以Spring委托 determineContextClass(sc) 方法去判断 WebApplicationContext 具体要创建的子类类型。
/**
 * 判断决定WebApplicationContext具体要创建的子类类型
 * Return the WebApplicationContext implementation class to use, either the
 * default XmlWebApplicationContext or a custom context class if specified.
 * @param servletContext current servlet context
 * @return the WebApplicationContext implementation class to use
 * @see #CONTEXT_CLASS_PARAM
 * @see org.springframework.web.context.support.XmlWebApplicationContext
 */
protected Class<?> determineContextClass(ServletContext servletContext) {
   // 获取ServletContext名称为“contextClass”的初始化参数的值
   String contextClassName = servletContext.getInitParameter(CONTEXT_CLASS_PARAM);
   // 如果web.xml中指定了WebApplicationContext具体要创建的子类类型,就用指定的,否则采用默认的
   if (contextClassName != null) {
      try {
         return ClassUtils.forName(contextClassName, ClassUtils.getDefaultClassLoader());
      }
      catch (ClassNotFoundException ex) {
         throw new ApplicationContextException(
               "Failed to load custom context class [" + contextClassName + "]", ex);
      }
   }
   else {
      // 默认是org.springframework.web.context.support.XmlWebApplicationContext类型
      contextClassName = defaultStrategies.getProperty(WebApplicationContext.class.getName());
      try {
         return ClassUtils.forName(contextClassName, ContextLoader.class.getClassLoader());
      }
      catch (ClassNotFoundException ex) {
         throw new ApplicationContextException(
               "Failed to load default context class [" + contextClassName + "]", ex);
      }
   }
}
如果用户在 web.xml 中配置了具体需要创建的容器类型,那么这里就会被获取到。
<context-param>
   <param-name>contextClass</param-name>
   <param-value>具体的容器类型</param-value>
</context-param>
如果用户没有配置,则会从 defaultStrategies 获取名为 WebApplicationContext.class.getName() 的属性值,那么 defaultStrategies 什么时候存储了这个属性呢?查看 ContextLoader 类中的一段静态代码块。
private static final Properties defaultStrategies;

static {
    // Load default strategy implementations from properties file.
    // This is currently strictly internal and not meant to be customized by application developers.
    // 从ContextLoader.properties配置文件中读取默认实现类
    try {
        // DEFAULT_STRATEGIES_PATH = "ContextLoader.properties"
        ClassPathResource resource = new ClassPathResource(DEFAULT_STRATEGIES_PATH, ContextLoader.class);
        defaultStrategies = PropertiesLoaderUtils.loadProperties(resource);
    }
    catch (IOException ex) {
        throw new IllegalStateException("Could not load 'ContextLoader.properties': " + ex.getMessage());
    }
}
根据以上静态代码块的内容,我们推断在当前类 ContextLoader 同样目录下必定会存在属性文件ContextLoader.properties,查看后果然存在。

所以用户如果没有配置具体的 WebApplicationContext 要创建的子类类型,Spring默认的实现类型为 XmlWebApplicationContext。
③ 刷新
在 initWebApplicationContext() 方法中除了创建实例一句关键代码之外,还有一个方法 configureAndRefreshWebApplicationContext(cwac, servletContext),也非常重要。
研究该方法之前,我们先来看一下 WebApplicationContext 实例的 debug 内容,可以看到很多内容都是空,包括最重要的 beanFactory 容器也是空。
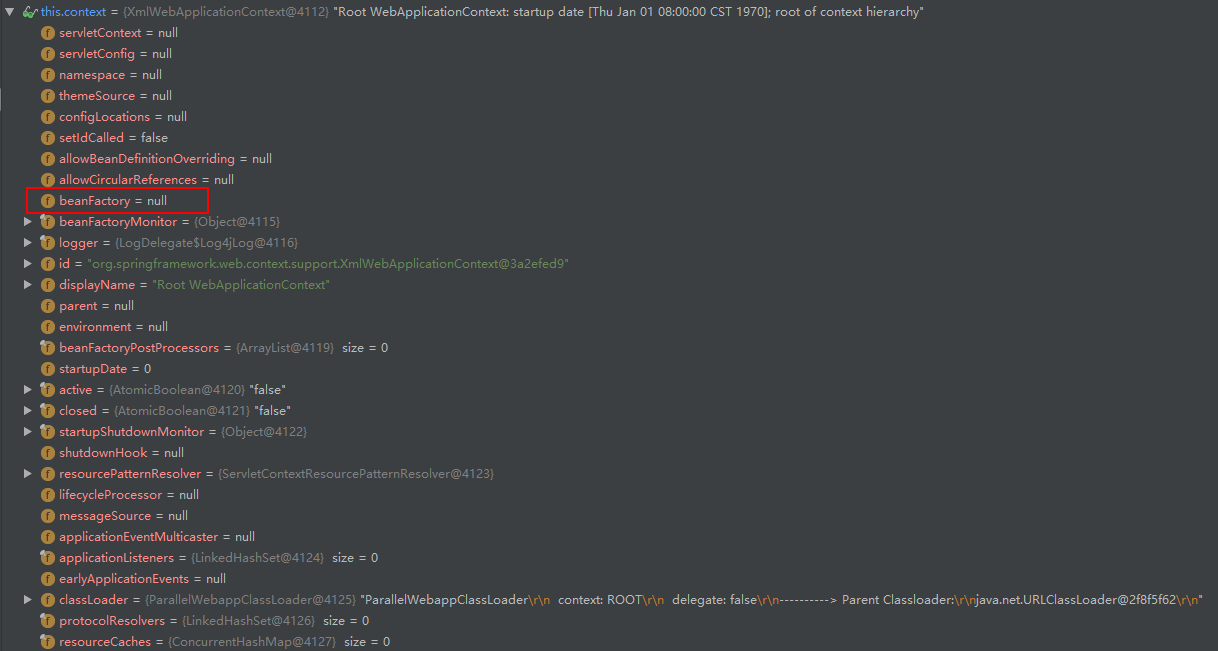
那么 configureAndRefreshWebApplicationContext(cwac, servletContext) 主要就是为了初始化 WebApplicationContext 实例的各种内容,我们具体进入方法一探究竟。
/**
 * 配置并刷新WebApplicationContext
 * @param wac
 * @param sc
 */
protected void configureAndRefreshWebApplicationContext(ConfigurableWebApplicationContext wac, ServletContext sc) {
   if (ObjectUtils.identityToString(wac).equals(wac.getId())) {
      // The application context id is still set to its original default value -> assign a more useful id based on available information
      // 替换WebApplicationContext容器的id,起一个更有意义的名字。如果ServletContext配置了则使用配置,否则默认规则起名
      String idParam = sc.getInitParameter(CONTEXT_ID_PARAM);
      if (idParam != null) {
         wac.setId(idParam);
      }
      else {
         // 生成默认id替换,WebApplicationContext全限定类名+":"+项目名
         wac.setId(ConfigurableWebApplicationContext.APPLICATION_CONTEXT_ID_PREFIX +
               ObjectUtils.getDisplayString(sc.getContextPath()));
      }
   }

   // 将ServletContext设置给Spring容器
   wac.setServletContext(sc);

   // 设置Spring容器的配置文件路径
   String configLocationParam = sc.getInitParameter(CONFIG_LOCATION_PARAM);
   if (configLocationParam != null) {
      wac.setConfigLocation(configLocationParam);
   }

   // The wac environment's #initPropertySources will be called in any case when the context
   // is refreshed; do it eagerly here to ensure servlet property sources are in place for
   // use in any post-processing or initialization that occurs below prior to #refresh
   ConfigurableEnvironment env = wac.getEnvironment();
   if (env instanceof ConfigurableWebEnvironment) {
      ((ConfigurableWebEnvironment) env).initPropertySources(sc, null);
   }

   customizeContext(sc, wac);

   // 调用Spring容器的refresh()方法,加载配置文件
   wac.refresh();
}
更新 id
从之前的截图可以看到,WebApplicationContext 实例的 id 为 org.springframework.web.context.support.XmlWebApplicationContext@3a2efed9,为了更好的区别容器,Spring对 id 进行了更名。同样,如果用户在 web.xml 中配置了 contextId 这个参数值的话,就将WebApplicationContext 实例的 id 设置为用户配置的,否则Spring采用默认的方式进行更改名字。
Spring默认的命名规则为 WebApplicationContext 的全限定类名 + “:” + 项目名。例如:org.springframework.web.context.WebApplicationContext:/mvc_test。
将ServletContext设置给容器
之前我们将容器设置在 ServletContext 的属性中,现在又将 ServletContext 注入进 WebApplicationContext 实例中,有那么一种循环依赖的感觉哈 : )
// 将ServletContext设置给Spring容器
wac.setServletContext(sc);
设置Spring容器的配置文件路径
在初始化 WebApplicationContext 实例的 beanFactory 属性之前,我们首先要从 web.xml 中获取到用户配置的Spring配置文件所在位置。
// 设置Spring容器的配置文件路径
String configLocationParam = sc.getInitParameter(CONFIG_LOCATION_PARAM);
if (configLocationParam != null) {
    wac.setConfigLocation(configLocationParam);
}
获取方式没什么好谈的,但是我们好像记得,如果用户没有配置,默认Spring会去寻找 /WEB-INF/applicationContext.xml 文件。这是在哪里体现的呢?
查看 XmlWebApplicationContext 类中的属性方法,可以看见 getDefaultConfigLocations() 方法获取到的默认配置文件路径就是 /WEB-INF/applicationContext.xml。
public class XmlWebApplicationContext extends AbstractRefreshableWebApplicationContext {

   /** Default config location for the root context. */
   public static final String DEFAULT_CONFIG_LOCATION = "/WEB-INF/applicationContext.xml";

   /** Default prefix for building a config location for a namespace. */
   public static final String DEFAULT_CONFIG_LOCATION_PREFIX = "/WEB-INF/";

   /** Default suffix for building a config location for a namespace. */
   public static final String DEFAULT_CONFIG_LOCATION_SUFFIX = ".xml";

   ······

   /**
    * The default location for the root context is "/WEB-INF/applicationContext.xml",
    * and "/WEB-INF/test-servlet.xml" for a context with the namespace "test-servlet"
    * (like for a DispatcherServlet instance with the servlet-name "test").
    */
   @Override
   protected String[] getDefaultConfigLocations() {
      if (getNamespace() != null) {
         return new String[] {DEFAULT_CONFIG_LOCATION_PREFIX + getNamespace() + DEFAULT_CONFIG_LOCATION_SUFFIX};
      }
      else {
         return new String[] {DEFAULT_CONFIG_LOCATION};
      }
   }
}
刷新容器
当所有的准备要素都准备好,就可以刷新容器了,调用 refresh() 方法就是我们之前分析的 ApplicationContext 中的 refresh() 方法。
// 调用Spring容器的refresh()方法,加载配置文件
wac.refresh();
我们再看一眼当执行完 refresh() 方法后,WebApplicationContext 实例的内容。
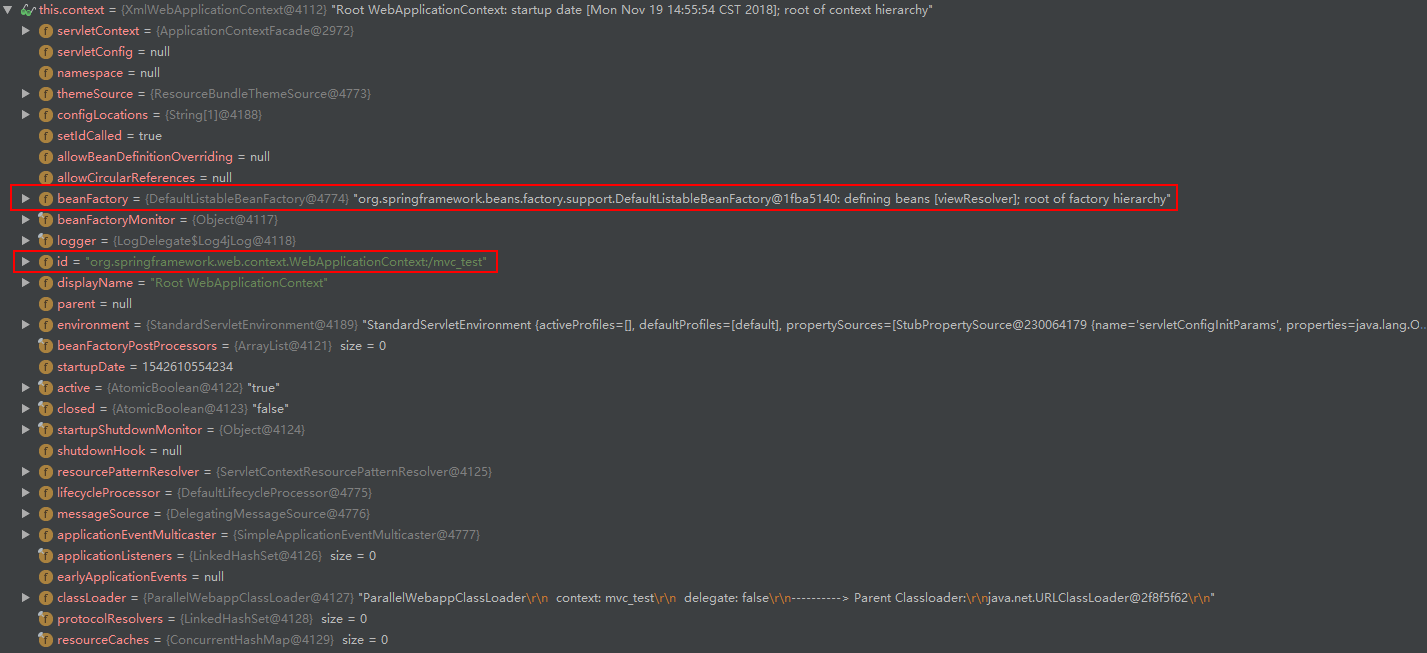
④ 设置到ServletContext
创建完实例后,将其设置到 ServletContext 的 WebApplicationContext.ROOT_WEB_APPLICATION_CONTEXT_ATTRIBUTE 属性中,之前我们就是依据这个来进行判断是否已经存在实例的。
// 记录在servletContext中
servletContext.setAttribute(WebApplicationContext.ROOT_WEB_APPLICATION_CONTEXT_ATTRIBUTE, this.context);
⑤ 将当前的类加载器与实例添加到全局变量
// 映射当前的类加载器与创建的实例到全局变量currentContextPerThread中
currentContextPerThread.put(ccl, this.context);
这样,创建Spring的 WebApplicationContext 就完成了,也就是执行完 initWebApplicationContext() 方法。
III. DispatcherServlet
上一部分中Spring已经实例化了一个 IOC 容器,容器中已经预先初始化完毕一些 bean。

可以看到,已经包含了我们在 spring-config.xml 文件中配置的试图解析器 bean。
Servlet 是一个 Java 编写的程序,此程序是基于 HTTP 协议的,在服务器端运行的 (如Tomcat),是按照 Servlet 规范编写的一个 Java 类。主要是处理客户端的请求并将其结果发送到客户端。Servlet 的生命周期是由 Servlet 的容器来控制的,它可以分为3个阶段:初始化、运行和销毁。
- 初始化。Servlet 容器加载 Servlet 类,把 Servlet 类的 .class 文件中的数据读到内存中。Servlet 容器创建一个
ServletConfig对象。ServletConfig对象包含了 Servlet 的初始化配置信息。Servlet 容器创建一个 Servlet 对象。Servlet 容器调用 Servlet 对象的init()方法进行初始化。 - 运行。当 Servlet 容器接收到一个请求时,Servlet 容器会针对这个请求创建 servletRequest 和 servletResponse对象,然后调用
service()方法。并把这两个参数传递给service()方法。service()方法通过 servletRequest 对象获得请求的信息,并处理该请求。再通过 servletResponse 对象生成这个请求的响应结果。最后销毁 servletRequest 和 servletResponse 对象。我们不管这个请求是 post 提交的还是 get 提交的,最终这个请求都会由service()方法来处理。 - 销毁阶段。当Web应用被终止时,Servlet 容器会先调用 Servlet 对象的
destrory()方法,然后再销毁 servlet 对象,同时也会销毁与 servlet 对象相关联的 servletConfig 对象。我们可以在destrory()方法的实现中,释放 servlet 所占用的资源,如关闭数据库连接,关闭文件输入输出流等。
Servlet 的框架是由两个 Java 包组成:javax.servlet 和 javax.servlet.http。在 javax.servlet 包中定义了所有的 servlet 类都必须实现或扩展的通用接口和类,在 javax.servlet.http 包中定义了采用 HTTP 通信协议的 HttpServlet 类。
Servlet 被设计成请求驱动,Servlet 的请求可能包含多个数据项,当 Web 容器接收到某个 Servlet 请求时,Servlet 把请求封装成一个 HttpServletRequest 对象,然后把对象传给 Servlet 的对应的服务方法。HTTP 的请求方式包括 delete、get、options、post、put 和 trace,在 HttpServlet 类中分别提供了相应的服务方法,它们是 doDelete()、doGet()、doOptions()、doPost()、doPut() 和 doTrace()。
关于 Servlet 的相关使用,可以参考 Servlet 教程。
初始化DispatcherServlet
web.xml 文件中我们仅仅配置了一个 Servlet 就是 DispatcherServlet。所以 Servlet 容器控制着 DispatcherServlet 的生命周期,我们从初始化阶段开始展开分析。
<servlet>
   <servlet-name>mvc-test</servlet-name>
   <servlet-class>org.springframework.web.servlet.DispatcherServlet</servlet-class>
   <!--SpringMVC配置文件-->
   <init-param>
      <param-name>contextConfigLocation</param-name>
      <param-value>classpath:springmvc-config.xml</param-value>
   </init-param>
   <load-on-startup>1</load-on-startup>
</servlet>
正式分析 DispatcherServlet 之前我们先看一下它的类继承结构。
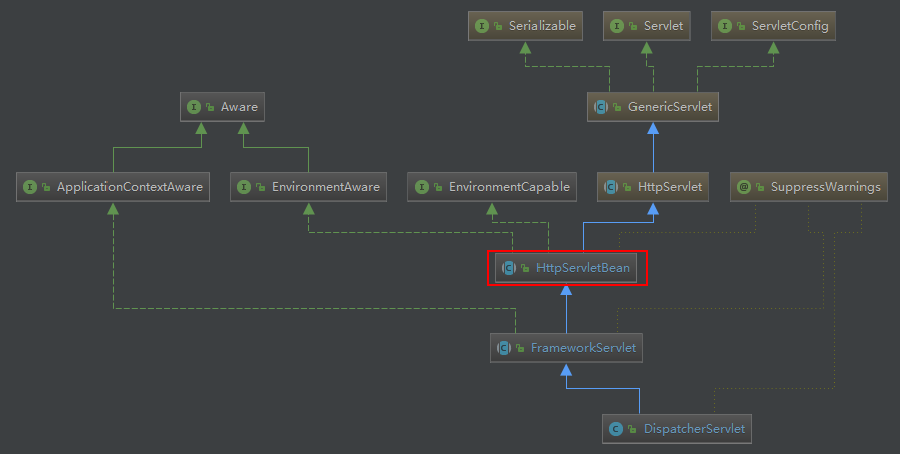
DispatcherServlet 继承自 FrameworkServlet,FrameworkServlet 又继承自 HttpServletBean。我们查看 DispatcherServlet 的初始化方法 init() 方法,其实现是在 HttpServletBean 中的。
/**
 * 重写了Servlet的init()方法,DispatcherServlet的init()方法就是这个,DispatcherServlet的生命周期开始
 * Map config parameters onto bean properties of this servlet, and
 * invoke subclass initialization.
 * @throws ServletException if bean properties are invalid (or required
 * properties are missing), or if subclass initialization fails.
 */
@Override
public final void init() throws ServletException {
   if (logger.isTraceEnabled()) {
      logger.trace("Initializing servlet '" + getServletName() + "'");
   }

   // Set bean properties from init parameters.
   // 解析web.xml中的init-param并封装至PropertyValues中,其中就包含了SpringMVC的配置文件路径
   PropertyValues pvs = new ServletConfigPropertyValues(getServletConfig(), this.requiredProperties);
   if (!pvs.isEmpty()) {
      try {
         // 将DispatchServlet类实例(this)转化为一个BeanWrapper,从而能够以Spring的方式来对init-param的值进行注入
         BeanWrapper bw = PropertyAccessorFactory.forBeanPropertyAccess(this);
         ResourceLoader resourceLoader = new ServletContextResourceLoader(getServletContext());
         // 注册自定义属性编辑器,一旦遇到Resource类型的属性将会使用ResourceEditor进行解析
         bw.registerCustomEditor(Resource.class, new ResourceEditor(resourceLoader, getEnvironment()));
         // 空实现,留给子类覆盖
         initBeanWrapper(bw);
         // 属性注入
         bw.setPropertyValues(pvs, true);
      }
      catch (BeansException ex) {
         if (logger.isErrorEnabled()) {
            logger.error("Failed to set bean properties on servlet '" + getServletName() + "'", ex);
         }
         throw ex;
      }
   }

   // 留给子类扩展,父类FrameworkServlet重写了
   initServletBean();

   if (logger.isTraceEnabled()) {
      logger.trace("Servlet '" + getServletName() + "' configured successfully");
   }
}
DipatcherServlet 的初始化过程主要是通过将当前的 servlet 类型实例转换为 BeanWrapper 类型实例,以便使用Spring中提供的注入功能进行对应属性的注入。这些属性如 contextAttribute、contextClass、nameSpace、contextConfigLocation 等,都可以在 web.xml 文件中以初始化参数的方式配置在 servlet 的声明中,Spring会保证这些参数被注入到对应的值中。
属性注入主要包含以下几个步骤。
① 封装及验证初始化参数
ServletConfigPropertyValues 除了封装属性外还有对属性验证的功能,传入的参数主要是 ServletConfig 实例以及需要验证存在与否的必须的属性。用户可以通过对 requiredProperties 参数的初始化来强制验证某些属性的必要性,这样,在属性封装的过程中,一旦检测到 requiredProperties 中的属性没有指定初始值,就会抛出异常。
/**
 * ServletConfigPropertyValues除了封装属性外还有对属性验证的功能
 * PropertyValues implementation created from ServletConfig init parameters.
 */
private static class ServletConfigPropertyValues extends MutablePropertyValues {

   /**
    * 对web.xml中的初始化参数进行封装
    * Create new ServletConfigPropertyValues.
    * @param config the ServletConfig we'll use to take PropertyValues from
    * @param requiredProperties set of property names we need, where
    * we can't accept default values
    * @throws ServletException if any required properties are missing
    */
    public ServletConfigPropertyValues(ServletConfig config, Set<String> requiredProperties)
        throws ServletException {

        Set<String> missingProps = (!CollectionUtils.isEmpty(requiredProperties) ?
                                    new HashSet<>(requiredProperties) : null);

        // 获取初始化参数名称
        Enumeration<String> paramNames = config.getInitParameterNames();
        while (paramNames.hasMoreElements()) {
            String property = paramNames.nextElement();
            Object value = config.getInitParameter(property);
            addPropertyValue(new PropertyValue(property, value));
            if (missingProps != null) {
                missingProps.remove(property);
            }
        }

        // 用户可以通过对requiredProperties参数的初始化来强制验证某些属性的必要性,这样,
        // 在属性封装的过程中,一旦检测到requiredProperties中的属性没有指定初始值,就会抛出异常。
        if (!CollectionUtils.isEmpty(missingProps)) {
            throw new ServletException(
                "Initialization from ServletConfig for servlet '" + config.getServletName() +
                "' failed; the following required properties were missing: " +
                StringUtils.collectionToDelimitedString(missingProps, ", "));
        }
    }
}
从代码中得知,封装属性主要是对初始化的参数进行封装,也就是 servlet 中配置的 <init-param> 中配置的封装。这些初始化参数被 servlet 容器已经封装在了 ServletConfig 实例中,如下图所示显示了Spring MVC的配置文件路径参数。
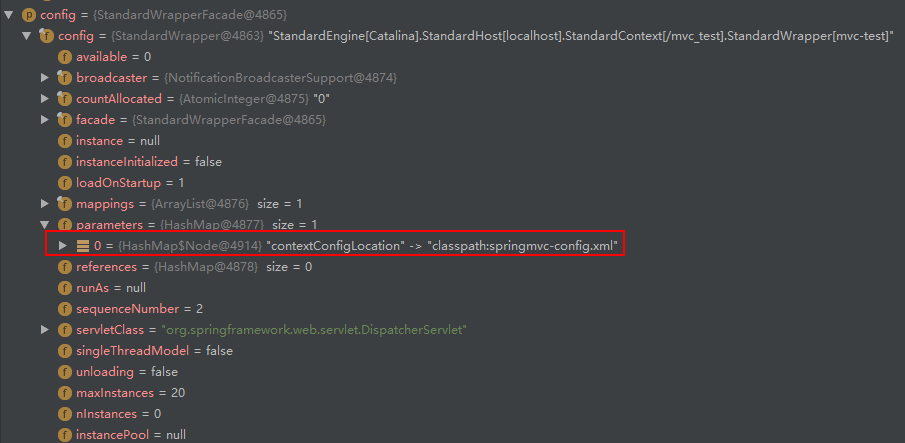
通过从 ServletConfig 实例中获取出属性值并将其重新封装成 PropertyValue。

② 用BeanWrapper包裹DispatcherServlet实例
PropertyAccessorFactory.forBeanPropertyAccess() 是Spring中提供的工具方法,主要用于将指定实例转化为Spring中可以处理的 BeanWrapper 类型的实例,方便将上一步包含 init-param 参数信息的 PropertyValue 注入进去。
// 将DispatchServlet类实例(this)转化为一个BeanWrapper,从而能够以Spring的方式来对init-param的值进行注入
BeanWrapper bw = PropertyAccessorFactory.forBeanPropertyAccess(this);

/**
 * Obtain a BeanWrapper for the given target object,
 * accessing properties in JavaBeans style.
 * @param target the target object to wrap
 * @return the property accessor
 * @see BeanWrapperImpl
 */
public static BeanWrapper forBeanPropertyAccess(Object target) {
    return new BeanWrapperImpl(target);
}
③ 注册解析Resource类型的属性编辑器
ResourceLoader resourceLoader = new ServletContextResourceLoader(getServletContext());
// 注册自定义属性编辑器,一旦遇到Resource类型的属性将会使用ResourceEditor进行解析
bw.registerCustomEditor(Resource.class, new ResourceEditor(resourceLoader, getEnvironment()));
关于自定义属性编辑器,我们在分析 ApplicationContext 已经进行相关介绍,可以自行回顾一下。注册 org.springframework.core.io.ResourceEditor 自定义属性编辑器后,凡是遇到 org.springframework.core.io.Resource 类型的属性,将会利用 ResourceEditor 进行解析赋值。
我们查看 ResourceEditor 的 setAsText() 方法。
@Override
public void setAsText(String text) {
    if (StringUtils.hasText(text)) {
        String locationToUse = resolvePath(text).trim();
        setValue(this.resourceLoader.getResource(locationToUse));
    }
    else {
        setValue(null);
    }
}

@Override
public Resource getResource(String location) {
    Assert.notNull(location, "Location must not be null");

    for (ProtocolResolver protocolResolver : this.protocolResolvers) {
        Resource resource = protocolResolver.resolve(location, this);
        if (resource != null) {
            return resource;
        }
    }

    if (location.startsWith("/")) {
        return getResourceByPath(location);
    }
    else if (location.startsWith(CLASSPATH_URL_PREFIX)) {
        return new ClassPathResource(location.substring(CLASSPATH_URL_PREFIX.length()), getClassLoader());
    }
    else {
        try {
            // Try to parse the location as a URL...
            URL url = new URL(location);
            return (ResourceUtils.isFileURL(url) ? new FileUrlResource(url) : new UrlResource(url));
        }
        catch (MalformedURLException ex) {
            // No URL -> resolve as resource path.
            return getResourceByPath(location);
        }
    }
}
其实就是能够将String类型的资源路径,读取返回Spring中对资源统一的封装类型 Resource。
④ 属性注入
BeanWrapper 为Spring中的方法,支持Spring的自动注入。其实我们最常用的属性注入无非是 contextAttribute、contextClass、nameSpace、contextConfigLocation 等属性。
// 属性注入
bw.setPropertyValues(pvs, true);
⑤ 初始化servletBean
HttpServletBean 中仅仅定义了该方法的模板,而其子类 FrameworkServlet 重写了该方法。
/**
 * 覆盖了HttpServletBean的方法
 * Overridden method of {@link HttpServletBean}, invoked after any bean properties
 * have been set. Creates this servlet's WebApplicationContext.
 */
@Override
protected final void initServletBean() throws ServletException {
    getServletContext().log("Initializing Spring FrameworkServlet '" + getServletName() + "'");
    if (logger.isInfoEnabled()) {
        logger.info("FrameworkServlet '" + getServletName() + "': initialization started");
    }
    long startTime = System.currentTimeMillis();

    try {
        // 创建或刷新WebApplicationContext实例(子容器)并对servlet功能所使用的变量进行初始化
        this.webApplicationContext = initWebApplicationContext();
        // 设计为子类重写
        initFrameworkServlet();
    }
    catch (ServletException | RuntimeException ex) {
        logger.error("Context initialization failed", ex);
        throw ex;
    }

    if (logger.isDebugEnabled()) {
        String value = this.enableLoggingRequestDetails ?
            "shown which may lead to unsafe logging of potentially sensitive data" :
        "masked to prevent unsafe logging of potentially sensitive data";
        logger.debug("enableLoggingRequestDetails='" + this.enableLoggingRequestDetails +
                     "': request parameters and headers will be " + value);
    }

    if (logger.isInfoEnabled()) {
        long elapsedTime = System.currentTimeMillis() - startTime;
        logger.info("FrameworkServlet '" + getServletName() + "': initialization completed in " +
                    elapsedTime + " ms");
    }
}
除了一个模板方法和大量的日志代码,仅仅只有一个核心方法 initWebApplicationContext()。这个方法非常的眼熟,我们在上一部分就是利用该同名方法进行初始化 WebApplicationContext 容器实例的,只不过之前的是在 ContextLoader 类中,现在是在 FrameworkServlet 类中。
其实这里的 initWebApplicationContext() 也是初始化一个Spring IOC容器,只是这个容器的配置文件加载的Spring MVC配置文件,所以称为Spring MVC容器,和之前的Spring容器一起组成了常说的Spring父子容器的概念。为了凸显创建Spring MVC子容器的重要性,我们单独开辟一小节进行讲解。
初始化SpringMVC子容器
initWebApplicationContext() 函数的主要工作就是创建或刷新 WebApplicationContext 实例并对 servlet 功能所使用的变量进行初始化。
/**
 * 创建或刷新WebApplicationContext实例(子容器)并对servlet功能所使用的变量进行初始化
 * Initialize and publish the WebApplicationContext for this servlet.
 * <p>Delegates to {@link #createWebApplicationContext} for actual creation
 * of the context. Can be overridden in subclasses.
 * @return the WebApplicationContext instance
 * @see #FrameworkServlet(WebApplicationContext)
 * @see #setContextClass
 * @see #setContextConfigLocation
 */
protected WebApplicationContext initWebApplicationContext() {
   // 从ServletContext中获取父容器WebApplicationContext,如果没有指定<context-param>,则为空
   WebApplicationContext rootContext =
         WebApplicationContextUtils.getWebApplicationContext(getServletContext());

   // 创建SpringMVC容器——子容器
   WebApplicationContext wac = null;

   // 通过判断this.webApplicationContext是否为null来知道this.webApplicationContext是否是通过构造函数创建的,也就是一启动就创建了
   if (this.webApplicationContext != null) {
      // A context instance was injected at construction time -> use it
      // this.webApplicationContext实例在构造函数中被注入
      wac = this.webApplicationContext;
      if (wac instanceof ConfigurableWebApplicationContext) {
         ConfigurableWebApplicationContext cwac = (ConfigurableWebApplicationContext) wac;
         // 如果SpringMVC容器还没有刷新,那么就进行刷新父容器的上下文,设置id等操作
         if (!cwac.isActive()) {
            if (cwac.getParent() == null) {
               // The context instance was injected without an explicit parent -> set
               // the root application context (if any; may be null) as the parent
               // 设置SpringMVC容器的父容器
               cwac.setParent(rootContext);
            }
            // 2. 刷新上下文环境
            configureAndRefreshWebApplicationContext(cwac);
         }
      }
   }
   if (wac == null) {
      // No context instance was injected at construction time -> see if one
      // has been registered in the servlet context. If one exists, it is assumed
      // that the parent context (if any) has already been set and that the
      // user has performed any initialization such as setting the context id
      // 没有被初始化,则查找是否有存在的容器-->根据contextAttribute属性加载WebApplicationContext
      wac = findWebApplicationContext();
   }
   if (wac == null) {
      // 仍然没有的话DispatcherServlet就自己创建一个子容器
      wac = createWebApplicationContext(rootContext);
   }

   if (!this.refreshEventReceived) {
      // Either the context is not a ConfigurableApplicationContext with refresh
      // support or the context injected at construction time had already been
      // refreshed -> trigger initial onRefresh manually here.
      // 3. 刷新Spring在Web功能实现中所必须使用的全局变量
      onRefresh(wac);
   }

   if (this.publishContext) {
      // 将子容器当作属性设置给ServletContext,属性名为org.springframework.web.servlet.FrameworkServlet.CONTEXT.+servlet name
      String attrName = getServletContextAttributeName();
      getServletContext().setAttribute(attrName, wac);
      if (logger.isTraceEnabled()) {
         logger.trace("Published WebApplicationContext of servlet '" + getServletName() +
               "' as ServletContext attribute [" + attrName + "]");
      }
   }

   return wac;
}
初始化的逻辑主要分为以下几步:
① 创建WebApplicationContext实例
当然这里的 WebApplicationContext 实例是指子容器实例。而父容器实例就是这里的 rootContext,当然 rootContext 很有可能为空,因为用户很可能没有在 web.xml 中配置父容器的创建,所以只存在Spring MVC的容器。
那么会涉及到一个问题,子容器是在 DispatcherServlet 中进行初始化的,也就是我们正在分析的过程。而 DispatcherServlet 是由 Web 容器初始化加载的,同时 IOC 容器的初始化比较耗时,所以我们最好让 Web 容器一启动就初始化 DispatcherServlet,而不是等到用户请求了 DispatcherServlet 才开始初始化,然后 DispatcherServlet 还得等待 IOC 容器才能处理请求。索性这一需求可以直接在 web.xml 中直接配置。通过 <load-on-startup> 标签配置。
- load-on-startup 元素标记容器是否应该在web应用程序启动的时候就加载这个servlet,实例化并调用其init()方法;
- 值必须是一个整数,表示 servlet 被加载的先后顺序;如果值为负数或者没有设置,则容器会当 servlet 被请求时再加载;如果值为正整数或者0时,表示容器在应用启动时就加载并初始化这个 servlet ,值越小, servlet 的优先级越高,就越先被加载。值相同时,容器就会自己选择顺序来加载。
所以我们在示例程序中为 DispatcherServlet 配置了这一元素属性,让其一开始就初始化。
说完题外话,我们回到正文,继续说 WebApplicationContext 实例的初始化。当进入 initWebApplicationContext() 函数后通过判断 this.webApplicationContext != null 后,便可以确定 this.webApplicationContext 是否是通过构造函数来初始化的。Spring提供了相关构造函数用于注入一个 WebApplicationContext 实例。
public FrameworkServlet(WebApplicationContext webApplicationContext) {
   this.webApplicationContext = webApplicationContext;
}
如果上一步没有通过构造函数注入进行初始化,则尝试通过获取 contextAttribute 参数查找是否有存在的实例。通过在 web.xml 文件中配置的 servlet 参数 contextAttribute 来查找 ServletContext 中对应的属性,默认是名称为 WebApplicationContext.class.getName() + “.ROOT”。
/**
 * 通过在web.xml文件中配置的servlet参数contextAttribute来查找ServletContext中对应的属性
 * Retrieve a {@code WebApplicationContext} from the {@code ServletContext}
 * attribute with the {@link #setContextAttribute configured name}. The
 * {@code WebApplicationContext} must have already been loaded and stored in the
 * {@code ServletContext} before this servlet gets initialized (or invoked).
 * <p>Subclasses may override this method to provide a different
 * {@code WebApplicationContext} retrieval strategy.
 * @return the WebApplicationContext for this servlet, or {@code null} if not found
 * @see #getContextAttribute()
 */
@Nullable
protected WebApplicationContext findWebApplicationContext() {
    String attrName = getContextAttribute();
    if (attrName == null) {
        return null;
    }
    WebApplicationContext wac =
        WebApplicationContextUtils.getWebApplicationContext(getServletContext(), attrName);
    if (wac == null) {
        throw new IllegalStateException("No WebApplicationContext found: initializer not registered?");
    }
    return wac;
}

/**
 * Return the name of the ServletContext attribute which should be used to retrieve the
 * {@link WebApplicationContext} that this servlet is supposed to use.
 */
@Nullable
public String getContextAttribute() {
    return this.contextAttribute;
}

/**
 * Find a custom {@code WebApplicationContext} for this web app.
 * @param sc the ServletContext to find the web application context for
 * @param attrName the name of the ServletContext attribute to look for
 * @return the desired WebApplicationContext for this web app, or {@code null} if none
 */
@Nullable
public static WebApplicationContext getWebApplicationContext(ServletContext sc, String attrName) {
    Assert.notNull(sc, "ServletContext must not be null");
    Object attr = sc.getAttribute(attrName);
    if (attr == null) {
        return null;
    }
    if (attr instanceof RuntimeException) {
        throw (RuntimeException) attr;
    }
    if (attr instanceof Error) {
        throw (Error) attr;
    }
    if (attr instanceof Exception) {
        throw new IllegalStateException((Exception) attr);
    }
    if (!(attr instanceof WebApplicationContext)) {
        throw new IllegalStateException("Context attribute is not of type WebApplicationContext: " + attr);
    }
    return (WebApplicationContext) attr;
}
如果仍然没有存在的 IOC 容器,那么 DispatcherServlet 就自己创建一个子容器。调用 createWebApplicationContext() 方法。
/**
 * 创建一个子容器
 * Instantiate the WebApplicationContext for this servlet, either a default
 * {@link org.springframework.web.context.support.XmlWebApplicationContext}
 * or a {@link #setContextClass custom context class}, if set.
 * Delegates to #createWebApplicationContext(ApplicationContext).
 * @param parent the parent WebApplicationContext to use, or {@code null} if none
 * @return the WebApplicationContext for this servlet
 * @see org.springframework.web.context.support.XmlWebApplicationContext
 * @see #createWebApplicationContext(ApplicationContext)
 */
protected WebApplicationContext createWebApplicationContext(@Nullable WebApplicationContext parent) {
    return createWebApplicationContext((ApplicationContext) parent);
}
传入的参数为父容器,也就是 rootParent。继续调用重载方法:
/**
 * Instantiate the WebApplicationContext for this servlet, either a default
 * {@link org.springframework.web.context.support.XmlWebApplicationContext}
 * or a {@link #setContextClass custom context class}, if set.
 * <p>This implementation expects custom contexts to implement the
 * {@link org.springframework.web.context.ConfigurableWebApplicationContext}
 * interface. Can be overridden in subclasses.
 * <p>Do not forget to register this servlet instance as application listener on the
 * created context (for triggering its {@link #onRefresh callback}, and to call
 * {@link org.springframework.context.ConfigurableApplicationContext#refresh()}
 * before returning the context instance.
 * @param parent the parent ApplicationContext to use, or {@code null} if none
 * @return the WebApplicationContext for this servlet
 * @see org.springframework.web.context.support.XmlWebApplicationContext
 */
protected WebApplicationContext createWebApplicationContext(@Nullable ApplicationContext parent) {
    // 获取servlet的初始化参数contextClass,如果没有配置默认为XmlWebApplicationContext.class
    Class<?> contextClass = getContextClass();
    if (logger.isTraceEnabled()) {
        logger.trace("Servlet '" + getServletName() +
                     "' will create custom WebApplicationContext context of class '" +
                     contextClass.getName() + "'" + ", parent context [" + parent + "]");
    }
    if (!ConfigurableWebApplicationContext.class.isAssignableFrom(contextClass)) {
        throw new ApplicationContextException(
            "Fatal initialization error in servlet with name '" + getServletName() +
            "': custom WebApplicationContext class [" + contextClass.getName() +
            "] is not of type ConfigurableWebApplicationContext");
    }
    // 通过反射方式实例化contextClass,创建出一个容器
    ConfigurableWebApplicationContext wac =
        (ConfigurableWebApplicationContext) BeanUtils.instantiateClass(contextClass);

    wac.setEnvironment(getEnvironment());
    // parent为在ContextLoaderListener中创建的实例,即为父容器
    // 在ContextLoaderListener加载的时候初始化的WebApplicationContext类型实例
    wac.setParent(parent);
    // 获取contextConfigLocation属性,SpringMVC的配置文件路径,配置在servlet初始化参数中
    String configLocation = getContextConfigLocation();
    if (configLocation != null) {
        wac.setConfigLocation(configLocation);
    }
    // 配置Spring容器包括加载配置文件等
    configureAndRefreshWebApplicationContext(wac);

    return wac;
}
整个流程注释已经十分详尽了,这里我们再着重提一下,代码中包含了显式设置子容器的父容器函数 wac.setParent(parent)。然后获取配置的Spring MVC配置文件路径,也设置给 wac。
② 配置刷新子容器
无论是通过构造函数注入还是单独创建,都免不了会调用 configureAndRefreshWebApplicationContext() 方法来对已经创建的 WebApplicationContext 实例进行配置及刷新,那么这个步骤又做了哪些工作呢?
/**
 * 对已经创建的WebApplicationContext实例进行配置及刷新
 * @param wac
 */
protected void configureAndRefreshWebApplicationContext(ConfigurableWebApplicationContext wac) {
    if (ObjectUtils.identityToString(wac).equals(wac.getId())) {
        // The application context id is still set to its original default value
        // -> assign a more useful id based on available information
        if (this.contextId != null) {
            wac.setId(this.contextId);
        }
        else {
            // Generate default id...   e.g. org.springframework.web.context.WebApplicationContext:/mvc-test
            wac.setId(ConfigurableWebApplicationContext.APPLICATION_CONTEXT_ID_PREFIX +
                      ObjectUtils.getDisplayString(getServletContext().getContextPath()) + '/' + getServletName());
        }
    }

    wac.setServletContext(getServletContext());
    // 子容器额外保存了ServletConfig
    wac.setServletConfig(getServletConfig());
    // 设置命名空间:servlet名称+"-servlet"
    wac.setNamespace(getNamespace());
    // 添加监听器
    wac.addApplicationListener(new SourceFilteringListener(wac, new ContextRefreshListener()));

    // The wac environment's #initPropertySources will be called in any case when the context
    // is refreshed; do it eagerly here to ensure servlet property sources are in place for
    // use in any post-processing or initialization that occurs below prior to #refresh
    ConfigurableEnvironment env = wac.getEnvironment();
    if (env instanceof ConfigurableWebEnvironment) {
        ((ConfigurableWebEnvironment) env).initPropertySources(getServletContext(), getServletConfig());
    }

    // 模板方法
    postProcessWebApplicationContext(wac);
    applyInitializers(wac);
    // 调用子容器的onRefresh()方法
    wac.refresh();
}
这个方法其实在上一部分也有一个相似的方法,实现逻辑也十分的相似,就不具体展开介绍了。需要额外提及的是其中添加了一个监听器 SourceFilteringListener, SourceFilteringListener 需要 ContextRefreshListener 监听器,我们仔细查看一下这个监听器。
/**
 * 监听ContextRefreshedEvent事件的监听器
 * ApplicationListener endpoint that receives events from this servlet's WebApplicationContext
 * only, delegating to {@code onApplicationEvent} on the FrameworkServlet instance.
 */
private class ContextRefreshListener implements ApplicationListener<ContextRefreshedEvent> {

    @Override
    public void onApplicationEvent(ContextRefreshedEvent event) {
        // 当发出ContextRefreshedEvent事件,执行onApplicationEvent方法
        FrameworkServlet.this.onApplicationEvent(event);
    }
}

/**
 * Callback that receives refresh events from this servlet's WebApplicationContext.
 * <p>The default implementation calls {@link #onRefresh},
 * triggering a refresh of this servlet's context-dependent state.
 * @param event the incoming ApplicationContext event
 */
public void onApplicationEvent(ContextRefreshedEvent event) {
    // 设置SpringMVC容器刷新过标记
    this.refreshEventReceived = true;
    // 刷新Spring在Web功能实现中所必须使用的全局变量
    onRefresh(event.getApplicationContext());
}
可以发现注册的 ContextRefreshListener 监听器,专门监听 ContextRefreshedEvent 事件,而一旦监听到该事件便会执行 onApplicationEvent() 方法。方法中主要设置SpringMVC容器刷新过标记为 true,并调用 onRefresh() 方法。
③ 调用onRefresh方法
回头看 initWebApplicationContext() 的逻辑,当执行完 configureAndRefreshWebApplicationContext() 方法后,其实容器还没有刷新,this.refreshEventReceived 还是 false,所以不会执行 onRefresh(wac) 方法。
if (wac == null) {
    // 仍然没有的话DispatcherServlet就自己创建一个子容器
    wac = createWebApplicationContext(rootContext);
}

if (!this.refreshEventReceived) {
    // Either the context is not a ConfigurableApplicationContext with refresh
    // support or the context injected at construction time had already been
    // refreshed -> trigger initial onRefresh manually here.
    // 3. 刷新Spring在Web功能实现中所必须使用的全局变量
    onRefresh(wac);
}
但是由于上一步我们注册了监听器,只要容器一刷新,发出 ContextRefreshedEvent 事件,还是会执行 onRefresh(wac) 方法。那么什么时候发出 ContextRefreshedEvent 事件的呢?
其实这是在 ApplicationContext 调用 refresh() 最后一步中发出的。
/**
 * 完成刷新过程,通知生命周期处理器 lifecycleProcessor 刷新过程,同时发出 ContextRefreshEvent 通知别人
 * Finish the refresh of this context, invoking the LifecycleProcessor's
 * onRefresh() method and publishing the
 * {@link org.springframework.context.event.ContextRefreshedEvent}.
 */
protected void finishRefresh() {
   // Clear context-level resource caches (such as ASM metadata from scanning).
   clearResourceCaches();

   // Initialize lifecycle processor for this context.
   // 当ApplicationContext启动或者停止的时候,它会通过LifecycleProcessor来与所有声明的bean的周期做状态更新,而在使用前先初始化
   initLifecycleProcessor();

   // Propagate refresh to lifecycle processor first.
   // 启动所有实现了Lifecycle接口的bean
   getLifecycleProcessor().onRefresh();

   // Publish the final event.
   // 当完成ApplicationContext初始化时,要通过Spring中的事件发布机制来发出ContextRefreshedEvent事件,让监听器进一步处理
   publishEvent(new ContextRefreshedEvent(this));

   // Participate in LiveBeansView MBean, if active.
   LiveBeansView.registerApplicationContext(this);
}
搞清楚什么时候发出 ContextRefreshedEvent 事件,什么时候真正执行 onRefresh(wac) 方法,下面就来研究 onRefresh(wac) 方法究竟帮我们做了什么。
onRefresh(wac) 是 FrameworkServlet 类中提供的模板方法,在其子类 DispatcherServlet 中进行了重写,主要用于刷新Spring在Web功能实现中所必须使用的全局变量。下面我们会介绍它们的初始化过程以及使用场景,而至于具体的使用细节会在下一部分中再做详细介绍。
/**
 * 实现FrameworkServlet类中的模板方法,用于刷新Spring在Web功能实现中所必须使用的全局变量
 * This implementation calls {@link #initStrategies}.
 */
@Override
protected void onRefresh(ApplicationContext context) {
    initStrategies(context);
}

/**
 * 刷新Spring在Web功能实现中所必须使用的全局变量(从容器中获取)
 * Initialize the strategy objects that this servlet uses.
 * <p>May be overridden in subclasses in order to initialize further strategy objects.
 */
protected void initStrategies(ApplicationContext context) {
    // (1)初始化MultipartResolver,用于处理文件上传
    initMultipartResolver(context);
    // (2)初始化LocaleResolver,用于处理国际化
    initLocaleResolver(context);
    // (3)初始化ThemeResolver,用于处理网页主题风格
    initThemeResolver(context);
    // (4)初始化HandlerMappings,用于处理请求映射
    initHandlerMappings(context);
    // (5)初始化HandlerAdapters,用于处理器适配器
    initHandlerAdapters(context);
    // (6)初始化HandlerExceptionResolvers
    initHandlerExceptionResolvers(context);
    // (7)初始化RequestToViewNameTranslator,用于处理视图名称
    initRequestToViewNameTranslator(context);
    // (8)初始化ViewResolvers,用于判断展示的jsp页面
    initViewResolvers(context);
    // (9)初始化FlashMapManager,用于请求存储属性
    initFlashMapManager(context);
}
a. 初始化MultipartResolver
在Spring中,MultipartResolver 主要用来处理文件上传。默认情况下,Spring是没有 multipart 处理的,因为一些开发者想要自己处理它们。如果想使用Spring的 multipart,则需要在Web应用的容器中添加 multipart 解析器。这样,每个请求就会被检查是否包含 multipart。然而,如果请求中包含 multipart,那么上下文中定义的 MultipartResolver 就会解析它,这样请求中的 multipart 属性就会象其他属性一样被处理。
<bean id="multipartResolver" class="org.Springframework.web.multipart.commons.CommonsMultipartResolver">
	<!--该属性用来配置可上传文件的最大byte数 -->
	<property name="maximumFileSize">
    	<value>100000</value>
    </property>
</bean>
查看 initMultipartResolver(context) 的实现。
/**
 * 初始化文件的解析
 * Initialize the MultipartResolver used by this class.
 * <p>If no bean is defined with the given name in the BeanFactory for this namespace,
 * no multipart handling is provided.
 */
private void initMultipartResolver(ApplicationContext context) {
   try {
      // 尝试获取容器中配置的名为multipartResolver的bean,没有的话执行catch块返回null
      this.multipartResolver = context.getBean(MULTIPART_RESOLVER_BEAN_NAME, MultipartResolver.class);
      if (logger.isTraceEnabled()) {
         logger.trace("Detected " + this.multipartResolver);
      }
      else if (logger.isDebugEnabled()) {
         logger.debug("Detected " + this.multipartResolver.getClass().getSimpleName());
      }
   }
   catch (NoSuchBeanDefinitionException ex) {
      // Default is no multipart resolver.
      this.multipartResolver = null;
      if (logger.isTraceEnabled()) {
         logger.trace("No MultipartResolver '" + MULTIPART_RESOLVER_BEAN_NAME + "' declared");
      }
   }
}
因为之前的步骤已经完成了Spring中配置文件的解析,所以在这里只要在配置文件注册过都可以通过 ApplicationContext 提供的 getBean() 方法来直接获取对应 bean ,进而初始化 this.multipartResolver 变量。其实在 getBean() 方法实现中,会首先在当前子容器中寻找,如果没有再去父容器中寻找,都没有找到则会抛出异常 NoSuchBeanDefinitionException 异常,执行 this.multipartResolver = null 语句,也就是不使用Spring的文件上传功能。
所以 try 语句块中是用户配置了相关 bean 的处理逻辑,而 catch 语句块是Spring默认处理逻辑。剩下的8个初始化操作都是如此。
b. 初始化LocaleResolver
LocaleResolver 主要用于处理Spring中的国际化。
/**
 * 国际化处理
 * Initialize the LocaleResolver used by this class.
 * <p>If no bean is defined with the given name in the BeanFactory for this namespace,
 * we default to AcceptHeaderLocaleResolver.
 */
private void initLocaleResolver(ApplicationContext context) {
   try {
      this.localeResolver = context.getBean(LOCALE_RESOLVER_BEAN_NAME, LocaleResolver.class);
      if (logger.isTraceEnabled()) {
         logger.trace("Detected " + this.localeResolver);
      }
      else if (logger.isDebugEnabled()) {
         logger.debug("Detected " + this.localeResolver.getClass().getSimpleName());
      }
   }
   catch (NoSuchBeanDefinitionException ex) {
      // 用户没有配置,创建一个默认的org.springframework.web.servlet.i18n.AcceptHeaderLocaleResolver,同时交由SpringMVC容器管理
      this.localeResolver = getDefaultStrategy(context, LocaleResolver.class);
      if (logger.isTraceEnabled()) {
         logger.trace("No LocaleResolver '" + LOCALE_RESOLVER_BEAN_NAME +
               "': using default [" + this.localeResolver.getClass().getSimpleName() + "]");
      }
   }
}
同样,如果用户配置 LocaleResolver 的 bean 则从容器中获取并赋值给 FrameworkServlet 类的成员变量 this.localeResolver。重点是分析一下,Spring默认的处理方式,这里并没有直接赋值为 null,而是调用 getDefaultStrategy() 方法创建了一个实例。
/**
 * Return the default strategy object for the given strategy interface.
 * <p>The default implementation delegates to {@link #getDefaultStrategies},
 * expecting a single object in the list.
 * @param context the current WebApplicationContext
 * @param strategyInterface the strategy interface
 * @return the corresponding strategy object
 * @see #getDefaultStrategies
 */
protected <T> T getDefaultStrategy(ApplicationContext context, Class<T> strategyInterface) {
    List<T> strategies = getDefaultStrategies(context, strategyInterface);
    if (strategies.size() != 1) {
        throw new BeanInitializationException(
            "DispatcherServlet needs exactly 1 strategy for interface [" + strategyInterface.getName() + "]");
    }
    return strategies.get(0);
}

/**
 * Create a List of default strategy objects for the given strategy interface.
 * <p>The default implementation uses the "DispatcherServlet.properties" file (in the same
 * package as the DispatcherServlet class) to determine the class names. It instantiates
 * the strategy objects through the context's BeanFactory.
 * @param context the current WebApplicationContext
 * @param strategyInterface the strategy interface
 * @return the List of corresponding strategy objects
 */
@SuppressWarnings("unchecked")
protected <T> List<T> getDefaultStrategies(ApplicationContext context, Class<T> strategyInterface) {
    String key = strategyInterface.getName();
    String value = defaultStrategies.getProperty(key);
    if (value != null) {
        String[] classNames = StringUtils.commaDelimitedListToStringArray(value);
        List<T> strategies = new ArrayList<>(classNames.length);
        for (String className : classNames) {
            try {
                Class<?> clazz = ClassUtils.forName(className, DispatcherServlet.class.getClassLoader());
                Object strategy = createDefaultStrategy(context, clazz);
                strategies.add((T) strategy);
            }
            catch (ClassNotFoundException ex) {
                throw new BeanInitializationException(
                    "Could not find DispatcherServlet's default strategy class [" + className +
                    "] for interface [" + key + "]", ex);
            }
            catch (LinkageError err) {
                throw new BeanInitializationException(
                    "Unresolvable class definition for DispatcherServlet's default strategy class [" +
                    className + "] for interface [" + key + "]", err);
            }
        }
        return strategies;
    }
    else {
        return new LinkedList<>();
    }
}
我们看一下 debug 该函数的截图,红色部分代表了默认创建的 LocaleResolver 的 bean 的 class。重点是 class 的获知方式,又是从 defaultStrategies 中获得的。而知道了 class 之后,想要创建 bean 直接反射即可。
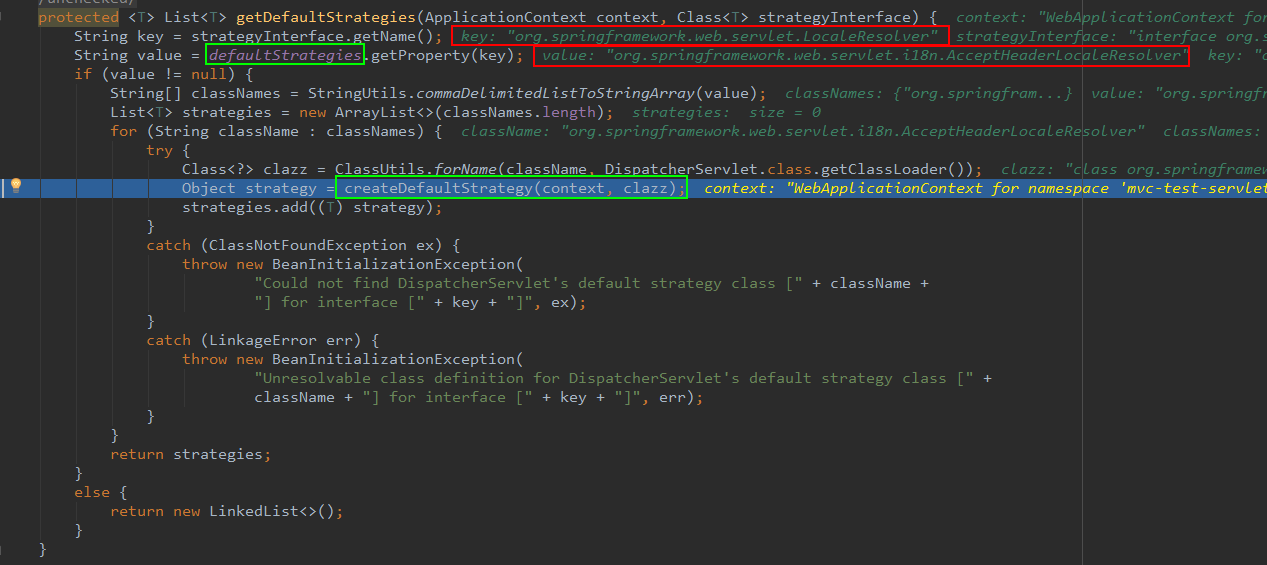
由于Spring有 IOC 专业管理各种 bean,所以创建出来的 bean 也会交给容器管理。创建 bean 的方法其实最终还是 beanFactory 的 createBean() 方法。createBean() 方法创建的 bean 都会加入容器缓存的。
/**
 * Create a default strategy.
 * <p>The default implementation uses
 * {@link org.springframework.beans.factory.config.AutowireCapableBeanFactory#createBean}.
 * @param context the current WebApplicationContext
 * @param clazz the strategy implementation class to instantiate
 * @return the fully configured strategy instance
 * @see org.springframework.context.ApplicationContext#getAutowireCapableBeanFactory()
 * @see org.springframework.beans.factory.config.AutowireCapableBeanFactory#createBean
 */
protected Object createDefaultStrategy(ApplicationContext context, Class<?> clazz) {
    return context.getAutowireCapableBeanFactory().createBean(clazz);
}
所以默认创建了 AcceptHeaderLocaleResolver 类型的国际化处理器。至于各种类型的国际化处理器区别,可以自行查阅资料。
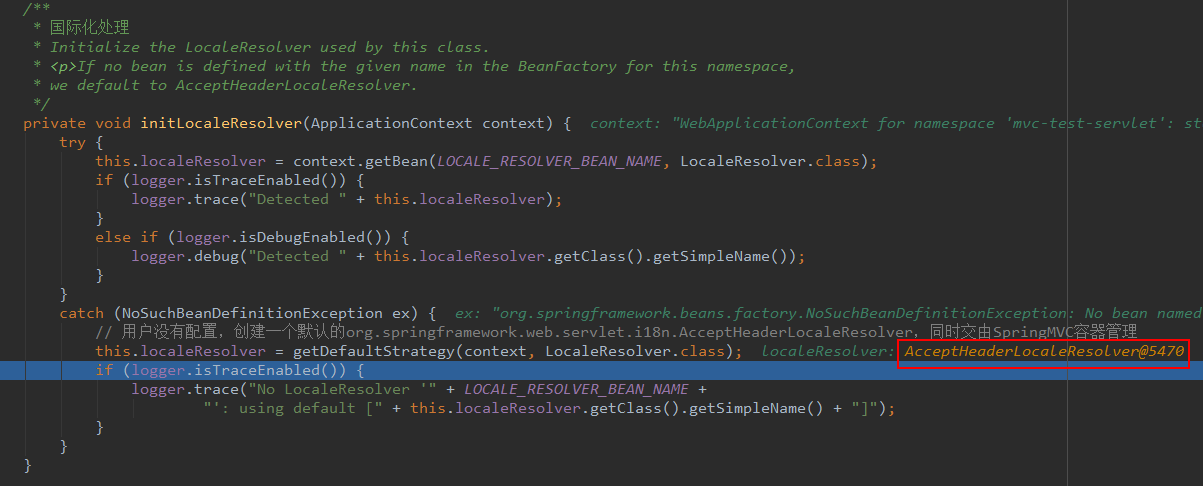
c. 初始化ThemeResolver
有了前两个的例子,分析剩下的7个初始化全局变量代码就不是非常繁琐了。
在Web开发中经常会遇到通过主题 Theme 来控制网页风格,这将进一步改善用户体验。简单地说,一个主题就是一组静态资源(比如样式表和图片),它们可以影响应用程序的视觉效果。Spring中的主题功能和国际化功能非常类似。构成Spring主题功能主要包括如下内容。
- 主题资源。
org.Springframework.ui.context.ThemeSource是Spring中主题资源的接口,Spring的主题需要通过ThemeSource接口来实现存放主题信息的资源。 - 主题解析器。
ThemeSource定义了一些主题资源,那么不同的用户使用什么主题资源由谁定义呢?org.Springframework.web.servlet.ThemeResolver是主题解析器的接口,主题解析的工作便是由它的子类来完成。
具体考虑篇幅,就不具体讲解,可参阅其他资料。主要看一下这里的逻辑实现(代码注释)。
/**
 * 主题解析
 * Initialize the ThemeResolver used by this class.
 * <p>If no bean is defined with the given name in the BeanFactory for this namespace,
 * we default to a FixedThemeResolver.
 */
private void initThemeResolver(ApplicationContext context) {
   try {
      this.themeResolver = context.getBean(THEME_RESOLVER_BEAN_NAME, ThemeResolver.class);
      if (logger.isTraceEnabled()) {
         logger.trace("Detected " + this.themeResolver);
      }
      else if (logger.isDebugEnabled()) {
         logger.debug("Detected " + this.themeResolver.getClass().getSimpleName());
      }
   }
   catch (NoSuchBeanDefinitionException ex) {
      // 创建一个默认的主题解析bean,类型为FixedThemeResolver
      this.themeResolver = getDefaultStrategy(context, ThemeResolver.class);
      if (logger.isTraceEnabled()) {
         logger.trace("No ThemeResolver '" + THEME_RESOLVER_BEAN_NAME +
               "': using default [" + this.themeResolver.getClass().getSimpleName() + "]");
      }
   }
}
d. 初始化HandlerMappings
作为Spring MVC的三大件之一处理器映射器 (HandlerMappings),当客户端发出请求时,DispatcherServlet 会将 Request 提交给处理器映射器,然后处理器映射器根据容器中的配置规则来将请求回传给 DispatcherServlet 相应的 Controller。
在基于SpringMVC的Web应用程序中,我们可以为 DispatcherServlet 提供多个 HandlerMapping 供其使用。DispatcherServlet 在选用 HandlerMapping 的过程中,将根据我们所指定的一系列 HandlerMapping 的优先级进行排序,然后优先使用优先级在前的 HandlerMapping。如果当前的 HandlerMapping 能够返回可用的处理器 Handler,DispatcherServlet 则使用当前返回的 Handler 进行Web请求的处理,而不再继续询问其他的 HandlerMapping。否则,DispatcherServlet 将继续按照各个 HandlerMapping 的优先级进行询问,直到获取一个可用的 Handler 为止。
/**
 * 初始化所有的处理器映射器
 * Initialize the HandlerMappings used by this class.
 * <p>If no HandlerMapping beans are defined in the BeanFactory for this namespace,
 * we default to BeanNameUrlHandlerMapping.
 */
private void initHandlerMappings(ApplicationContext context) {
    this.handlerMappings = null;

    // 是否加载当前系统所有实现了HandlerMapping接口的bean
    if (this.detectAllHandlerMappings) {
        // Find all HandlerMappings in the ApplicationContext, including ancestor contexts.
        Map<String, HandlerMapping> matchingBeans =
            BeanFactoryUtils.beansOfTypeIncludingAncestors(context, HandlerMapping.class, true, false);
        if (!matchingBeans.isEmpty()) {
            this.handlerMappings = new ArrayList<>(matchingBeans.values());
            // We keep HandlerMappings in sorted order.
            AnnotationAwareOrderComparator.sort(this.handlerMappings);
        }
    }
    else {
        try {
            // 只加载spring配置文件中的id为handlerMapping的bean
            HandlerMapping hm = context.getBean(HANDLER_MAPPING_BEAN_NAME, HandlerMapping.class);
            this.handlerMappings = Collections.singletonList(hm);
        }
        catch (NoSuchBeanDefinitionException ex) {
            // Ignore, we'll add a default HandlerMapping later.
        }
    }

    // Ensure we have at least one HandlerMapping, by registering
    // a default HandlerMapping if no other mappings are found.
    // 如果没有人为配置,则将按照org.Springframework.web.servlet.DispatcherServlet目录下的DispatcherServlet.properties
    // 中所定义的org.Springframework.web.servlet.HandlerMapping的内容来加载
    if (this.handlerMappings == null) {
        this.handlerMappings = getDefaultStrategies(context, HandlerMapping.class);
        if (logger.isTraceEnabled()) {
            logger.trace("No HandlerMappings declared for servlet '" + getServletName() +
                         "': using default strategies from DispatcherServlet.properties");
        }
    }
}
初始化所有的处理器映射器的逻辑比之前略有复杂。默认情况下,SpringMVC将加载当前系统中所有实现了HandlerMapping 接口的 bean。如果只期望SpringMVC加载指定的 bean 的 id 为 handlermapping 的处理器映射器,可以修改web.xml中的DispatcherServlet 的初始参数,将 this.detectAllHandlerMappings 的值设置为 false。
<init-param>
    <param-name>detectAllHandlerMappings</param-name>
    <param-value>false</param-value>
</init-param>
此时, SpringMVC 将查找名为 “handlerMapping” 的 bean,并作为当前系统中唯一的 handlermapping。如果用户没有定义 handlerMapping 的话,则SpringMVC将按照 DispatcherServlet 所在目录的 DispatcherServlet.properties 中所定义的 org.Springframework.web.servlet.HandlerMapping 的内容来加载默认的 handlerMapping。
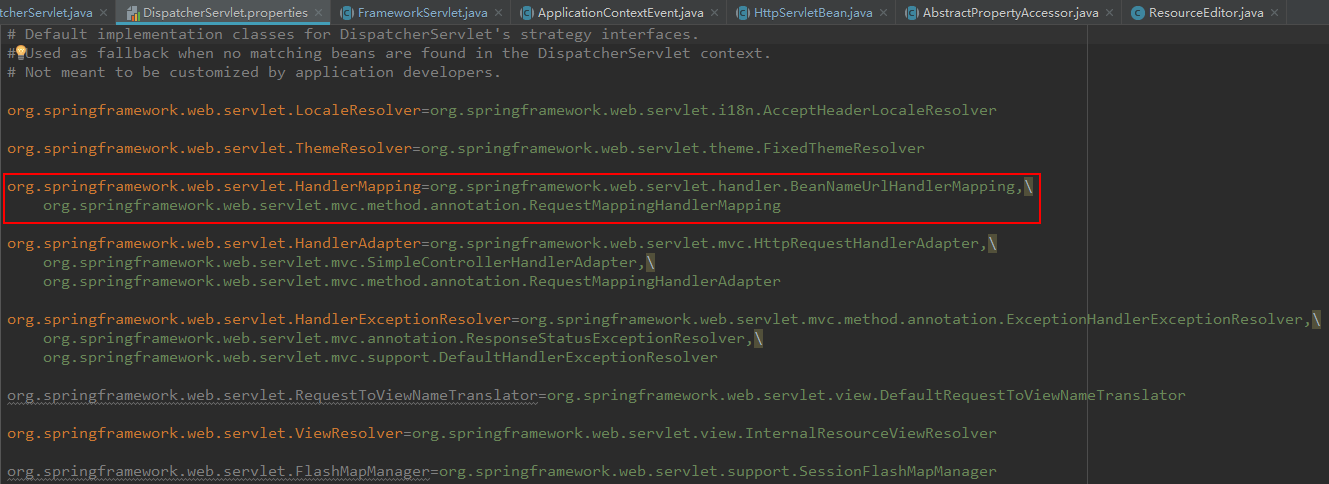
e. 初始化HandlerAdapters
SpringMVC的三大件的另一个就是处理器适配器,从名字也能联想到这是一个典型的适配器模式的使用。使用适配器,可以使接口不兼容而无法在一起工作的类协同工作,做法是将一个类中自己的接口包裹在一个已存在的类中。那么在处理 handler 时为什么会使用适配器模式呢?回答这个问题我们首先要分析它的初始化逻辑。
/**
 * 初始化处理器适配器
 * Initialize the HandlerAdapters used by this class.
 * <p>If no HandlerAdapter beans are defined in the BeanFactory for this namespace,
 * we default to SimpleControllerHandlerAdapter.
 */
private void initHandlerAdapters(ApplicationContext context) {
   this.handlerAdapters = null;

   if (this.detectAllHandlerAdapters) {
      // Find all HandlerAdapters in the ApplicationContext, including ancestor contexts.
      Map<String, HandlerAdapter> matchingBeans =
            BeanFactoryUtils.beansOfTypeIncludingAncestors(context, HandlerAdapter.class, true, false);
      if (!matchingBeans.isEmpty()) {
         this.handlerAdapters = new ArrayList<>(matchingBeans.values());
         // We keep HandlerAdapters in sorted order.
         AnnotationAwareOrderComparator.sort(this.handlerAdapters);
      }
   }
   else {
      try {
         HandlerAdapter ha = context.getBean(HANDLER_ADAPTER_BEAN_NAME, HandlerAdapter.class);
         this.handlerAdapters = Collections.singletonList(ha);
      }
      catch (NoSuchBeanDefinitionException ex) {
         // Ignore, we'll add a default HandlerAdapter later.
      }
   }

   // 如果没有配置, Spring默认初始化三个:HttpRequestHandlerAdapter,SimpleControllerHandlerAdapter和RequestMappingHandlerAdapter
   if (this.handlerAdapters == null) {
      this.handlerAdapters = getDefaultStrategies(context, HandlerAdapter.class);
      if (logger.isTraceEnabled()) {
         logger.trace("No HandlerAdapters declared for servlet '" + getServletName() +
               "': using default strategies from DispatcherServlet.properties");
      }
   }
}
同样在初始化的过程中涉及了一个变量 detectAllHandlerAdapters,detectAllHandlerAdapters 作用和detectAllHandlerMappings 类似,只不过作用对象为 handlerAdapter。亦可通过如下配置来强制系统只加载 bean name为 “handlerAdapter” 的 handlerAdapter。
<init-param>
    <param-name>detectAllHandlerAdapters</param-name>
    <param-value>false</param-value>
</init-param>
如果无法找到对应的bean,那么系统会尝试加载默认的适配器。
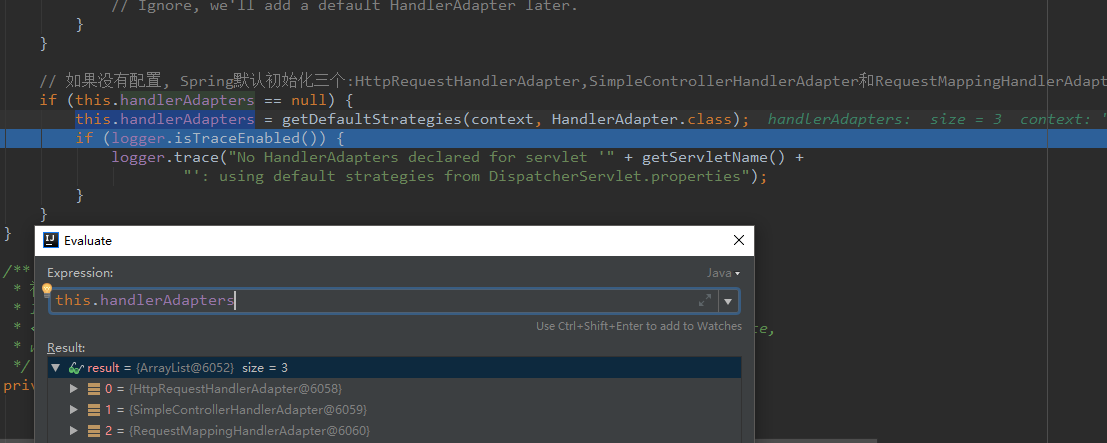
由此得知,如果程序开发人员没有在配置文件中定义自己的适配器,那么Spring会默认加载配置文件中的3个适配器。
作为总控制器的派遣器 DispatcherServlet 根据请求通过处理器映射器得到处理器后,会轮询所有处理器适配器模块,查找能够处理当前 HTTP 请求的处理器适配器的实现,处理器适配器模块根据处理器映射器返回的处理器类型,例如简单的控制器类型、注解控制器类型或者远程调用处理器类型,来选择某一个适当的处理器适配器的实现,从而适配当前的HTTP请求。
-
HTTP 请求处理器适配器 (HttpRequestHandlerAdapter)
HTTP 请求处理器适配器仅仅支持对 HTTP 请求处理器的适配。它简单地将 HTTP 请求对象和响应对象传递给HTTP 请求处理器的实现,它并不需要返回值。它主要应用在基于 HTTP 的远程调用的实现上。
-
简单控制器处理器适配器 (SimpleControllerHandlerAdapter)
这个实现类将 HTTP 请求适配到一个控制器
Controller的实现进行处理。这里控制器的实现是一个简单的控制器接口的实现。简单控制器处理器适配器被设计成一个框架类的实现,不需要被改写,客户化的业务逻辑通常是在控制器接口的实现类中实现的。 -
注解方法处理器适配器 (AnnotationMethodHandlerAdapter)
这个类的实现是基于注解的实现,它需要结合注解方法映射和注解方法处理器协同工作。它通过解析声明在注解控制器的请求映射信息来解析相应的处理器方法来处理当前的 HTTP 请求。在处理的过程中,它通过反射来发现探测处理器方法的参数,调用处理器方法,并且映射返回值到模型和控制器对象,最后返回模型和控制器对象给作为主控制器的派遣器 Servlet。
所以我们现在基本上可以回答之前的问题了,Spring中所使用的 Handler 并没有任何特殊的联系,但是为了统一处理,Spring提供了不同情况下的适配器。
f. 初始化HandlerExceptionResolvers
基于 HandlerExceptionResolver 接口的异常处理,使用这种方式只需要实现 resolveException() 方法,该方法返回一个 ModelAndView 对象,在方法内部对异常的类型进行判断,然后尝试生成对应的 ModelAndView 对象,如果该方法返回了 null,则Spring会继续寻找其他的实现了 HandlerExceptionResolver 接口的 bean。换句话说,Spring会搜索所有注册在其环境中的实现了 HandlerExceptionResolver 接口的 bean,逐个执行,直到返回了一个 ModelAndView 对象。
import javax.servlet.http.HttpServletRequest;
import javax.servlet.http.HttpServletResponse;
import org.apache.commons.logging.Log;
import org.apache.commons.logging.LogFactory;
import org.Springframework.stereotype.Component;
import org.Springframework.web.servlet.HandlerExceptionResolver;
import org.Springframework.web.servlet.ModelAndView;
@Component
public class MyExceptionHandler implements HandlerExceptionResolver {
    private static final Log logs = LogFactory.getLog(ExceptionHandler.class);
    @Override
    public ModelAndView resolveException(HttpServletRequest request, HttpServletResponse response, Object obj, Exception exception) {
        request.setAttribute("exception", exception.toString());
        request.setAttribute("exceptionStack", exception);
        logs.error(exception.toString(), exception);
        return new ModelAndView("error/exception");
    }
}
这个类必须声明到Spring中去,让Spring管理。在Spring的配置文件 applicationContext.xml 中增加以下内容:
<bean id="exceptionHandler" class="xxx.xxx.xxx.MyExceptionHandler"/>
初始化代码如下:
/**
 * 初始化handler的异常处理解析器
 * Initialize the HandlerExceptionResolver used by this class.
 * <p>If no bean is defined with the given name in the BeanFactory for this namespace,
 * we default to no exception resolver.
 */
private void initHandlerExceptionResolvers(ApplicationContext context) {
    this.handlerExceptionResolvers = null;

    if (this.detectAllHandlerExceptionResolvers) {
        // Find all HandlerExceptionResolvers in the ApplicationContext, including ancestor contexts.
        Map<String, HandlerExceptionResolver> matchingBeans = BeanFactoryUtils
            .beansOfTypeIncludingAncestors(context, HandlerExceptionResolver.class, true, false);
        if (!matchingBeans.isEmpty()) {
            this.handlerExceptionResolvers = new ArrayList<>(matchingBeans.values());
            // We keep HandlerExceptionResolvers in sorted order.
            AnnotationAwareOrderComparator.sort(this.handlerExceptionResolvers);
        }
    }
    else {
        try {
            HandlerExceptionResolver her =
                context.getBean(HANDLER_EXCEPTION_RESOLVER_BEAN_NAME, HandlerExceptionResolver.class);
            this.handlerExceptionResolvers = Collections.singletonList(her);
        }
        catch (NoSuchBeanDefinitionException ex) {
            // Ignore, no HandlerExceptionResolver is fine too.
        }
    }

    // Ensure we have at least some HandlerExceptionResolvers, by registering
    // default HandlerExceptionResolvers if no other resolvers are found.
    if (this.handlerExceptionResolvers == null) {
        // 如果没有配置, Spring默认初始化三个:ExceptionHandlerExceptionResolver,ResponseStatusExceptionResolver和DefaultHandlerExceptionResolver
        this.handlerExceptionResolvers = getDefaultStrategies(context, HandlerExceptionResolver.class);
        if (logger.isTraceEnabled()) {
            logger.trace("No HandlerExceptionResolvers declared in servlet '" + getServletName() +
                         "': using default strategies from DispatcherServlet.properties");
        }
    }
}
相信已经不用具体分析了,流程是非常相似的。
g. 初始化RequestToViewNameTranslator
当 Controller 处理器方法没有返回一个 View 对象或逻辑视图名称,并且在该方法中没有直接往 response 的输出流里面写数据的时候,Spring就会采用约定好的方式提供一个逻辑视图名称。这个逻辑视图名称是通过Spring定义的 org.springframework.web.servlet.RequestToViewNameTranslator 接口的 getViewName()方法来实现的,我们可以实现自己的 RequestToViewNameTranslator 接口来约定好没有返回视图名称的时候如何确定视图名称。
Spring已经给我们提供了一个它自己的实现,那就是 org.Springframework.web.servlet.view.DefaultRequestToViewNameTranslator。
在介绍 DefaultRequestToViewNameTranslator 是如何约定视图名称之前,先来看一下它支持用户定义的属性。
- prefix:前缀,表示约定好的视图名称需要加上的前缀,默认是空串。
- suffix:后缀,表示约定好的视图名称需要加上的后缀,默认是空串。
- separator:分隔符,默认是斜杠 “/”。
- stripLeadingSlash:如果首字符是分隔符,是否要去除,默认是 true。
- stripTrailingSlash:如果最后一个字符是分隔符,是否要去除,默认是 true。
- stripExtension:如果请求路径包含扩展名是否要去除,默认是 true。
- urlDecode:是否需要对 URL 解码,默认是 true。它会采用 request 指定的编码或者 ISO-8859-1 编码对 URL 进行解码。
/**
 * 当处理器没有返回逻辑视图名等相关信息时,自动将请求URL映射为逻辑视图名
 * Initialize the RequestToViewNameTranslator used by this servlet instance.
 * <p>If no implementation is configured then we default to DefaultRequestToViewNameTranslator.
 */
private void initRequestToViewNameTranslator(ApplicationContext context) {
   try {
      this.viewNameTranslator =
            context.getBean(REQUEST_TO_VIEW_NAME_TRANSLATOR_BEAN_NAME, RequestToViewNameTranslator.class);
      if (logger.isTraceEnabled()) {
         logger.trace("Detected " + this.viewNameTranslator.getClass().getSimpleName());
      }
      else if (logger.isDebugEnabled()) {
         logger.debug("Detected " + this.viewNameTranslator);
      }
   }
   catch (NoSuchBeanDefinitionException ex) {
      // 默认创建一个DefaultRequestToViewNameTranslator的bean
      this.viewNameTranslator = getDefaultStrategy(context, RequestToViewNameTranslator.class);
      if (logger.isTraceEnabled()) {
         logger.trace("No RequestToViewNameTranslator '" + REQUEST_TO_VIEW_NAME_TRANSLATOR_BEAN_NAME +
               "': using default [" + this.viewNameTranslator.getClass().getSimpleName() + "]");
      }
   }
}
当我们没有在SpringMVC的配置文件中手动的定义一个名为 viewNameTranlator 的 bean 的时候,Spring就会为我们提供一个默认的 viewNameTranslator,即 DefaultRequestToViewNameTranslator。
接下来看一下,当 Controller 处理器方法没有返回逻辑视图名称时,DefaultRequestToViewNameTranslator 是如何约定视图名称的。DefaultRequestToViewNameTranslator 会获取到请求的 URI,然后根据提供的属性做一些改造,把改造之后的结果作为视图名称返回。这里以请求路径 http://localhost/app/test/index.html 为例,来说明一下 DefaultRequestToViewNameTranslator 是如何工作的。该请求路径对应的请求 URI 为 /test/index.html,我们来看以下几种情况,它分别对应的逻辑视图名称是什么。
- prefix 和 suffix 如果都存在,其他为默认值,那么对应返回的逻辑视图名称应该是 prefixtest/indexsuffix。
- stripLeadingSlash 和 stripExtension 都为 false,其他默认,这时候对应的逻辑视图名称是 /test/index.html。
- 都采用默认配置时,返回的逻辑视图名称应该是 test/index。
如果逻辑视图名称跟请求路径相同或者相关关系都是一样的,那么我们就可以采用Spring为我们事先约定好的逻辑视图名称返回。
h. 初始化ViewResolvers
作为SpringMVC的最后一个三大件试图解析器,当 Controller 将请求处理结果放入到 ModelAndView 中以后,DispatcherServlet 会根据 ModelAndView 选择合适的视图进行渲染,而如何选择合适的 View 就是交给试图解析器的。ViewResolver 接口定义了 resolverViewName() 方法,根据 viewName 创建合适类型的 View 实现。
那么如何配置 ViewResolver 呢?在Spring中,ViewResolver 作为Spring bean 存在,可以在Spring配置文件中进行配置,例如下面的代码,配置了 jsp 相关的 viewResolver。
<bean class="org.Springframework.web.servlet.view.InternalResourceViewResolver">
    <property name="prefix" value="/WEB-INF/jsp/"/>
    <property name="suffix" value=".jsp"/>
</bean>
初始化视图解析的代码如下:
/**
 * 逻辑视图名称转化器,即允许返回逻辑视图名称,然后它会找到真实的视图
 * Initialize the ViewResolvers used by this class.
 * <p>If no ViewResolver beans are defined in the BeanFactory for this
 * namespace, we default to InternalResourceViewResolver.
 */
private void initViewResolvers(ApplicationContext context) {
   this.viewResolvers = null;

   if (this.detectAllViewResolvers) {
      // Find all ViewResolvers in the ApplicationContext, including ancestor contexts.
      Map<String, ViewResolver> matchingBeans =
            BeanFactoryUtils.beansOfTypeIncludingAncestors(context, ViewResolver.class, true, false);
      if (!matchingBeans.isEmpty()) {
         this.viewResolvers = new ArrayList<>(matchingBeans.values());
         // We keep ViewResolvers in sorted order.
         AnnotationAwareOrderComparator.sort(this.viewResolvers);
      }
   }
   else {
      try {
         ViewResolver vr = context.getBean(VIEW_RESOLVER_BEAN_NAME, ViewResolver.class);
         this.viewResolvers = Collections.singletonList(vr);
      }
      catch (NoSuchBeanDefinitionException ex) {
         // Ignore, we'll add a default ViewResolver later.
      }
   }

   // Ensure we have at least one ViewResolver, by registering
   // a default ViewResolver if no other resolvers are found.
   if (this.viewResolvers == null) {
      this.viewResolvers = getDefaultStrategies(context, ViewResolver.class);
      if (logger.isTraceEnabled()) {
         logger.trace("No ViewResolvers declared for servlet '" + getServletName() +
               "': using default strategies from DispatcherServlet.properties");
      }
   }
}
i. 初始化FlashMapManager
SpringMVC Flash attributes提供了一个请求存储属性,可供其他请求使用。在使用重定向时候非常必要,例如Post/Redirect/Get 模式。Flash attributes在重定向之前暂存(就像存在 session 中)以便重定向之后还能使用,并立即删除。
关于 FlashMapManager 的使用,具体可以参考Spring MVC Flash Attribute 的讲解与使用示例 和 SpringMVC——redirect重定向跳转传值。
/**
 * RedirectView在页面跳转,数据的保存依赖于FlashMap和FlashMapManger,这里进行初始化
 * Initialize the {@link FlashMapManager} used by this servlet instance.
 * <p>If no implementation is configured then we default to
 * {@code org.springframework.web.servlet.support.DefaultFlashMapManager}.
 */
private void initFlashMapManager(ApplicationContext context) {
   try {
      this.flashMapManager = context.getBean(FLASH_MAP_MANAGER_BEAN_NAME, FlashMapManager.class);
      if (logger.isTraceEnabled()) {
         logger.trace("Detected " + this.flashMapManager.getClass().getSimpleName());
      }
      else if (logger.isDebugEnabled()) {
         logger.debug("Detected " + this.flashMapManager);
      }
   }
   catch (NoSuchBeanDefinitionException ex) {
      // 默认创建一个SessionFlashMapManager的bean
      this.flashMapManager = getDefaultStrategy(context, FlashMapManager.class);
      if (logger.isTraceEnabled()) {
         logger.trace("No FlashMapManager '" + FLASH_MAP_MANAGER_BEAN_NAME +
               "': using default [" + this.flashMapManager.getClass().getSimpleName() + "]");
      }
   }
}
IV. DispatcherServlet的逻辑处理
上一部分我们主要研究了 Web 容器初始化 DispatcherServlet 的逻辑,重点是Spring MVC的子容器的初始化。那么我们还没有真正的分析,DispatcherServlet 究竟是如何处理我们用户发出的请求的,这一部分主要就是摸清这一原理。
根据之前的示例,我们知道在 HttpServlet 类中分别提供了相应的服务方法,它们是 doDelete()、doGet()、doOptions()、doPost()、doPut() 和 doTrace(),它会根据请求的不同形式将程序引导至对应的函数进行处理。这几个函数中最常用的函数无非就是 doGet() 和 doPost(),那么我们就直接查看 DispatcherServlet 中对于这两个函数的逻辑实现,实际是在 FrameworkServlet。
/**
 * 重写自HttpServlet的方法
 * Delegate GET requests to processRequest/doService.
 * <p>Will also be invoked by HttpServlet's default implementation of {@code doHead},
 * with a {@code NoBodyResponse} that just captures the content length.
 * @see #doService
 * @see #doHead
 */
@Override
protected final void doGet(HttpServletRequest request, HttpServletResponse response)
      throws ServletException, IOException {
    // 对于不同的方法,Spring 并没有做特殊处理,而是统一将程序再一次地引导至 process Request(request, response)中
    processRequest(request, response);
}

/**
 * 重写自HttpServlet的方法
 * Delegate POST requests to {@link #processRequest}.
 * @see #doService
 */
@Override
protected final void doPost(HttpServletRequest request, HttpServletResponse response)
    throws ServletException, IOException {
    // 对于不同的方法,Spring 并没有做特殊处理,而是统一将程序再一次地引导至processRequest(request, response)中
    processRequest(request, response);
}
其实可以发现,DispatcherServlet 将用户所有的请求进行拦下,然后自己进行对应的处理,dispatcher 译为调度员,说明 DispatcherServlet 会调度相应的处理器来进行处理请求。我们具体查看 processRequest(request, response) 方法。
/**
 * Process this request, publishing an event regardless of the outcome.
 * <p>The actual event handling is performed by the abstract
 * {@link #doService} template method.
 */
protected final void processRequest(HttpServletRequest request, HttpServletResponse response)
      throws ServletException, IOException {

   // 记录当前时间,用于计算web请求的处理时间
   long startTime = System.currentTimeMillis();
   Throwable failureCause = null;

   // 为了保证当前线程的LocaleContext以及RequestAttributes可以在当前请求后还能恢复,提取当前线程的两个属性。

   // 获取ThreadLocal中之前保存的LocaleContext
   LocaleContext previousLocaleContext = LocaleContextHolder.getLocaleContext();
   // 建立新的LocaleContext
   LocaleContext localeContext = buildLocaleContext(request);

   // 获取ThreadLocal中之前保存的RequestAttributes
   RequestAttributes previousAttributes = RequestContextHolder.getRequestAttributes();
   // 建立新的RequestAttributes
   ServletRequestAttributes requestAttributes = buildRequestAttributes(request, response, previousAttributes);

   WebAsyncManager asyncManager = WebAsyncUtils.getAsyncManager(request);
   asyncManager.registerCallableInterceptor(FrameworkServlet.class.getName(), new RequestBindingInterceptor());

   // 绑定新的LocaleContext和RequestAttributes到当前线程
   initContextHolders(request, localeContext, requestAttributes);

   try {
      // 委托给doService方法进一步处理,抽象方法,在DispatcherServlet中实现
      doService(request, response);
   }
   catch (ServletException | IOException ex) {
      failureCause = ex;
      throw ex;
   }
   catch (Throwable ex) {
      failureCause = ex;
      throw new NestedServletException("Request processing failed", ex);
   }

   finally {
      // 请求处理结束后恢复线程到原始状态
      resetContextHolders(request, previousLocaleContext, previousAttributes);
      if (requestAttributes != null) {
         requestAttributes.requestCompleted();
      }
      // 打印日志输出结果
      logResult(request, response, failureCause, asyncManager);
      // 请求处理结束后无论成功与否发布事件通知
      publishRequestHandledEvent(request, response, startTime, failureCause);
   }
}
函数中已经开始了对请求的处理,虽然把细节转移到了 doService() 函数中实现,但是我们不难看出处理请求前后所做的准备与处理工作。
- 为了保证当前线程的 LocaleContext 以及 RequestAttributes 可以在当前请求后还能恢复,提取当前线程的这两个属性。这两个属性分别存储在了两个 ThreadLocal 变量中,尝试从其中进行获取。
- 根据当前 request 请求创建对应的 LocaleContext 和 RequestAttributes,并绑定到当前线程。绑定线程依靠将新创建的 LocaleContext 和 RequestAttributes set 到 ThreadLocal 中。
- 委托给
doService()方法进一步处理。 - 请求处理结束后,恢复线程的原始状态,也就是将 previousLocaleContext 和 previousAttributes 进行再重新写到 ThreadLocal 中,覆盖掉之前新建的。
- 请求处理结束后无论成功与否发布事件通知。
为什么这里要进行保存—>新建—>恢复?
我们重点关注 doService() 方法。FrameworkServlet 定义了 doService() 模板方法,真正重写是在 DispatcherServlet 中。
/**
 * 实现自FrameworkServlet的抽象方法,处理请求
 * Exposes the DispatcherServlet-specific request attributes and delegates to {@link #doDispatch}
 * for the actual dispatching.
 */
@Override
protected void doService(HttpServletRequest request, HttpServletResponse response) throws Exception {

    // 打印请求
    logRequest(request);

    // Keep a snapshot of the request attributes in case of an include,
    // to be able to restore the original attributes after the include.
    Map<String, Object> attributesSnapshot = null;
    if (WebUtils.isIncludeRequest(request)) {
        attributesSnapshot = new HashMap<>();
        Enumeration<?> attrNames = request.getAttributeNames();
        while (attrNames.hasMoreElements()) {
            String attrName = (String) attrNames.nextElement();
            if (this.cleanupAfterInclude || attrName.startsWith(DEFAULT_STRATEGIES_PREFIX)) {
                attributesSnapshot.put(attrName, request.getAttribute(attrName));
            }
        }
    }

    // Make framework objects available to handlers and view objects.
    // 给request添加属性信息,包括WebApplicationContext,localeResolver,themeResolver和themeSource
    request.setAttribute(WEB_APPLICATION_CONTEXT_ATTRIBUTE, getWebApplicationContext());
    request.setAttribute(LOCALE_RESOLVER_ATTRIBUTE, this.localeResolver);
    request.setAttribute(THEME_RESOLVER_ATTRIBUTE, this.themeResolver);
    request.setAttribute(THEME_SOURCE_ATTRIBUTE, getThemeSource());

    if (this.flashMapManager != null) {
        FlashMap inputFlashMap = this.flashMapManager.retrieveAndUpdate(request, response);
        if (inputFlashMap != null) {
            request.setAttribute(INPUT_FLASH_MAP_ATTRIBUTE, Collections.unmodifiableMap(inputFlashMap));
        }
        request.setAttribute(OUTPUT_FLASH_MAP_ATTRIBUTE, new FlashMap());
        request.setAttribute(FLASH_MAP_MANAGER_ATTRIBUTE, this.flashMapManager);
    }

    try {
        // 委托doDispatch处理请求
        doDispatch(request, response);
    }
    finally {
        if (!WebAsyncUtils.getAsyncManager(request).isConcurrentHandlingStarted()) {
            // Restore the original attribute snapshot, in case of an include.
            if (attributesSnapshot != null) {
                restoreAttributesAfterInclude(request, attributesSnapshot);
            }
        }
    }
}
我们猜想对请求处理至少应该包括一些诸如寻找处理器 Handler 并页面跳转之类的逻辑处理,但是,在 doService() 中我们并没有看到想看到的逻辑,相反却同样是一些准备工作,但是这些准备工作却是必不可少的。Spring将已经初始化的功能辅助工具变量,比如 WebApplicationContext、 localeResolver、themeResolver 等设置在 request 的属性中,而这些属性会在接下来的处理中派上用场。

经过层层的准备工作,终于在 doDispatch() 函数中看到了完整的请求处理过程。
/**
 * 真正处理请求的地方
 * Process the actual dispatching to the handler.
 * <p>The handler will be obtained by applying the servlet's HandlerMappings in order.
 * The HandlerAdapter will be obtained by querying the servlet's installed HandlerAdapters
 * to find the first that supports the handler class.
 * <p>All HTTP methods are handled by this method. It's up to HandlerAdapters or handlers
 * themselves to decide which methods are acceptable.
 * @param request current HTTP request
 * @param response current HTTP response
 * @throws Exception in case of any kind of processing failure
 */
protected void doDispatch(HttpServletRequest request, HttpServletResponse response) throws Exception {
    HttpServletRequest processedRequest = request;
    HandlerExecutionChain mappedHandler = null;
    boolean multipartRequestParsed = false;

    WebAsyncManager asyncManager = WebAsyncUtils.getAsyncManager(request);

    try {
        ModelAndView mv = null;
        Exception dispatchException = null;

        try {
            // 检查是否要文件上传处理,multipartRequestParsed为标记。
            // 如果是MultipartContent类型的request则转换request为MultipartHttpServletRequest类型的
            processedRequest = checkMultipart(request);
            multipartRequestParsed = (processedRequest != request);

            // 获取当前请求对应的处理器执行链
            mappedHandler = getHandler(processedRequest);
            // 没获取到就报错,通过response反馈错误信息
            if (mappedHandler == null) {
                noHandlerFound(processedRequest, response);
                return;
            }

            // 获取适合当前请求的处理器适配器
            HandlerAdapter ha = getHandlerAdapter(mappedHandler.getHandler());

            // 缓存处理:如果当前handler支持last-modified头处理
            String method = request.getMethod();
            boolean isGet = "GET".equals(method);
            if (isGet || "HEAD".equals(method)) {
                long lastModified = ha.getLastModified(request, mappedHandler.getHandler());
                if (new ServletWebRequest(request, response).checkNotModified(lastModified) && isGet) {
                    return;
                }
            }

            // 调用拦截器执行链中所有的拦截器的preHandler方法
            if (!mappedHandler.applyPreHandle(processedRequest, response)) {
                // 如果拦截器中返回false,那么就执行到这里直接返回了
                return;
            }

            // 利用处理器适配器调用handler方法进行逻辑处理并返回视图
            mv = ha.handle(processedRequest, response, mappedHandler.getHandler());

            if (asyncManager.isConcurrentHandlingStarted()) {
                return;
            }

            // 视图名称转换应用于需要添加前缀后缀的情况
            applyDefaultViewName(processedRequest, mv);
            // 应用所有拦截器的postHandle方法
            mappedHandler.applyPostHandle(processedRequest, response, mv);
        }
        catch (Exception ex) {
            dispatchException = ex;
        }
        catch (Throwable err) {
            // As of 4.3, we're processing Errors thrown from handler methods as well,
            // making them available for @ExceptionHandler methods and other scenarios.
            dispatchException = new NestedServletException("Handler dispatch failed", err);
        }
        processDispatchResult(processedRequest, response, mappedHandler, mv, dispatchException);
    }
    catch (Exception ex) {
        triggerAfterCompletion(processedRequest, response, mappedHandler, ex);
    }
    catch (Throwable err) {
        triggerAfterCompletion(processedRequest, response, mappedHandler,
                               new NestedServletException("Handler processing failed", err));
    }
    finally {
        if (asyncManager.isConcurrentHandlingStarted()) {
            // Instead of postHandle and afterCompletion
            if (mappedHandler != null) {
                mappedHandler.applyAfterConcurrentHandlingStarted(processedRequest, response);
            }
        }
        else {
            // Clean up any resources used by a multipart request.
            if (multipartRequestParsed) {
                cleanupMultipart(processedRequest);
            }
        }
    }
}
doDispatch() 函数中展示了Spring请求处理所涉及的主要逻辑,而我们之前设置在 request 中的各种辅助属性也都有被派上了用场。下面研究一下逻辑处理的全过程。
MultipartContent类型的request处理
对于请求的处理,Spring首先考虑的是对于 Multipart 的处理,如果是 MultipartContent 类型的 request,则转换 request 为 MultipartHttpServletRequest 类型的 request,否则返回原来的 request。doDispatcher() 中定义了一个布尔变量 multipartRequestParsed 标记是否进行 Multipart 的处理,判断依据就是返回回来的 request 和 之前的是否一样。
/**
 * 如果请求类型是multipart,则转换request转换为MultipartHttpServletRequest类型
 * Convert the request into a multipart request, and make multipart resolver available.
 * <p>If no multipart resolver is set, simply use the existing request.
 * @param request current HTTP request
 * @return the processed request (multipart wrapper if necessary)
 * @see MultipartResolver#resolveMultipart
 */
protected HttpServletRequest checkMultipart(HttpServletRequest request) throws MultipartException {
    if (this.multipartResolver != null && this.multipartResolver.isMultipart(request)) {
        if (WebUtils.getNativeRequest(request, MultipartHttpServletRequest.class) != null) {
            if (request.getDispatcherType().equals(DispatcherType.REQUEST)) {
                logger.trace("Request already resolved to MultipartHttpServletRequest, e.g. by MultipartFilter");
            }
        }
        else if (hasMultipartException(request) ) {
            logger.debug("Multipart resolution previously failed for current request - " +
                         "skipping re-resolution for undisturbed error rendering");
        }
        else {
            try {
                return this.multipartResolver.resolveMultipart(request);
            }
            catch (MultipartException ex) {
                if (request.getAttribute(WebUtils.ERROR_EXCEPTION_ATTRIBUTE) != null) {
                    logger.debug("Multipart resolution failed for error dispatch", ex);
                    // Keep processing error dispatch with regular request handle below
                }
                else {
                    throw ex;
                }
            }
        }
    }
    // If not returned before: return original request.
    return request;
}
获取当前请求对应的处理器执行链
想要处理请求,Spring首先先要根据处理器映射器查找请求所对应的处理器。查找请求对应的处理器由 getHandler() 方法完成。可以看到,其实是对我们注册的所有处理器映射器进行遍历,分别再通过单个的映射器的 getHandler() 方法尝试返回对应当前请求的处理器执行链对象。如果一旦有返回成功了,方法直接运行结束,其他排在后面的处理器映射器就不在继续考虑了。这也是为什么之前初始化 HandlerMappings 时方法内部有一个 sort() 排序。
/**
 * 返回当前请求的处理器执行链
 * Return the HandlerExecutionChain for this request.
 * <p>Tries all handler mappings in order.
 * @param request current HTTP request
 * @return the HandlerExecutionChain, or {@code null} if no handler could be found
 */
@Nullable
protected HandlerExecutionChain getHandler(HttpServletRequest request) throws Exception {
   if (this.handlerMappings != null) {
      for (HandlerMapping mapping : this.handlerMappings) {
         HandlerExecutionChain handler = mapping.getHandler(request);
         if (handler != null) {
            return handler;
         }
      }
   }
   return null;
}
我们在示例中配置的处理器映射器如下:
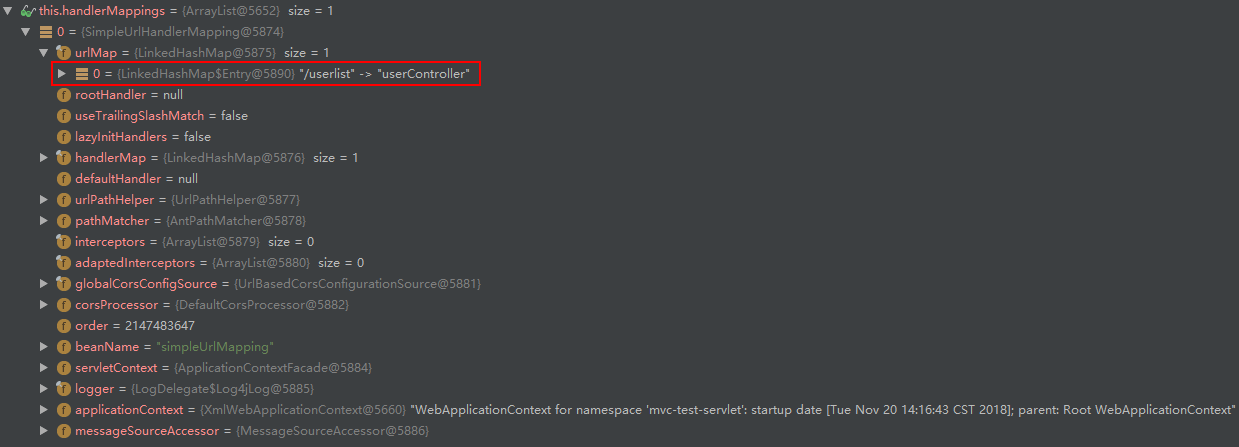
在Spring加载的过程中,Spring会将类型为 SimpleUrlHandlerMapping 的实例加载到 this.handlerMappings 中。按照常理推断,根据 request 提取对应的 Handler,无非就是提取当前实例中的 userController,但是 userController 为继承自 AbstractController 类型实例,与 HandlerExecutionChain 并无任何关联,那么这一步是如何封装的呢?进入 AbstractHandlerMapping 的 getHandler() 方法, SimpleUrlHandlerMapping 继承自 AbstractHandlerMapping 。
/**
 * Look up a handler for the given request, falling back to the default
 * handler if no specific one is found.
 * @param request current HTTP request
 * @return the corresponding handler instance, or the default handler
 * @see #getHandlerInternal
 */
@Override
@Nullable
public final HandlerExecutionChain getHandler(HttpServletRequest request) throws Exception {
    // 根据request获取对应的handler(Controller),这一步返回的是处理器执行链
    Object handler = getHandlerInternal(request);
    if (handler == null) {
        // 如果没有对应request的handler则使用默认的handler
        handler = getDefaultHandler();
    }
    // 如果也没有提供默认的handler则无法继续处理返回null
    if (handler == null) {
        return null;
    }
    // Bean name or resolved handler?
    if (handler instanceof String) {
        String handlerName = (String) handler;
        handler = obtainApplicationContext().getBean(handlerName);
    }

    // 向处理器执行链中添加拦截器
    HandlerExecutionChain executionChain = getHandlerExecutionChain(handler, request);

    if (logger.isTraceEnabled()) {
        logger.trace("Mapped to " + handler);
    }
    else if (logger.isDebugEnabled() && !request.getDispatcherType().equals(DispatcherType.ASYNC)) {
        logger.debug("Mapped to " + executionChain.getHandler());
    }

    // 跨域相关
    if (CorsUtils.isCorsRequest(request)) {
        CorsConfiguration globalConfig = this.globalCorsConfigSource.getCorsConfiguration(request);
        CorsConfiguration handlerConfig = getCorsConfiguration(handler, request);
        CorsConfiguration config = (globalConfig != null ? globalConfig.combine(handlerConfig) : handlerConfig);
        executionChain = getCorsHandlerExecutionChain(request, executionChain, config);
    }

    return executionChain;
}
函数中首先会使用 getHandlerInternal() 方法根据 request 信息获取对应的 Handler,如果以 SimpleUrlHandlerMapping 为例分析,那么我们推断此步骤提供的功能很可能就是根据 URL 找到匹配的 Controller 并返回。当然如果没有找到对应的 Controller 处理器那么程序会尝试去查找配置中的默认处理器,当然,当查找的 controller 为 String 类型时,那就意味着返回的是配置的 bean 名称,需要根据 bean 名称查找对应的 bean,最后,还要通过 getHandlerExecutionChain() 方法对返回的 Handler 进行封装,以保证满足返回类型的匹配。
下面详细分析这个过程。
① 根据request查找对应的Handler
首先从根据 request 查找对应的 Handler 开始分析。
/**
 * 根据请求url寻找Handler
 * Look up a handler for the URL path of the given request.
 * @param request current HTTP request
 * @return the handler instance, or {@code null} if none found
 */
@Override
@Nullable
protected Object getHandlerInternal(HttpServletRequest request) throws Exception {
    // 截取用于匹配的url有效路径
    String lookupPath = getUrlPathHelper().getLookupPathForRequest(request);
    // 根据路径寻找Handler
    Object handler = lookupHandler(lookupPath, request);
    // 如果根据路径没有匹配到
    if (handler == null) {
        // We need to care for the default handler directly, since we need to
        // expose the PATH_WITHIN_HANDLER_MAPPING_ATTRIBUTE for it as well.
        Object rawHandler = null;
        // 如果请求的路径仅仅是”/”,那么使用RootHandler进行处理
        if ("/".equals(lookupPath)) {
            rawHandler = getRootHandler();
        }
        // 无法找到handler则使用默认handler
        if (rawHandler == null) {
            rawHandler = getDefaultHandler();
        }
        if (rawHandler != null) {
            // Bean name or resolved handler?
            // 根据beanName获取对应的bean
            if (rawHandler instanceof String) {
                String handlerName = (String) rawHandler;
                rawHandler = obtainApplicationContext().getBean(handlerName);
            }
            // 模版方法
            validateHandler(rawHandler, request);
            handler = buildPathExposingHandler(rawHandler, lookupPath, lookupPath, null);
        }
    }
    return handler;
}
首先先从请求中获取出用于匹配的 url 有效路径,利用 UrlPathHelper 的 getLookupPathForRequest(request) 方法。示例中我们的请求路径为:http://localhost:8080/mvc_test/userlist,那么截取到用于匹配的 url 有效路径为:/userlist。
然后调用 lookupHandler(lookupPath, request) 方法根据 uri 去寻找合适的处理器。
/**
 * 根据Url寻找handler
 * Look up a handler instance for the given URL path.
 * <p>Supports direct matches, e.g. a registered "/test" matches "/test",
 * and various Ant-style pattern matches, e.g. a registered "/t*" matches
 * both "/test" and "/team". For details, see the AntPathMatcher class.
 * <p>Looks for the most exact pattern, where most exact is defined as
 * the longest path pattern.
 * @param urlPath the URL the bean is mapped to
 * @param request current HTTP request (to expose the path within the mapping to)
 * @return the associated handler instance, or {@code null} if not found
 * @see #exposePathWithinMapping
 * @see org.springframework.util.AntPathMatcher
 */
@Nullable
protected Object lookupHandler(String urlPath, HttpServletRequest request) throws Exception {
   // 直接匹配情况的处理
   Object handler = this.handlerMap.get(urlPath);
   if (handler != null) {
      // Bean name or resolved handler?
      if (handler instanceof String) {
         String handlerName = (String) handler;
         handler = obtainApplicationContext().getBean(handlerName);
      }
      validateHandler(handler, request);
      return buildPathExposingHandler(handler, urlPath, urlPath, null);
   }

   // 通配符匹配的处理
   List<String> matchingPatterns = new ArrayList<>();
   for (String registeredPattern : this.handlerMap.keySet()) {
      if (getPathMatcher().match(registeredPattern, urlPath)) {
         matchingPatterns.add(registeredPattern);
      }
      else if (useTrailingSlashMatch()) {
         if (!registeredPattern.endsWith("/") && getPathMatcher().match(registeredPattern + "/", urlPath)) {
            matchingPatterns.add(registeredPattern +"/");
         }
      }
   }

   String bestMatch = null;
   Comparator<String> patternComparator = getPathMatcher().getPatternComparator(urlPath);
   if (!matchingPatterns.isEmpty()) {
      matchingPatterns.sort(patternComparator);
      if (logger.isTraceEnabled() && matchingPatterns.size() > 1) {
         logger.trace("Matching patterns " + matchingPatterns);
      }
      bestMatch = matchingPatterns.get(0);
   }
   if (bestMatch != null) {
      handler = this.handlerMap.get(bestMatch);
      if (handler == null) {
         if (bestMatch.endsWith("/")) {
            handler = this.handlerMap.get(bestMatch.substring(0, bestMatch.length() - 1));
         }
         if (handler == null) {
            throw new IllegalStateException(
                  "Could not find handler for best pattern match [" + bestMatch + "]");
         }
      }
      // Bean name or resolved handler?
      if (handler instanceof String) {
         String handlerName = (String) handler;
         handler = obtainApplicationContext().getBean(handlerName);
      }
      validateHandler(handler, request);
      String pathWithinMapping = getPathMatcher().extractPathWithinPattern(bestMatch, urlPath);

      // There might be multiple 'best patterns', let's make sure we have the correct URI template variables
      // for all of them
      Map<String, String> uriTemplateVariables = new LinkedHashMap<>();
      for (String matchingPattern : matchingPatterns) {
         if (patternComparator.compare(bestMatch, matchingPattern) == 0) {
            Map<String, String> vars = getPathMatcher().extractUriTemplateVariables(matchingPattern, urlPath);
            Map<String, String> decodedVars = getUrlPathHelper().decodePathVariables(request, vars);
            uriTemplateVariables.putAll(decodedVars);
         }
      }
      if (logger.isTraceEnabled() && uriTemplateVariables.size() > 0) {
         logger.trace("URI variables " + uriTemplateVariables);
      }
      // 将handler封装成处理器执行链进行返回
      return buildPathExposingHandler(handler, bestMatch, pathWithinMapping, uriTemplateVariables);
   }

   // No handler found...
   return null;
}
根据 URL 获取对应 Handler 的匹配规则代码实现起来虽然很长,但是并不难理解,考虑了直接匹配与通配符两种情况。示例中,我们配置了 /userlist 对应的对象为 UserController 实例。

如果对应的对象只是String,那么利用 obtainApplicationContext().getBean(handlerName) 尝试从容器中获取该名称的对象。
获取到处理器,这里就是 UserController 实例后,Spring还将其包装成了处理器执行链。
/**
 * 将handler封装成处理器执行链进行返回
 * Build a handler object for the given raw handler, exposing the actual
 * handler, the {@link #PATH_WITHIN_HANDLER_MAPPING_ATTRIBUTE}, as well as
 * the {@link #URI_TEMPLATE_VARIABLES_ATTRIBUTE} before executing the handler.
 * <p>The default implementation builds a {@link HandlerExecutionChain}
 * with a special interceptor that exposes the path attribute and uri template variables
 * @param rawHandler the raw handler to expose
 * @param pathWithinMapping the path to expose before executing the handler
 * @param uriTemplateVariables the URI template variables, can be {@code null} if no variables found
 * @return the final handler object
 */
protected Object buildPathExposingHandler(Object rawHandler, String bestMatchingPattern,
      String pathWithinMapping, @Nullable Map<String, String> uriTemplateVariables) {

    HandlerExecutionChain chain = new HandlerExecutionChain(rawHandler);
    chain.addInterceptor(new PathExposingHandlerInterceptor(bestMatchingPattern, pathWithinMapping));
    if (!CollectionUtils.isEmpty(uriTemplateVariables)) {
        chain.addInterceptor(new UriTemplateVariablesHandlerInterceptor(uriTemplateVariables));
    }
    return chain;
}
在函数中我们看到了通过将Handler以参数形式传入,并构建 HandlerExecutionChain 类型实例,加入了两个拦截器。此时我们似乎已经了解了Spring这样大番周折的目的。链处理机制,是Spring中非常常用的处理方式,是AOP中的重要组成部分,可以方便地对目标对象进行扩展及拦截,这是非常优秀的设计。

HandlerExecutionChain 类声明如下:
public class HandlerExecutionChain {

    private final Object handler;

    @Nullable
    private HandlerInterceptor[] interceptors;

    @Nullable
    private List<HandlerInterceptor> interceptorList;

    private int interceptorIndex = -1;
② 加入拦截器到执行链
getHandlerExecutionChain() 函数最主要的目的是将配置中的对应拦截器加入到执行链中,以保证这些拦截器可以有效地作用于目标对象。
/**
 * 获取处理器执行链,将配置中的对应拦截器加入到执行链中,保证这些拦截器可以有效的作用于目标对象
 * Build a {@link HandlerExecutionChain} for the given handler, including
 * applicable interceptors.
 * <p>The default implementation builds a standard {@link HandlerExecutionChain}
 * with the given handler, the handler mapping's common interceptors, and any
 * {@link MappedInterceptor MappedInterceptors} matching to the current request URL. Interceptors
 * are added in the order they were registered. Subclasses may override this
 * in order to extend/rearrange the list of interceptors.
 * <p><b>NOTE:</b> The passed-in handler object may be a raw handler or a
 * pre-built {@link HandlerExecutionChain}. This method should handle those
 * two cases explicitly, either building a new {@link HandlerExecutionChain}
 * or extending the existing chain.
 * <p>For simply adding an interceptor in a custom subclass, consider calling
 * {@code super.getHandlerExecutionChain(handler, request)} and invoking
 * {@link HandlerExecutionChain#addInterceptor} on the returned chain object.
 * @param handler the resolved handler instance (never {@code null})
 * @param request current HTTP request
 * @return the HandlerExecutionChain (never {@code null})
 * @see #getAdaptedInterceptors()
 */
protected HandlerExecutionChain getHandlerExecutionChain(Object handler, HttpServletRequest request) {
    // 先对上一步返回的结果类型进行强转为HandlerExecutionChain
    HandlerExecutionChain chain = (handler instanceof HandlerExecutionChain ?
                                   (HandlerExecutionChain) handler : new HandlerExecutionChain(handler));

    // 截取用于匹配的url有效路径
    String lookupPath = this.urlPathHelper.getLookupPathForRequest(request);

    // 将this.adaptedInterceptors中与请求url有效路径匹配的的拦截器添加到执行链中
    for (HandlerInterceptor interceptor : this.adaptedInterceptors) {
        if (interceptor instanceof MappedInterceptor) {
            MappedInterceptor mappedInterceptor = (MappedInterceptor) interceptor;
            if (mappedInterceptor.matches(lookupPath, this.pathMatcher)) {
                chain.addInterceptor(mappedInterceptor.getInterceptor());
            }
        }
        else {
            chain.addInterceptor(interceptor);
        }
    }
    return chain;
}
没找到对应的Handler的错误处理
每个请求都应该对应着一 Handler,或者说是包装着 Handler 以及拦截器的执行链。这是因为每个请求都会在后台有相应的逻辑处理对应,而逻辑的实现就是在Handler 中,所以一旦遇到没有找到 Handler 的情况(正常情况下如果没有 URL 匹配的 Handler,开发人员可以设置默认的 Handler 来处理请求,但是如果默认请求也未设置就会出现 Handler 为空的情况),就只能通过 response 向用户返回错误信息。
// 没获取到就报错,通过response反馈错误信息
if (mappedHandler == null) {
    noHandlerFound(processedRequest, response);
    return;
}
doDispatch() 函数中当发现获取的处理器执行链为空时,调用 noHandlerFound(processedRequest, response) 方法反馈错误信息并直接返回。我们具体查看该方法。
/**
 * 没找到对应的Handler的错误处理
 * No handler found -> set appropriate HTTP response status.
 * @param request current HTTP request
 * @param response current HTTP response
 * @throws Exception if preparing the response failed
 */
protected void noHandlerFound(HttpServletRequest request, HttpServletResponse response) throws Exception {
    if (pageNotFoundLogger.isWarnEnabled()) {
        pageNotFoundLogger.warn("No mapping for " + request.getMethod() + " " + getRequestUri(request));
    }
    if (this.throwExceptionIfNoHandlerFound) {
        throw new NoHandlerFoundException(request.getMethod(), getRequestUri(request),
                                          new ServletServerHttpRequest(request).getHeaders());
    }
    else {
        // 返回404错误
        response.sendError(HttpServletResponse.SC_NOT_FOUND);
    }
}
其实错误处理方式,就是发出警告和报出异常,警告和异常的抛出根据我们的配置级别选择性报出。如果不抛异常,那么就会返回 404 not found 的错误。
根据处理器获取处理器适配器
doDispatch() 函数中利用 getHandlerAdapter() 方法进行获取匹配处理器的处理器适配器,所以传入的参数就是处理器 handler,在我们的示例中就是保存在处理器执行链中的处理器 UserController 对象。
// 根据处理器获取适合当前请求的处理器适配器
HandlerAdapter ha = getHandlerAdapter(mappedHandler.getHandler());
查看 getHandlerAdapter() 方法:
/**
 * 根据当前Handler寻找对应的HandlerAdapter
 * Return the HandlerAdapter for this handler object.
 * @param handler the handler object to find an adapter for
 * @throws ServletException if no HandlerAdapter can be found for the handler. This is a fatal error.
 */
protected HandlerAdapter getHandlerAdapter(Object handler) throws ServletException {
    if (this.handlerAdapters != null) {
        // 遍历所有的适配器来选择合适的适配器
        for (HandlerAdapter adapter : this.handlerAdapters) {
            // 通过适配器的support()方法判断是否适合
            if (adapter.supports(handler)) {
                return adapter;
            }
        }
    }
    throw new ServletException("No adapter for handler [" + handler +
                               "]: The DispatcherServlet configuration needs to include a HandlerAdapter that supports this handler");
}
根据当前 Handler 寻找对应的 HandlerAdapter 的方法其实就是对所有的适配器进行遍历,如果发现适配器匹配上了处理器,那么直接返回该适配器即可。所以,关键的在于如何验证适配器是否符合该处理器。而这一点其实是靠每一个处理器适配器中的 supports() 方法完成的。
在上一部分Spring MVC子容器的初始化过程中我们讨论了 HandlerAdapters 的初始化,了解了在默认情况下普通的 Web 请求会交给 SimpleControllerHandlerAdapter 去处理。即使我们没有注册 SimpleControllerHandlerAdapter 处理器适配器,系统也会默认帮我们注册好。下面我们以 SimpleControllerHandlerAdapter 中的 supports() 方法为例来分析是否适合的逻辑。
/**
 * 判断该处理器适配器是否适合该请求,标准是handler是Controller即可
 * @param handler handler object to check
 * @return
 */
@Override
public boolean supports(Object handler) {
    return (handler instanceof Controller);
}
其实很简单,只要处理器的类型是 Controller,SimpleControllerHandlerAdapter 适配器就完全OK。分析到这里,一切已经明了,SimpleControllerHandlerAdapter 就是用于处理普通的 Web 请求的,而且对于SpringMVC来说,我们会把逻辑封装至 Controller 的子类中,例如我们之前的引导示例 UserController 就是继承自 AbstractController,而 AbstractController 实现 Controller 接口。
经过这一步,根据处理器获取合适处理器适配器,获得到了一个 SimpleControllerHandlerAdapter 类型的适配器。
缓存处理
在研究Spring对缓存处理的功能支持前,我们先了解一个概念:Last-Modified 缓存机制。
-
在客户端第一次输入URL 时,服务器端会返回内容和状态码 200,表示请求成功,同时会添加一个 “Last-Modified” 的响应头,表示此文件在服务器上的最后更新时间。例如图中所示的最后更新格林尼治时间为 2018-11-21 3:24:27。
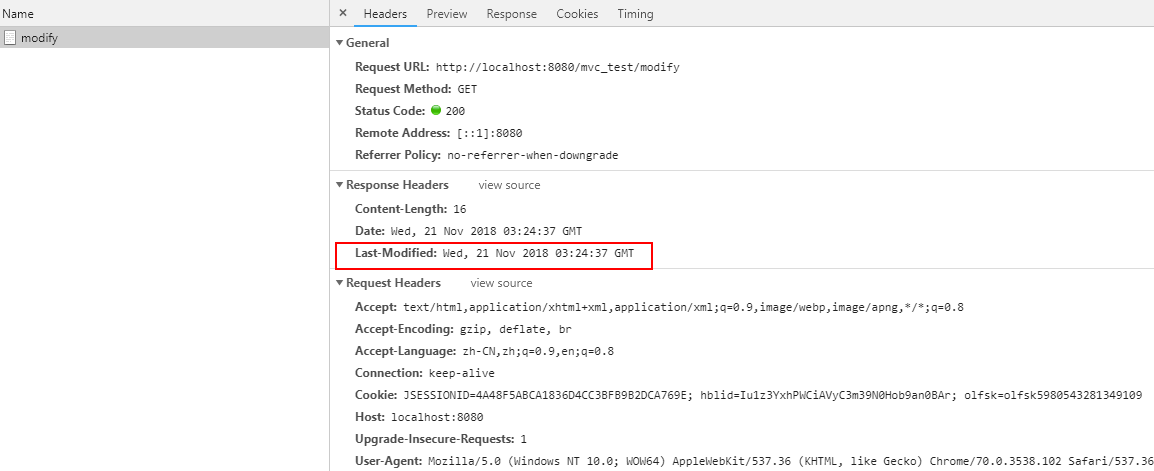
-
客户端第二次请求此 URL 时,客户端会向服务器发送请求头 “If-Modified-Since”,询问服务器该时间之后当前请求内容是否有被修改过。如下图所示,请求头中的格林尼治时间为 2018-11-21 3:24:27,如果服务器端的内容没有发生变化,则自动返回 HTTP 304 状态码。该状态码只要响应头,内容为空,这样就节省了网络带宽,对比上图的响应头,明显少了 Content Length。

想要使用Spring提供的对 Last-Modified 机制的支持,只需要 Controller 实现 LastModified 接口,。我们重新定义一个 Controller 作为演示。
public class ModifyController extends AbstractController implements LastModified {

    private long lastModified;

    @Override
    protected ModelAndView handleRequestInternal(HttpServletRequest request, HttpServletResponse response) throws Exception {
        response.getWriter().write("test last modify");
        return null;
    }

    @Override
    public long getLastModified(HttpServletRequest request) {
        if (lastModified == 0L) {
            lastModified = System.currentTimeMillis();
        }
        return lastModified;
    }
}
ModifyController 只需要实现 LastModified 接口的 getLastModified() 方法,保证当内容发生改变时返回最新的修改时间即可。也就是说,想要更新服务器内容让浏览器获得到,必须在内容更新完及时的更新 lastModified 的值并返回给 getLastModified() 方法。
Spring判断是否过期,通过判断请求的 “If-Modified-Since” 是否大于等于当前的 getLastModified() 方法的时间戳。如果是,则认为没有修改。也就是说浏览器记住了上一次请求服务器内容更新时间,如果服务器后面把这个时间进行更新的话,那么浏览器记住的上一次更新时间肯定是早于服务器最近一次更新时间的。据此客户端可以通过将自己认为的最近一次更新和服务器真实的最近一次更新比较来判断是否返回缓存。
测试的结果就是开头的两张截图。
我们一起研究一下关于 HTTP 缓存部分的Spring实现。
// 缓存处理:如果当前handler支持last-modified头处理
String method = request.getMethod();  // 获取请求类型
boolean isGet = "GET".equals(method);
if (isGet || "HEAD".equals(method)) {
    // 获取上一次服务器端内容更新时间
    long lastModified = ha.getLastModified(request, mappedHandler.getHandler());
    // 检测当前请求的If-Modified-Since时间和最近一次服务器端内容更新时间进行比较
    if (new ServletWebRequest(request, response).checkNotModified(lastModified) && isGet) {
        return;
    }
}
lastModified 就是我们服务器真实的最近一次更新时间,是需要我们的 Controller 自己实现返回数值的。获取方法通过处理器适配器 SimpleControllerHandlerAdapter 中的 getLastModified() 方法。查看方法内容,因为首先会对处理器进行判断是否实现了 LastModified 接口,然后会调用处理器重写的 getLastModified() 方法返回服务器最近一次更新时间。
/**
 * 获取上一次服务器端内容更新时间
 * @param request current HTTP request
 * @param handler handler to use
 * @return
 */
@Override
public long getLastModified(HttpServletRequest request, Object handler) {
    // 所以需要实现LastModified接口,因为这一步会判断
    if (handler instanceof LastModified) {
        return ((LastModified) handler).getLastModified(request);
    }
    return -1L;
}
获取到服务器真实的更新时间后,然后我们需要做的就是和当前请求的请求头中的 If-Modified-Since 时间进行比较来决定是否使用缓存。这里委托了 ServletWebRequest 的 checkNotModified() 方法进行判断,在 checkNotModified() 方法不仅仅要比较,如果发现更新了还要将真实的服务器更新值设置给响应头的 Last-Modified 。可以具体查看 checkNotModified() 方法。
@Override
public boolean checkNotModified(@Nullable String etag, long lastModifiedTimestamp) {
    HttpServletResponse response = getResponse();
    if (this.notModified || (response != null && HttpStatus.OK.value() != response.getStatus())) {
        return this.notModified;
    }

    // Evaluate conditions in order of precedence.
    // See https://tools.ietf.org/html/rfc7232#section-6

    if (validateIfUnmodifiedSince(lastModifiedTimestamp)) {
        if (this.notModified && response != null) {
            response.setStatus(HttpStatus.PRECONDITION_FAILED.value());
        }
        return this.notModified;
    }

    boolean validated = validateIfNoneMatch(etag);
    if (!validated) {
        // 比较If-Modified-Since和lastModifiedTimestamp
        validateIfModifiedSince(lastModifiedTimestamp);
    }

    // Update response
    if (response != null) {
        boolean isHttpGetOrHead = SAFE_METHODS.contains(getRequest().getMethod());
        if (this.notModified) {
            response.setStatus(isHttpGetOrHead ?
                               HttpStatus.NOT_MODIFIED.value() : HttpStatus.PRECONDITION_FAILED.value());
        }
        if (isHttpGetOrHead) {
            if (lastModifiedTimestamp > 0 && parseDateValue(response.getHeader(LAST_MODIFIED)) == -1) {
                // 更新Last-Modified为最新的更新时间
                response.setDateHeader(LAST_MODIFIED, lastModifiedTimestamp);
            }
            if (StringUtils.hasLength(etag) && response.getHeader(ETAG) == null) {
                response.setHeader(ETAG, padEtagIfNecessary(etag));
            }
        }
    }

    return this.notModified;
}

private boolean validateIfModifiedSince(long lastModifiedTimestamp) {
    if (lastModifiedTimestamp < 0) {
        return false;
    }
    long ifModifiedSince = parseDateHeader(IF_MODIFIED_SINCE);
    if (ifModifiedSince == -1) {
        return false;
    }
    // 如果当前请求中的If-Modified-Since时间晚于服务器时间,则认为是最新的,直接使用缓存
    this.notModified = ifModifiedSince >= (lastModifiedTimestamp / 1000 * 1000);
    return true;
}
调用执行链中的拦截器
Servlet API定义的 servlet 过滤器可以在 servlet 处理每个 Web 请求的前后分别对它进行前置处理和后置处理。此外,有些时候,你可能只想处理由某些SpringMVC处理程序处理的 Web 请求,并在这些处理程序返回的模型属性被传递到视图之前,对它们进行一些操作。
SpringMVC允许你通过处理拦截Web请求,进行前置处理和后置处理。处理拦截是在Spring的Web应用程序上下文中配置的,因此它们可以利用各种容器特性,并引用容器中声明的任何 bean。处理拦截是针对特殊的处理器映射器中进行注册的,因此它只拦截通过这些处理器映射器的请求。每个处理拦截都必须实现 HandlerInterceptor 接口,它包含三个需要你实现的回调方法:preHandle()、postHandle() 和 afterCompletion()。第一个和第二个方法分别是在处理程序处理请求之前和之后被调用的。第二个方法还允许访问返回的 ModelAndView 对象,因此可以在它里面操作模型属性。最后一个方法是在所有请求处理完成之后被调用的。
public interface HandlerInterceptor {

   default boolean preHandle(HttpServletRequest request, HttpServletResponse response, Object handler)
         throws Exception {

      return true;
   }

   default void postHandle(HttpServletRequest request, HttpServletResponse response, Object handler,
         @Nullable ModelAndView modelAndView) throws Exception {
   }

   default void afterCompletion(HttpServletRequest request, HttpServletResponse response, Object handler,
         @Nullable Exception ex) throws Exception {
   }
}
我们自定义一个拦截器示例,主要用于记录一次请求花费的时间。
public class CountTimeInterceptor implements HandlerInterceptor {

    @Override
    public boolean preHandle(HttpServletRequest request, HttpServletResponse response, Object handler) throws Exception {
        long startTime = System.currentTimeMillis();
        request.setAttribute("startTime", startTime);
        return true;
    }

    @Override
    public void postHandle(HttpServletRequest request, HttpServletResponse response, Object handler, ModelAndView modelAndView) throws Exception {
        long startTime = (long) request.getAttribute("startTime");
        request.removeAttribute("startTime");
        long endTime = System.currentTimeMillis();
        modelAndView.addObject("handingTime", endTime - startTime);
    }

    @Override
    public void afterCompletion(HttpServletRequest request, HttpServletResponse response, Object handler, Exception ex) throws Exception {

    }
}
我们需要将拦截器注册进入处理器执行链。
<bean id="simpleUrlMapping" class="org.springframework.web.servlet.handler.SimpleUrlHandlerMapping">
    <property name="mappings">
        <props>
            <prop key="/userlist">userController</prop>
            <prop key="/modify">modifyController</prop>
        </props>
    </property>
    <property name="interceptors">
        <list>
            <ref bean="countTimeInterceptor" />
        </list>
    </property>
</bean>

<bean id="countTimeInterceptor" class="guo.ping.mvctest.interceptor.CountTimeInterceptor" />
测试结果如下,我们在 jsp 中通过 {handingTime} 显示时间。
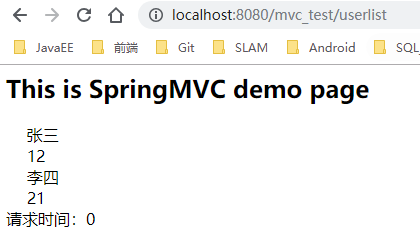
我们具体研究一下拦截器的执行原理。
// 调用拦截器执行链中所有的拦截器的preHandler方法
if (!mappedHandler.applyPreHandle(processedRequest, response)) {
   // 如果拦截器中返回false,那么就执行到这里直接返回了
   return;
}
进入处理器执行链 HandlerExecutionChain 中的 applyPreHandle() 方法。
/**
 * 调用拦截器执行链中所有的拦截器的preHandler方法
 * Apply preHandle methods of registered interceptors.
 * @return {@code true} if the execution chain should proceed with the
 * next interceptor or the handler itself. Else, DispatcherServlet assumes
 * that this interceptor has already dealt with the response itself.
 */
boolean applyPreHandle(HttpServletRequest request, HttpServletResponse response) throws Exception {
    // 首先获取执行链中所有的拦截器
    HandlerInterceptor[] interceptors = getInterceptors();
    if (!ObjectUtils.isEmpty(interceptors)) {
        // 遍历所有拦截器依次执行其中的preHandle方法
        for (int i = 0; i < interceptors.length; i++) {
            HandlerInterceptor interceptor = interceptors[i];
            if (!interceptor.preHandle(request, response, this.handler)) {
                // 如果拦截器执行到这里,说明其中有拦截器的preHandle方法返回为true,导致applyPreHandle返回为false
                triggerAfterCompletion(request, response, null);
                return false;
            }
            this.interceptorIndex = i;
        }
    }
    return true;
}
首先获取执行链中所有的拦截器,可以看到现在有了我们自定义拦截器的存在。

applyPreHandle() 方法主要就是遍历获得所有的拦截器,并挨个执行它们的 preHandle() 方法。这里要说的是,如果有拦截器的 preHandle() 方法返回为 true,导致 applyPreHandle() 返回为 false,那么根据 if (!mappedHandler.applyPreHandle(processedRequest, response)),括号中表达式值为 true,方法会直接返回,不继续处理。这一点与我们平时使用拦截器的返回值规则一致。
逻辑处理
对于逻辑处理其实是通过处理器适配器调用其 handle() 方法,方法处理完会返回视图。
// 利用处理器适配器调用handler方法进行逻辑处理并返回视图
mv = ha.handle(processedRequest, response, mappedHandler.getHandler());
查看处理器适配器 SimpleControllerHandlerAdapter 的 handle() 方法。
/**
 * 处理请求,返回视图
 * @param request current HTTP request
 * @param response current HTTP response
 * @param handler handler to use. This object must have previously been passed
 * to the {@code supports} method of this interface, which must have
 * returned {@code true}.
 * @return
 * @throws Exception
 */
@Override
@Nullable
public ModelAndView handle(HttpServletRequest request, HttpServletResponse response, Object handler)
      throws Exception {

    // 委托具体的Controller的handleRequest方法
    return ((Controller) handler).handleRequest(request, response);
}
本质还是调用处理器的方法去处理。同时这里把处理器强转为 Controller 类型,调用了我们自定义的 Controller 实现的 AbstractController 类中的 handleRequest 方法。
/**
 * 处理请求返回视图
 * @param request current HTTP request
 * @param response current HTTP response
 * @return
 * @throws Exception
 */
@Override
@Nullable
public ModelAndView handleRequest(HttpServletRequest request, HttpServletResponse response)
      throws Exception {

    if (HttpMethod.OPTIONS.matches(request.getMethod())) {
        response.setHeader("Allow", getAllowHeader());
        return null;
    }

    // Delegate to WebContentGenerator for checking and preparing.
    checkRequest(request);
    prepareResponse(response);

    // 如果需要session内的同步执行
    if (this.synchronizeOnSession) {
        HttpSession session = request.getSession(false);
        if (session != null) {
            Object mutex = WebUtils.getSessionMutex(session);
            synchronized (mutex) {
                // 抽象方法,也就是我们的Controller对应要实现的方法,包含我们的处理逻辑
                return handleRequestInternal(request, response);
            }
        }
    }

    // 抽象方法,也就是我们的Controller对应要实现的方法,包含我们的处理逻辑
    return handleRequestInternal(request, response);
}
可以看到 handleRequest 方法中的核心实现是调用 handleRequestInternal(request, response) 抽象方法,也就是我们自己实现的 Controller 中对应实现的方法,其中包含我们的处理逻辑。
视图名称转换
处理完逻辑后得到结果 ModelAndView 对象,视图名称可能需要添加前缀后缀进行转换。查看函数逻辑,可以知道这一步的完成需要我们初始化的 RequestToViewNameTranslator。
/**
 * Do we need view name translation?
 */
private void applyDefaultViewName(HttpServletRequest request, @Nullable ModelAndView mv) throws Exception {
    if (mv != null && !mv.hasView()) {
        String defaultViewName = getDefaultViewName(request);
        if (defaultViewName != null) {
            mv.setViewName(defaultViewName);
        }
    }
}

/**
 * Translate the supplied request into a default view name.
 * @param request current HTTP servlet request
 * @return the view name (or {@code null} if no default found)
 * @throws Exception if view name translation failed
 */
@Nullable
protected String getDefaultViewName(HttpServletRequest request) throws Exception {
    return (this.viewNameTranslator != null ? this.viewNameTranslator.getViewName(request) : null);
}
返回结果的处理
当逻辑处理完,视图名称转换结束,拦截器的后处理方法运行完毕,Spring又对得到的视图结果进行了最后的处理,主要包括异常视图的处理、根据视图跳转页面和完成处理后激活触发器。
/**
 * 处理返回结果,包括异常视图的处理、根据视图跳转页面、完成处理后激活触发器
 * Handle the result of handler selection and handler invocation, which is
 * either a ModelAndView or an Exception to be resolved to a ModelAndView.
 */
private void processDispatchResult(HttpServletRequest request, HttpServletResponse response,
      @Nullable HandlerExecutionChain mappedHandler, @Nullable ModelAndView mv,
      @Nullable Exception exception) throws Exception {

    boolean errorView = false;

    if (exception != null) {
        if (exception instanceof ModelAndViewDefiningException) {
            logger.debug("ModelAndViewDefiningException encountered", exception);
            mv = ((ModelAndViewDefiningException) exception).getModelAndView();
        }
        else {
            Object handler = (mappedHandler != null ? mappedHandler.getHandler() : null);
            // 异常视图的处理
            mv = processHandlerException(request, response, handler, exception);
            errorView = (mv != null);
        }
    }

    // Did the handler return a view to render?
    // 如果在Handler实例的处理中返回了view,那么需要做页面的处理
    if (mv != null && !mv.wasCleared()) {
        // 处理页面跳转
        render(mv, request, response);
        if (errorView) {
            WebUtils.clearErrorRequestAttributes(request);
        }
    }
    else {
        if (logger.isTraceEnabled()) {
            logger.trace("No view rendering, null ModelAndView returned.");
        }
    }

    if (WebAsyncUtils.getAsyncManager(request).isConcurrentHandlingStarted()) {
        // Concurrent handling started during a forward
        return;
    }

    if (mappedHandler != null) {
        // 完成处理激活触发器
        mappedHandler.triggerAfterCompletion(request, response, null);
    }
}
① 异常视图的处理
有时候系统运行过程中出现异常,而我们并不希望就此中断对用户的服务,而是至少告知客户当前系统在处理逻辑的过程中出现了异常,甚至告知他们因为什么原因导致的。Spring中的异常处理机制会帮我们完成这个工作。
其实,这里Spring主要的工作就是将逻辑引导至 HandlerExceptionResolver 类的 resolveException 方法,而 HandlerExceptionResolver 的使用,我们在讲解Spring MVC子容器的初始化的时候已经介绍过了。
/**
 * 异常视图的处理
 * Determine an error ModelAndView via the registered HandlerExceptionResolvers.
 * @param request current HTTP request
 * @param response current HTTP response
 * @param handler the executed handler, or {@code null} if none chosen at the time of the exception
 * (for example, if multipart resolution failed)
 * @param ex the exception that got thrown during handler execution
 * @return a corresponding ModelAndView to forward to
 * @throws Exception if no error ModelAndView found
 */
@Nullable
protected ModelAndView processHandlerException(HttpServletRequest request, HttpServletResponse response,
      @Nullable Object handler, Exception ex) throws Exception {

   // Success and error responses may use different content types
   request.removeAttribute(HandlerMapping.PRODUCIBLE_MEDIA_TYPES_ATTRIBUTE);

   // Check registered HandlerExceptionResolvers...
   ModelAndView exMv = null;
   if (this.handlerExceptionResolvers != null) {
      for (HandlerExceptionResolver resolver : this.handlerExceptionResolvers) {
         exMv = resolver.resolveException(request, response, handler, ex);
         if (exMv != null) {
            break;
         }
      }
   }
   if (exMv != null) {
      if (exMv.isEmpty()) {
         request.setAttribute(EXCEPTION_ATTRIBUTE, ex);
         return null;
      }
      // We might still need view name translation for a plain error model...
      if (!exMv.hasView()) {
         String defaultViewName = getDefaultViewName(request);
         if (defaultViewName != null) {
            exMv.setViewName(defaultViewName);
         }
      }
      if (logger.isTraceEnabled()) {
         logger.trace("Using resolved error view: " + exMv, ex);
      }
      if (logger.isDebugEnabled()) {
         logger.debug("Using resolved error view: " + exMv);
      }
      WebUtils.exposeErrorRequestAttributes(request, ex, getServletName());
      return exMv;
   }

   throw ex;
}
② 根据视图跳转页面
无论是一个系统还是一个站点,最重要的工作都是与用户进行交互,用户操作系统后无论下发的命令成功与否都需要给用户一个反馈,以便于用户进行下一步的判断。所以,在逻辑处理的最后一定会涉及一个页面跳转的问题。
/**
 * 页面跳转
 * Render the given ModelAndView.
 * <p>This is the last stage in handling a request. It may involve resolving the view by name.
 * @param mv the ModelAndView to render
 * @param request current HTTP servlet request
 * @param response current HTTP servlet response
 * @throws ServletException if view is missing or cannot be resolved
 * @throws Exception if there's a problem rendering the view
 */
protected void render(ModelAndView mv, HttpServletRequest request, HttpServletResponse response) throws Exception {
    // Determine locale for request and apply it to the response.
    Locale locale =
        (this.localeResolver != null ? this.localeResolver.resolveLocale(request) : request.getLocale());
    response.setLocale(locale);

    View view;
    String viewName = mv.getViewName();
    if (viewName != null) {
        // 解析视图名称返回视图
        view = resolveViewName(viewName, mv.getModelInternal(), locale, request);
        if (view == null) {
            throw new ServletException("Could not resolve view with name '" + mv.getViewName() +
                                       "' in servlet with name '" + getServletName() + "'");
        }
    }
    else {
        // No need to lookup: the ModelAndView object contains the actual View object.
        view = mv.getView();
        if (view == null) {
            throw new ServletException("ModelAndView [" + mv + "] neither contains a view name nor a " +
                                       "View object in servlet with name '" + getServletName() + "'");
        }
    }

    // Delegate to the View object for rendering.
    if (logger.isTraceEnabled()) {
        logger.trace("Rendering view [" + view + "] ");
    }
    try {
        if (mv.getStatus() != null) {
            response.setStatus(mv.getStatus().value());
        }
        // 实现页面跳转逻辑
        view.render(mv.getModelInternal(), request, response);
    }
    catch (Exception ex) {
        if (logger.isDebugEnabled()) {
            logger.debug("Error rendering view [" + view + "]", ex);
        }
        throw ex;
    }
}
首先需要解析视图名称,创建视图对象。
在上文中我们提到 DispatcherServlet 会根据 ModelAndView 选择合适的视图来进行渲染,而这一功能就是在 resolveViewName() 函数中完成的。
/**
 * 利用视图解析器去解析视图名称
 * Resolve the given view name into a View object (to be rendered).
 * <p>The default implementations asks all ViewResolvers of this dispatcher.
 * Can be overridden for custom resolution strategies, potentially based on
 * specific model attributes or request parameters.
 * @param viewName the name of the view to resolve
 * @param model the model to be passed to the view
 * @param locale the current locale
 * @param request current HTTP servlet request
 * @return the View object, or {@code null} if none found
 * @throws Exception if the view cannot be resolved
 * (typically in case of problems creating an actual View object)
 * @see ViewResolver#resolveViewName
 */
@Nullable
protected View resolveViewName(String viewName, @Nullable Map<String, Object> model,
      Locale locale, HttpServletRequest request) throws Exception {

    if (this.viewResolvers != null) {
        // 遍历所有的视图解析器去解析,不为空就返回
        for (ViewResolver viewResolver : this.viewResolvers) {
            View view = viewResolver.resolveViewName(viewName, locale);
            if (view != null) {
                return view;
            }
        }
    }
    return null;
}
resolveViewName() 函数就是遍历所有的视图解析器去解析 viewName,返回一个视图对象。我们在配置文件中注册的视图解析器为 org.Springframework.web.servlet.view.InternalResourceViewResolver,查看其中的 resolveViewName()函数。其实现是在其父类 AbstractCachingViewResolver 中完成的。
/**
 * 解析视图名称获取对应视图
 * @param viewName name of the view to resolve
 * @param locale the Locale in which to resolve the view.
 * ViewResolvers that support internationalization should respect this.
 * @return
 * @throws Exception
 */
@Override
@Nullable
public View resolveViewName(String viewName, Locale locale) throws Exception {
    if (!isCache()) {
        // 不存在缓存的情况下直接创建视图
        return createView(viewName, locale);
    }
    else {
        // 直接从缓存中取
        Object cacheKey = getCacheKey(viewName, locale);
        View view = this.viewAccessCache.get(cacheKey);
        if (view == null) {
            synchronized (this.viewCreationCache) {
                view = this.viewCreationCache.get(cacheKey);
                if (view == null) {
                    // Ask the subclass to create the View object.
                    view = createView(viewName, locale);
                    if (view == null && this.cacheUnresolved) {
                        view = UNRESOLVED_VIEW;
                    }
                    if (view != null) {
                        this.viewAccessCache.put(cacheKey, view);
                        this.viewCreationCache.put(cacheKey, view);
                    }
                }
            }
        }
        else {
            if (logger.isTraceEnabled()) {
                logger.trace(formatKey(cacheKey) + "served from cache");
            }
        }
        return (view != UNRESOLVED_VIEW ? view : null);
    }
}
对于视图对象,Spring采用了缓存机制。我们这里主要分析新建视图的逻辑。新建视图主要依赖 createView(viewName, locale) 实现。我们进入 AbstractCachingViewResolver 的子类 UrlBasedViewResolver 中的 createView(viewName, locale) 方法。
/**
 * 创建视图并加入缓存
 * Overridden to implement check for "redirect:" prefix.
 * <p>Not possible in {@code loadView}, since overridden
 * {@code loadView} versions in subclasses might rely on the
 * superclass always creating instances of the required view class.
 * @see #loadView
 * @see #requiredViewClass
 */
@Override
protected View createView(String viewName, Locale locale) throws Exception {
    // 如果当前解析器不能解析,直接返回null等下一个
    if (!canHandle(viewName, locale)) {
        return null;
    }

    // 处理前缀为redirect:xxx的情况
    if (viewName.startsWith(REDIRECT_URL_PREFIX)) {
        String redirectUrl = viewName.substring(REDIRECT_URL_PREFIX.length());
        RedirectView view = new RedirectView(redirectUrl,
                                             isRedirectContextRelative(), isRedirectHttp10Compatible());
        String[] hosts = getRedirectHosts();
        if (hosts != null) {
            view.setHosts(hosts);
        }
        return applyLifecycleMethods(REDIRECT_URL_PREFIX, view);
    }

    // 处理前缀为forward:xxx的情况
    if (viewName.startsWith(FORWARD_URL_PREFIX)) {
        String forwardUrl = viewName.substring(FORWARD_URL_PREFIX.length());
        InternalResourceView view = new InternalResourceView(forwardUrl);
        return applyLifecycleMethods(FORWARD_URL_PREFIX, view);
    }

    // 正常的话调用父类的创建视图方法
    return super.createView(viewName, locale);
}
可以看到,主要分为四种情况。首先如果当前解析器不能解析 viewName 直接返回 null,然后又分重定向和 forward 的处理,最后如果正常情况的话调用父类 AbstractCachingViewResolver 中创建视图方法。
/**
 * Create the actual View object.
 * <p>The default implementation delegates to {@link #loadView}.
 * This can be overridden to resolve certain view names in a special fashion,
 * before delegating to the actual {@code loadView} implementation
 * provided by the subclass.
 * @param viewName the name of the view to retrieve
 * @param locale the Locale to retrieve the view for
 * @return the View instance, or {@code null} if not found
 * (optional, to allow for ViewResolver chaining)
 * @throws Exception if the view couldn't be resolved
 * @see #loadView
 */
@Nullable
protected View createView(String viewName, Locale locale) throws Exception {
    return loadView(viewName, locale);
}

/**
 * 创建一个新的视图
 * Delegates to {@code buildView} for creating a new instance of the
 * specified view class. Applies the following Spring lifecycle methods
 * (as supported by the generic Spring bean factory):
 * <ul>
 * <li>ApplicationContextAware's {@code setApplicationContext}
 * <li>InitializingBean's {@code afterPropertiesSet}
 * </ul>
 * @param viewName the name of the view to retrieve
 * @return the View instance
 * @throws Exception if the view couldn't be resolved
 * @see #buildView(String)
 * @see org.springframework.context.ApplicationContextAware#setApplicationContext
 * @see org.springframework.beans.factory.InitializingBean#afterPropertiesSet
 */
@Override
protected View loadView(String viewName, Locale locale) throws Exception {
    AbstractUrlBasedView view = buildView(viewName);
    View result = applyLifecycleMethods(viewName, view);
    return (view.checkResource(locale) ? result : null);
}

// InternalResourceViewResolver.java
@Override
protected AbstractUrlBasedView buildView(String viewName) throws Exception {
    InternalResourceView view = (InternalResourceView) super.buildView(viewName);
    if (this.alwaysInclude != null) {
        view.setAlwaysInclude(this.alwaysInclude);
    }
    view.setPreventDispatchLoop(true);
    return view;
}

// UrlBasedViewResolver.java
/**
 * Creates a new View instance of the specified view class and configures it.
 * Does <i>not</i> perform any lookup for pre-defined View instances.
 * <p>Spring lifecycle methods as defined by the bean container do not have to
 * be called here; those will be applied by the {@code loadView} method
 * after this method returns.
 * <p>Subclasses will typically call {@code super.buildView(viewName)}
 * first, before setting further properties themselves. {@code loadView}
 * will then apply Spring lifecycle methods at the end of this process.
 * @param viewName the name of the view to build
 * @return the View instance
 * @throws Exception if the view couldn't be resolved
 * @see #loadView(String, java.util.Locale)
 */
protected AbstractUrlBasedView buildView(String viewName) throws Exception {
    Class<?> viewClass = getViewClass();
    Assert.state(viewClass != null, "No view class");

    AbstractUrlBasedView view = (AbstractUrlBasedView) BeanUtils.instantiateClass(viewClass);
    // 添加前缀以及后缀
    view.setUrl(getPrefix() + viewName + getSuffix());

    String contentType = getContentType();
    if (contentType != null) {
        // 设置contentType
        view.setContentType(contentType);
    }

    view.setRequestContextAttribute(getRequestContextAttribute());
    view.setAttributesMap(getAttributesMap());

    Boolean exposePathVariables = getExposePathVariables();
    if (exposePathVariables != null) {
        view.setExposePathVariables(exposePathVariables);
    }
    Boolean exposeContextBeansAsAttributes = getExposeContextBeansAsAttributes();
    if (exposeContextBeansAsAttributes != null) {
        view.setExposeContextBeansAsAttributes(exposeContextBeansAsAttributes);
    }
    String[] exposedContextBeanNames = getExposedContextBeanNames();
    if (exposedContextBeanNames != null) {
        view.setExposedContextBeanNames(exposedContextBeanNames);
    }

    return view;
}
这一段函数层层调用,主要是将创建一个具体的 view 对象,额外将视图解析器中的一些属性设置给 view 对象中。
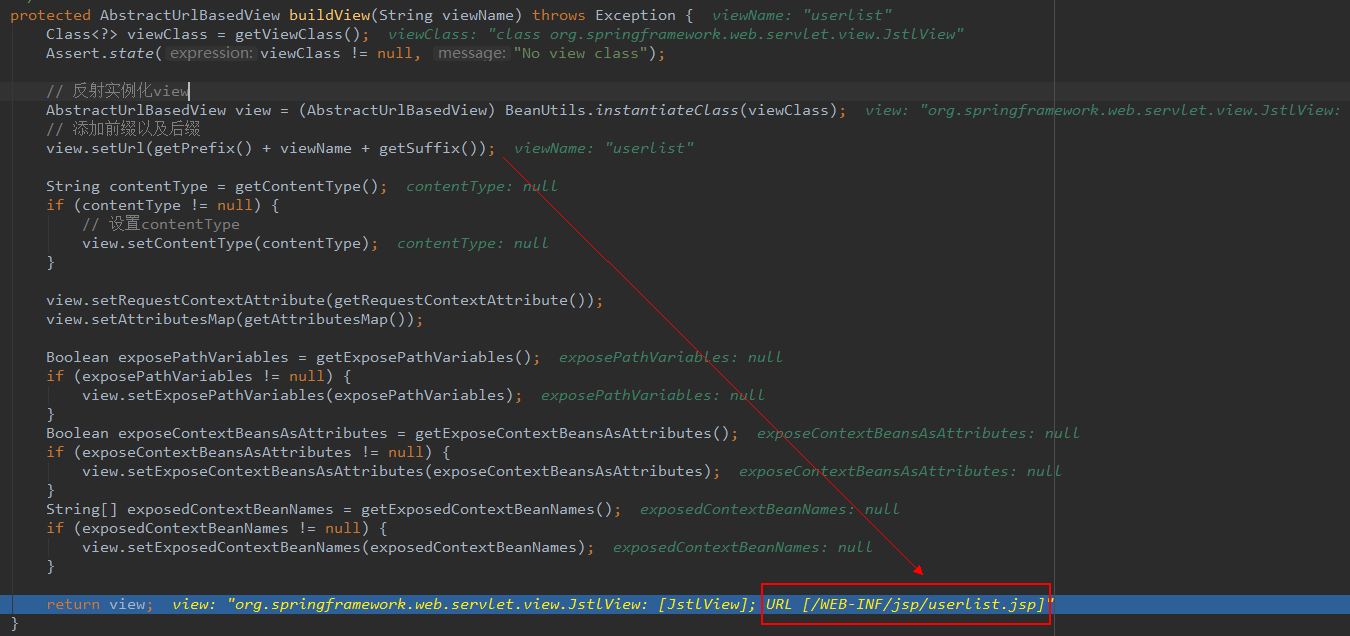
创建出视图对象,接下来需要跳转页面。
跳转页面的实现是靠 view 对象的 render() 方法完成的。进入 AbstractView 中的 render() 方法。
/**
 * 页面跳转
 * Prepares the view given the specified model, merging it with static
 * attributes and a RequestContext attribute, if necessary.
 * Delegates to renderMergedOutputModel for the actual rendering.
 * @see #renderMergedOutputModel
 */
@Override
public void render(@Nullable Map<String, ?> model, HttpServletRequest request,
      HttpServletResponse response) throws Exception {

   if (logger.isDebugEnabled()) {
      logger.debug("View " + formatViewName() +
            ", model " + (model != null ? model : Collections.emptyMap()) +
            (this.staticAttributes.isEmpty() ? "" : ", static attributes " + this.staticAttributes));
   }

   // 解析属性包装成map对象,后面会设置到request中
   Map<String, Object> mergedModel = createMergedOutputModel(model, request, response);
   // 准备response
   prepareResponse(request, response);
   // 处理页面跳转
   renderMergedOutputModel(mergedModel, getRequestToExpose(request), response);
}
在引导示例中,我们了解到对于 ModelAndView的使用,可以将一些属性直接放入其中,然后在页面上直接通过 JSTL 语法或者原始的 request 获取。这是一个很方便也很神奇的功能,但是实现却并不复杂,无非是把我们将要用到的属性放入 request 中,以便在其他地方可以直接调用,而解析这些属性的工作就是在 createMergedOutputModel() 函数中完成的。
/**
 * Creates a combined output Map (never {@code null}) that includes dynamic values and static attributes.
 * Dynamic values take precedence over static attributes.
 */
protected Map<String, Object> createMergedOutputModel(@Nullable Map<String, ?> model,
      HttpServletRequest request, HttpServletResponse response) {

    @SuppressWarnings("unchecked")
    Map<String, Object> pathVars = (this.exposePathVariables ?
                                    (Map<String, Object>) request.getAttribute(View.PATH_VARIABLES) : null);

    // Consolidate static and dynamic model attributes.
    int size = this.staticAttributes.size();
    size += (model != null ? model.size() : 0);
    size += (pathVars != null ? pathVars.size() : 0);

    // 定义存储属性的map
    Map<String, Object> mergedModel = new LinkedHashMap<>(size);
    mergedModel.putAll(this.staticAttributes);
    if (pathVars != null) {
        mergedModel.putAll(pathVars);
    }
    if (model != null) {
        mergedModel.putAll(model);
    }

    // Expose RequestContext?
    if (this.requestContextAttribute != null) {
        mergedModel.put(this.requestContextAttribute, createRequestContext(request, response, mergedModel));
    }

    return mergedModel;
}
获取到属性之后,需要将属性设置给 request,同时进行页面跳转逻辑的实现。这一步主要交给了 renderMergedOutputModel(mergedModel, getRequestToExpose(request), response) 函数实现。
/**
 * Render the internal resource given the specified model.
 * This includes setting the model as request attributes.
 */
@Override
protected void renderMergedOutputModel(
      Map<String, Object> model, HttpServletRequest request, HttpServletResponse response) throws Exception {

    // 将model中的数据以属性的方式设置到request中
    exposeModelAsRequestAttributes(model, request);

    // Expose helpers as request attributes, if any.
    exposeHelpers(request);

    // Determine the path for the request dispatcher.
    String dispatcherPath = prepareForRendering(request, response);

    // Obtain a RequestDispatcher for the target resource (typically a JSP).
    RequestDispatcher rd = getRequestDispatcher(request, dispatcherPath);
    if (rd == null) {
        throw new ServletException("Could not get RequestDispatcher for [" + getUrl() +
                                   "]: Check that the corresponding file exists within your web application archive!");
    }

    // If already included or response already committed, perform include, else forward.
    if (useInclude(request, response)) {
        response.setContentType(getContentType());
        if (logger.isDebugEnabled()) {
            logger.debug("Including [" + getUrl() + "]");
        }
        rd.include(request, response);
    }

    else {
        // Note: The forwarded resource is supposed to determine the content type itself.
        if (logger.isDebugEnabled()) {
            logger.debug("Forwarding to [" + getUrl() + "]");
        }
        rd.forward(request, response);
    }
}
设置 model 中的数据进入 request。
/**
 * 将model中的数据以属性的方式设置到request中
 * Expose the model objects in the given map as request attributes.
 * Names will be taken from the model Map.
 * This method is suitable for all resources reachable by {@link javax.servlet.RequestDispatcher}.
 * @param model a Map of model objects to expose
 * @param request current HTTP request
 */
protected void exposeModelAsRequestAttributes(Map<String, Object> model,
      HttpServletRequest request) throws Exception {

    model.forEach((name, value) -> {
        if (value != null) {
            request.setAttribute(name, value);
        }
        else {
            request.removeAttribute(name);
        }
    });
}
跳转页面通过 rd.forward(request, response) 实现。rd 是 RequestDispatcher 类型,这是 servlet 包下的一个接口,其中 forward() 方法将请求从一个 Servlet or JSP目标资源上转发到服务器上的另一个资源(servlet、jsp 文件或 html 文件,这些资源必须是当前 Web 上下文中的),让其它的资源去生成响应数据。
V. 总结
关于Spring MVC部分的源码分析,主要就是搭建了一个 hello world 级别的测试项目。随后我们对Spring父子容器的初始化进行了研究,理清其中的脉络关系。最后,着重研究 DispatcherServlet 的 “调度” 作用,如何处理请求,跳转页面,这其中涉及到很多的组件。
有关Spring MVC的研究还远远不够,Spring MVC提供的功能还有很多,特别是现在注解式开发,有必要后续继续研究。
整个《Spring源码深度解析》一书的内容差不多就到这里了,Spring的源码研究远远没有结束。Spring 5 中对于MVC 加入了新的特性,这些还都需要继续研究。