linux clk驱动框架
        <div class="article-info-box">
            <div class="article-bar-top d-flex">
                                                                            <span class="time">2016年06月14日 16:25:41</span>
                <div class="float-right">
                    <span class="read-count">阅读数:6184</span>
                                                                </div>
            </div>
        </div>

    </div>
</div>
<article>
    <div id="article_content" class="article_content clearfix csdn-tracking-statistics" data-pid="blog" data-mod="popu_307" data-dsm="post">
                <div class="markdown_views">
            <p>内核中提供了clk common framework子系统,用来完成对clock的统一管理。 <br>
我们将从如下几个方面来介绍clk子系统的内容:
1.  clk framework简介
2.  clk framework的实现
3.  clk和device tree
4.  如何添加自己的clock
- 1
- 2
- 3
- 4
一、 clk framework简介
clk framework是内核中用来统一管理clock的子系统。代码存在于kernel/driver/clk目录中。
要使用clkframework来实现厂商自己平台上的clock驱动,首先需要在defconfig中使能如下的几个CONFIG来配置内核。
CONFIG_CLKDEV_LOOKUP=y
CONFIG_HAVE_CLK_PREPARE=y
CONFIG_COMMON_CLK=y
- 1
- 2
- 3
除了这几个以外,还有一个是否打开DEBUG的开关配置:
CONFIG_COMMON_CLK_DEBUG=y
- 1
- 2
这个DEBUG开关是控制内核是否产生clk的debugfs的,如果配置了这个选项,内核将生成相应的debugfs,在启动后将会挂载于/sys/kernel/debug目录下。
clk framework是一个通用core模块,它主要提供了如下几个功能:
1.  向上提供给其他driver调用的接口API
2.  向下提供给clock driver注册的接口API
3.  debugfs创建
4.  若干个基于dts配置的通用clock模型(通过调用注册接口API)
- 1
- 2
- 3
- 4
它的框架图如下所示:
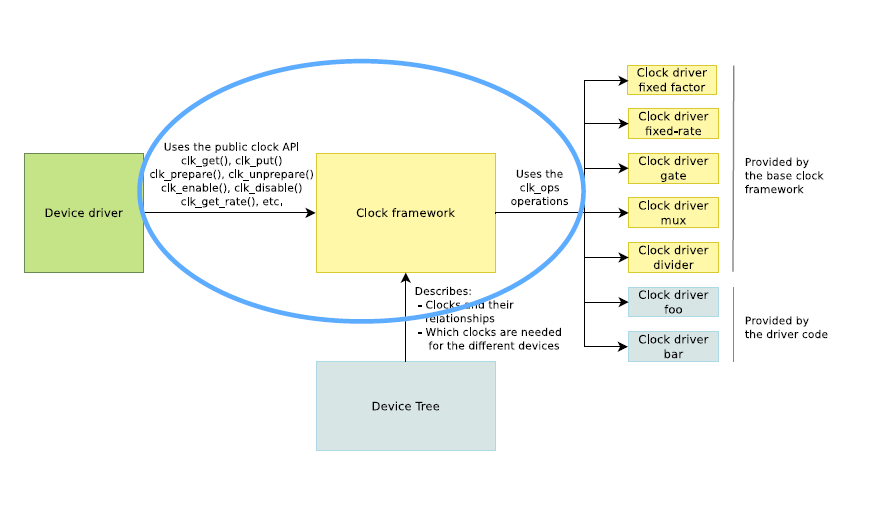
上图中的黄色区域都是clk core所实现的功能,灰色区域是clock驱动开发需要做的事情,而绿色区域是其他device driver需要使用clock时要调用到的clk功能。
二、 clk framework的实现
在开始介绍clk framework之前,首先需要了解一下几个重要的结构体:
struct clk_ops {
    int     (*prepare)(struct clk_hw *hw);
    void        (*unprepare)(struct clk_hw *hw);
    int     (*is_prepared)(struct clk_hw *hw);
    void        (*unprepare_unused)(struct clk_hw *hw);
    int     (*enable)(struct clk_hw *hw);
    void        (*disable)(struct clk_hw *hw);
    int     (*is_enabled)(struct clk_hw *hw);
    void        (*disable_unused)(struct clk_hw *hw);
    unsigned long   (*recalc_rate)(struct clk_hw *hw,
                    unsigned long parent_rate);
    long        (*round_rate)(struct clk_hw *hw, unsigned long,
                    unsigned long *);
    int     (*set_parent)(struct clk_hw *hw, u8 index);
    u8      (*get_parent)(struct clk_hw *hw);
    int     (*set_rate)(struct clk_hw *hw, unsigned long,
                    unsigned long);
    void        (*init)(struct clk_hw *hw);
};
- 1
- 2
- 3
- 4
- 5
- 6
- 7
- 8
- 9
- 10
- 11
- 12
- 13
- 14
- 15
- 16
- 17
- 18
- 19
- 20
- 21
这个结构体主要定义了一些用来操作硬件的回调函数,这个部分是需要厂商开发自己的clock驱动的时候实现的。
struct clk_hw {
    struct clk *clk;
    const struct clk_init_data *init;
};
struct clk_init_data {
    const char      *name;
    const struct clk_ops    *ops;
    const char      **parent_names;
    u8          num_parents;
    unsigned long       flags;
};
- 1
- 2
- 3
- 4
- 5
- 6
- 7
- 8
- 9
- 10
- 11
- 12
- 13
clk_hw结构体可以看到其中封装了一个clk_ops结构体,它是一个clk驱动需要实现的关键结构,厂商需要实现此结构体,并把它注册到clk framework。clk_hw是联系clk_ops和struct clk的纽带。它一般会被封装到一个厂商自己定义的更大的结构体中,主要是用来建立与struct clk的联系。
struct clk {
    const char      *name;
    const struct clk_ops    *ops;
    struct clk_hw       *hw;
    struct clk      *parent;
    const char      **parent_names;
    struct clk      **parents;
    u8          num_parents;
    unsigned long       rate;
    unsigned long       new_rate;
    unsigned long       flags;
    unsigned int        enable_count;
    unsigned int        prepare_count;
    struct hlist_head   children;
    struct hlist_node   child_node;
    unsigned int        notifier_count;
#ifdef CONFIG_COMMON_CLK_DEBUG
    struct dentry       *dentry;
#endif
};
- 1
- 2
- 3
- 4
- 5
- 6
- 7
- 8
- 9
- 10
- 11
- 12
- 13
- 14
- 15
- 16
- 17
- 18
- 19
- 20
- 21
- 22
这个是framework core中关键的结构体,core中都是通过这个结构体来管理clk的,它主要是用来抽象clk硬件的差异,并完成一些通用操作的封装。其中的hw成员变量是与之关联的clk_hw结构。由上面的介绍可知,通过struct clk_hw和struct clk就把差异的部分和通用部分给联系 起来了。
介绍了结构体以后,我们就来看一下clk framework提供的具体功能吧。这部分的实现主要在clk.c和clkdev.c两个源文件中。
(1) 向上提供的接口API
struct clk *clk_get(struct device *dev, const char *id);
struct clk *devm_clk_get(struct device *dev, const char *id);
int clk_enable(struct clk *clk);
void clk_disable(struct clk *clk);
unsigned long clk_get_rate(struct clk *clk);
void clk_put(struct clk *clk);
long clk_round_rate(struct clk *clk, unsigned long rate);
int clk_set_rate(struct clk *clk, unsigned long rate);
int clk_set_parent(struct clk *clk, struct clk *parent);
struct clk *clk_get_parent(struct clk *clk);
int clk_prepare(struct clk *clk);
void clk_unprepare(struct clk *clk);
- 1
- 2
- 3
- 4
- 5
- 6
- 7
- 8
- 9
- 10
- 11
- 12
这些都是比较重要的api接口,主要是在device driver中调用来设置device的clk的。这部分的实现最终会调用到clk_ops中的回调函数来设置硬件并且会更新core中的clk链表。具体实现自行阅读源代码。
除了上面介绍的api,作为一个clk设备,它有可能会改变rate,那么作为device driver的一方需要获取到这个改变,并作出相应的响应,那么就可以通过通知功能的接口来实现,我们可以在感兴趣的clk上注册notifier_block,然后当该clk的rate发生了改变的时候会通过__clk_notify,通知到相应的回调函数,来做相应的处理。
int clk_notifier_register(struct clk *clk, struct notifier_block *nb);
int clk_notifier_unregister(struct clk *clk, struct notifier_block *nb);
- 1
- 2
- 3
以上是device driver开发中可能会使用到的接口,接下来我们以clk_enbale为例做个简单介绍:
int clk_enable(struct clk *clk)
{
    unsigned long flags;
    int ret;

    flags = clk_enable_lock();
    ret = __clk_enable(clk);
    clk_enable_unlock(flags);

    return ret;
}
static int __clk_enable(struct clk *clk)
{
    int ret = 0;

    if (!clk)
        return 0;

    if (WARN_ON(clk->prepare_count == 0))
        return -ESHUTDOWN;

    if (clk->enable_count == 0) {
        ret = __clk_enable(clk->parent);

        if (ret)
            return ret;

        if (clk->ops->enable) {
            ret = clk->ops->enable(clk->hw);
            if (ret) {
                __clk_disable(clk->parent);
                return ret;
            }
        }
    }

    clk->enable_count++;
    return 0;
}
- 1
- 2
- 3
- 4
- 5
- 6
- 7
- 8
- 9
- 10
- 11
- 12
- 13
- 14
- 15
- 16
- 17
- 18
- 19
- 20
- 21
- 22
- 23
- 24
- 25
- 26
- 27
- 28
- 29
- 30
- 31
- 32
- 33
- 34
- 35
- 36
- 37
- 38
- 39
clk_enable会调用到__clk_enable函数,这个函数中会反复迭代调用自身来使能parent clk。并最后调用到了ops->enable回调函数。其他api自行阅读。
我们使用这些API的一般顺序为,通过clk_get获取到跟设备相关的struct clk结构体,接着再调用其他的api来针对它进行处理。
(2) 向下提供给clock driver注册的接口API
Clk framework向下提供了注册clk设备的api,主要是平台厂商实现自己的clk驱动时使用到的。
主要接口如下:
struct clk *clk_register(struct device *dev, struct clk_hw *hw);
struct clk *__clk_register(struct device *dev, struct clk_hw *hw);
void clk_unregister(struct clk *clk);
- 1
- 2
- 3
注意clk_register和__clk_register之间的区别,clk_register会自己申请struct clk结构体并对它进行初始化。而__clk_register是静态定义了一个struct clk的结构体,所以它不会再申请内存来存放struct clk结构体。
作为了一个clk设备,我们注册clk设备会建立clk之间的拓扑关系,但是除了这个以外,驱动还有一个重要的事情要做,那就是建立struct device和struct clk之间的关系,还记得上面讲到的clk_get接口吗,我们看一下它的完整api:
struct clk *clk_get(struct device *dev, const char *con_id);
- 1
- 2
可以看到其他驱动程序在获取并操作跟设备相关的clk时,会传入device结构和connectid来获取相应的struct clk结构,所以我们必须想办法来建立这种关系。其实这种关系是通过如下的api来建立的:
int clk_register_clkdev(struct clk *clk, const char *con_id, const char *dev_fmt, ...);
- 1
- 2
这个接口会建立一个struct clk_lookup结构体并加入的core的clocks链表中,这样每次调用clk_get的时候都会遍历这个链表来找到匹配的clk设备。我们看一下struct clk_lookup:
static LIST_HEAD(clocks);
......
struct clk_lookup {
    struct list_head    node;
    const char      *dev_id;
    const char      *con_id;
    struct clk      *clk;
};
- 1
- 2
- 3
- 4
- 5
- 6
- 7
- 8
有关这部分的内容都在clkdev.c源文件中,读者可以自行研读。除了这种注册方式还有另外一种方法来建立这种关系,这种新方式是基于dts来建立关系的,也就是说必须内核中使能了CONFIG_OF才会编译进来,它的注册方式为:
int of_clk_add_provider(struct device_node *np, struct clk *(*clk_src_get)(struct of_phandle_args *args,void *data),void *data);
- 1
这种就是通过解析dts文件中属性的配置来获取device相关的clk设备的。具体参考代码。至于我们在驱动中使用哪种方式,还要看驱动是否支持dts来决定。
(3) debugfs的创建
debugfs的创建有两个函数,分别如下:
int __init clk_debug_init(void);
int clk_debug_register(struct clk *clk);
- 1
- 2
第一个clk_debug_init函数是在系统启动时调用的,他会首先创建clk debugfs的入口。
而clk_debug_register则是在clk_register中会调用的,也就是说他是在注册clk设备的时候调用的,他会更新clk之间的拓扑关系,并更新debugfs。
(4) 若干clk通用设备实现
Clk framework为了简化clk设备的开发,也按照clk的不同特性实现了几个clk驱动模型,这样厂商可以根据自己clk的特点直接调用相应模型的注册函数就能快速实现一个clk驱动,而不必重复造轮子。当然这样的模型并不能包含所有的clk设备,一些厂商也会自己来实现clk驱动,而不套用相关模型。
一些模型api:
struct clk *clk_register_fixed_rate(struct device *dev, const char *name,
        const char *parent_name, unsigned long flags,
        unsigned long fixed_rate);
struct clk *clk_register_gate(struct device *dev, const char *name,
        const char *parent_name, unsigned long flags,
        void __iomem *reg, u8 bit_idx,
        u8 clk_gate_flags, spinlock_t *lock);
struct clk *clk_register_divider(struct device *dev, const char *name,
        const char *parent_name, unsigned long flags,
        void __iomem *reg, u8 shift, u8 width,
        u8 clk_divider_flags, spinlock_t *lock);
struct clk *clk_register_mux(struct device *dev, const char *name,
        const char **parent_names, u8 num_parents, unsigned long flags,
        void __iomem *reg, u8 shift, u8 width,
        u8 clk_mux_flags, spinlock_t *lock);
struct clk *clk_register_fixed_factor(struct device *dev, const char *name,
        const char *parent_name, unsigned long flags,
        unsigned int mult, unsigned int div);

struct clk *clk_register_composite(struct device *dev, const char *name,
        const char **parent_names, int num_parents,
        struct clk_hw *mux_hw, const struct clk_ops *mux_ops,
        struct clk_hw *rate_hw, const struct clk_ops *rate_ops,
        struct clk_hw *gate_hw, const struct clk_ops *gate_ops,
        unsigned long flags);
- 1
- 2
- 3
- 4
- 5
- 6
- 7
- 8
- 9
- 10
- 11
- 12
- 13
- 14
- 15
- 16
- 17
- 18
- 19
- 20
- 21
- 22
- 23
- 24
- 25
如上等等。
三、 与device tree的关系
说起dts,就不得不在代码中指定相应的of_device_id,因为dts中定义的设备是通过这个结构来进行驱动和设备匹配的。
Clk-provider.h
#define CLK_OF_DECLARE(name, compat, fn)            \
    static const struct of_device_id __clk_of_table_##name  \
        __used __section(__clk_of_table)        \
        = { .compatible = compat, .data = fn };
- 1
- 2
- 3
- 4
Clk.c
extern struct of_device_id __clk_of_table[];

static const struct of_device_id __clk_of_table_sentinel
    __used __section(__clk_of_table_end);
- 1
- 2
- 3
- 4
- 5
上面这一段需要借助内核编译的lds文件来解读,其中传入了参数给编译器来确定变量的存放位置。
_section(__clk_of_table)意思就是把该变量存入__clk_of_table段中。而在lds文件中可以看到该段的定义,并且该段是以__clk_of_table_end为结尾的。由上面的定义可以知道,在编译内核的时候,会把所有的__clk_of_table##name变量都保存在__clk_of_table中,并且__clk_of_table的最后是__clk_of_table_end来结束的。
void __init of_clk_init(const struct of_device_id *matches)
{
    struct device_node *np;

    if (!matches)
        matches = __clk_of_table;

    for_each_matching_node(np, matches) {
        const struct of_device_id *match = of_match_node(matches, np);
        of_clk_init_cb_t clk_init_cb = match->data;
        clk_init_cb(np);
    }
}
- 1
- 2
- 3
- 4
- 5
- 6
- 7
- 8
- 9
- 10
- 11
- 12
- 13
从这段用来初始化驱动的函数可以看出来我们自己创建的clk驱动,需要先通过CLK_OF_DECLARE来定义相应的of_device_id,并且要把相应的驱动初始化函数func的地址传给data。这样在匹配到相应的设备时就会直接调用驱动初始化函数了。
四、 如何创建自己的clk设备
我们以全志的sunxi平台为例,它的clk驱动是在driver/clk/sunxi/目录下
在clk-sunxi.c中:
401 /* Matches for of_clk_init */
402 static const __initconst struct of_device_id clk_match[] = {
403     {.compatible = "allwinner,sun4i-osc-clk", .data = sunxi_osc_clk_setup,},
404     {}
405 };
406
407 /* Matches for factors clocks */
408 static const __initconst struct of_device_id clk_factors_match[] = {
409     {.compatible = "allwinner,sun4i-pll1-clk", .data = &pll1_data,},
410     {.compatible = "allwinner,sun4i-apb1-clk", .data = &apb1_data,},
411     {}
412 };
413
414 /* Matches for divider clocks */
415 static const __initconst struct of_device_id clk_div_match[] = {
416     {.compatible = "allwinner,sun4i-axi-clk", .data = &axi_data,},
417     {.compatible = "allwinner,sun4i-ahb-clk", .data = &ahb_data,},
418     {.compatible = "allwinner,sun4i-apb0-clk", .data = &apb0_data,},
419     {}
420 };
421
422 /* Matches for mux clocks */
423 static const __initconst struct of_device_id clk_mux_match[] = {
424     {.compatible = "allwinner,sun4i-cpu-clk", .data = &cpu_data,},
425     {.compatible = "allwinner,sun4i-apb1-mux-clk", .data = &apb1_mux_data,},
426     {}
427 };
428
429 /* Matches for gate clocks */
430 static const __initconst struct of_device_id clk_gates_match[] = {
431     {.compatible = "allwinner,sun4i-axi-gates-clk", .data = &axi_gates_data,},
432     {.compatible = "allwinner,sun4i-ahb-gates-clk", .data = &ahb_gates_data,},
433     {.compatible = "allwinner,sun4i-apb0-gates-clk", .data = &apb0_gates_data,},
434     {.compatible = "allwinner,sun4i-apb1-gates-clk", .data = &apb1_gates_data,},
435     {}
436 };
437
438 static void __init of_sunxi_table_clock_setup(const struct of_device_id *clk_match,
439                           void *function)
440 {
441     struct device_node *np;
442     const struct div_data *data;
443     const struct of_device_id *match;
444     void (*setup_function)(struct device_node *, const void *) = function;
445
446     for_each_matching_node(np, clk_match) {
447         match = of_match_node(clk_match, np);
448         data = match->data;
449         setup_function(np, data);
450     }
451 }
452
453 void __init sunxi_init_clocks(void)
454 {
455     /* Register all the simple sunxi clocks on DT */
456     of_clk_init(clk_match);
457
458     /* Register factor clocks */
459     of_sunxi_table_clock_setup(clk_factors_match, sunxi_factors_clk_setup);
460
461     /* Register divider clocks */
462     of_sunxi_table_clock_setup(clk_div_match, sunxi_divider_clk_setup);
463
464     /* Register mux clocks */
465     of_sunxi_table_clock_setup(clk_mux_match, sunxi_mux_clk_setup);
466
467     /* Register gate clocks */
468     of_sunxi_table_clock_setup(clk_gates_match, sunxi_gates_clk_setup);
469 }
- 1
- 2
- 3
- 4
- 5
- 6
- 7
- 8
- 9
- 10
- 11
- 12
- 13
- 14
- 15
- 16
- 17
- 18
- 19
- 20
- 21
- 22
- 23
- 24
- 25
- 26
- 27
- 28
- 29
- 30
- 31
- 32
- 33
- 34
- 35
- 36
- 37
- 38
- 39
- 40
- 41
- 42
- 43
- 44
- 45
- 46
- 47
- 48
- 49
- 50
- 51
- 52
- 53
- 54
- 55
- 56
- 57
- 58
- 59
- 60
- 61
- 62
- 63
- 64
- 65
- 66
- 67
- 68
- 69
- 70
- 71
- 72
这段代码主要就是定义of_device_id以及相应的主初始化函数。我们通过grep来查一下sunxi_init_clocks在哪里有调用使用到。
经过查找,在kernel/arch/arm/mach-sunxi/sunxi.c中有调用:
98 static void __init sunxi_timer_init(void)
 99 {
100     sunxi_init_clocks();
101     clocksource_of_init();
102 }
103
104 static void __init sunxi_dt_init(void)
105 {
106     sunxi_setup_restart();
107
108     of_platform_populate(NULL, of_default_bus_match_table, NULL, NULL);
109 }
110
111 static const char * const sunxi_board_dt_compat[] = {
112     "allwinner,sun4i-a10",
113     "allwinner,sun5i-a13",
114     NULL,
115 };
116
117 DT_MACHINE_START(SUNXI_DT, "Allwinner A1X (Device Tree)")
118     .init_machine   = sunxi_dt_init,
119     .map_io     = sunxi_map_io,
120     .init_irq   = irqchip_init,
121     .init_time  = sunxi_timer_init,
122     .dt_compat  = sunxi_board_dt_compat,
123 MACHINE_END
- 1
- 2
- 3
- 4
- 5
- 6
- 7
- 8
- 9
- 10
- 11
- 12
- 13
- 14
- 15
- 16
- 17
- 18
- 19
- 20
- 21
- 22
- 23
- 24
- 25
- 26
- 27
在sunxi_timer_init中有调用到sunxi_init_clocks函数来初始化clk驱动。
题外话
系统起来的时候会bringup运行到kernel_start,在这个函数中会逐一对系统资源进行初始化,它也会根据bootloader传入的参数来匹配machine,这里的machine也就是上面各个平台都会自己实现的部分,上面的两个宏定义DT_MACHINE_START和DT_MACHINE_END之间就是对machine的定义。可以看到machine也是通过dt_compat来进行匹配的。从上面的信息可以看到,这一套内核时同时兼容allwinner,sun4i-a10和allwinner,sun5i-a13两种类型的设备的。
</div>