本文是笔记博客,主要参考了https://blog.csdn.net/u012124438/article/details/76382894
的内容,感觉很有意思,记录一下
Service的启动过程
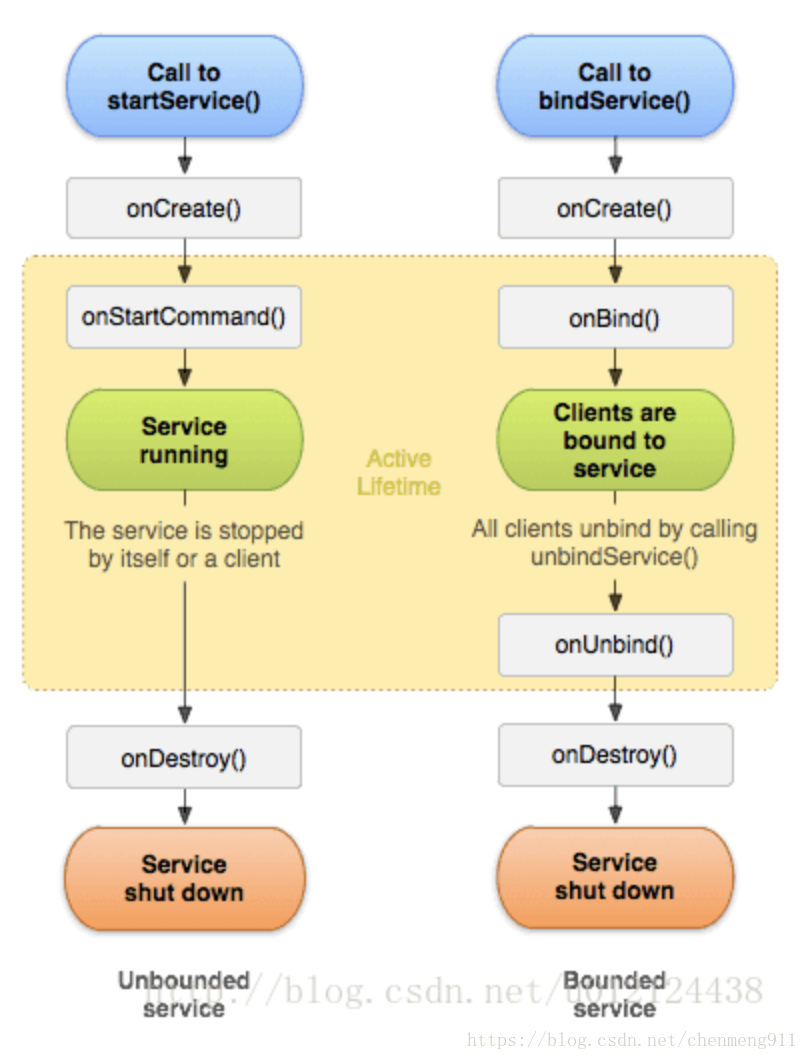
Service是四大组件之一,主要运行在后台,其生命周期受AMS的控制,
下面主要是讲解binderService的启动过程。
binderService最终在ContextImpl中的binderService中进行的,binderService直接调用了bindServiceCommon,在这个方法中调用了ActivityManagerNative借助AMS进而完成Service的绑定过程。这里需要提及一下sd变量,这个变量的类型是IServiceConnection,这个IServiceConnection与IApplicationThread是相同的,都是ActivityThread给AMS提供的用来与之进行通信的Binder对象,在ActivityManagerNative的bindService方法中调用了ActivityServices类的bindServiceLocked方法。
bindServiceLocked方法
这是在AMS的一个方法主要是完成三件事:
1.根据intent找到要启动的service
2.对IServiceConnection使用ConnectionRecord进行了包装,方便接下来使用
3.调用bringUpServiceLocked开始创建Service。
bringUpServiceLocked是是启动service的关键方法
bringUpServiceLocked方法
如果Service所在的进程已经启动,那么直接调用realStartServiceLocked方法来真正启动Service组件;如果Service所在的进程还没有启动,那么先在AMS中记下这个要启动的Service组件,然后通过startProcessLocked启动新的进程。只看第一种情况
如果service所在的进程存在了就利用IApplicationThread进行跨进程通信调用app的scheduleCreateService方法,这里发送一个消息给ActivityThread的H这个Handler,H类收到这个消息之后,直接调用了ActivityThread类的handleCreateService方法,在这里进行classloader加载service:
1.使用ClassLoader加载并通过反射创建Service 对象
2.创建ContextImpl ,并绑定Service
3.makeApplication创建Application
4.service.attach方法将创建的Application和ContextImpl 和service进行绑定
5.service.onCreate()方法进行service的创建
代码如下:
private void handleCreateService(CreateServiceData data) {
        // If we are getting ready to gc after going to the background, well
        // we are back active so skip it.
        unscheduleGcIdler();

        LoadedApk packageInfo = getPackageInfoNoCheck(
                data.info.applicationInfo, data.compatInfo);
        Service service = null;
        try {
            java.lang.ClassLoader cl = packageInfo.getClassLoader();
            service = (Service) cl.loadClass(data.info.name).newInstance();
        } catch (Exception e) {
            if (!mInstrumentation.onException(service, e)) {
                throw new RuntimeException(
                    "Unable to instantiate service " + data.info.name
                    + ": " + e.toString(), e);
            }
        }

        try {
            if (localLOGV) Slog.v(TAG, "Creating service " + data.info.name);

            ContextImpl context = ContextImpl.createAppContext(this, packageInfo);
            context.setOuterContext(service);

            Application app = packageInfo.makeApplication(false, mInstrumentation);
            service.attach(context, this, data.info.name, data.token, app,
                    ActivityManagerNative.getDefault());
            service.onCreate();
            mServices.put(data.token, service);
            try {
                ActivityManagerNative.getDefault().serviceDoneExecuting(
                        data.token, SERVICE_DONE_EXECUTING_ANON, 0, 0);
            } catch (RemoteException e) {
                // nothing to do.
            }
        } catch (Exception e) {
            if (!mInstrumentation.onException(service, e)) {
                throw new RuntimeException(
                    "Unable to create service " + data.info.name
                    + ": " + e.toString(), e);
            }
        }
    }
onBinder方法的启动
scheduleCreateService这个binder调用之后,执行了一个requestServiceBindingsLocked方法又通过IApplicationThread这个Binder进行了一次IPC调用,我们跟踪ActivityThread类里面的ApplicationThread的scheduleBindService方法,发现这个方法不过通过Handler转发了一次消息,真正的处理代码在handleBindService里面,在这个方法中会调用onBinder方法,
onServiceConnected方法
要Bind的Service在这里完成了绑定,绑定之后又通过ActivityManagerNative这个Binder进行一次IPC调用,我们查看AMS的publishService方法,这个方法又调用了publishServiceLocked方法
void publishServiceLocked(ServiceRecord r, Intent intent, IBinder service) {
        final long origId = Binder.clearCallingIdentity();
        try {
            if (DEBUG_SERVICE) Slog.v(TAG, "PUBLISHING " + r
                    + " " + intent + ": " + service);
            if (r != null) {
                Intent.FilterComparison filter
                        = new Intent.FilterComparison(intent);
                IntentBindRecord b = r.bindings.get(filter);
                if (b != null && !b.received) {
                    b.binder = service;
                    b.requested = true;
                    b.received = true;
                    for (int conni=r.connections.size()-1; conni>=0; conni--) {
                        ArrayList<ConnectionRecord> clist = r.connections.valueAt(conni);
                        for (int i=0; i<clist.size(); i++) {
                            ConnectionRecord c = clist.get(i);
                            if (!filter.equals(c.binding.intent.intent)) {
                                if (DEBUG_SERVICE) Slog.v(
                                        TAG, "Not publishing to: " + c);
                                if (DEBUG_SERVICE) Slog.v(
                                        TAG, "Bound intent: " + c.binding.intent.intent);
                                if (DEBUG_SERVICE) Slog.v(
                                        TAG, "Published intent: " + intent);
                                continue;
                            }
                            if (DEBUG_SERVICE) Slog.v(TAG, "Publishing to: " + c);
                            try {
                                c.conn.connected(r.name, service);
                            } catch (Exception e) {
                                Slog.w(TAG, "Failure sending service " + r.name +
                                      " to connection " + c.conn.asBinder() +
                                      " (in " + c.binding.client.processName + ")", e);
                            }
                        }
                    }
                }

                serviceDoneExecutingLocked(r, mDestroyingServices.contains(r), false);
            }
        } finally {
            Binder.restoreCallingIdentity(origId);
        }
    }
这里终于到IServiceConnection的用处了,在bindServiceLocked方法里面,这个IServiceConnection放到了一个ConnectionRecord的List中存放在ServiceRecord里面,这里所做的就是取出已经被Bind的这个Service对应的IServiceConnection对象,然后调用它的connected方法;我们说过,这个IServiceConnection也是一个Binder对象,它的Server端在LoadedApk.ServiceDispatcher里面。接下来是LoadedApk.ServiceDispatcher的connected方法。在这个方法中最重会调用doConnected方法:
public void doConnected(ComponentName name, IBinder service) {
            ServiceDispatcher.ConnectionInfo old;
            ServiceDispatcher.ConnectionInfo info;

            synchronized (this) {
                if (mForgotten) {
                    // We unbound before receiving the connection; ignore
                    // any connection received.
                    return;
                }
                old = mActiveConnections.get(name);
                if (old != null && old.binder == service) {
                    // Huh, already have this one.  Oh well!
                    return;
                }

                if (service != null) {
                    // A new service is being connected... set it all up.
                    mDied = false;
                    info = new ConnectionInfo();
                    info.binder = service;
                    info.deathMonitor = new DeathMonitor(name, service);
                    try {
                        service.linkToDeath(info.deathMonitor, 0);
                        mActiveConnections.put(name, info);
                    } catch (RemoteException e) {
                        // This service was dead before we got it...  just
                        // don't do anything with it.
                        mActiveConnections.remove(name);
                        return;
                    }

                } else {
                    // The named service is being disconnected... clean up.
                    mActiveConnections.remove(name);
                }

                if (old != null) {
                    old.binder.unlinkToDeath(old.deathMonitor, 0);
                }
            }

            // If there was an old service, it is not disconnected.
            if (old != null) {
                mConnection.onServiceDisconnected(name);
            }
            // If there is a new service, it is now connected.
            if (service != null) {
                mConnection.onServiceConnected(name, service);
            }
        }
这样service的启动过程就分析完了,可以看到,service的每一个周期方法都是在AMS发起的。可以知道,AMS是在管理service的生命周期。