LNMP的工作原理:
首先,浏览器发送http request请求到服务器(Nginx),服务器响应并处理web请求,将一些静态资源(CSS,图片,视频等)保存服务器上,然后将php脚本通过接口传输协议(网关协议)PHP-FCGI(fast-cgi)传输给PHP-FPM(进程管理程序),PHP-FPM不做处理,然后PHP-FPM调用PHP解析器进程,PHP解析器解析php脚本信息。PHP解析器进程可以启动多个,进行并发执行。然后将解析后的脚本返回到PHP-FPM,PHP-FPM再通过fast-cgi的形式将脚本信息传送给Nginx.服务器再通过Http response的形式传送给浏览器。
MYSQL编译:
安装包:
mysql-boost-5.7.17.tar.gz
cmake-2.8.12.2-4.el6.x86_64.rpm

   51  tar zxf mysql-boost-5.7.17.tar.gz
   52  ls
   53  cd mysql-5.7.17/
   54  cd
   55  yum install -y cmake-2.8.12.2-4.el6.x86_64.rpm
   56  ls

[root@server1 ~]# cd mysql-5.7.17/
[root@server1 mysql-5.7.17]# cmake -DCMAKE_INSTALL_PREFIX=/usr/local/lnmp/mysql \    #安装路径
> -DMYSQL_DATADIR=/usr/local/lnmp/mysql/data \    #数据库存放路径
> -DMYSQL_UNIX_ADDR=/usr/local/lnmp/mysql/data/mysql.sock \   #文件路径
> -DWITH_MYISAM_STORAGE_ENGINE=1 \    #安装 myisam 存储引擎
> -DWITH_INNOBASE_STORAGE_ENGINE=1 \  #安装 innodb 存储引擎
> -DDEFAULT_CHARSET=utf8 \     #使用 utf8 字符
> -DDEFAULT_COLLATION=utf8_general_ci \   #校验字符
> -DEXTRA_CHARSETS=all     #安装所有扩展字符集

[root@server1 mysql-5.7.17]# rm -fr CMakeCache.txt #清空缓存文件
[root@server5 mysql-5.7.11]# yum install ncurses-devel gcc-c++ -y #解决依赖包
再次将编译程序跑一边,后面加上boots指定路径
[root@server1 mysql-5.7.17]# cmake -DCMAKE_INSTALL_PREFIX=/usr/local/lnmp/mysql -DMYSQL_DATADIR=/usr/local/lnmp/mysql/data -DMYSQL_UNIX_ADDR=/usr/local/lnmp/mysql/data/mysql.sock -DWITH_MYISAM_STORAGE_ENGINE=1 -DWITH_INNOBASE_STORAGE_ENGINE=1 -DDEFAULT_CHARSET=utf8 -DDEFAULT_COLLATION=utf8_general_ci -DEXTRA_CHARSETS=all -DWITH_BOOST=boost/boost_1_59_0/   #boots指定路径
[root@server1 mysql-5.7.17]# yum install bison -y    #系统可以跳过warning错误
[root@server1 mysql-5.7.17]# make   #编译,链接,生成可执行文件
[root@server1 mysql-5.7.17]# make install    #安装
数据库初始化:
[root@server1 ~]# cd /usr/local/mysql/
[root@server1 mysql]# ls
bin  COPYING  docs  include  lib  man  mysql-test  README  share  support-files
[root@server1 mysql]# rpm -qa|grep mysql
mysql-libs-5.1.71-1.el6.x86_64
[root@server1 mysql]# cd support-files/
[root@server1 support-files]# ls
magic  my-default.cnf  mysqld_multi.server  mysql-log-rotate  mysql.server
[root@server1 support-files]# cp my-default.cnf  /etc/my.cnf
cp: overwrite `/etc/my.cnf'? Y
basedir = /usr/local/mysql
datadir = /usr/local/mysqldata
port = 3306
# server_id = .....
socket = /usr/local/mysqldata/mysql.sock
[root@server1 support-files]# ls
magic  my-default.cnf  mysqld_multi.server  mysql-log-rotate  mysql.server
[root@server1 support-files]# file mysql.server
mysql.server: POSIX shell script text executable
[root@server1 support-files]# cp mysql.server /etc/init.d/mysqld
[root@server1 support-files]# ll /etc/init.d/mysqld
-rwxr-xr-x 1 root root 10886 Aug  5 10:54 /etc/init.d/mysqld
[root@server1 mysql]# groupadd -g 27 mysql
[root@server1 mysql]# useradd -u 27 -g 27 -M -d /usr/local/mysql/data -s /sbin/nologin mysql
[root@server1 mysql]# ll
total 56
drwxr-xr-x  2 root root  4096 Aug  5 10:28 bin
-rw-r--r--  1 root root 17987 Nov 28  2016 COPYING
drwxr-xr-x  2 root root  4096 Aug  5 10:27 docs
drwxr-xr-x  3 root root  4096 Aug  5 10:27 include
drwxr-xr-x  4 root root  4096 Aug  5 10:28 lib
drwxr-xr-x  4 root root  4096 Aug  5 10:27 man
drwxr-xr-x 10 root root  4096 Aug  5 10:28 mysql-test
-rw-r--r--  1 root root  2478 Nov 28  2016 README
drwxr-xr-x 28 root root  4096 Aug  5 10:28 share
drwxr-xr-x  2 root root  4096 Aug  5 10:28 support-files
[root@server1 mysql]# chown -R mysql.mysql .
[root@server1 mysql]# ll
total 56
drwxr-xr-x  2 mysql mysql  4096 Aug  5 10:28 bin
-rw-r--r--  1 mysql mysql 17987 Nov 28  2016 COPYING
drwxr-xr-x  2 mysql mysql  4096 Aug  5 10:27 docs
drwxr-xr-x  3 mysql mysql  4096 Aug  5 10:27 include
drwxr-xr-x  4 mysql mysql  4096 Aug  5 10:28 lib
drwxr-xr-x  4 mysql mysql  4096 Aug  5 10:27 man
drwxr-xr-x 10 mysql mysql  4096 Aug  5 10:28 mysql-test
-rw-r--r--  1 mysql mysql  2478 Nov 28  2016 README
drwxr-xr-x 28 mysql mysql  4096 Aug  5 10:28 share
drwxr-xr-x  2 mysql mysql  4096 Aug  5 10:28 support-files
[root@server1 mysql]# cd
[root@server1 ~]# vim .bash_profile
# .bash_profile

# Get the aliases and functions
if [ -f ~/.bashrc ]; then
        . ~/.bashrc
fi

# User specific environment and startup programs

PATH=$PATH:$HOME/bin:/usr/local/mysql/mysql/bin

export PATH
[root@server1 ~]# source .bash_profile
[root@server1 mysql]# /etc/init.d/mysqld start
Starting MySQL.. SUCCESS!
[root@server1 mysql]# mysql_secure_installation

Securing the MySQL server deployment.

Enter password for user root:
##初始密码在mysql_install_db命令下的localhost:

The existing password for the user account root has expired. Please set a new password.

New password:

Re-enter new password:

VALIDATE PASSWORD PLUGIN can be used to test passwords
and improve security. It checks the strength of password
and allows the users to set only those passwords which are
secure enough. Would you like to setup VALIDATE PASSWORD plugin?

Press y|Y for Yes, any other key for No:
Using existing password for root.
Change the password for root ? ((Press y|Y for Yes, any other key for No) : y

New password:

Re-enter new password:
Sorry, passwords do not match.

New password:

Re-enter new password:
By default, a MySQL installation has an anonymous user,
allowing anyone to log into MySQL without having to have
a user account created for them. This is intended only for
testing, and to make the installation go a bit smoother.
You should remove them before moving into a production
environment.

Remove anonymous users? (Press y|Y for Yes, any other key for No) : y
Success.


Normally, root should only be allowed to connect from
'localhost'. This ensures that someone cannot guess at
the root password from the network.

Disallow root login remotely? (Press y|Y for Yes, any other key for No) : y
Success.

By default, MySQL comes with a database named 'test' that
anyone can access. This is also intended only for testing,
and should be removed before moving into a production
environment.


Remove test database and access to it? (Press y|Y for Yes, any other key for No) : y
 - Dropping test database...
Success.

 - Removing privileges on test database...
Success.

Reloading the privilege tables will ensure that all changes
made so far will take effect immediately.

Reload privilege tables now? (Press y|Y for Yes, any other key for No) : y
Success.

All done!
[root@server1 mysql]# mysql -p
Enter password:
Welcome to the MySQL monitor.  Commands end with ; or \g.
Your MySQL connection id is 6
Server version: 5.7.17 Source distribution

Copyright (c) 2000, 2016, Oracle and/or its affiliates. All rights reserved.

Oracle is a registered trademark of Oracle Corporation and/or its
affiliates. Other names may be trademarks of their respective
owners.

Type 'help;' or '\h' for help. Type '\c' to clear the current input statement.

mysql> show databases;
+--------------------+
| Database           |
+--------------------+
| information_schema |
| mysql              |
| performance_schema |
| sys                |
+--------------------+
4 rows in set (0.00 sec)

mysql> quit
Bye
PHP编译:
1.下载安装服务:
[root@server1 php-5.6.35]# yum install -y libxml2-devel
[root@server1 php-5.6.35]# yum install -y openssl-devel
[root@server1 php-5.6.35]# yum install -y curl-devel
[root@server1 ~]# yum install -y gd-devel-2.0.35-11.el6.x86_64.rpm
[root@server1 ~]# yum install -y re2c-0.13.5-1.el6.x86_64.rpm
[root@server1 ~]# yum install -y gmp-devel
[root@server1 ~]# yum install -y libmcrypt-devel-2.5.8-9.el6.x86_64.rpm
[root@server1 ~]# yum install -y libmcrypt-devel-2.5.8-9.el6.x86_64.rpm  libmcrypt-2.5.8-9.el6.x86_64.rpm
[root@server1 ~]# yum install -y net-snmp-devel
2.进行源码编译:
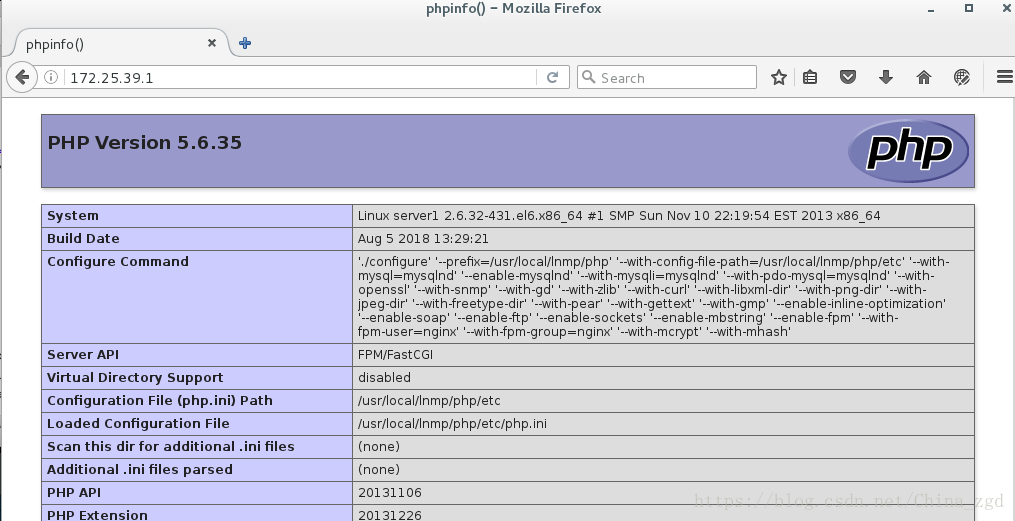
[root@server1 php-5.6.35]# ./configure --prefix=/usr/local/lnmp/php --with-config-file-path=/usr/local/lnmp/php/etc --with-mysql=mysqlnd --enable-mysqlnd --with-mysqli=mysqlnd --with-pdo-mysql=mysqlnd --with-openssl --with-snmp --with-gd --with-zlib --with-curl --with-libxml-dir --with-png-dir --with-jpeg-dir --with-freetype-dir --with-pear --with-gettext --with-gmp --enable-inline-optimization --enable-soap --enable-ftp --enable-sockets --enable-mbstring --enable-fpm --with-fpm-user=nginx --with-fpm-group=nginx --with-mcrypt --with-mhash

[root@server1 php-5.6.35]# make && make install
3.配置php服务:
[root@server1 php]# cd etc/
[root@server1 etc]# ls
pear.conf php-fpm.conf.default
[root@server1 etc]# cp php-fpm.conf.default php-fpm.conf
[root@server1 etc]# cd
[root@server1 ~]# cd php-5.6.35
[root@server1 php-5.6.35]# cp php.ini-production /usr/local/lnmp/php/etc/php.ini
修改时区:
[root@server1 ~]# cd /usr/local/lnmp/php/
[root@server1 php]# ls
bin etc include lib php sbin var
[root@server1 php]# cd etc/
[root@server1 etc]# vim php.ini
[Date]
; Defines the default timezone used by the date functions
; http://php.net/date.timezone
date.timezone = Asia/Shanghai
; http://php.net/date.default-latitude
;date.default_latitude = 31.7667
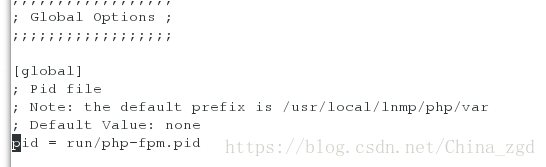
打开pid:
[root@server1 etc]# vim php-fpm.conf
4.建立用户:
[root@server1 etc]# useradd -M -d /usr/local/lnmp/nginx -s /sbin/nologin  nginx
[root@server1 etc]# id nginx
uid=500(nginx) gid=500(nginx) groups=500(nginx)
[root@server1 ~]# cd php-5.6.35
[root@server1 php-5.6.35]# cd sapi/
[root@server1 sapi]# cd fpm/
[root@server1 fpm]# ls
config.m4          LICENSE        php-fpm.conf        status.html.in
CREDITS            Makefile.frag  php-fpm.conf.in     tests
fpm                php-fpm        php-fpm.service     www.conf.in
init.d.php-fpm     php-fpm.8      php-fpm.service.in
init.d.php-fpm.in  php-fpm.8.in   status.html
[root@server1 fpm]# file init.d.php-fpm
init.d.php-fpm: POSIX shell script text executable
[root@server1 fpm]# cp init.d.php-fpm /etc/init.d/php-fpm
[root@server1 fpm]# chmod +x /etc/init.d/php-fpm
[root@server1 fpm]# /etc/init.d/php-fpm  start
Starting php-fpm  done
Nginx编译:
1.解压安装包:
[root@server1 ~]# tar zxf nginx-1.10.1.tar.gz
[root@server1 ~]# tar zxf nginx-sticky-module-ng.tar.gz
[root@server1 ~]# cd nginx-1.10.1
[root@server1 nginx-1.10.1]# ls
auto     CHANGES.ru  configure  html     man     src
CHANGES  conf        contrib    LICENSE  README
2.删除版本号:
[root@server1 nginx-1.10.1]# vim src/core/nginx.h 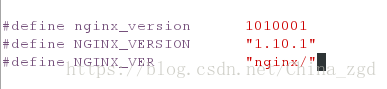
3.关闭debug调试:

4.进行编译:
[root@server1 nginx-1.10.1]# yum install -y pcre-devel
[root@server1 nginx-1.10.1]# ./configure --prefix=/usr/local/lnmp/nginx --with-http_ssl_module --with-http_stub_status_module --user=nginx --group=nginx --with-threads --with-file-aio
[root@server1 nginx-1.10.1]# make && make install
5.配置nginx:
[root@server1 nginx-1.10.1]# cd /usr/local/lnmp/nginx/conf/
[root@server1 conf]# vim nginx.conf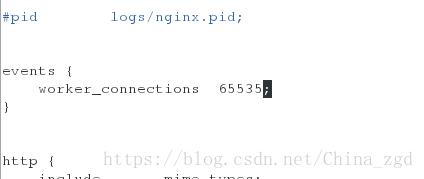
[root@server1 conf]# vim /etc/security/limits.conf 
[root@server1 ~]# vim .bash_profile
6.启动nginx服务:
[root@server1 ~]# source .bash_profile
[root@server1 ~]# nginx -t
nginx: the configuration file /usr/local/lnmp/nginx/conf/nginx.conf syntax is ok
nginx: configuration file /usr/local/lnmp/nginx/conf/nginx.conf test is successful
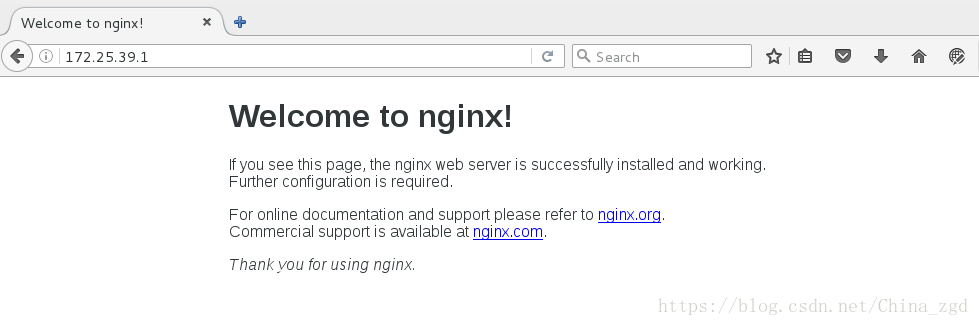
[root@server1 ~]# nginx 7.进行nginx服务测试:
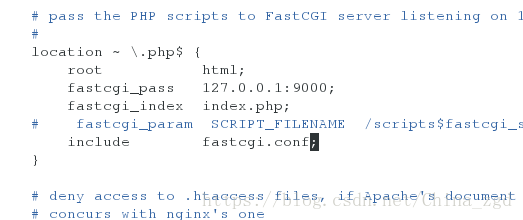
8.添加php动态网页测试:
[root@server1 ~]# cd /usr/local/lnmp/nginx/html/
[root@server1 html]# vim index.php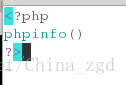
【优化:默认访问php】
[root@server1 ~]# cd /usr/local/lnmp/nginx/conf/
[root@server1 conf]# ls
fastcgi.conf            koi-win             scgi_params
fastcgi.conf.default    mime.types          scgi_params.default
fastcgi_params          mime.types.default  uwsgi_params
fastcgi_params.default  nginx.conf          uwsgi_params.default
koi-utf                 nginx.conf.default  win-utf
[root@server1 conf]# vim nginx.conf         ##改变ip默认访问目录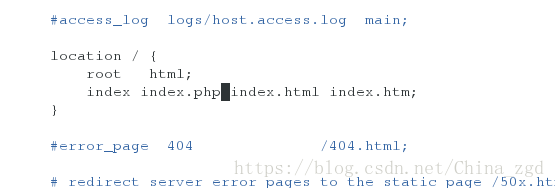
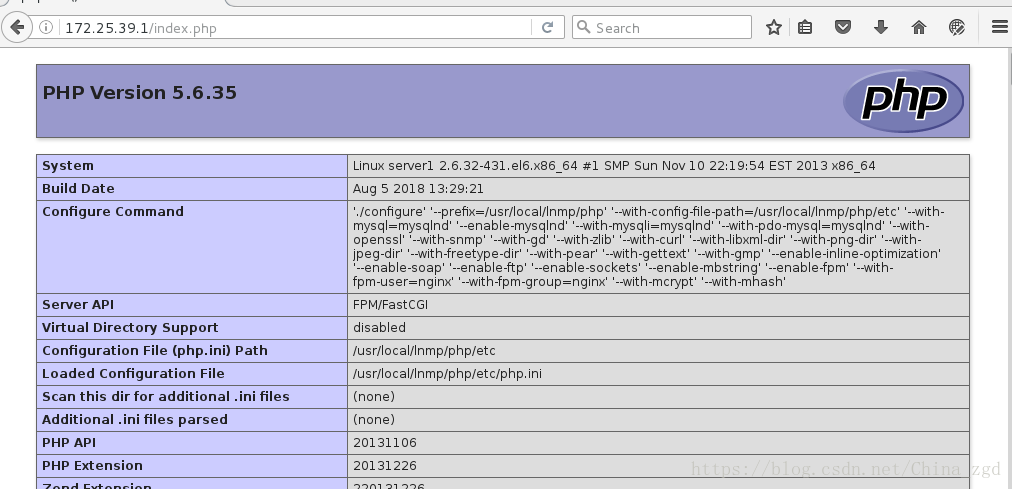
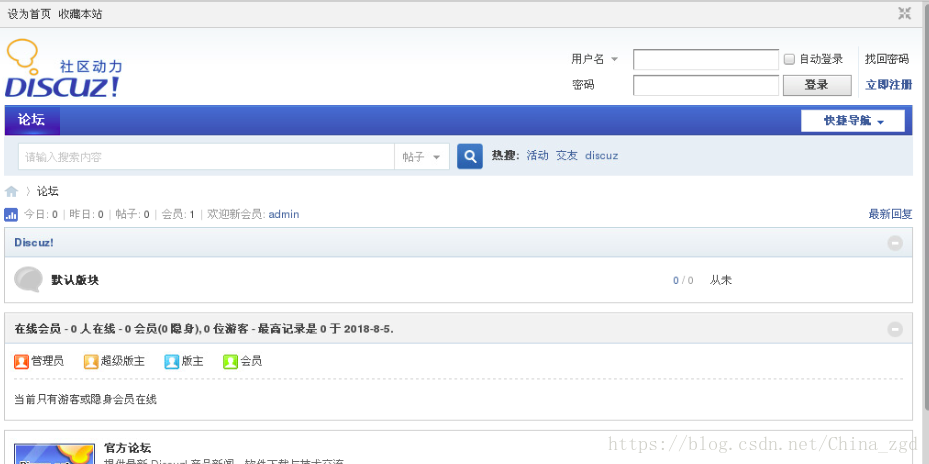
访问测试:
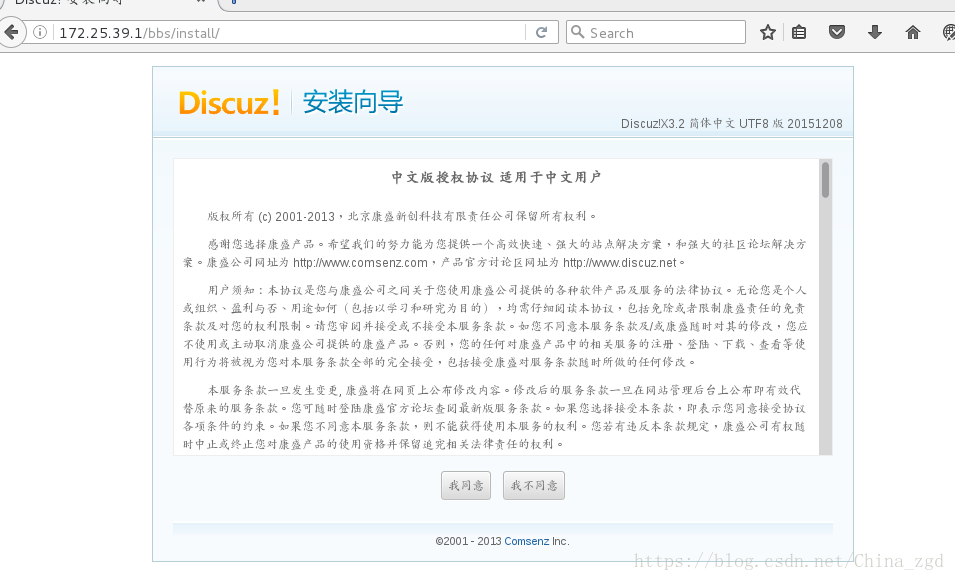
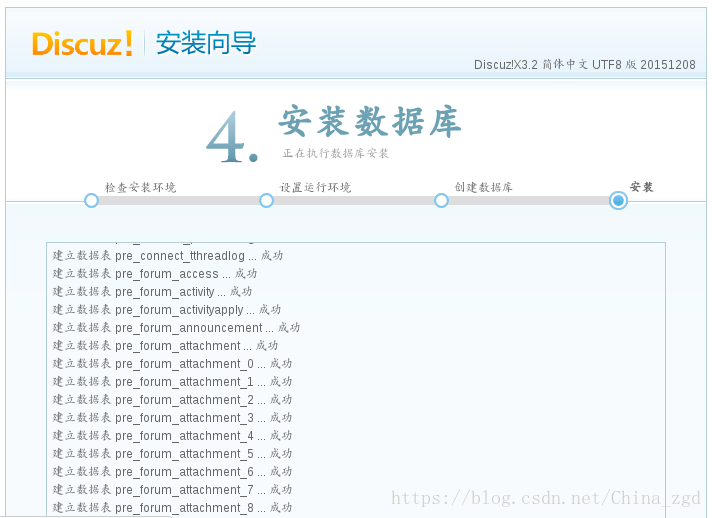
建立论坛
一.解压安装包:
[root@server1 ~]# yum install -y unzip
[root@server1 ~]# unzip Discuz_X3.2_SC_UTF8.zip  -d /usr/local/lnmp/nginx/html/
[root@server1 ~]# cd /usr/local/lnmp/nginx/html/
[root@server1 html]# ls
50x.html  index.html  index.php  readme  upload  utility
[root@server1 html]# mv upload/ bbs
二.网页建立:
1.权限不够,增加文件权限:
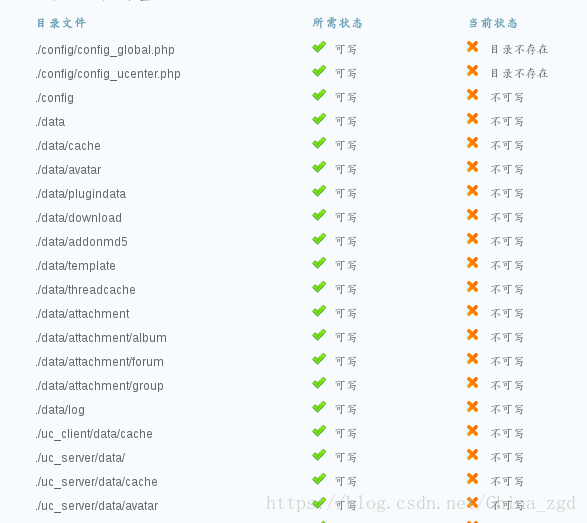
[root@server1 bbs]# chmod 777 config/ data/ uc_server/ uc_client/ -R

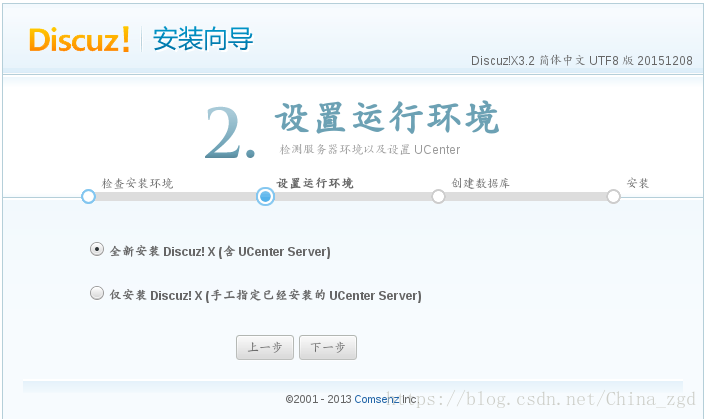
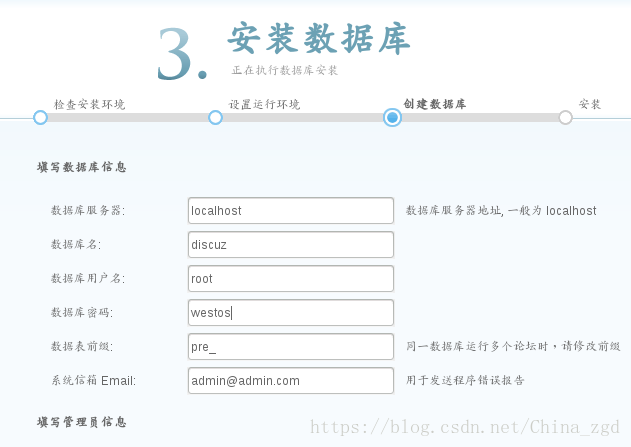
2.继续进行安装:
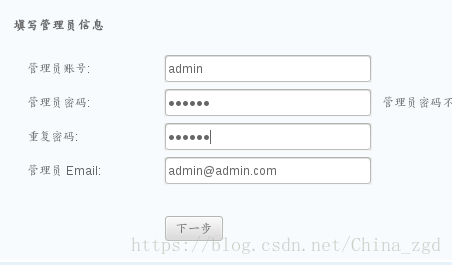
3.增加密码与信息:
4.排除报错:
【1】缺少文件与目录:
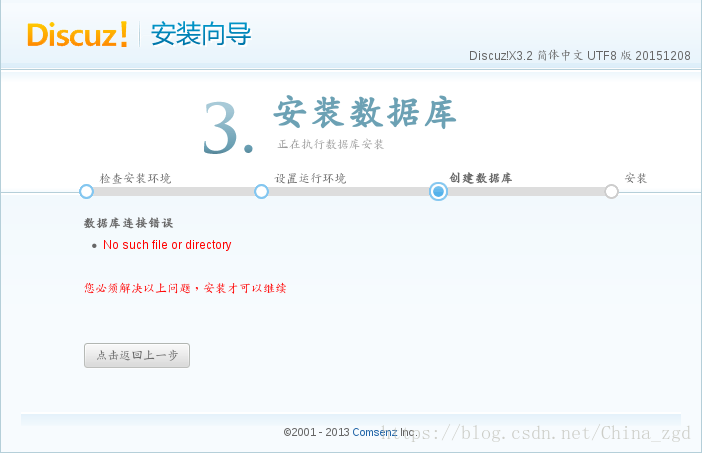
[root@server1 ~]# cd /usr/local/lnmp/php/etc/
[root@server1 etc]# vim php.ini
1013 pdo_mysql.default_socket=/usr/local/mysql/data/mysql.sock
1162 mysql.default_socket = /usr/local/mysql/data/mysql.sock
1221 mysqli.default_socket = /usr/local/mysql/data/mysql.sock
[root@server1 etc]# /etc/init.d/php-fpm  reload
Reload service php-fpm  done
【2】权限不够:
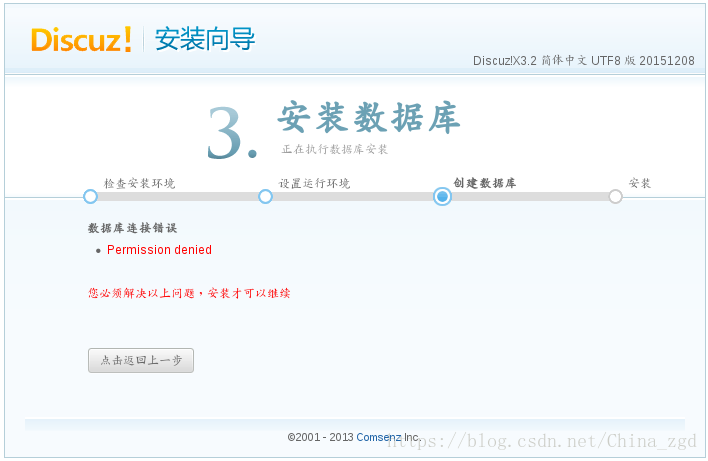
[root@server1 ~]# cd /usr/local/mysql
[root@server1 mysql]# ls
bin      data  include  man         README  support-files
COPYING  docs  lib      mysql-test  share
[root@server1 mysql]# chmod 755 data/
5.进行下一步:
6.管理员登陆,进入管理界面:

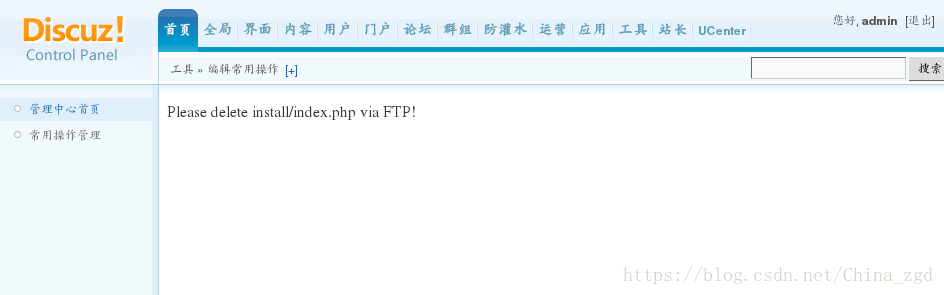
删除安装路径下的index.php,下回登陆论坛时,不会再次安装
[root@server1 ~]# cd /usr/local/lnmp/nginx/html/bbs/install/
[root@server1 install]# rm -fr index.php