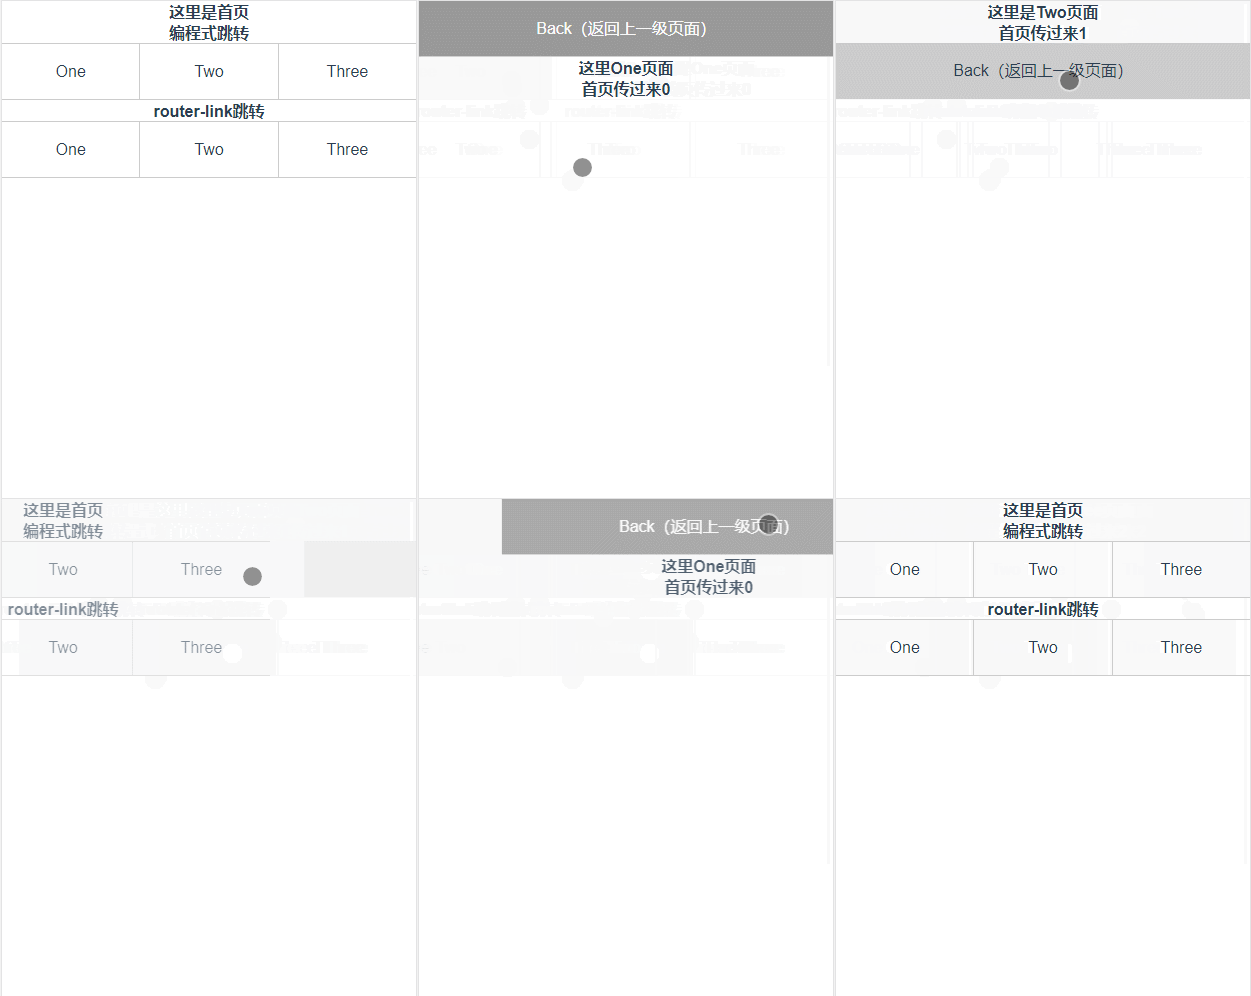
vue路由再vue开发的项目中可以说是一个必用的组件,而这个部分的水却依旧很深,今天我们深入分析其内部的东西,先看这样一个效果:

大家 可以看到上图中,我们通过两种方式实现了一个vue路由跳转的过度动画医技页面的参数的传递。
跳转方式及传参:
vue跳转方式一共有三种:编程式跳转和router-link跳转和router-view三种方式,
1.编程式跳转
写法:
<div class="li" @click="One()">One</div>
One: function () {
    this.$router.push({
        name:"one",
        params:{
            id:"0"
        }
    })
}
主要通过点击事件通过push方法来添加路由地址
2.router-link跳转
写法:
<router-link class="li" :to="{name:'one',params:{id:'0'}}" tag="div">One</router-link>
<router-link class="li" :to="{path:'/two',query:{id:'1'}}" tag="div">Two</router-link>
<router-link class="li" :to="{path:'/three',query:{id:'2'}}" tag="div">Three</router-link>
3.router-link
一般我们主要用在路由主入口,用到的不多,传参我们一般不再这中方式下 进行传参。
写法:
router:new VueRouter({
            routes:[
              {path:'/myLogin',component:testLogin},
      {path:'/myRegister',component:testRegister}
            ]
        })
我们可以看到新的页面再入栈时,页面会从左侧滑动出现,页面出栈会向又滑动出栈,我们还可以实现向上或向下的滑动等等过度效果。
首先我们来看上述效果的目录结构:
开始前的准备,我也就不多说了,安装vue脚手架,然后npm run dev启动项目,创建文件目录如上图,不过需要注意的是,在开始的时候我们需要将vue-router下载下载,记得选择yes哦
动画开始我们先了解这样一个属性<transition :name=""></transition>这个属性是vue中专门用来设置动画的一个标签,通过设置不能的 name改变其动画的实现方式。
App.vue:
<template>
<div id="app">
<transition :name="animate">
<router-view id="view"></router-view>
</transition>
</div>
</template>

<script>
export default {
name: 'App',
data () {
return {
animate: "",
}
},
watch: {
//to为下个页面,from为源路由。通过再路由的配置中将页面的入栈方式设置为1.再页面出栈的时候设置为2
$route: function(to,from) {
/*
0: 不做动画
1: 左切换
2: 右切换
3: 上切换
4: 下切换
*/
let animate = this.$router.animate || to.meta.slide;
if(!animate) {
this.animate = ""
} else {
this.animate =
animate === 1? "slide-left":
animate === 2? "slide-right":
animate === 3? "slide-top":
animate === 4? "slide-bottom":""
}
//当animate为1的时候页面想左滑动,2为右,3为上,4为下,0没有动画,
this.$router.animate = 0;//恢复状态
// console.log(this.animate);
}
}
}
</script>

<style>
* {
margin: 0;
padding: 0;
}
html,body {
width: 100%;
height: 100%;
font-size: 26.67vw;
}
.wraper {
width: 100%;
height: 100%;
}
.container {
width: 100%;
height: 100%;
display: flex;
flex-direction: column;
overflow: hidden;
background-color: #ffff;
}
#app {
font-family: 'Avenir', Helvetica, Arial, sans-serif;
-webkit-font-smoothing: antialiased;
-moz-osx-font-smoothing: grayscale;
text-align: center;
color: #2c3e50;
width: 100%;
height: 100%;
}
//不同动画的c3样式
#view {
position: absolute;
left: 0;
top: 0;
width: 100%;
height: 100%;
transition: all 0.5s cubic-bezier(0.55, 0, 0.1, 1);
}
.slide-left-enter,
.slide-right-leave-active {
opacity: 0;
transform: translate(100%, 0);
}
.slide-left-leave-active,
.slide-right-enter {
opacity: 0;
transform: translate(-100%, 0);
}
.slide-top-enter,
.slide-bottom-leave-active {
opacity: 0;
transform: translate(0, 100%);
}
.slide-top-leave-active,
.slide-bottom-enter {
opacity: 0;
transform: translate(0, -100%);
}
</style>
main.js
// The Vue build version to load with the `import` command
// (runtime-only or standalone) has been set in webpack.base.conf with an alias.
import Vue from 'vue'
import App from './App'
import router from './router'

// 全局路由返回,再页面返回上级页面时,可以通过调用back方法返回上级页面
Vue.prototype.back = (route) =>{
route.animate = 2;//设置路由返回页面的动画方式
window.history.go(-1);//返回一级页面
}

Vue.config.productionTip = false

/* eslint-disable no-new */
new Vue({
el: '#app',
router,
components: { App },
template: '<App/>'
})
router.js
import Vue from 'vue'
import Router from 'vue-router'
// import HelloWorld from '@/components/HelloWorld'
import Home from "@/views/home/index"
import One from "@/views/one/index"
import Two from "@/views/two/index"
import Three from "@/views/three/index"
Vue.use(Router);
Router.prototype.animate = 0;//给所有的路由设置动画初始化为0,无动画效果
//通过给不同的路由设置不同的slide来实现页面不同入栈方式为1,2,3,4
export default new Router({
routes: [
{
path: '/',
name: '/',
component: Home
},
{
path: "/one",
name: "one",
meta: {
slide: 1,
},
component: One,
},
{
path: "/two",
name: "two",
meta: {
slide: 1,
},
component: Two
},
{
path: "/three",
name: "three",
meta: {
slide: 1,
},
component: Three
}
]
})
以上就是主要代码,下面为页面的layout不是理解的重点:
home/index.vue
<template>
<div class="wraper">
<div class="container">
<div class="section">
<h3>这里是首页</h3>
<h3>编程式跳转</h3>
<div class="main">
<!--编程式路由跳转-->
<div class="li" @click="One()">One</div>
<div class="li" @click="Two()">Two</div>
<div class="li" @click="Three()">Three</div>
</div>
<h3>router-link跳转</h3>
<div class="main">
<!--编程式路由跳转-->
<router-link class="li" :to="{name:'one',params:{id:'0'}}" tag="div">One</router-link>
<router-link class="li" :to="{path:'/two',query:{id:'1'}}" tag="div">Two</router-link>
<router-link class="li" :to="{path:'/three',query:{id:'2'}}" tag="div">Three</router-link>
</div>
</div>
</div>
</div>
</template>
<script>
export default {
methods: {
One: function () {
this.$router.push({
name:"one",
params:{
id:"0"
}
})
},
Two: function () {
this.$router.push({
path:"/two",
query:{
id:"1"
}
})
},
Three: function () {
this.$router.push({
path:"/three",
query:{
id:"2"
}
})
},
}
}
</script>
<style scoped>
.section {
width: 100%;
flex: 1;
overflow-y: auto;
overflow-x: hidden;
}
* {
font-size: 16px;
}
.main {
width: 100%;
height: .5rem;
display: flex;
align-items: center;
border-bottom: 1px solid #ccc;
border-top: 1px solid #ccc;
}
.main div {
flex: 1;
height: .5rem;
line-height: .5rem;
}
.main div:hover {
background-color: #999988;
}
.main div:nth-of-type(2) {
box-sizing: border-box;
border-left: 1px solid #ccc;
border-right: 1px solid #ccc;
}
</style>
one/index.vue
<template>
<div class="wraper">
<div class="container">
<div class="back" @click="back($router)">Back(返回上一级页面)</div>
<h3>这里One页面</h3>
<h3>首页传过来{{msg}}</h3>
</div>
</div>
</template>
<script>
export default {
data () {
return {
msg: ""
}
},
methods: {
getParams() {
this.msg = this.$route.params.id;
}
},
mounted() {
this.getParams();
},
watch: {
'$route': 'getParams'
}
}
</script>
<style scoped>
* {
font-size: 16px;
}
.back {
height: .5rem;
line-height: .5rem;
border-bottom: 1px solid #ccc;
background-color: #999;
color: #fff;
}
.back:hover {
background-color: #999;
}
</style>
two/index.vue
<template>
<div class="wraper">
<div class="container">
<h3>这里是Two页面</h3>
<h3>首页传过来{{msg}}</h3>
<div class="back" @click="back($router)">Back(返回上一级页面)</div>
</div>
</div>
</template>
<script>
export default {
data () {
return {
msg: ""
}
},
methods: {
getParams() {
this.msg = this.$route.query.id;
}
},
mounted() {
this.getParams();
},
watch: {
'$route': 'getParams'
}
}
</script>
<style scoped>
* {
font-size: 16px;
}
.back {
width: 100%;
height: .5rem;
line-height: .5rem;
background-color: #ccc;
border-bottom: 1px solid #ccc;
}
</style>
three/index.vue
<template>
<div class="wraper">
<div class="container">
<h3>这里是Two页面</h3>
<h3>首页传过来{{msg}}</h3>
<div class="back" @click="back($router)">Back(返回上一级页面)</div>
</div>
</div>
</template>
<script>
export default {
data () {
return {
msg: ""
}
},
methods: {
getParams() {
this.msg = this.$route.query.id;
}
},
mounted() {
this.getParams();
},
watch: {
'$route': 'getParams'
}
}
</script>
<style scoped>
* {
font-size: 16px;
}
.back {
width: 100%;
height: .5rem;
line-height: .5rem;
background-color: #ccc;
border-bottom: 1px solid #ccc;
}
</style>
以上就为效果图的完整demo code,源码的阅读相信大家就会明白实现的原理。这里我们还需要了解这样一个知识点:
路由间传参的传递与接受:
页面参数的传递中可以通过params和query来实现参数的传递,见one/index.vue 那么这两种方式具体有什么区别呢?
query传参和接受参数
传参: this.$router.push({ path:'/xxx', query:{ id:id } }) 接收参数: this.$route.query.id
传参: this.$router.push({ name:'xxx', params:{ id:id } }) 接收参数: this.$route.params.id
这里我们需要注意的是:
另外,二者还有一个区别,直白的说query传递的参数相当于get请求,参数会在地址栏里看得见,二params相当于post地址栏中无法看见
到这里路由的基本的知识点总结完了,但是还有许多我们需要知道的子路由,导航守卫等官方 文档传送门:https://router.vuejs.org/zh/guide/advanced/transitions.html#%E5%8D%95%E4%B8%AA%E8%B7%AF%E7%94%B1%E7%9A%84%E8%BF%87%E6%B8%A1