轉載自https://www.linuxjournal.com/content/using-named-pipes-fifos-bash
It's hard to write a bash script of much import without using a pipe or two. Named pipes, on the other hand, are much rarer.
Like un-named/anonymous pipes, named pipes provide a form of IPC (Inter-Process Communication). With anonymous pipes, there's one reader and one writer, but that's not required with named pipes—any number of readers and writers may use the pipe.
Named pipes are visible in the filesystem and can be read and written just as other files are:
$ ls -la /tmp/testpipe
prw-r--r-- 1 mitch users 0 2009-03-25 12:06 /tmp/testpipe|
Why might you want to use a named pipe in a shell script? One situation might be when you've got a backup script that runs via cron, and after it's finished, you want to shut down your system. If you do the shutdown from the backup script, cron never sees the backup script finish, so it never sends out the e-mail containing the output from the backup job. You could do the shutdown via another cron job after the backup is "supposed" to finish, but then you run the risk of shutting down too early every now and then, or you have to make the delay much larger than it needs to be most of the time.
Using a named pipe, you can start the backup and the shutdown cron jobs at the same time and have the shutdown just wait till the backup writes to the named pipe. When the shutdown job reads something from the pipe, it then pauses for a few minutes so the cron e-mail can go out, and then it shuts down the system.
Of course, the previous example probably could be done fairly reliably by simply creating a regular file to signal when the backup has completed. A more complex example might be if you have a backup that wakes up every hour or so and reads a named pipe to see if it should run. You then could write something to the pipe each time you've made a lot of changes to the files you want to back up. You might even write the names of the files that you want backed up to the pipe so the backup doesn't have to check everything.
Named pipes are created via mkfifo or mknod:
$ mkfifo /tmp/testpipe
$ mknod /tmp/testpipe p
The following shell script reads from a pipe. It first creates the pipe if it doesn't exist, then it reads in a loop till it sees "quit":
#!/bin/bash

pipe=/tmp/testpipe

trap "rm -f $pipe" EXIT

if [[ ! -p $pipe ]]; then
    mkfifo $pipe
fi

while true
do
    if read line <$pipe; then
        if [[ "$line" == 'quit' ]]; then
            break
        fi
        echo $line
    fi
done

echo "Reader exiting"
The following shell script writes to the pipe created by the read script. First, it checks to make sure the pipe exists, then it writes to the pipe. If an argument is given to the script, it writes it to the pipe; otherwise, it writes "Hello from PID".
#!/bin/bash

pipe=/tmp/testpipe

if [[ ! -p $pipe ]]; then
    echo "Reader not running"
    exit 1
fi


if [[ "$1" ]]; then
    echo "$1" >$pipe
else
    echo "Hello from $$" >$pipe
fi
Running the scripts produces:
$ sh rpipe.sh &
[3] 23842
$ sh wpipe.sh
Hello from 23846
$ sh wpipe.sh
Hello from 23847
$ sh wpipe.sh
Hello from 23848
$ sh wpipe.sh quit
Reader exiting
Note: initially I had the read command in the read script directly in the while loop of the read script, but the read command would usually return a non-zero status after two or three reads causing the loop to terminate.
while read line <$pipe
do
    if [[ "$line" == 'quit' ]]; then
        break
    fi
    echo $line
done
--------------------------------------------------------------------------------------- 轉載自https://www.howtoforge.com/linux-mkfifo-command/
Linux mkfifo Command Tutorial for Beginners (with Examples)
If you're even a moderate Linux command line user, you must be aware of pipes, a fundamental command line feature that allows processes to communicate. Then there's a concept of named pipes (yeah, pipes with names, so that you can do more with pipes). The mkfifo command lets you create such named pipes.
In this tutorial, we will discuss the basics of mkfifo using some easy to understand examples. But before we do that, it's worth mentioning all examples here have been tested on Ubuntu 16.04 LTS.
Linux mkfifo command
The mkfifo command basically lets you create FIFOs (a.k.a named pipes). Following is the syntax of the command:
mkfifo [OPTION]... NAME...
And here's how the tool's man page explains it:
Create named pipes (FIFOs) with the given NAMEs.
Following are some Q&A-styled examples that should give you a good idea on how mkfifo works.
Q1. What exactly are named pipes?
To understand this, you should first be aware of the concept of basic pipes. You'd have seen commands that contain a vertical bar (|) in them. This bar is called a pipe. What it does is, it creates a channel of communication between the two processes (when the complete command is executed).
For example:
ls | grep .txt
The command mentioned above consists of two programs: ls and grep. Both these programs are separated by a pipe (|). So what pipe does here is, it creates a channel of communication between these programs - when the aforementioned command is executed, the output of ls is fed as input to grep. So finally, the output that gets displayed on the terminal consists of only those entries that have '.txt' string in them.
So that was a quick refresher of normal pipes. Now comes the concept of named pipes. As the name itself suggests, these are pipes with names. You can create a named pipe using the mkfifo command. For example:
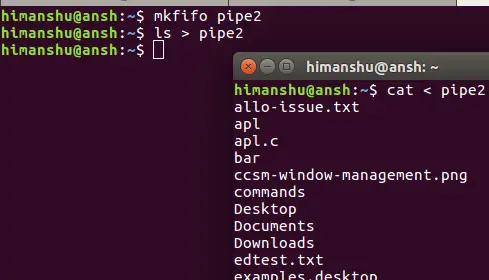
mkfifo pipe2
So 'pipe2' is now a named pipe. Now comes the question how named pipes are more useful? Well, consider the case where you have a process running in a terminal and producing output, and what you want is to channelize that output on to a different terminal. So here, a named pipe could of great help.
For example, suppose ls is the process running in the first terminal, and you want to see its output in a different terminal.. So here's what you can do:
ls > pipe2
and here's what you can do in the second terminal:
cat < pipe2
Q2. How to identify named pipes?
Named pipes can be accessed normally like files. So that means you can use the ls command to access them. If you see the access permissions for a named pipe, you'll see a 'p' in the beginning. This signifies the file in question is a named pipe. Here's an example:

Q3. How to set custom access permissions?
As you can see in the previous Q&A, the default access permissions for named pipes is 'rw', 'rw', and 'r' (for user, group, and others, respectively). However, if you want, you can set custom permissions as well, something which you can do using the -m option.
For example:
mkfifo pipe3 -m700
The following screenshot confirms custom permissions were set:

To know more about mkfifo, you can use the --help and --version options.
Conclusion
So depending upon what kind of work you do on the Linux command line, the mkfifo command can prove to be very useful to you. Once you're done with the basic usage we've discussed here, you can learn more about the tool by heading to its man page.