
将store文件夹分为四个文件夹,分别是actions,getters,mutations,state。
action:和mutatation功能是类似的,都是修改state里面的数据,区别是action用于异步修改
getter:后端传过来的数据,如果需要做一些处理就在getter里面写。
mutations:用于处理同步数据修改
state:存放后端传过来的原生数据。
父组件通过调用action对store里面数据进行了处理,他的子组件只要调用getter就可以获取到父组件处理后的数据
这里我们演示一个小栗子:
state.js
export default{
  count: 0,
  firstName: 'zha',
  lastName: 'lu'
}
getter.js:拼接两个字符串
// 和computer一样,都是对后台返回的数据做处理,只是这个可以应用多个页面
export default {
  fullName (state) {
    const name = state.firstName + state.lastName
    return name
  }
}
mutations.js 执行函数updateCount
// 所有数据的修改都尽量放在mutations,将mutation写成一个对象,它同步操作,不能有异步的代码在里面
export default{
  // 只能有两个参数
  updateCount (state, num) {
    state.count = num
  }
}
actions.js 每隔一段时间提交updateCount
// 和mutations差不多,区别是是action可以存放异步的代码
export default {
  updateCountAsync (store, data) {
    setTimeout(() => (
      store.commit('updateCount', data.num)
    ), data.time)
  }
}
store.js:上面几个都需要在这里进行注册
import Vuex from 'vuex'
import defaultState from './state/state.js'
import mutations from './mutations/mutations'
import getters from './getters/getters.js'
import actions from './actions/actions.js'
// 通过函数,返回一个store
export default () => {
  return new Vuex.Store({
    state: defaultState,
    mutations,
    getters,
    actions
  })
}
App.vue
<template>
  <div id="app">
    <img src="./assets/logo.png">
    <router-link to="/second">second</router-link>
    <router-view/>
    {{counter}} {{fullName}}
  </div>
</template>

<script>
import {
  mapState,
  mapGetters,
  mapMutations,
  mapActions
} from 'vuex'
export default {
  name: 'App',
  mounted () {
    console.log(this.$store)
    // let i = 1
    // actions异步处理,未使用mapActions
    // this.$store.dispatch('updateCountAsync', {
    //   num: 5,
    //   time: 2000
    // })
    // 使用mapActions,在调用方法的时候不用传方法名
    this.updateCountAsync(
      {
        num: 5,
        time: 2000
      })

    // mutations同步处理,每隔一秒进行count+1
    // setInterval(() => {
    //   this.$store.commit('updateCount', i++)
    // }, 1000)
  },
  computed: {
    /*  count () {
      return this.$store.state.count
  },和下面的mapState功能一致 ...要使用命令
  npm i babel-preset-stage-1
*/
    ...mapState({
      // counter: 'count'和下面一样,只是这个是传对象,下面是传方法
      counter: (state) => state.count
    }),
    ...mapGetters(['fullName'])
    // 和上面一样fullName () {
    //   return this.$store.getters.fullName
    // }
  },
  methods: {
    ...mapActions(['updateCountAsync']),
    ...mapMutations(['updateCount'])
  }
}
</script>

<style>
#app {
  font-family: 'Avenir', Helvetica, Arial, sans-serif;
  -webkit-font-smoothing: antialiased;
  -moz-osx-font-smoothing: grayscale;
  text-align: center;
  color: #2c3e50;
  margin-top: 60px;
}
</style>
最后结果:
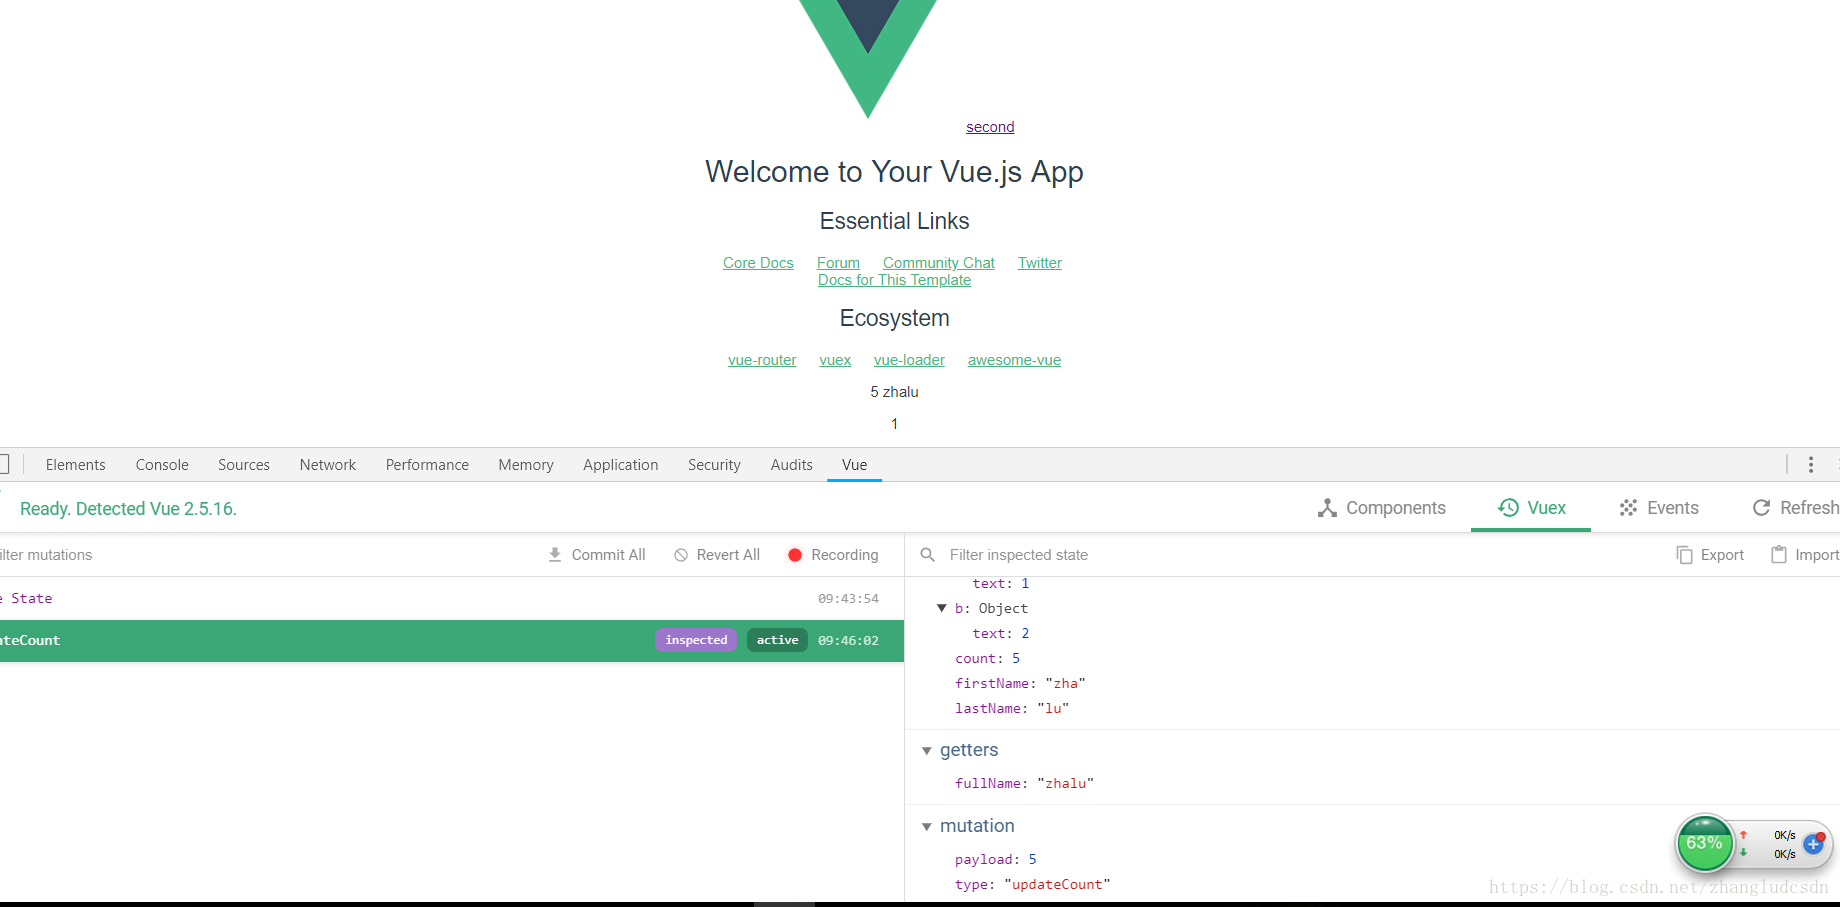
我们把store分为a、b模块,里面局部作用域的state,mutations,getters、actions。
store.js
export default () => {
  return new Vuex.Store({
    state: defaultState,
    mutations,
    getters,
    actions,
    // 加入模块功能,两个模块a,b
    modules: {
      a: {
        namespaced: true,
        state: {
          text: 1
        },
        mutations: {
          // 这里的state指的是a模块的state
          updateText (state, text) {
            console.log('a.state', state)
            state.text = text
          }
        },
        getters: {
          textPlus (state) {
            return state.text + 1
          }
        }
      },
      b: {
        state: {
          text: 2
        }
      }
    }
  })
}里面的a作用域的getter方法是可以改变全局的state的,action和mutations也是一样的,action默认是调用作用域内的方法,如果是全局,需要加{root:true}
 getters: {
          textPlus (state, getter, rootState) {
            return state.text + 1 + rootState.count
          }
        }
actions: {
add ({state, commit, rootState}) {
commit('updateText', rootState.count, {root: true})
}
}第三个参数就是全局的state,可以拿到外面的count。
应用入口在进行调用的时候首先在computer里面,使用...mapState({}),...mapGetter({})调用store对应作用域的state和getter,
mapState里面的参数
testA: (state) => state.a.textmapGetter里面的参数
...mapGetters({
      'fullName': 'fullName',
      textPlus: 'a/textPlus'
    })
如果是mutations和actions属性调用的函数部分,就写在methods里面
    ...mapActions(['updateCountAsync']),
    ...mapMutations(['updateCount', 'a/updateText'])
在mouted函数里面调用作用域里面方法
this['a/updateText']('123')在入口组件的App.vue里面写上展示标签
{{counter}} {{fullName}}
    <p>分模块的state:{{testA}}</p>
    <p>分模块的getters:{{textPlus}}</p
运行结果

如果我们某模块只是在异步加载的时候用到,我们就可以给这个项目的store提供一个注册功能,动态加载模块
我们可以在main.js注册一个模块c
store.registerModule('c', {
  state: {
    text: 3
  }
})
然后入口组件app.vue就可以进行调用
在computer里面的mapState写
textC: state => state.c.texttemplate里面就可以展示{{testC}}
store里面的watch对象
store.registerModule('c', {
  state: {
    text: 3
  }
})
// 解绑model store.unregisterModule('c')
// 参数是state方法,=>代表返回值指向,第二个参数也是一个方法,相当于方法一的回调函数
store.watch((state) => state.count + 1, (newCount) =>
  console.log('new count watched:', newCount)
)
应用入口组件里面的mounted:{}里面写
 setInterval(() => {
      this.$store.commit('updateCount', i++)
    }, 1000)
    this['a/updateText']('123')
每次state变换就会调用newCount,打印日志。
store的插件函数,追踪所有的mutations里面的函数调用
// 订阅,会拿到所有mutations的变化,执行回调函数
store.subscribe((mutation, state) => {
  // mutation的名字
  console.log(mutation.type)
  // mutation的参数
  console.log(mutation.payload)
})
追踪actions里面的函数调用
store.subscribeAction((action, state) => {
  console.log(action.type)
  console.log(action.payload)
})