mysql+keepalived双主热备高可用的介绍:
我们通常说的双机热备是指两台机器都在运行,但并不是两台机器都同时在提供服务。当提供服务的一台出现故障的时候,另外一台会马上自动接管并且提供服务,而且切换的时间非常短。MySQL双主复制,即互为Master-Slave(只有一个Master提供写操作),可以实现数据库服务器的热备,但是一个Master宕机后不能实现动态切换。使用Keepalived,可以通过虚拟IP,实现双主对外的统一接口以及自动检查、失败切换机制,从而实现MySQL数据库的高可用方案。之前梳理了Mysql主从/主主同步,下面说下Mysql+keeoalived双主热备高可用方案的实施。
Keepalived看名字就知道,保持存活,在网络里面就是保持在线了,也就是所谓的高可用或热备,用来防止单点故障(单点故障是指一旦某一点出现故障就会导
整个系统架构的不可用)的发生,那说到keepalived不得不说的一个协议不是VRRP协议,可以说这个协议就是keepalived实现的基础。
1)Keepalived的工作原理是VRRP(Virtual Router Redundancy Protocol)虚拟路由冗余协议。在VRRP中有两组重要的概念:VRRP路由器和虚拟路由器,主控路由器和备份路由器。
2)VRRP路由器是指运行VRRP的路由器,是物理实体,虚拟路由器是指VRRP协议创建的,是逻辑概念。一组VRRP路由器协同工作,共同构成一台虚拟路由器。
Vrrp中存在着一种选举机制,用以选出提供服务的路由即主控路由,其他的则成了备份路由。当主控路由失效后,备份路由中会重新选举出一个主控路由,来继
续工作,来保障不间断服务。
实验部署
实验需求:
1)先实施Master->Slave的主主同步。主主是数据双向同步,主从是数据单向同步。一般情况下,主库宕机后,需要手动将连接切换到从库上。(但是用keepalived就可以自动切换)
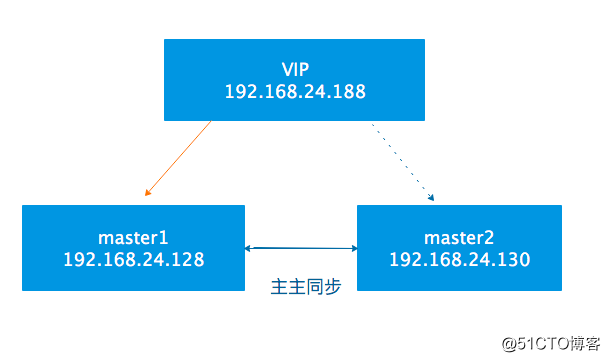
2)再结合Keepalived的使用,通过VIP实现Mysql双主对外连接的统一接口。即客户端通过Vip连接数据库;当其中一台宕机后,VIP会漂移到另一台上,这个过程对于客户端的数据连接来说几乎无感觉,从而实现高可用。
实验环境
| 服务角色 | IP | 系统及所需服务 |
|---|---|---|
| master1 | 192.168.24.128 | centos7 mysql keepalived |
| master2 | 192.168.24.130 | centos7 mysql keepalived |
| VIP | 192.168.24.188 |
注意:防火墙与SELINUX确保已经关闭
master1和master2同时按照mysql服务
博客中已有mysql的按照文档,在此不再赘述
mysql主主同步环境部署
在master1 上操作如下
在my.cnf文件的[mysqld]配置区域添加下面内容:
[root@linfan ~]# vim /etc/my.cnf
[mysqld]
basedir = /usr/local/mysql
datadir = /opt/data
socket = /tmp/mysql.sock
port = 3306
pid-file = /opt/data/mysql.pid
user = mysql
skip-name-resolve
//添加以下内容
server-id = 1
log-bin = mysql-bin
sync_binlog = 1
binlog_checksum = none
binlog_format = mixed
auto-increment-increment = 2
auto-increment-offset = 1
slave-skip-errors = all
重启mysql服务
[root@linfan ~]# service mysqld restart
Shutting down MySQL.. SUCCESS!
Starting MySQL.. SUCCESS!
数据同步授权,这样I/O线程就可以以这个用户的身份连接到主服务器,并且读取它的二进制日志。
mysql>  grant replication slave,replication client on *.* to doudou@'192.168.24.%' identified by "123456";
Query OK, 0 rows affected, 1 warning (0.01 sec)

mysql> flush privileges;
//刷新权限
Query OK, 0 rows affected (0.00 sec)

mysql>  flush tables with read lock;
//最好将库锁住,仅仅允许读,以保证数据一致性;待主主同步环境部署后再解锁;
锁住后,就不能往表里写数据,但是重启mysql服务后就会自动解锁!
Query OK, 0 rows affected (0.00 sec)

mysql> show master status;
//log bin日志和pos值位置
+------------------+----------+--------------+------------------+-------------------+
| File             | Position | Binlog_Do_DB | Binlog_Ignore_DB | Executed_Gtid_Set |
+------------------+----------+--------------+------------------+-------------------+
| mysql-bin.000001 |      612 |              |                  |                   |
+------------------+----------+--------------+------------------+-------------------+
1 row in set (0.00 sec)
在master2 上操作如下
在my.cnf文件的[mysqld]配置区域添加下面内容:
[root@linfan ~]# vim /etc/my.cnf
[mysqld]
basedir = /usr/local/mysql
datadir = /opt/data
socket = /tmp/mysql.sock
port = 3306
pid-file = /opt/data/mysql.pid
user = mysql
skip-name-resolve
//添加以下内容
server-id = 2
log-bin = mysql-bin
sync_binlog = 1
binlog_checksum = none
binlog_format = mixed
auto-increment-increment = 2
auto-increment-offset = 2
slave-skip-errors = all
重启mysql的服务
[root@linfan ~]# service mysqld restart
Shutting down MySQL.. SUCCESS!
Starting MySQL... SUCCESS!
数据同步授权,这样I/O线程就可以以这个用户的身份连接到主服务器,并且读取它的二进制日志。
mysql>  grant replication slave,replication client on *.* to doudou@'192.168.24.%' identified by "123456";
Query OK, 0 rows affected, 1 warning (0.00 sec)

mysql>  flush privileges;
Query OK, 0 rows affected (0.00 sec)

mysql>  flush tables with read lock;
Query OK, 0 rows affected (0.00 sec)

mysql> show master status;
+------------------+----------+--------------+------------------+-------------------+
| File             | Position | Binlog_Do_DB | Binlog_Ignore_DB | Executed_Gtid_Set |
+------------------+----------+--------------+------------------+-------------------+
| mysql-bin.000004 |      150 |              |                  |                   |
+------------------+----------+--------------+------------------+-------------------+
1 row in set (0.00 sec)
在master1上做同步操作
mysql> unlock tables;     //先解锁,将对方数据同步到自己的数据库中
mysql> stop slave;
mysql> change  master to master_host='192.168.24.130',master_user='doudou',master_password='123456',master_log_file='mysql-bin.000004',master_log_pos=150;
Query OK, 0 rows affected, 2 warnings (0.01 sec)

mysql> start slave;
Query OK, 0 rows affected (0.01 sec)

查看同步状态,如下出现两个“Yes”,表明同步成功!
mysql> show slave status\G;
*************************** 1. row ***************************
               Slave_IO_State: Waiting for master to send event
                  Master_Host: 192.168.24.130
                  Master_User: doudou
                  Master_Port: 3306
                Connect_Retry: 60
              Master_Log_File: mysql-bin.000004
          Read_Master_Log_Pos: 150
               Relay_Log_File: linfan-relay-bin.000002
                Relay_Log_Pos: 312
        Relay_Master_Log_File: mysql-bin.000004
             Slave_IO_Running: Yes
            Slave_SQL_Running: Yes
              Replicate_Do_DB:
          Replicate_Ignore_DB:
           Replicate_Do_Table:
       Replicate_Ignore_Table:
      Replicate_Wild_Do_Table:
  Replicate_Wild_Ignore_Table:
                   Last_Errno: 0
                   Last_Error:
                 Skip_Counter: 0
          Exec_Master_Log_Pos: 150
              Relay_Log_Space: 512
              Until_Condition: None
               Until_Log_File:
                Until_Log_Pos: 0
           Master_SSL_Allowed: No
           Master_SSL_CA_File:
           Master_SSL_CA_Path:
              Master_SSL_Cert:
            Master_SSL_Cipher:
               Master_SSL_Key:
        Seconds_Behind_Master: 0
Master_SSL_Verify_Server_Cert: No
                Last_IO_Errno: 0
                Last_IO_Error:
               Last_SQL_Errno: 0
               Last_SQL_Error:
  Replicate_Ignore_Server_Ids:
             Master_Server_Id: 2
                  Master_UUID: dc702f48-b7b9-11e8-9caa-000c298fc02c
             Master_Info_File: /opt/data/master.info
                    SQL_Delay: 0
          SQL_Remaining_Delay: NULL
      Slave_SQL_Running_State: Slave has read all relay log; waiting for more updates
           Master_Retry_Count: 86400
                  Master_Bind:
      Last_IO_Error_Timestamp:
     Last_SQL_Error_Timestamp:
               Master_SSL_Crl:
           Master_SSL_Crlpath:
           Retrieved_Gtid_Set:
            Executed_Gtid_Set:
                Auto_Position: 0
         Replicate_Rewrite_DB:
                 Channel_Name:
           Master_TLS_Version:
1 row in set (0.00 sec)

ERROR:
No query specified
在master2上做同步操作:
mysql> unlock tables;     //先解锁,将对方数据同步到自己的数据库中
mysql> stop slave;
mysql> change  master to master_host='192.168.24.129',master_user='doudou',master_password='123456',master_log_file='mysql-bin.000001',master_log_pos=612;
Query OK, 0 rows affected, 2 warnings (0.01 sec)

mysql> start slave;
Query OK, 0 rows affected (0.01 sec)

查看同步状态,如下出现两个“Yes”,表明同步成功!
mysql> show slave status\G;
*************************** 1. row ***************************
               Slave_IO_State: Waiting for master to send event
                  Master_Host: 192.168.24.130
                  Master_User: doudou
                  Master_Port: 3306
                Connect_Retry: 60
              Master_Log_File: mysql-bin.000001
          Read_Master_Log_Pos: 150
               Relay_Log_File: linfan-relay-bin.000002
                Relay_Log_Pos: 312
        Relay_Master_Log_File: mysql-bin.000001
             Slave_IO_Running: Yes
            Slave_SQL_Running: Yes
              Replicate_Do_DB:
          Replicate_Ignore_DB:
           Replicate_Do_Table:
       Replicate_Ignore_Table:
      Replicate_Wild_Do_Table:
  Replicate_Wild_Ignore_Table:
                   Last_Errno: 0
                   Last_Error:
                 Skip_Counter: 0
          Exec_Master_Log_Pos: 150
              Relay_Log_Space: 512
              Until_Condition: None
               Until_Log_File:
                Until_Log_Pos: 0
           Master_SSL_Allowed: No
           Master_SSL_CA_File:
           Master_SSL_CA_Path:
              Master_SSL_Cert:
            Master_SSL_Cipher:
               Master_SSL_Key:
        Seconds_Behind_Master: 0
Master_SSL_Verify_Server_Cert: No
                Last_IO_Errno: 0
                Last_IO_Error:
               Last_SQL_Errno: 0
               Last_SQL_Error:
  Replicate_Ignore_Server_Ids:
             Master_Server_Id: 2
                  Master_UUID: dc702f48-b7b9-11e8-9caa-000c298fc02c
             Master_Info_File: /opt/data/master.info
                    SQL_Delay: 0
          SQL_Remaining_Delay: NULL
      Slave_SQL_Running_State: Slave has read all relay log; waiting for more updates
           Master_Retry_Count: 86400
                  Master_Bind:
      Last_IO_Error_Timestamp:
     Last_SQL_Error_Timestamp:
               Master_SSL_Crl:
           Master_SSL_Crlpath:
           Retrieved_Gtid_Set:
            Executed_Gtid_Set:
                Auto_Position: 0
         Replicate_Rewrite_DB:
                 Channel_Name:
           Master_TLS_Version:
1 row in set (0.00 sec)

ERROR:
No query specified
PS: 在这里可能会报错
Got fatal error 1236 from master when reading data from binary log: 'Could not find first log file name in binary log index file'突然之间Slave_IO_Running: 状态变成NO了
解决方法。
首先在从库上执行
stop slave;
查看主库master状态
mysql> show master status\G;
*************************** 1. row ***************************
             File: mysql-bin.000113
         Position: 276925387
     Binlog_Do_DB:
 Binlog_Ignore_DB:
Executed_Gtid_Set:
1 row in set (0.00 sec)

ERROR:
No query specified

mysql> flush logs;
Query OK, 0 rows affected (0.11 sec)
刷新binlog日志
flush logs;
刷新后的日志会+1
例如上面的 File: mysql-bin.000113 会变成 File: mysql-bin.000114
再次查看master状态
mysql> show master status\G;
*************************** 1. row ***************************
             File: mysql-bin.000114
         Position: 120
     Binlog_Do_DB:
 Binlog_Ignore_DB:
Executed_Gtid_Set:
1 row in set (0.00 sec)

ERROR:
No query specified
然后就不需要在操作master,切换到从库
输入CHANGE MASTER TO MASTER_LOG_FILE='mysql-bin.000114',MASTER_LOG_POS=120;
执行start slave;
查看从库状态
mysql> show slave status\G;
*************************** 1. row ***************************
               Slave_IO_State: Waiting for master to send event
                  Master_Host: 101.200.*.*
                  Master_User: backup
                  Master_Port: 3306
                Connect_Retry: 60
              Master_Log_File: mysql-bin.000114
          Read_Master_Log_Pos: 11314
               Relay_Log_File: mysql-relay.000002
                Relay_Log_Pos: 11477
        Relay_Master_Log_File: mysql-bin.000114
             Slave_IO_Running: Yes
            Slave_SQL_Running: Yes
              Replicate_Do_DB:
          Replicate_Ignore_DB:
           Replicate_Do_Table:
       Replicate_Ignore_Table:
      Replicate_Wild_Do_Table:
  Replicate_Wild_Ignore_Table:
                   Last_Errno: 0
                   Last_Error:
                 Skip_Counter: 0
          Exec_Master_Log_Pos: 11314
              Relay_Log_Space: 11646
              Until_Condition: None
               Until_Log_File:
                Until_Log_Pos: 0
           Master_SSL_Allowed: No
           Master_SSL_CA_File:
           Master_SSL_CA_Path:
              Master_SSL_Cert:
            Master_SSL_Cipher:
               Master_SSL_Key:
        Seconds_Behind_Master: 0
Master_SSL_Verify_Server_Cert: No
                Last_IO_Errno: 0
                Last_IO_Error:
               Last_SQL_Errno: 0
               Last_SQL_Error:
  Replicate_Ignore_Server_Ids:
             Master_Server_Id: 21
                  Master_UUID: e4a43da7-5b58-11e5-a12f-00163e003632
             Master_Info_File: /home/data/mysql/master.info
                    SQL_Delay: 0
          SQL_Remaining_Delay: NULL
      Slave_SQL_Running_State: Slave has read all relay log; waiting for the slave I/O thread to update it
           Master_Retry_Count: 86400
                  Master_Bind:
      Last_IO_Error_Timestamp:
     Last_SQL_Error_Timestamp:
               Master_SSL_Crl:
           Master_SSL_Crlpath:
           Retrieved_Gtid_Set:
            Executed_Gtid_Set:
                Auto_Position: 0
1 row in set (0.00 sec)

ERROR:
No query specified
主主同步效果验证
1)在master1服务器的数据库写入数据:
mysql> create database tom;
Query OK, 1 row affected (0.01 sec)

mysql> use tom;
Database changed

mysql> create table mary(id int,name varchar(100) not null,age tinyint);
Query OK, 0 rows affected (0.06 sec)

mysql> insert mary values(1,"lisi",10),(2,"zhangshan",28),(3,"wangwu",18);
Query OK, 3 rows affected (0.11 sec)
Records: 3  Duplicates: 0  Warnings: 0

mysql> select * from mary;
+------+-----------+------+
| id   | name      | age  |
+------+-----------+------+
|    1 | lisi      |   10 |
|    2 | zhangshan |   28 |
|    3 | wangwu    |   18 |
+------+-----------+------+
3 rows in set (0.00 sec)
然后在master2数据库上查看,发现数据已经同步过来了!
mysql> show databases;
+--------------------+
| Database           |
+--------------------+
| information_schema |
| mysql              |
| performance_schema |
| sys                |
| tom                |
+--------------------+
5 rows in set (0.01 sec)

mysql> use tom;
Reading table information for completion of table and column names
You can turn off this feature to get a quicker startup with -A

Database changed
mysql> show tables;
+---------------+
| Tables_in_tom |
+---------------+
| mary          |
+---------------+
1 row in set (0.00 sec)

mysql> select * from mary;
+------+-----------+------+
| id   | name      | age  |
+------+-----------+------+
|    1 | lisi      |   10 |
|    2 | zhangshan |   28 |
|    3 | wangwu    |   18 |
+------+-----------+------+
3 rows in set (0.00 sec)
2)在master2数据库上写入新数据
mysql> insert mary values(4,"zhaosi",66),(5,"lida",88);
Query OK, 2 rows affected (0.01 sec)
Records: 2  Duplicates: 0  Warnings: 0

mysql> select * from mary;
+------+-----------+------+
| id   | name      | age  |
+------+-----------+------+
|    1 | lisi      |   10 |
|    2 | zhangshan |   28 |
|    3 | wangwu    |   18 |
|    4 | zhaosi    |   66 |
|    5 | lida      |   88 |
+------+-----------+------+
5 rows in set (0.00 sec)
然后在master1数据库上查看,发现数据也已经同步过来了!
mysql>  select * from mary;
+------+-----------+------+
| id   | name      | age  |
+------+-----------+------+
|    1 | lisi      |   10 |
|    2 | zhangshan |   28 |
|    3 | wangwu    |   18 |
|    4 | zhaosi    |   66 |
|    5 | lida      |   88 |
+------+-----------+------+
5 rows in set (0.00 sec)
至此,Mysql主主同步环境已经实现。
配置Mysql+Keepalived故障转移的高可用环境
安装keepalived并将其配置成系统服务。master1和master2两台机器上同样进行如下操作:
[root@linfan ~]# yum install -y openssl-devel
[root@linfan ~]# cd /usr/src/
[root@linfan src]# wget http://www.keepalived.org/software/keepalived-1.3.5.tar.gz
[root@linfan src]# tar -xf keepalived-1.3.5.tar.gz
[root@linfan src]# cd keepalived-1.3.5
[root@linfan keepalived-1.3.5]#  ./configure --prefix=/usr/local/keepalived
//此处会有警告提示,忽略即可!
[root@linfan keepalived-1.3.5]# make && make install
[root@linfan keepalived-1.3.5]# cp /usr/src/keepalived-1.3.5/keepalived/etc/init.d/keepalived /etc/rc.d/init.d/
[root@linfan keepalived-1.3.5]# cp /usr/local/keepalived/etc/sysconfig/keepalived /etc/sysconfig/
[root@linfan keepalived-1.3.5]#  mkdir /etc/keepalived/
[root@linfan keepalived-1.3.5]# cp /usr/local/keepalived/etc/keepalived/keepalived.conf /etc/keepalived/
[root@linfan keepalived-1.3.5]# cp /usr/local/keepalived/sbin/keepalived /usr/sbin/
[root@linfan keepalived-1.3.5]# echo "/etc/init.d/keepalived start" >> /etc/rc.local
2)master1机器上的keepalived.conf配置。(下面配置中没有使用lvs的负载均衡功能,所以不需要配置虚拟服务器virtual server)
[root@linfan ~]# cp /etc/keepalived/keepalived.conf /etc/keepalived/keepalived.conf.bak
[root@linfan ~]# vim /etc/keepalived/keepalived.conf  //清空内容,添加为以下内容
! Configuration File for keepalived

global_defs {
notification_email {
[email protected]
[email protected]
}

notification_email_from [email protected]
smtp_server 127.0.0.1
smtp_connect_timeout 30
router_id MASTER-HA
}

vrrp_script chk_mysql_port {     #检测mysql服务是否在运行。有很多方式,比如进程,用脚本检测等等
    script "/opt/chk_mysql.sh"   #这里通过脚本监测
    interval 2                   #脚本执行间隔,每2s检测一次
    weight -5                    #脚本结果导致的优先级变更,检测失败(脚本返回非0)则优先级 -5
    fall 2                    #检测连续2次失败才算确定是真失败。会用weight减少优先级(1-255之间)
    rise 1                    #检测1次成功就算成功。但不修改优先级
}

vrrp_instance VI_1 {
    state MASTER
    interface eth0      #指定虚拟ip的网卡接口
    mcast_src_ip 192.168.24.128
    virtual_router_id 51    #路由器标识,MASTER和BACKUP必须是一致的
    priority 101            #定义优先级,数字越大,优先级越高,在同一个vrrp_instance下,MASTER的优先级必须大于BACKUP的优先级。
这样MASTER故障恢复后,就可以将VIP资源再次抢回来
    advert_int 1
    authentication {
        auth_type PASS
        auth_pass 1111
    }
    virtual_ipaddress {
        192.168.24.188
    }

track_script {
   chk_mysql_port
}
}
编写切换脚本。KeepAlived做心跳检测,如果Master的MySQL服务挂了(3306端口挂了),那么它就会选择自杀。Slave的KeepAlived通过心跳检测发现这个情况,就会将VIP的请求接管
vim /opt/chk_mysql.sh
#!/bin/bash
counter=$(netstat -na|grep "LISTEN"|grep "3306"|wc -l)
if [ "${counter}" -eq 0 ]; then
    /etc/init.d/keepalived stop
fi
[root@linfan ~]#  chmod 755 /opt/chk_mysql.sh
[root@linfan ~]# /etc/init.d/keepalived start
Starting keepalived (via systemctl):  Job for keepalived.service failed because a timeout was exceeded. See "systemctl status keepalived.service" and "journalctl -xe" for details.
                                                           [FAILED]
                                                           //发现启动失败。经排查,是因为pid的路径有问题
                                                           vim /lib/systemd/system/keepalived.service
                                                           [Unit]
Description=LVS and VRRP High Availability Monitor
After=syslog.target network-online.target

[Service]
Type=forking
PIDFile=/var/run/keepalived.pid //将此行修改如此
KillMode=process
EnvironmentFile=-/usr/local/keepalived/etc/sysconfig/keepalived
ExecStart=/usr/local/keepalived/sbin/keepalived $KEEPALIVED_OPTIONS
ExecReload=/bin/kill -HUP $MAINPID

[Install]
WantedBy=multi-user.target
[root@linfan ~]# systemctl daemon-reload   //重新载入 systemd,扫描新的或有变动的单元
再次启动
[root@linfan ~]# /etc/init.d/keepalived start
Starting keepalived (via systemctl):                       [  OK  ]
4)master2机器上的keepalived配置。master2机器上的keepalived.conf文件只修改priority为90、nopreempt不设置、real_server设置本地IP。
[root@linfan ~]# cp /etc/keepalived/keepalived.conf /etc/keepalived/keepalived.conf.bak
[root@linfan ~]# vim /etc/keepalived/keepalived.conf //清空内容,添加为以下内容
! Configuration File for keepalived

global_defs {
notification_email {
[email protected]
[email protected]
}

notification_email_from [email protected]
smtp_server 127.0.0.1
smtp_connect_timeout 30
router_id MASTER-HA
}

vrrp_script chk_mysql_port {
    script "/opt/chk_mysql.sh"
    interval 2
    weight -5
    fall 2
    rise 1
}

vrrp_instance VI_1 {
    state BACKUP
    interface eth0
    mcast_src_ip 192.168.24.130 //本机IP
    virtual_router_id 51
    priority 99
    advert_int 1
    authentication {
        auth_type PASS
        auth_pass 1111
    }
    virtual_ipaddress {
        192.168.24.188 //VIP
    }

track_script {
   chk_mysql_port
}
}
vim /opt/chk_mysql.sh //编写脚本
#!/bin/bash
counter=$(netstat -na|grep "LISTEN"|grep "3306"|wc -l)
if [ "${counter}" -eq 0 ]; then
    /etc/init.d/keepalived stop
fi
//为了避免再次启动失败,在此提前修改
vim /lib/systemd/system/keepalived.service
                                                           [Unit]
Description=LVS and VRRP High Availability Monitor
After=syslog.target network-online.target

[Service]
Type=forking
PIDFile=/var/run/keepalived.pid //将此行修改如此
KillMode=process
EnvironmentFile=-/usr/local/keepalived/etc/sysconfig/keepalived
ExecStart=/usr/local/keepalived/sbin/keepalived $KEEPALIVED_OPTIONS
ExecReload=/bin/kill -HUP $MAINPID

[Install]
WantedBy=multi-user.target
[root@linfan ~]# systemctl daemon-reload   //重新载入 systemd,扫描新的或有变动的单元
启动
[root@linfan ~]# /etc/init.d/keepalived start
Starting keepalived (via systemctl):                       [  OK  ]
5)master1和master2两台服务器都要授权允许root用户远程登录,用于在客户端登陆测试!
mysql> grant all on *.* to root@'%' identified by "123456";
Query OK, 0 rows affected, 1 warning (0.02 sec)

mysql> flush privileges;
Query OK, 0 rows affected (0.01 sec)
Mysql+keepalived故障转移的高可用测试
1)通过Mysql客户端通过VIP连接,看是否连接成功。
比如,在远程一台测试机上连接,通过vip地址可以正常连接(下面的连接权限要是在服务端提前授权的)
[root@linfan ~]# mysql -h192.168.24.188 -uroot -p123456
mysql: [Warning] Using a password on the command line interface can be insecure.
Welcome to the MySQL monitor.  Commands end with ; or \g.
Your MySQL connection id is 7
Server version: 5.7.22-log MySQL Community Server (GPL)

Copyright (c) 2000, 2018, Oracle and/or its affiliates. All rights reserved.

Oracle is a registered trademark of Oracle Corporation and/or its
affiliates. Other names may be trademarks of their respective
owners.

Type 'help;' or '\h' for help. Type '\c' to clear the current input statement.

mysql>  select * from tom.mary;
+------+-----------+------+
| id   | name      | age  |
+------+-----------+------+
|    1 | lisi      |   10 |
|    2 | zhangshan |   28 |
|    3 | wangwu    |   18 |
|    4 | zhaosi    |   66 |
|    5 | lida      |   88 |
+------+-----------+------+
5 rows in set (0.00 sec)
2)默认情况下,vip是在master1上的。使用"ip addr"命令查看vip切换情况
[root@linfan ~]# ip a
1: lo: <LOOPBACK,UP,LOWER_UP> mtu 65536 qdisc noqueue state UNKNOWN qlen 1
    link/loopback 00:00:00:00:00:00 brd 00:00:00:00:00:00
    inet 127.0.0.1/8 scope host lo
       valid_lft forever preferred_lft forever
    inet6 ::1/128 scope host
       valid_lft forever preferred_lft forever
2: eth0: <BROADCAST,MULTICAST,UP,LOWER_UP> mtu 1500 qdisc pfifo_fast state UP qlen 1000
    link/ether 00:0c:29:23:40:f6 brd ff:ff:ff:ff:ff:ff
    inet 192.168.24.128/24 brd 192.168.24.255 scope global eth0
       valid_lft forever preferred_lft forever
    inet 192.168.24.188/32 scope global eth0
       valid_lft forever preferred_lft forever  ////这个32位子网掩码的vip地址表示该资源目前还在master1机器上
    inet 192.168.24.146/24 brd 192.168.24.255 scope global secondary dynamic eth0
       valid_lft 1115sec preferred_lft 1115sec
    inet6 fe80::20c:29ff:fe23:40f6/64 scope link
       valid_lft forever preferred_lft forever
停止master1机器上的mysql服务,根据配置中的脚本,mysql服务停了,keepalived也会停,从而vip资源将会切换到master2机器上。(mysql服务没有起来的时候,keepalived服务也无法顺利启动!)
[root@linfan ~]# service mysqld stop
Shutting down MySQL............ SUCCESS!
[root@linfan ~]# ps -ef|grep mysql
root      10652   2175  0 03:04 pts/1    00:00:00 grep --color=auto mysql
[root@linfan ~]# ps -ef|grep keepalived
root      10654   2175  0 03:04 pts/1    00:00:00 grep --color=auto keepalived
[root@linfan ~]# ip a
1: lo: <LOOPBACK,UP,LOWER_UP> mtu 65536 qdisc noqueue state UNKNOWN qlen 1
    link/loopback 00:00:00:00:00:00 brd 00:00:00:00:00:00
    inet 127.0.0.1/8 scope host lo
       valid_lft forever preferred_lft forever
    inet6 ::1/128 scope host
       valid_lft forever preferred_lft forever
2: eth0: <BROADCAST,MULTICAST,UP,LOWER_UP> mtu 1500 qdisc pfifo_fast state UP qlen 1000
    link/ether 00:0c:29:23:40:f6 brd ff:ff:ff:ff:ff:ff
    inet 192.168.24.128/24 brd 192.168.24.255 scope global eth0
       valid_lft forever preferred_lft forever
    inet 192.168.24.146/24 brd 192.168.24.255 scope global secondary dynamic eth0
       valid_lft 998sec preferred_lft 998sec
    inet6 fe80::20c:29ff:fe23:40f6/64 scope link
       valid_lft forever preferred_lft forever
如上结果,发现32位子网掩码的vip没有了,说明此时vip资源已不在master1机器上了
查看下master1的系统日志,如下,会发现vip资源已经切换走了
[root@linfan ~]# tail -f /var/log/messages
Sep 14 03:03:54 linfan systemd: Stopping LVS and VRRP High Availability Monitor...
Sep 14 03:03:54 linfan Keepalived_vrrp[6871]: VRRP_Instance(VI_1) sent 0 priority
Sep 14 03:03:54 linfan Keepalived_vrrp[6871]: VRRP_Instance(VI_1) removing protocol VIPs.
Sep 14 03:03:54 linfan Keepalived_healthcheckers[6869]: Stopped
Sep 14 03:03:55 linfan Keepalived_vrrp[6871]: Stopped
Sep 14 03:03:55 linfan Keepalived[6868]: Stopped Keepalived v1.3.5 (03/19,2017), git commit v1.3.5-6-g6fa32f2
Sep 14 03:03:55 linfan systemd: Stopped LVS and VRRP High Availability Monitor.
Sep 14 03:04:55 linfan dhclient[3177]: DHCPREQUEST on eth0 to 192.168.24.254 port 67 (xid=0x7f91b51f)
Sep 14 03:04:55 linfan dhclient[3177]: DHCPACK from 192.168.24.254 (xid=0x7f91b51f)
Sep 14 03:04:57 linfan dhclient[3177]: bound to 192.168.24.146 -- renewal in 829 seconds.
再到master2机器上,发现vip资源的确切换过来了
[root@linfan ~]# ip a
1: lo: <LOOPBACK,UP,LOWER_UP> mtu 65536 qdisc noqueue state UNKNOWN qlen 1
    link/loopback 00:00:00:00:00:00 brd 00:00:00:00:00:00
    inet 127.0.0.1/8 scope host lo
       valid_lft forever preferred_lft forever
    inet6 ::1/128 scope host
       valid_lft forever preferred_lft forever
2: eth0: <BROADCAST,MULTICAST,UP,LOWER_UP> mtu 1500 qdisc pfifo_fast state UP qlen 1000
    link/ether 00:0c:29:8f:c0:2c brd ff:ff:ff:ff:ff:ff
    inet 192.168.24.130/24 brd 192.168.24.255 scope global eth0
       valid_lft forever preferred_lft forever
    inet 192.168.24.188/32 scope global eth0
       valid_lft forever preferred_lft forever
    inet6 fe80::20c:29ff:fe8f:c02c/64 scope link
       valid_lft forever preferred_lft forever
查看master2的系统日志
[root@linfan ~]#  tail -f /var/log/messages
Sep 14 03:12:19 linfan Keepalived_vrrp[6710]: Sending gratuitous ARP on eth0 for 192.168.24.188
Sep 14 03:12:19 linfan Keepalived_vrrp[6710]: Sending gratuitous ARP on eth0 for 192.168.24.188
Sep 14 03:12:19 linfan Keepalived_vrrp[6710]: Sending gratuitous ARP on eth0 for 192.168.24.188
Sep 14 03:12:19 linfan Keepalived_vrrp[6710]: Sending gratuitous ARP on eth0 for 192.168.24.188
Sep 14 03:12:24 linfan Keepalived_vrrp[6710]: Sending gratuitous ARP on eth0 for 192.168.24.188
Sep 14 03:12:24 linfan Keepalived_vrrp[6710]: VRRP_Instance(VI_1) Sending/queueing gratuitous ARPs on eth0 for 192.168.24.188
Sep 14 03:12:24 linfan Keepalived_vrrp[6710]: Sending gratuitous ARP on eth0 for 192.168.24.188
Sep 14 03:12:24 linfan Keepalived_vrrp[6710]: Sending gratuitous ARP on eth0 for 192.168.24.188
Sep 14 03:12:24 linfan Keepalived_vrrp[6710]: Sending gratuitous ARP on eth0 for 192.168.24.188
Sep 14 03:12:24 linfan Keepalived_vrrp[6710]: Sending gratuitous ARP on eth0 for 192.168.24.188
3)再次启动master1的mysql和keepalived服务。(注意:如果restart重启mysql,那么还要启动下keepalived,因为mysql重启,根据脚本会造成keepalived关闭)
注意:一定要先启动mysql服务,然后再启动keepalived服务。如果先启动keepalived服务,按照上面的配置,mysql没有起来,就会自动关闭keepalived。
[root@linfan ~]# service mysqld start
Starting MySQL.. SUCCESS!
[root@linfan ~]# /etc/init.d/keepalived start
Starting keepalived (via systemctl):                       [  OK  ]
启动这两个服务器后,稍微等过一会儿,注意观察会发现vip资源再次从master2机器上切换回来了。
[root@linfan ~]# ip addr
1: lo: <LOOPBACK,UP,LOWER_UP> mtu 65536 qdisc noqueue state UNKNOWN qlen 1
    link/loopback 00:00:00:00:00:00 brd 00:00:00:00:00:00
    inet 127.0.0.1/8 scope host lo
       valid_lft forever preferred_lft forever
    inet6 ::1/128 scope host
       valid_lft forever preferred_lft forever
2: eth0: <BROADCAST,MULTICAST,UP,LOWER_UP> mtu 1500 qdisc pfifo_fast state UP qlen 1000
    link/ether 00:0c:29:23:40:f6 brd ff:ff:ff:ff:ff:ff
    inet 192.168.24.128/24 brd 192.168.24.255 scope global eth0
       valid_lft forever preferred_lft forever
    inet 192.168.24.188/32 scope global eth0
       valid_lft forever preferred_lft forever
    inet 192.168.24.146/24 brd 192.168.24.255 scope global secondary dynamic eth0
       valid_lft 1587sec preferred_lft 1587sec
    inet6 fe80::20c:29ff:fe23:40f6/64 scope link
       valid_lft forever preferred_lft forever
[root@linfan ~]# tail -f /var/log/messages
Sep 14 03:08:26 linfan Keepalived_vrrp[11028]: Sending gratuitous ARP on eth0 for 192.168.24.188
Sep 14 03:08:26 linfan Keepalived_vrrp[11028]: Sending gratuitous ARP on eth0 for 192.168.24.188
Sep 14 03:08:26 linfan Keepalived_vrrp[11028]: Sending gratuitous ARP on eth0 for 192.168.24.188
Sep 14 03:08:26 linfan Keepalived_vrrp[11028]: Sending gratuitous ARP on eth0 for 192.168.24.188
Sep 14 03:08:31 linfan Keepalived_vrrp[11028]: Sending gratuitous ARP on eth0 for 192.168.24.188
Sep 14 03:08:31 linfan Keepalived_vrrp[11028]: VRRP_Instance(VI_1) Sending/queueing gratuitous ARPs on eth0 for 192.168.24.188
Sep 14 03:08:31 linfan Keepalived_vrrp[11028]: Sending gratuitous ARP on eth0 for 192.168.24.188
Sep 14 03:08:31 linfan Keepalived_vrrp[11028]: Sending gratuitous ARP on eth0 for 192.168.24.188
Sep 14 03:08:31 linfan Keepalived_vrrp[11028]: Sending gratuitous ARP on eth0 for 192.168.24.188
Sep 14 03:08:31 linfan Keepalived_vrrp[11028]: Sending gratuitous ARP on eth0 for 192.168.24.188
再看看master2机器,发现vip资源又被恢复后的master1抢过去了
[root@linfan ~]# ip a
1: lo: <LOOPBACK,UP,LOWER_UP> mtu 65536 qdisc noqueue state UNKNOWN qlen 1
    link/loopback 00:00:00:00:00:00 brd 00:00:00:00:00:00
    inet 127.0.0.1/8 scope host lo
       valid_lft forever preferred_lft forever
    inet6 ::1/128 scope host
       valid_lft forever preferred_lft forever
2: eth0: <BROADCAST,MULTICAST,UP,LOWER_UP> mtu 1500 qdisc pfifo_fast state UP qlen 1000
    link/ether 00:0c:29:8f:c0:2c brd ff:ff:ff:ff:ff:ff
    inet 192.168.24.130/24 brd 192.168.24.255 scope global eth0
       valid_lft forever preferred_lft forever
    inet6 fe80::20c:29ff:fe8f:c02c/64 scope link
       valid_lft forever preferred_lft forever
[root@linfan ~]#  tail -f /var/log/messages
Sep 14 03:08:25 linfan Keepalived_vrrp[6710]: VRRP_Instance(VI_1) Received advert with higher priority 101, ours 99
Sep 14 03:08:25 linfan Keepalived_vrrp[6710]: VRRP_Instance(VI_1) Entering BACKUP STATE
Sep 14 03:08:25 linfan Keepalived_vrrp[6710]: VRRP_Instance(VI_1) removing protocol VIPs.
4)同样,关闭master1机器的keepalived服务,vip资源会自动切换到master2机器上。当master1的keepalived服务恢复后,会将vip资源再次切回来。
[root@linfan ~]# /etc/init.d/keepalived stop
Stopping keepalived (via systemctl):                       [  OK  ]
[root@linfan ~]# ip addr
1: lo: <LOOPBACK,UP,LOWER_UP> mtu 65536 qdisc noqueue state UNKNOWN qlen 1
    link/loopback 00:00:00:00:00:00 brd 00:00:00:00:00:00
    inet 127.0.0.1/8 scope host lo
       valid_lft forever preferred_lft forever
    inet6 ::1/128 scope host
       valid_lft forever preferred_lft forever
2: eth0: <BROADCAST,MULTICAST,UP,LOWER_UP> mtu 1500 qdisc pfifo_fast state UP qlen 1000
    link/ether 00:0c:29:23:40:f6 brd ff:ff:ff:ff:ff:ff
    inet 192.168.24.128/24 brd 192.168.24.255 scope global eth0
       valid_lft forever preferred_lft forever
    inet 192.168.24.146/24 brd 192.168.24.255 scope global secondary dynamic eth0
       valid_lft 1351sec preferred_lft 1351sec
    inet6 fe80::20c:29ff:fe23:40f6/64 scope link
       valid_lft forever preferred_lft forever
查看master2,发现vip切过来了
[root@linfan ~]# ip addr
1: lo: <LOOPBACK,UP,LOWER_UP> mtu 65536 qdisc noqueue state UNKNOWN qlen 1
    link/loopback 00:00:00:00:00:00 brd 00:00:00:00:00:00
    inet 127.0.0.1/8 scope host lo
       valid_lft forever preferred_lft forever
    inet6 ::1/128 scope host
       valid_lft forever preferred_lft forever
2: eth0: <BROADCAST,MULTICAST,UP,LOWER_UP> mtu 1500 qdisc pfifo_fast state UP qlen 1000
    link/ether 00:0c:29:8f:c0:2c brd ff:ff:ff:ff:ff:ff
    inet 192.168.24.130/24 brd 192.168.24.255 scope global eth0
       valid_lft forever preferred_lft forever
    inet 192.168.24.188/32 scope global eth0
       valid_lft forever preferred_lft forever
    inet6 fe80::20c:29ff:fe8f:c02c/64 scope link
       valid_lft forever preferred_lft forever
再次恢复master1的keepalived服务,发现vip资源很快又切回来了。
[root@linfan ~]# /etc/init.d/keepalived start
Starting keepalived (via systemctl):                       [  OK  ]
[root@linfan ~]# ip a
1: lo: <LOOPBACK,UP,LOWER_UP> mtu 65536 qdisc noqueue state UNKNOWN qlen 1
    link/loopback 00:00:00:00:00:00 brd 00:00:00:00:00:00
    inet 127.0.0.1/8 scope host lo
       valid_lft forever preferred_lft forever
    inet6 ::1/128 scope host
       valid_lft forever preferred_lft forever
2: eth0: <BROADCAST,MULTICAST,UP,LOWER_UP> mtu 1500 qdisc pfifo_fast state UP qlen 1000
    link/ether 00:0c:29:23:40:f6 brd ff:ff:ff:ff:ff:ff
    inet 192.168.24.128/24 brd 192.168.24.255 scope global eth0
       valid_lft forever preferred_lft forever
    inet 192.168.24.188/32 scope global eth0
       valid_lft forever preferred_lft forever
    inet 192.168.24.146/24 brd 192.168.24.255 scope global secondary dynamic eth0
       valid_lft 1190sec preferred_lft 1190sec
    inet6 fe80::20c:29ff:fe23:40f6/64 scope link
       valid_lft forever preferred_lft forever
再此查看master2,发现vip资源被切走了
[root@linfan ~]# ip a
1: lo: <LOOPBACK,UP,LOWER_UP> mtu 65536 qdisc noqueue state UNKNOWN qlen 1
    link/loopback 00:00:00:00:00:00 brd 00:00:00:00:00:00
    inet 127.0.0.1/8 scope host lo
       valid_lft forever preferred_lft forever
    inet6 ::1/128 scope host
       valid_lft forever preferred_lft forever
2: eth0: <BROADCAST,MULTICAST,UP,LOWER_UP> mtu 1500 qdisc pfifo_fast state UP qlen 1000
    link/ether 00:0c:29:8f:c0:2c brd ff:ff:ff:ff:ff:ff
    inet 192.168.24.130/24 brd 192.168.24.255 scope global eth0
       valid_lft forever preferred_lft forever
    inet6 fe80::20c:29ff:fe8f:c02c/64 scope link
       valid_lft forever preferred_lft forever
以上在vip资源切换过程中,对于客户端连接mysql(使用vip连接)来说几乎是没有任何影响的。
温馨提示(Keepalived的抢占和非抢占模式)
keepalive是基于vrrp协议在linux主机上以守护进程方式,根据配置文件实现健康检查。
VRRP是一种选择协议,它可以把一个虚拟路由器的责任动态分配到局域网上的VRRP路由器中的一台。
控制虚拟路由器IP地址的VRRP路由器称为主路由器,它负责转发数据包到这些虚拟IP地址。
一旦主路由器不可用,这种选择过程就提供了动态的故障转移机制,这就允许虚拟路由器的IP地址可以作为终端主机的默认第一跳路由器。

keepalive通过组播,单播等方式(自定义),实现keepalive主备推选。工作模式分为抢占和非抢占(通过参数nopreempt来控制)。
1)抢占模式:
主服务正常工作时,虚拟IP会在主上,备不提供服务,当主服务优先级低于备的时候,备会自动抢占虚拟IP,这时,主不提供服务,备提供服务。
也就是说,工作在抢占模式下,不分主备,只管优先级。

如上配置,不管keepalived.conf里的state配置成master还是backup,只看谁的priority优先级高(一般而言,state为MASTER的优先级要高于BACKUP)。
priority优先级高的那一个在故障恢复后,会自动将VIP资源再次抢占回来!!

2)非抢占模式:
这种方式通过参数nopreempt(一般设置在advert_int的那一行下面)来控制。不管priority优先级,只要MASTER机器发生故障,VIP资源就会被切换到BACKUP上。
并且当MASTER机器恢复后,也不会去将VIP资源抢占回来,直至BACKUP机器发生故障时,才能自动切换回来。

千万注意:
nopreempt这个参数只能用于state为backup的情况,所以在配置的时候要把master和backup的state都设置成backup,这样才会实现keepalived的非抢占模式!

也就是说:
a)当state状态一个为master,一个为backup的时候,加不加nopreempt这个参数都是一样的效果。即都是根据priority优先级来决定谁抢占vip资源的,是抢占模式!
b)当state状态都设置成backup,如果不配置nopreempt参数,那么也是看priority优先级决定谁抢占vip资源,即也是抢占模式。
c)当state状态都设置成backup,如果配置nopreempt参数,那么就不会去考虑priority优先级了,是非抢占模式!即只有vip当前所在机器发生故障,另一台机器才能接管vip。即使优先级高的那一台机器恢复  后也不会主动抢回vip,只能等到对方发生故障,才会将vip切回来。
mysql状态检测脚本优化
上面的mysql监测脚本有点过于简单且粗暴,即脚本一旦监测到Master的mysql服务关闭,就立刻把keepalived服务关闭,从而实现vip转移!
下面对该脚本进行优化,优化后,当监测到Master的mysql服务关闭后,就会将vip切换到Backup上(但此时Master的keepalived服务不会被暴力kill)
当Master的mysql服务恢复后,就会再次将VIP资源切回来!
[root@linfan keepalived-1.3.5]# vim /opt/chk_mysql.sh
#!/bin/bash
MYSQL=/usr/local/mysql/bin/mysql
MYSQL_HOST=localhost
MYSQL_USER=mysql
MYSQL_PASSWORD=linfan123
CHECK_TIME=3

#mysql  is working MYSQL_OK is 1 , mysql down MYSQL_OK is 0

MYSQL_OK=1

function check_mysql_helth (){
    $MYSQL -h $MYSQL_HOST -u $MYSQL_USER -p${MYSQL_PASSWORD} -e "show status;" >/dev/null 2>&1
    if [ $? = 0 ] ;then
    MYSQL_OK=1
    else
    MYSQL_OK=0
    fi
    return $MYSQL_OK
}
while [ $CHECK_TIME -ne 0 ]
do
    let "CHECK_TIME -= 1"
    check_mysql_helth
if [ $MYSQL_OK = 1 ] ; then
    CHECK_TIME=0
    exit 0
fi
if [ $MYSQL_OK -eq 0 ] &&  [ $CHECK_TIME -eq 0 ]
then
    pkill keepalived
    exit 1
fi
sleep 1
done