Centos7 使用ansible-playbook批量安装nginx
首先进入/etc/ansible 路径 创建安装nginx的yml

vim deploy-yml/nginx.yml
|
#安装nginx #ansible-playbook -C nginx.yml
- hosts: nginx-test remote_user: root roles:
扫描二维码关注公众号,回复:
3211253 查看本文章

- nginx |
进入roles 创建nginx 文件夹 并创建以下路径及文件
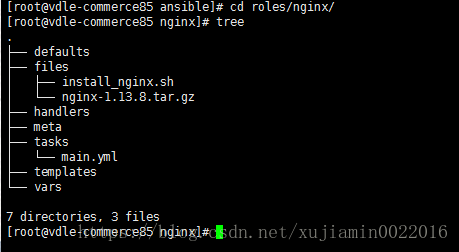
暂时用不到的文件夹为空
default 空
files下创建install_nginx.sh 并放置nginx 的安装包
| # install_nginx.sh - name: copy nginx_tar_gz to client copy: src=/etc/ansible/roles/nginx/files/nginx-1.13.8.tar.gz dest=/tmp/nginx-1.13.8.tar.gz - name: copy install_shell to client copy: src=/etc/ansible/roles/nginx/files/install_nginx.sh dest=/tmp/install_nginx.sh - name: install nginx shell: /bin/bash /tmp/install_nginx.sh
[root@vdle-commerce85 nginx]# cat files/ install_nginx.sh nginx-1.13.8.tar.gz [root@vdle-commerce85 nginx]# cat files/install_nginx.sh #!/bin/sh # Author:jiaminxu # Email:[email protected] # Description: 安装nginx 1.13.8 # Notes:由install.sh 调用执行
#yum 安装依赖---------------------------------------------------------------------- yum -y install gcc gcc-c++ autoconf automake make yum -y install zlib zlib-devel openssl openssl-devel pcre pcre-devel
#创建nginx 日志文件夹---------------------------------------------------------------------- mkdir /var/nginx mkdir /var/log/nginx/
#解压nginx---------------------------------------------------------------------- cd /tmp tar xzvf nginx-1.13.8.tar.gz rm -rf nginx-1.13.8.tar.gz cd nginx-1.13.8
#编译nginx 并配置需要安装的模块,编译后可通过nginx -V查看---------------------------------------------------------------------- ./configure --with-http_ssl_module --with-http_stub_status_module --with-http_flv_module --with-http_gzip_static_module #google 内存优化 一般用不到 #--with-google_perftools_module #支持流媒体播放 #--with-http_flv_module #在线查看nginx 客户端连接数 #--with-http_stub_status__module #在nginx.conf的server块中添加如下代码 #通过 curl 127.0.0.1/nginx_status访问 #location /nginx_status { # stub_status on; # access_log off; #} #文件压缩模块 #--with-http_gzip_static_module
make && make install
#修改 /usr/local/nginx/conf/nginx.conf---------------------------------------------------------------------- cat > /usr/local/nginx/conf/nginx.conf <<EOF #main(全局设置)---------------------------------------------------------------------- user root; pid /var/run/nginx.pid; worker_processes 1; worker_rlimit_nofile 100000;
#events(nginx工作模式) events { worker_connections 2048; multi_accept on; use epoll; }
#http(http设置)---------------------------------------------------------------------- http { server_tokens on; #如果出现206错误 修改sendfile 为off sendfile on; #以下2条纺织网络堵塞 tcp_nopush on; tcp_nodelay on; log_format main '\$remote_addr - \$remote_user [\$time_local] "\$request" ' '\$status \$body_bytes_sent "\$http_referer" ' '"\$http_user_agent" "\$http_x_forwarded_for" "\$upstream_addr" "\$upstream_response_time"';
#access_log & error_log access_log /var/log/nginx/access.log main; error_log /var/log/nginx/error.log crit;
#上传文件大小100M client_max_body_size 100m; keepalive_timeout 60; client_header_timeout 15; #502 get away时间 client_body_timeout 60; reset_timedout_connection on; send_timeout 25;
limit_conn_zone \$binary_remote_addr zone=addr:5m; limit_conn addr 100;
include /usr/local/nginx/conf/mime.types; default_type text/html; charset UTF-8; #在mime.types中找不到类型的文件默认以二进制文件传输 #default_type application/octet-stream;
#解决504 getaway #fastcgi_send_timeout 300; #fastcgi_read_timeout 300; #fastcgi_buffer_size 64k; #fastcgi_buffers 4 64k; #fastcgi_busy_buffers_size 128k; #fastcgi_temp_file_write_size 128k;
gzip on; gzip_disable "msie6"; gzip_proxied any; gzip_min_length 1000; gzip_comp_level 6; #压缩传输 但是会造成css等乱码 #gzip_types text/plain text/css application/json application/x-javascript text/xml application/xml application/xml+rss text/javascript;
open_file_cache max=100000 inactive=20s; open_file_cache_valid 30s; open_file_cache_min_uses 2;
#upsteam(负载均衡服务器设置)---------------------------------------------------------------------- #1:权重 后端服务器宕机会自动剔除 #upstream nbh_supplier { # server 172.30.31.10:8084 weight=1; # server 172.30.31.11:8084 weight=1; #}
#2:ip hash 来自同一个ip的访客固定访问一个后端服务器 利于session共享 #upstream nbh_supplier2 { # ip_hash; # server 172.30.31.10:8084; #down表示暂时关闭 # server 172.30.31.11:8084 down; # server 172.30.31.12:8084 max_fails=0 fail_timeout=10s; #}
#下面配置keepalive #upstream nbh_supplier3 { # server 172.30.31.10:8084 weight=1 max_fails=0 fail_timeout=10s; # server 172.30.31.11:8084 weight=1 max_fails=0 fail_timeout=10s; # keepalive 16; #}
#server(主机设置)---------------------------------------------------------------------- server { listen 80; server_name ip;
#location(url配置)---------------------------------------------------------------------- location /nginx_status { stub_status on; }
#location ^~ /admin { # proxy_pass http://10.28.141.34:8080; # proxy_redirect off; # proxy_set_header HOST $host; # proxy_set_header X-Real-IP $remote_addr; # proxy_set_header X-Forwarded-For $proxy_add_x_forwarded_for; # rewrite ^(.*)$ https://$host$1 permanent; #}
#防止恶意解析 #if (\$host !~ ^www/.123/.com$){ # rewrite ^(.*) http://www.123.com\$1 permanent #}
#缩放旋转tomcat下图片 需要安装--with-http_image_filter_module #location ^~ /img { # proxy_pass http://10.6.11.33:8080; # image_filter resize 150 100; # image_filter rotate 90; #} #由Nginx处理静态请求 #location ~*\.(gif|jpg|jpeg|png)$ { # root /ftp/www/; # image_filter resize 150 100; # image_filter rotate 90; # }
#nginx 匹配规则 #(location =) > (location 完整路径 >) >(location ^~ 路径) >(location ~* 正则) >(location 路径) #location = /uri =开头表示精确匹配,只有完全匹配上才能生效。 #location ^~ /uri ^~ 开头对URL路径进行前缀匹配,并且在正则之前。 #location ~ pattern ~开头表示区分大小写的正则匹配。 #location ~* pattern ~*开头表示不区分大小写的正则匹配。 #location /uri 不带任何修饰符,也表示前缀匹配,但是在正则匹配之后。 #location / 通用匹配,任何未匹配到其它location的请求都会匹配到,相当于switch中的default。
#android 匹配规则尽量不要使用 /admin/ 这样 否则可能因为android框架转发问题 出现接口405报错
#禁止解析指定程序 #location ~* \.(php|php5|sh|pl|py)$ #{ # deny all; #}
#location / #{ # 24表示255.255.255.0 16表示255.255.0.0 8表示255.0.0.0 # deny 192.168.1.1; # allow 192.168.1.0/24 # deny all; #}
#由Nginx处理静态请求 windows server下}需要换行单独一行 否则会报location错误 location ~*\.(htm|html|js|css|less|json|gif|jpg|jpeg|png|bmp|swf|ioc|rar|zip|txt|flv|mid|doc|ppt|pdf|xls|xlsx|mp3|mp4|wma|apk|zip|rar|map)\$ { #root 表示根目录是/ftp/www root /ftp/www/; #静态文件缓存30天 #expires 30d; index index.html index.htm; } #alias用法 当客户端请求/request_path/image/cat.png的时候,映射为/local_path/image/cat.png #location /request_path/image/{ # alias /local_path/image/; #}
} #server { # listen 443 ssl; # server_name 47.97.214.190 www.yysssddyy.top;
# ssl_certificate /usr/local/nginx/conf/www/214546962750286.pem; # ssl_certificate_key /usr/local/nginx/conf/www/214546962750286.key;
#location ~*\.(htm|html|js|css|less|json|gif|jpg|jpeg|png|bmp|swf|ioc|rar|zip|txt|flv|mid|doc|ppt|pdf|xls|xlsx|mp3|mp4|wma|apk|zip|rar|map)\$ { # root /ftp/www/; #静态文件缓存30天 #expires 30d; # index index.html index.htm; #}
#}
#也可以指定conf文件位置 在文件夹中配置上述各个参数 #include vhost/*.conf; #include mysvrhost.conf; }
#----------------------------------------------------------------------
EOF
#启动nginx 并把nginx 加入开机启动 /usr/local/nginx/sbin/nginx -c /usr/local/nginx/conf/nginx.conf sed -i '5a /usr/local/nginx/sbin/nginx -c /usr/local/nginx/conf/nginx.conf' /etc/rc.d/rc.local chmod +x /etc/rc.d/rc.local
#将nginx添加到服务中---------------------------------------------------------------------- cat >>/etc/init.d/nginx<<EOF #! /bin/bash # chkconfig: - 85 15 PATH=/usr/local/nginx DESC="nginx " NAME=nginx DAEMON=\$PATH/sbin/\$NAME CONFIGFILE=\$PATH/conf/\$NAME.conf PIDFILE=\$PATH/logs/\$NAME.pid SCRIPTNAME=/etc/init.d/\$NAME set -e [ -x "\$DAEMON" ] || exit 0 do_start() { \$DAEMON -c \$CONFIGFILE || echo -n "nginx already running" } do_stop() { \$DAEMON -s stop || echo -n "nginx not running" } do_reload() { \$DAEMON -s reload || echo -n "nginx can't reload" } case "\$1" in start) echo -n "Starting \$DESC: \$NAME" do_start echo "." ;; stop) echo -n "Stopping \$DESC: \$NAME" do_stop echo "." ;; reload|graceful) echo -n "Reloading \$DESC configuration..." do_reload echo "." ;; restart) echo -n "Restarting \$DESC: \$NAME" do_stop do_start echo "." ;; *) echo "Usage: \$SCRIPTNAME {start|stop|reload|restart}" >&2 exit 3 ;; esac exit 0 EOF
chmod a+x /etc/init.d/nginx
chkconfig --add nginx
chkconfig nginx on |
handlers 空
meta 空
tasks 下创建main.yml 里面是写拷贝脚本 安装包的命令 以及scp过去之后执行的命令
| # main.yml - name: copy nginx_tar_gz to client copy: src=/etc/ansible/roles/nginx/files/nginx-1.13.8.tar.gz dest=/tmp/nginx-1.13.8.tar.gz - name: copy install_shell to client copy: src=/etc/ansible/roles/nginx/files/install_nginx.sh dest=/tmp/install_nginx.sh - name: install nginx shell: /bin/bash /tmp/install_nginx.sh |
templates 空
vars 空
在/etc/ansible/hosts 中创建一个nginx-test的组 然后把需要安装nginx 的ip加进去
先做免密登录哦
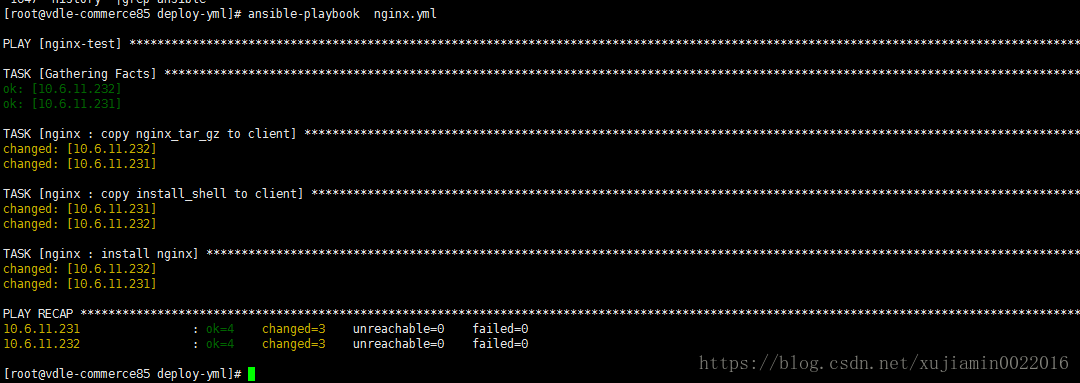
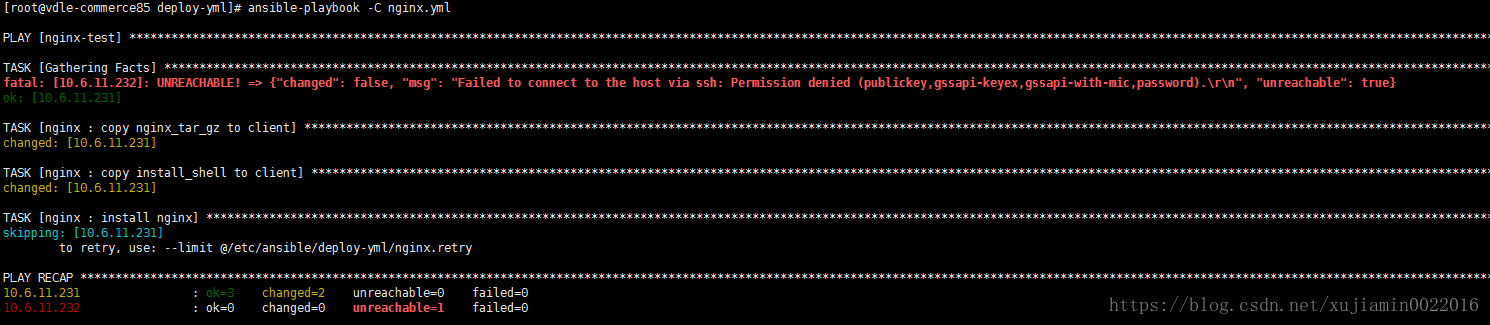
不免密会报错的 使用ansible-playbook -C nginx.yml 进程测试

测试没问题之后ansible-playbook nginx.yml 执行
安装成功