一、 默认模式
function Parent(){
        this.nameArr=["name0","name1","name2"];
    }
    Parent.prototype.sayName = function() {
        console.log(this.nameArr);
    };
    function Child1(){};
    Child1.prototype = new Parent();
    var child1_1=new Child1();
    var child1_2=new Child1();
    console.log(child1_1.nameArr);
    console.log(child1_2.nameArr);
    child1_2.nameArr.push("name3");
    console.log(child1_1.nameArr);
    console.log(child1_2.nameArr);
    console.table(child1_1);
    console.table(child1_2);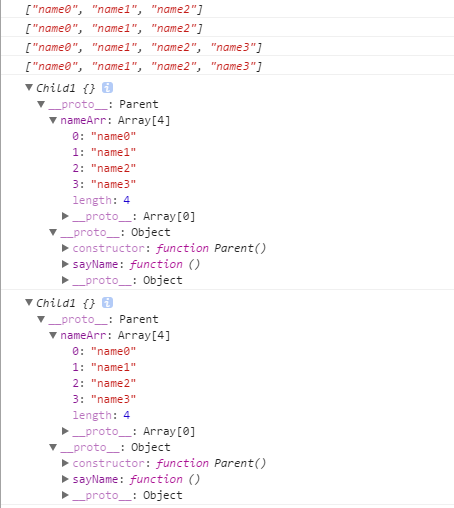
因为在Child1的构造函数的原型上继承的Parent实例,又因为child1_1和child1_2 共享原型,故child1_1和child1_2的原型都指向了这个Parent实例。所以只是引用继承。所以在child1_2.nameArr.push("name3");操作后,会导致child1_1.nameArr里也出现name3。
并且采用new操作符,将继承Parent的所有公共属性(被this引用,可供外部使用点操作或中括号操作访问的属性)和原型。
这里顺便提一下new操作都做了些什么
1、创建了一个新对象,并用this对其进行引用,同时使其继承原函数的原型。
2、将原函数内部使用this引用的属性和方法添加到新对象。
3、返回this.
function Parent(){
        var someWords="hello!";
        this.nameArr=["name0","name1","name2"];
    }
    Parent.prototype.sayName = function() {
        console.log(this.nameArr);
    };
    Parent.prototype.sex="famle"
    var child1_1=new Parent();
    var child1_2=new Parent();
    console.log(child1_1.nameArr);
    console.log(child1_2.nameArr);
    child1_2.nameArr.push("name3");
    console.log(child1_1.nameArr);
    console.log(child1_2.nameArr);
    console.table(child1_1);
    console.table(child1_2);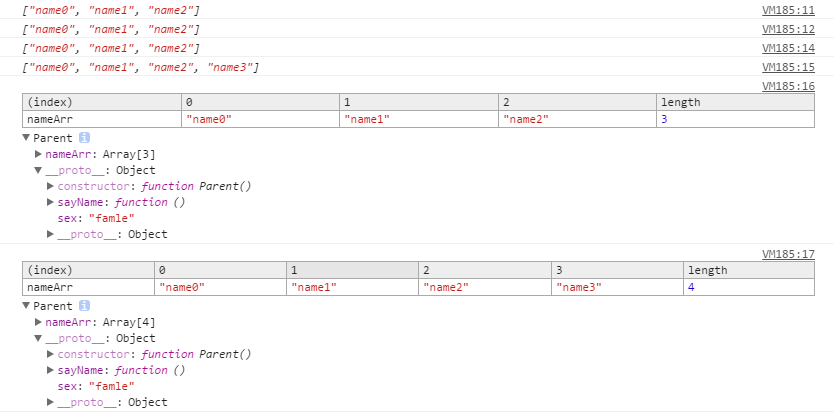
二、借用构造函数模式
function Parent(str){
this.name=str||"Liz";
}
Parent.prototype.sayName = function() {
console.log(this.name);
};
function Child1 (str) {
Parent.apply(this,[str]);
this.sex="female";
};
function Child2 (str) {
Parent.apply(this,[str]);
this.sex="male";
};
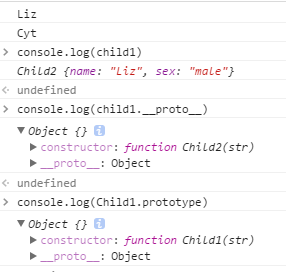
var child1=new Child2("Liz");
var child2=new Child2("Cyt");
console.log(child1.name);
通过apply和call方法,我们可以继承到Parent的属性,而且获得的是副本。apply和call并不能继承Parent的原型,所以还得继续设置。
三、借用和设置原型
function Parent() {
this.name = "Xzz";
}
Parent.prototype.age="21";
Parent.prototype.sayName = function() {
return this.name;
};
function Child1(s1,s2){
Parent.apply(this);
this.sex=s2||'female';
};
function Child2(s1,s2){
Parent.apply(this);
this.sex=s2||'male';
this.name="Lucy";
};
Child1.prototype=new Parent();
Child2.prototype=new Parent();
Child2.prototype.age="22";
var child1=new Child1("Liz");
var child2=new Child2("Cyt");
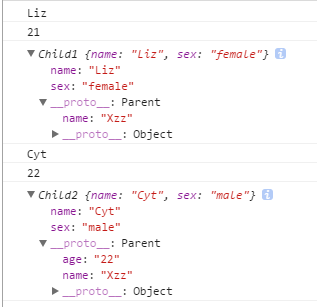
console.log(child1.name);
console.log(child1.age);
console.log(child1);
console.log(child2.name);
console.log(child2.age);
console.log(child2);通过apply和call方法继承Parent的属性获得的是独立的副本。为了弥补apply和call并不能继承Parent的原型的缺点,再次使用了new操作符在Child1的构造函数的原型上继承的Parent。这样做确实获得了独立的属性和共用的原型,但是属性我们继承了两次,有些累赘了,那就继续优化吧。
四、共享原型
  function Parent() {
        this.name = "Xzz";
    }
    Parent.prototype.age="21";
    Parent.prototype.sayName = function() {
        return this.name;
    };

    function Child1(s1,s2){
        Parent.apply(this);
        this.sex=s2||'female';
    };
    function Child2(s1,s2){
        Parent.apply(this);
        this.sex=s2||'male';
        this.name="Lucy";
    };
    Child1.prototype=Parent.prototype;
    Child2.prototype=Parent.prototype;
    //Child2.prototype.age="22";


    var child1=new Child1("Liz");
    var child2=new Child2("Cyt");


    console.log(child1.name);
    console.log(child1.age);
    console.log(child1);

    console.log(child2.name);
    console.log(child2.age);
console.log(child2);apply和call方法继承Parent的属性获得的是独立的副本。
使用子孙实例与祖先共享原型确实实现了,独立副本共用原型的效果,但是问题又来了,这样我们在操作子孙元素的Prototype属性时很容易误覆盖了祖先的原型···太不安全了···继续改进,我们需要到达祖先原型的桥梁,但是我们不能让他太容易就到达···毕竟我们在子孙对象上操作时,最多操作子孙的原型。

五、临时构造函数
   function Parent(str) {
        this.name = str||"Xzz";
    }
    Parent.prototype.age="21";
    Parent.prototype.sayName = function() {
        return this.name;
    };

    function Child1(s1,s2){
        Parent.apply(this,[s1]);
        this.sex=s2||'female';
    };
    function Child2(s1,s2){
        Parent.apply(this,[s1]);
        this.sex=s2||'male';
    };
    var Func=function (){};
    Func.prototype=Parent.prototype;
    Child1.prototype=new Func();
    Child2.prototype=new Func();
    Child2.prototype.age="22";

    Parent.prototype.constructor=Parent;
    Child1.prototype.constructor=Child1;
    Child2.prototype.constructor=Child2;

    var child1=new Child1("Liz");
    var child2=new Child2("Cyt");


    console.log(child1.name);
    console.log(child1.age);
    console.log(child1);

    console.log(child2.name);
    console.log(child2.age);
    console.log(child2);
在Parent对象与Child对象间采用空Func()作为原型链纽带,使我们可以找到Parent的原型,在操作Child.prototype时也只是影响到了空Func(),对Parent的原型不会造成影响,除非你故意要越过Func。为了避免constructor的怪异表现,在修改原型指向后要记得将各自的构造函数正确指定。

小计
一些杂七杂八的话。
prototype是函数独有的属性。
__proto__是实际对象的属性。