1.使用到的环境和插件
"css-loader": "^1.0.0",
"html-webpack-plugin": "^3.2.0",
"mini-css-extract-plugin": "^0.4.2",
"style-loader": "^0.22.1",
"webpack": "^4.17.1",
"webpack-cli": "^3.1.0"
"babel-core": "^6.26.3",
"babel-loader": "^7.1.5",
"vue": "^2.5.17",
"vue-loader": "^15.4.0",
"vue-router": "^3.0.1",
"vue-template-compiler": "^2.5.17"
使用nginx服务器(由phpstudy配置)
2.安装插件
1)全局安装webpack
npm install -g webpack webpack-cli2)当前目录安装webpack
npm install webpack webpack-cli --save-dev3)安装style-loader和css-loader用于解析css文件
npm install style-loader css-loader --save-dev4)安装mini-css-extract-plugin用于打包css文件
npm install mini-css-extract-plugin --save-dev5)安装babel-core和babel-loader用于转译ES6代码为浏览器可读代码
npm install babel-core babel-loader6)安装html-webpack-plugin用于解析和打包html文件
npm install html-webpack-plugin --save-dev7)安装vue和vue-router相关插件,由于最终代码需要vue支持,所以安装为最终依赖
npm install vue vue-loader vue-router vue-template-compiler8)生成package.json文件
npm -y init{
"name": "vuetest",
"version": "1.0.0",
"main": "index.js",
"dependencies": {
"babel-core": "^6.26.3",
"babel-loader": "^7.1.5",
"vue": "^2.5.17",
"vue-loader": "^15.4.1",
"vue-router": "^3.0.1",
"vue-template-compiler": "^2.5.17"
},
"devDependencies": {
"css-loader": "^1.0.0",
"html-webpack-plugin": "^3.2.0",
"mini-css-extract-plugin": "^0.4.2",
"style-loader": "^0.22.1",
"webpack": "^4.17.1",
"webpack-cli": "^3.1.0"
},
"scripts": {
"test": "echo \"Error: no test specified\" && exit 1"
},
"keywords": [],
"author": "",
"license": "ISC",
"description": ""
}3.其他文件目录

src:源码目录
src/vue:vue模板源码文件目录
src/main.js:打包入口文件
src/main.css:样式源码文件
src/index.html:页面入口
config/webpack.dev.js:打包配置文件
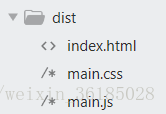
dist/:打包输出目录
相关代码:
config/webpack.dev.js:
const path = require("path");
const HtmlWebpackPlugin = require('html-webpack-plugin'); //打包html
const MiniCssExtractPlugin = require("mini-css-extract-plugin"); //打包css
const VueLoaderPlugin = require('vue-loader/lib/plugin'); //打包vue
module.exports = {
	//打包模式
	mode: "development",
	//入口文件
	entry: {
		main: "./src/main.js"
	},
	//输出文件
	output: {
		path: path.resolve(__dirname,"../dist"),
		filename: "[name].js"
	},
	//模块:例如解读css,图片如何转换压缩等
	module: {
		rules: [
	      {
	        test: /\.css$/,
	        use: [
	        	MiniCssExtractPlugin.loader,
	        	{
		            loader: "css-loader",
		            options: {
		              minimize: true
		            }
		        },
	        ]
	      },
	      {
                test: /\.vue$/,
                loader: 'vue-loader'
           },
           /* 用babel来解析js文件并把es6的语法转换成浏览器认识的语法 */
            {
                test: /\.js$/,
                loader: 'babel-loader',
                /* 排除模块安装目录的文件 */
                exclude: /node_modules/
            }
	    ]
	},
	//插件,用于生产模板和各项功能
	plugins: [
		new HtmlWebpackPlugin({
			template: './src/index.html', //指定要打包的html路径和文件名
			filename:'./index.html' //指定输出路径和文件名(相对js的路径)
		}),
		new MiniCssExtractPlugin({
	    	filename: "./main.css" //如果需要将css文件单独放入css文件夹中需要../
	    }),
	    new VueLoaderPlugin()
	],
	//给vue配置别名,import引入不用写易长串
	resolve:{
		alias: {
			'vue$': 'vue/dist/vue.common.js'
        }
	},
	//配置webpack开发服务功能
	devServer: {

	}
}
src/main.js:
import Css from './main.css'; //引入css要从打包后的路径开始引入
import Vue from 'vue'; //npm 安装过vue.可以直接import
import VueRouter from 'vue-router'; //引入插件
Vue.use(VueRouter); //安装插件

import Foo from './vue/foo.vue';
import Bar from './vue/bar.vue';

// 定义路由
const routes = [
	{ name: 'default',path: '',redirect: {name: 'foo'}}, // 设置默认路由
    { name: 'foo',path: '/foo', component: Foo },
    { name: 'bar',path: '/bar', component: Bar }
]

// 创建 router 实例,然后传 `routes` 配置
const router = new VueRouter({
    routes // (缩写) 相当于 routes: routes
})

// 创建和挂载根实例。通过 router 配置参数注入路由,从而让整个应用都有路由功能
const app = new Vue({
    router
}).$mount('#app')
src/index.html:
<!DOCTYPE html>
<html lang="en">

<head>
    <meta charset="UTF-8">
    <meta name="viewport" content="width=device-width, initial-scale=1.0">
    <meta http-equiv="X-UA-Compatible" content="ie=edge">
    <title>Document</title>
</head>

<body>
    <div id="app">
        <h1>Hello App!</h1>
        <p>
            <!-- 使用 router-link 组件来导航. -->
            <!-- 通过传入 `to` 属性指定链接. -->
            <!-- <router-link> 默认会被渲染成一个 `<a>` 标签 -->
            <router-link to="/foo">Go to Foo</router-link>
            <router-link to="/bar">Go to Bar</router-link>
        </p>
        <!-- 路由出口 -->
        <!-- 路由匹配到的组件将渲染在这里 -->
        <router-view></router-view>
    </div>
</body>

</html>
src/main.css:
h1 {
	color: red;
}
src/vue/bar.vue:
<template>
	<div>This is bar.</div>
</template>
src/foo.vue:
<template>
	<div>This is foo.</div>
</template>
修改package.json的配置在scripts对象中添加一行
"scripts": {
    "test": "echo \"Error: no test specified\" && exit 1",
    "dev": "webpack --config=config/webpack.dev.js"
  },
4.打包输出
运行
npm run dev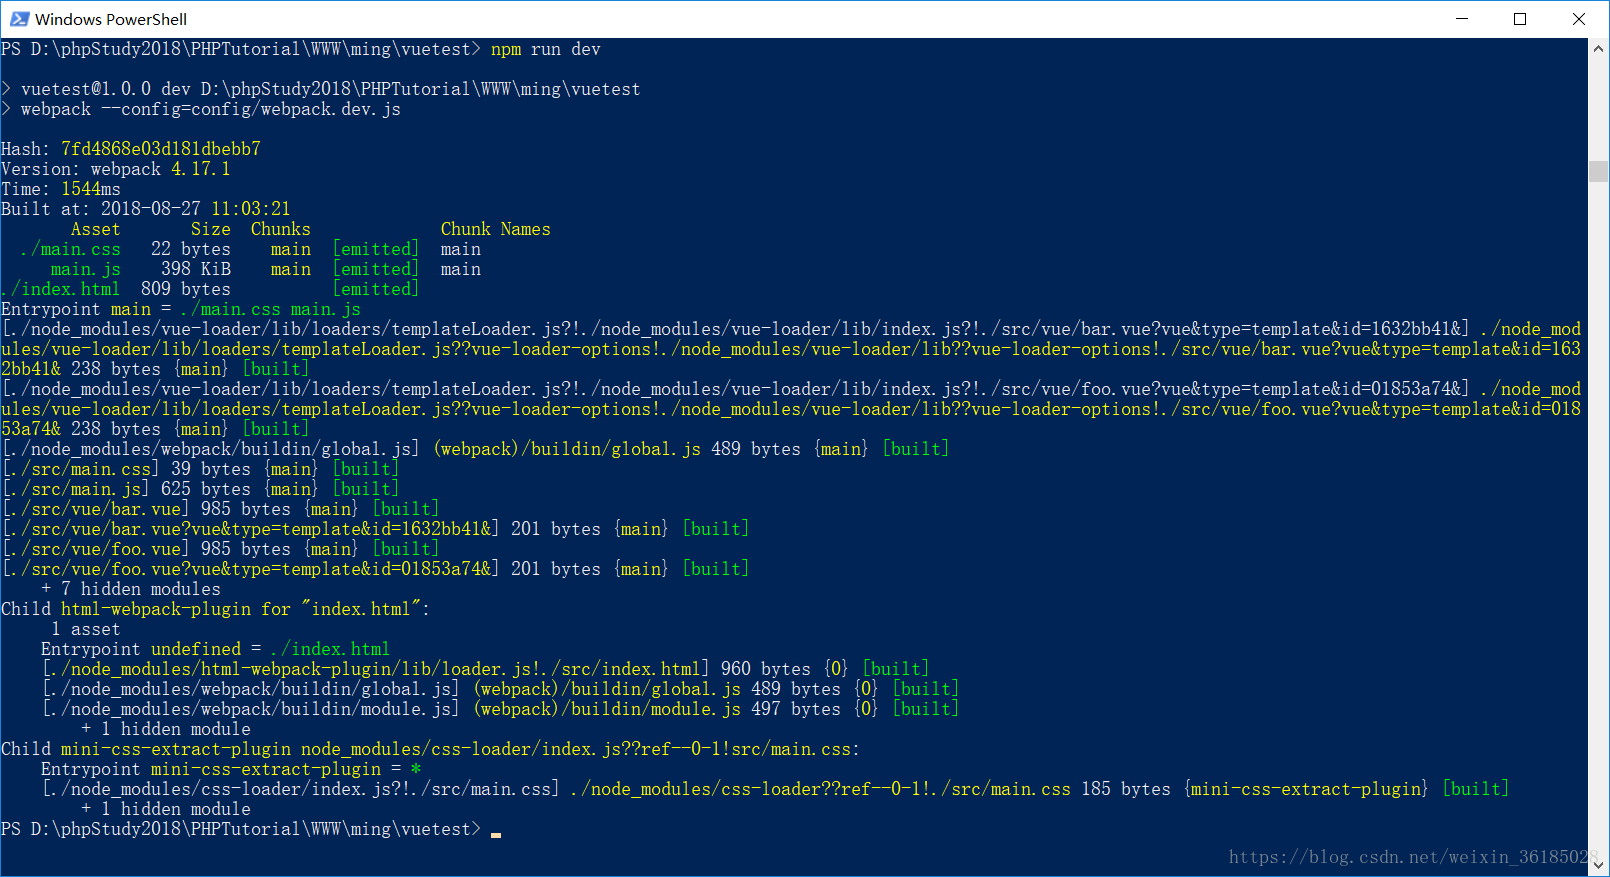
dist目录多了相关文件:
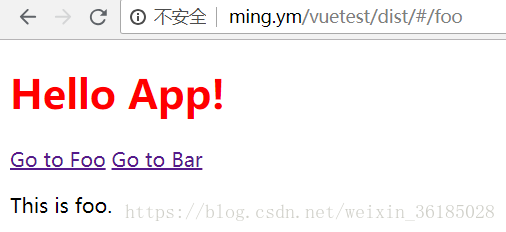
开启服务器打开网页: