上一篇文章,讲了mybatis generator 插件的安装,如果有需要的可以点击本句话看一下。
下面讲插件的使用步骤:
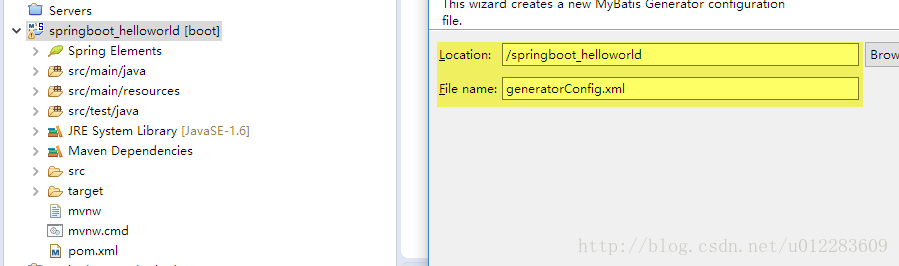
Step1,file–>new–>other–>mybatis–>mybatis genertator configuration file–>next–>browse–>finish完成。选则需要使用插件的项目,如下图所示(或者直接右击项目,然后再按照上面的file–>new…….步骤,这样就不需要browse这一步了)。
注意:
*如果出现**File Already Exists(如下图),则说明配置文件已经存在,直接参考Step4的mybatis generator 插件使用方法就行了。

Step2,点击finish后,会在项目根目录下生成generatorConfig.xml配置文件。如下图所示。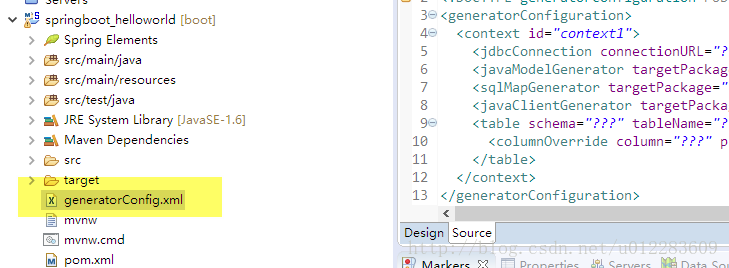
Step3,至于generatorConfig.xml文件里面的内容,我这里有一篇介绍的比较不错,具体地址记不得了,所以在这里贴出来。
<?xml version="1.0" encoding="UTF-8" ?>
<!DOCTYPE generatorConfiguration PUBLIC "-//mybatis.org//DTD MyBatis Generator Configuration 1.0//EN" "http://mybatis.org/dtd/mybatis-generator-config_1_0.dtd" >
<generatorConfiguration>
    <!-- 引入配置文件 -->
    <properties resource="init.properties"/>

    <!-- 指定数据连接驱动jar地址 -->
    <classPathEntry location="${classPath}" />

    <!-- 一个数据库一个context -->
    <context id="infoGuardian">
        <!-- 注释 -->
        <commentGenerator >
            <property name="suppressAllComments" value="false"/><!-- 是否取消注释 -->
            <property name="suppressDate" value="true" /> <!-- 是否生成注释代时间戳-->
        </commentGenerator>

        <!-- jdbc连接 -->
        <jdbcConnection driverClass="${jdbc_driver}"
            connectionURL="${jdbc_url}" userId="${jdbc_user}"
            password="${jdbc_password}" />

        <!-- 类型转换 -->
        <javaTypeResolver>
            <!-- 是否使用bigDecimal, false可自动转化以下类型(Long, Integer, Short, etc.) -->
            <property name="forceBigDecimals" value="false"/>
        </javaTypeResolver>

        <!-- 生成实体类地址 -->
        <javaModelGenerator targetPackage="com.oop.eksp.user.model"
            targetProject="${project}" >
            <!-- 是否在当前路径下新加一层schema,eg:fase路径com.oop.eksp.user.model, true:com.oop.eksp.user.model.[schemaName] -->
            <property name="enableSubPackages" value="false"/>
            <!-- 是否针对string类型的字段在set的时候进行trim调用 -->
            <property name="trimStrings" value="true"/>
        </javaModelGenerator>

        <!-- 生成mapxml文件 -->
        <sqlMapGenerator targetPackage="com.oop.eksp.user.data"
            targetProject="${project}" >
            <!-- 是否在当前路径下新加一层schema,eg:fase路径com.oop.eksp.user.model, true:com.oop.eksp.user.model.[schemaName] -->
            <property name="enableSubPackages" value="false" />
        </sqlMapGenerator>

        <!-- 生成mapxml对应client,也就是接口dao -->
        <javaClientGenerator targetPackage="com.oop.eksp.user.data"
            targetProject="${project}" type="XMLMAPPER" >
            <!-- 是否在当前路径下新加一层schema,eg:fase路径com.oop.eksp.user.model, true:com.oop.eksp.user.model.[schemaName] -->
            <property name="enableSubPackages" value="false" />
        </javaClientGenerator>

        <!-- 配置表信息 -->
        <table schema="${jdbc_user}" tableName="s_user"
            domainObjectName="UserEntity" enableCountByExample="false"
            enableDeleteByExample="false" enableSelectByExample="false"
            enableUpdateByExample="false">
            <!-- schema即为数据库名 tableName为对应的数据库表 domainObjectName是要生成的实体类 enable*ByExample
                是否生成 example类   -->

            <!-- 忽略列,不生成bean 字段 -->
            <ignoreColumn column="FRED" />
            <!-- 指定列的java数据类型 -->
            <columnOverride column="LONG_VARCHAR_FIELD" jdbcType="VARCHAR" />
        </table>

    </context>
</generatorConfiguration>
init配置文件
#Mybatis Generator configuration
project = EKSP
classPath=E:/workplace/EKSP/WebContent/WEB-INF/lib/ojdbc14.jar
jdbc_driver = oracle.jdbc.driver.OracleDriver
jdbc_url=jdbc:oracle:thin:@127.0.0.1:1521:orcl
jdbc_user=INFOGUARDIAN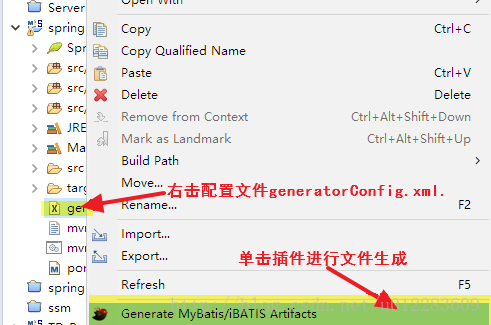
jdbc_password=info_idap132Step4,当你改好配置文件里面的相关内容时,接下来就是使用mybatis generator 插件生成bean,mapper文件了,只需要右击配置文件,点击mybatis generator 插件就可以生成了。如下图所示。
谢谢,写于2017年3月30日00:39:09,深夜难眠,想你!