Spring MVC Flash Attribute 的讲解与使用示例
1.
Spring MVC 3.1版本加了一个很有用的特性,Flash属性,它能解决一个长久以来缺少解决的问题,一个POST/Redirect/GET模式问题。
正常的MVC Web应用程序在每次提交都会POST数据到服务器。一个正常的Controller (被注解 @Controller标记)从请求获取数据和处理它 (保存或更新数据库)。一旦操作成功,用户就会被带到(forward)一个操作成功的页面。传统上来说,这样的POST/Forward/GET模式,有时候会导致多次提交问题. 例如用户按F5刷新页面,这时同样的数据会再提交一次。
为了解决这问题, POST/Redirect/GET 模式被用在MVC应用程序上. 一旦用户表单被提交成功, 我们重定向(Redirect)请求到另一个成功页面。这样能够令浏览器创建新的GET请求和加载新页面。这样用户按下F5,是直接GET请求而不是再提交一次表单。

|
|
|
虽然这一方法看起来很完美,并且解决了表单多次提交的问题,但是它又引入了一个获取请求参数和属性的难题. 通常当我们生成一次http重定向请求的时候,被存储到请求数据会丢失,使得下一次GET请求不可能访问到这次请求中的一些有用的信息. Flash attributes 的到来就是为了处理这一情况. Flash attributes 为一个请求存储意图为另外一个请求所使用的属性提供了一条途径. Flash attributes 在对请求的重定向生效之前被临时存储(通常是在session)中,并且在重定向之后被立即移除.
为了这样做, Flash 特性使用了两个集合. FlashMap 被用来管理 flash attributes 而 FlashMapManager 则被用来存储,获取和管理 FlashMap 实体. 对于每一次请求一个 “input” flash map 会被创建,来存储来自任何之前请求的 flash attribute 还有一个 “output” flash map 会被创建,来存储任何我们存储在这个请求中的,之后的请求参数. |
|

使用要想在你的 Spring MVC 应用中使用 Flash attribute,要用 3.1 版本或以上。并且要在 spring-servlet.xml 文件中加入 mvc:annotation-driven。
这些都完成之后,Flash attribute 就会自动设为“开启”,以供使用了。只需在你的 Spring controller 方法中加入RedirectAttributes redirectAttributes。
addFlashAttribute 方法会自动向 output flash map 中添加给定的参数,并将它传递给后续的请求。 我们来看看一个使用 Flash attribute 来完成 POST/Redirect/GET 并传递一些信息的完整实例吧。 Flash Attribute 实例下面的应用向用户显示一个表单。当用户填完数据,并提交表单之后,页面会重定向到另一个显示成功信息的页面。在这个重定向的新页面中,会显示用户刚才输入的信息。 |
|
第1步: 需要的 JAR 和项目结构如果你用 Maven 来做依赖管理,用下面的 dependencies 来添加 Spring 3.1 MVC 的支持。
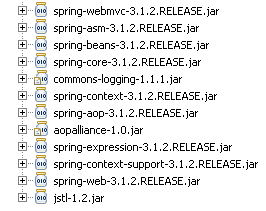
或者,你可以下载以下 JAR 文件,然后把它们放在 /WEB-INF/lib 文件夹下。
第2步: Spring 配置要为 web 项目添加 Spring 支持,需要在 web.xml 中添加 DispatcherServlet 。 web.xml
然后,spring-servlet 使用 mvc:annotation-driven 来支持 mvc ,并且会扫描项目中的 context:component-scan 标签。 spring-servlet.xml
第3步: Spring Controller – RedirectAttributesController 的代码使用 Customer.java 对象作为 bean 来保存客户信息。 Customer.java
CustomerController 类有3个方法。showForm 方法对应 URL /form ,用来显示 Add New Customer 表单。addCustomer 方法对应 URL /addcustomer ,用来处理 POST 请求。 CustomerController.java
注意我们在 addCustomer 方法中是如何使用 redirectAttributes 参数来添加 flash attribute 的。并且,我们是用 addFlashAttribute 方法来设置新的参数为 flash attribute。 |
|
第4步: View 层
add customer.JSP 文件显示一个 Add New Customer(添加新客户)表单。 add_customer.jsp
|
1
2
3
4
5
6
7
8
9
10
11
12
13
14
15
16
17
18
19
20
21
22
23
24
25
26
27
28
29
30
|
<%@taglib uri="http://www.springframework.org/tags/form" prefix="form"%>
<
html
>
<
body
>
<
h1
>Add New Customer</
h1
>
<
form:form
action
=
"addcustomer.html"
method
=
"post"
commandName
=
"customer"
>
<
table
>
<
tr
>
<
td
><
form:label
path
=
"firstname"
>Firstname</
form:label
></
td
>
<
td
><
form:input
path
=
"firstname"
/> </
td
>
</
tr
>
<
tr
>
<
td
><
form:label
path
=
"lastname"
>Lastname</
form:label
></
td
>
<
td
><
form:input
path
=
"lastname"
/> </
td
>
</
tr
>
<
tr
>
<
td
><
form:label
path
=
"age"
>Age</
form:label
></
td
>
<
td
><
form:input
path
=
"age"
/> </
td
>
</
tr
>
<
tr
>
<
td
><
form:label
path
=
"email"
>Email</
form:label
>
<
td
><
form:input
path
=
"email"
/> </
td
>
</
tr
>
<
tr
>
<
td
colspan
=
"2"
><
input
type
=
"submit"
value
=
"Add Customer"
/>
</
td
>
</
tr
>
</
table
>
</
form:form
>
</
body
>
</
html
>
|
show_customer.jsp 简单地显示客户的名和姓,以及用 flash attributes 设置的成功信息。
show_customer.jsp
|
1
2
3
4
5
6
7
|
<%@taglib uri="http://www.springframework.org/tags/form" prefix="form"%>
<
html
>
<
body
>
<
h1
>${message}</
h1
>
${customer.lastname}, ${customer.firstname} added successfully..
</
body
>
</
html
>
|
Demo:
执行这个 web 项目即可。 URL: http://localhost:8080/SpringMVC_Flash_Attribute_Maven_example/form.html 

转 : https://www.cnblogs.com/sharpest/p/6151239.html
1.
Spring MVC 3.1版本加了一个很有用的特性,Flash属性,它能解决一个长久以来缺少解决的问题,一个POST/Redirect/GET模式问题。
正常的MVC Web应用程序在每次提交都会POST数据到服务器。一个正常的Controller (被注解 @Controller标记)从请求获取数据和处理它 (保存或更新数据库)。一旦操作成功,用户就会被带到(forward)一个操作成功的页面。传统上来说,这样的POST/Forward/GET模式,有时候会导致多次提交问题. 例如用户按F5刷新页面,这时同样的数据会再提交一次。
为了解决这问题, POST/Redirect/GET 模式被用在MVC应用程序上. 一旦用户表单被提交成功, 我们重定向(Redirect)请求到另一个成功页面。这样能够令浏览器创建新的GET请求和加载新页面。这样用户按下F5,是直接GET请求而不是再提交一次表单。
|
|
|
虽然这一方法看起来很完美,并且解决了表单多次提交的问题,但是它又引入了一个获取请求参数和属性的难题. 通常当我们生成一次http重定向请求的时候,被存储到请求数据会丢失,使得下一次GET请求不可能访问到这次请求中的一些有用的信息. Flash attributes 的到来就是为了处理这一情况. Flash attributes 为一个请求存储意图为另外一个请求所使用的属性提供了一条途径. Flash attributes 在对请求的重定向生效之前被临时存储(通常是在session)中,并且在重定向之后被立即移除.
为了这样做, Flash 特性使用了两个集合. FlashMap 被用来管理 flash attributes 而 FlashMapManager 则被用来存储,获取和管理 FlashMap 实体. 对于每一次请求一个 “input” flash map 会被创建,来存储来自任何之前请求的 flash attribute 还有一个 “output” flash map 会被创建,来存储任何我们存储在这个请求中的,之后的请求参数. |
|
使用要想在你的 Spring MVC 应用中使用 Flash attribute,要用 3.1 版本或以上。并且要在 spring-servlet.xml 文件中加入 mvc:annotation-driven。
这些都完成之后,Flash attribute 就会自动设为“开启”,以供使用了。只需在你的 Spring controller 方法中加入RedirectAttributes redirectAttributes。
addFlashAttribute 方法会自动向 output flash map 中添加给定的参数,并将它传递给后续的请求。 我们来看看一个使用 Flash attribute 来完成 POST/Redirect/GET 并传递一些信息的完整实例吧。 Flash Attribute 实例下面的应用向用户显示一个表单。当用户填完数据,并提交表单之后,页面会重定向到另一个显示成功信息的页面。在这个重定向的新页面中,会显示用户刚才输入的信息。 |
|
第1步: 需要的 JAR 和项目结构如果你用 Maven 来做依赖管理,用下面的 dependencies 来添加 Spring 3.1 MVC 的支持。
或者,你可以下载以下 JAR 文件,然后把它们放在 /WEB-INF/lib 文件夹下。
第2步: Spring 配置要为 web 项目添加 Spring 支持,需要在 web.xml 中添加 DispatcherServlet 。 web.xml
然后,spring-servlet 使用 mvc:annotation-driven 来支持 mvc ,并且会扫描项目中的 context:component-scan 标签。 spring-servlet.xml
第3步: Spring Controller – RedirectAttributesController 的代码使用 Customer.java 对象作为 bean 来保存客户信息。 Customer.java
CustomerController 类有3个方法。showForm 方法对应 URL /form ,用来显示 Add New Customer 表单。addCustomer 方法对应 URL /addcustomer ,用来处理 POST 请求。 CustomerController.java
注意我们在 addCustomer 方法中是如何使用 redirectAttributes 参数来添加 flash attribute 的。并且,我们是用 addFlashAttribute 方法来设置新的参数为 flash attribute。 |
|
第4步: View 层
add customer.JSP 文件显示一个 Add New Customer(添加新客户)表单。 add_customer.jsp
|
1
2
3
4
5
6
7
8
9
10
11
12
13
14
15
16
17
18
19
20
21
22
23
24
25
26
27
28
29
30
|
<%@taglib uri="http://www.springframework.org/tags/form" prefix="form"%>
<
html
>
<
body
>
<
h1
>Add New Customer</
h1
>
<
form:form
action
=
"addcustomer.html"
method
=
"post"
commandName
=
"customer"
>
<
table
>
<
tr
>
<
td
><
form:label
path
=
"firstname"
>Firstname</
form:label
></
td
>
<
td
><
form:input
path
=
"firstname"
/> </
td
>
</
tr
>
<
tr
>
<
td
><
form:label
path
=
"lastname"
>Lastname</
form:label
></
td
>
<
td
><
form:input
path
=
"lastname"
/> </
td
>
</
tr
>
<
tr
>
<
td
><
form:label
path
=
"age"
>Age</
form:label
></
td
>
<
td
><
form:input
path
=
"age"
/> </
td
>
</
tr
>
<
tr
>
<
td
><
form:label
path
=
"email"
>Email</
form:label
>
<
td
><
form:input
path
=
"email"
/> </
td
>
</
tr
>
<
tr
>
<
td
colspan
=
"2"
><
input
type
=
"submit"
value
=
"Add Customer"
/>
</
td
>
</
tr
>
</
table
>
</
form:form
>
</
body
>
</
html
>
|
show_customer.jsp 简单地显示客户的名和姓,以及用 flash attributes 设置的成功信息。
show_customer.jsp
|
1
2
3
4
5
6
7
|
<%@taglib uri="http://www.springframework.org/tags/form" prefix="form"%>
<
html
>
<
body
>
<
h1
>${message}</
h1
>
${customer.lastname}, ${customer.firstname} added successfully..
</
body
>
</
html
>
|
Demo:
执行这个 web 项目即可。 URL: http://localhost:8080/SpringMVC_Flash_Attribute_Maven_example/form.html