引言
上一篇文章Android进阶——性能优化之进程保活原理及手段完全解析(一)总结了Android进程和线程的相关知识,主要介绍了几种提升进程优先级的手段,通常仅仅是提高优先级只能让你的进程存活时间久一点,但是真正的被杀死之后就不会自动拉活的,如果你的进程需要尽可能存在后台还需要拉活措施,在被杀死之后一段时间之内自动拉活。(如非绝对的需求,还是少浪费点用户的资源吧)
一、系统账户同步机制拉活
手机系统设置里会有Account帐户一项功能,任何第三方APP都可以通过此功能将我们自己的APP注册到这个Account帐户中,并且将数据在一定时间内同步到服务器中去。系统在将APP帐户同步时,自动将未启动的APP进程拉活,具体操作参见Google官方demo。
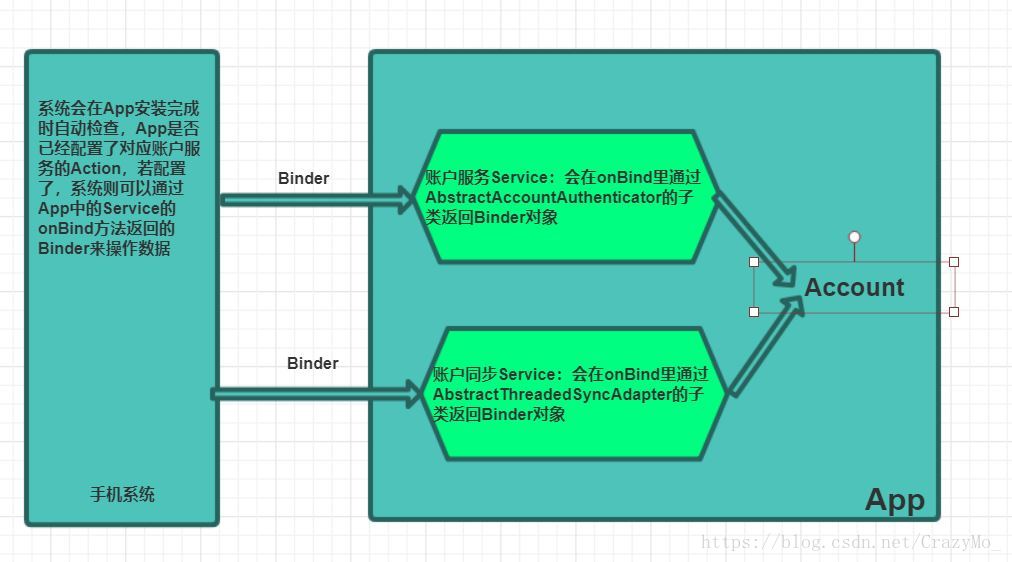
1、继承Service并在内部继承实现用于返回Binder的AbstractAccountAuthenticator
AuthenticationService继承自Service本质上是一个AIDL,提供给其他的进程使用的,主要我们实现并且声明了之后,android系统会通过android.accounts.AccountAuthenticator这个Action找到它,并通过它来把我们自己的账号注册到系统设置界面,其中Authenticator是一个继承自AbstractAccountAuthenticator的类,而AbstractAccountAuthenticator是用于实现对手机系统设置里“账号与同步”中Account的添加、删除和验证等一些基本功能。很明显AbstractAccountAuthenticator里面有个继承于IAccountAuthenticator.Stub的内部类,以用来对AbstractAccountAuthenticator的远程接口调用进行包装。所以可以通过AbstractAccountAuthenticator的getIBinder()方法,返回内部类的IBinder形式.
/**
 * Created by cmo on 2018/8/19  14:17
 */

public class AuthenticationService extends Service {
    private AccountAuthenticator mAuthenticator;

    @Nullable
    @Override
    public IBinder onBind(Intent intent) {
        return mAuthenticator.getIBinder();//返回操作数据的Binder
    }

    @Override
    public void onCreate() {
        super.onCreate();
        mAuthenticator = new AccountAuthenticator(this);
    }

    /**
     * 账户操作的
     */
    class AccountAuthenticator extends AbstractAccountAuthenticator{

        public AccountAuthenticator(Context context) {
            super(context);
        }

        @Override
        public Bundle editProperties(AccountAuthenticatorResponse response, String accountType) {
            return null;
        }

        @Override
        public Bundle addAccount(AccountAuthenticatorResponse response, String accountType, String authTokenType, String[] requiredFeatures, Bundle options) throws NetworkErrorException {
            return null;
        }

        @Override
        public Bundle confirmCredentials(AccountAuthenticatorResponse response, Account account, Bundle options) throws NetworkErrorException {
            return null;
        }

        @Override
        public Bundle getAuthToken(AccountAuthenticatorResponse response, Account account, String authTokenType, Bundle options) throws NetworkErrorException {
            return null;
        }

        @Override
        public String getAuthTokenLabel(String authTokenType) {
            return null;
        }

        @Override
        public Bundle updateCredentials(AccountAuthenticatorResponse response, Account account, String authTokenType, Bundle options) throws NetworkErrorException {
            return null;
        }

        @Override
        public Bundle hasFeatures(AccountAuthenticatorResponse response, Account account, String[] features) throws NetworkErrorException {
            return null;
        }
    }
}
2、在res/xml/文件夹下定义将要显示在Account列表的资源
以account-authenticator 为根节点的xml文件,其中icon、label分别是Account列表中的图标和显示名称,而accountType则是操作用户所必须的参数之一。
<!--res/xml/accountauthenticator.xml-->
<?xml version="1.0" encoding="utf-8"?>
<account-authenticator xmlns:android="http://schemas.android.com/apk/res/android"
    android:accountType="com.crazymo.guardback"
    android:icon="@mipmap/ic_launcher"
    android:label="@string/app_name" />
3、在清单文件中配置AuthenticationService
一定要配置上指定的Action:android.accounts.AccountAuthenticator和meta-data
<application>
<!-- 这个是配置账户服务的Service-->
 <service android:name=".account.AuthenticationService" >
            <intent-filter>
                <action android:name="android.accounts.AccountAuthenticator"/>
            </intent-filter>
            <meta-data android:name="android.accounts.AccountAuthenticator"
                android:resource="@xml/accountauthenticator"/>
        </service>
    </application>
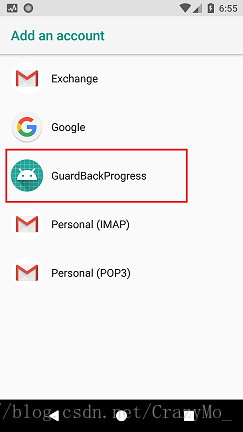
经过以上三步之后,安装Apk,再次打开Account你会发现原来的Account列表多了一行数据,说明我们的App也可以支持这个Account系统了
4、创建App的账户
接来还需要创建一个我们自己的Account和进行一些必要的配置。
public class AccountHelper {
        //authenticator.xml 中配置 的accountType值
    public static final String ACCOUNT_TYPE="com.crazymo.guardback";
    /**
     * 添加Account,需要"android.permission.GET_ACCOUNTS"权限
     * @param context
     */
    public  static void addAccount(Context context){
        AccountManager accountManager = (AccountManager) context.getSystemService(Context.ACCOUNT_SERVICE);
        Account[] accountsType = accountManager.getAccountsByType(ACCOUNT_TYPE);
        if(accountsType.length>0){
            Log.e("cmo","账户已经存在");
            return;
        }
        //给这个账户类型添加账户 crazymo cmo518
        Account account=new Account("crazymo",ACCOUNT_TYPE);
        //需要"android.permission.AUTHENTICATE_ACCOUNTS"权限
        accountManager.addAccountExplicitly(account,"cmo518",new Bundle());
    }

    /**
     * 设置账户同步,即告知系统我们需要系统为我们来进行账户同步,只有设置了之后系统才会自动去
     * 触发SyncAdapter#onPerformSync方法
     */
    public static void autoSyncAccount(){
        Account account=new Account("crazymo",ACCOUNT_TYPE);
        //设置可同步
        ContentResolver.setIsSyncable(account,"com.crazymo.guardback.provider",2);
        //设置自动同步
        ContentResolver.setSyncAutomatically(account,"com.crazymo.guardback.provider",true);
        //设置同步周期参考值,不受开发者控制完全由系统决定何时同步,测试下来最长等了差不多几十分钟才同步一次,不同系统表现不同
        ContentResolver.addPeriodicSync(account,"com.crazymo.guardback.provider",new Bundle(),1);

    }
}
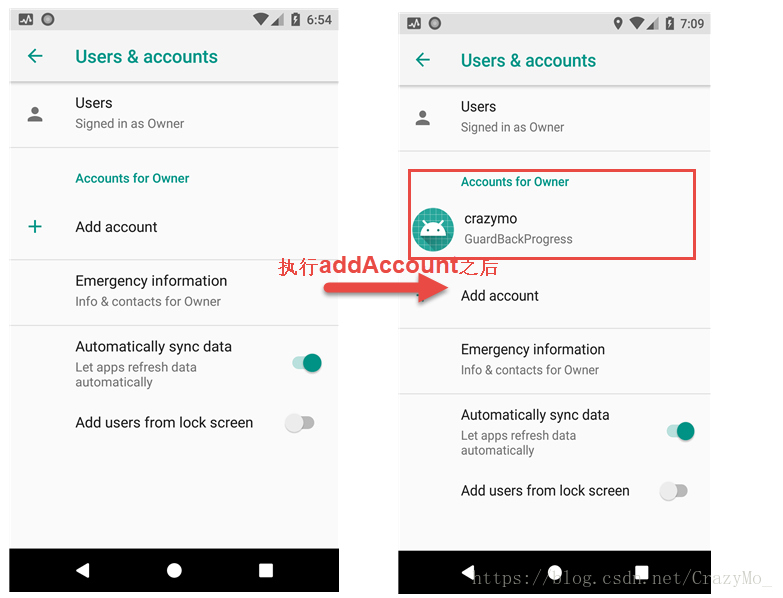
调用addAccount这个方法之后就会在系统设置的Account界面多了一个Account
5、创建账户同步Service
创建一个Service作为同步Service,并且在onBind返回AbstractThreadedSyncAdapter的getSyncAdapterBinder
/**
* Created by cmo on 2018/8/19 22:35
* 用于执行账户同步,当系统执行账户同步时则会自动拉活所在的进程,不需要手动配置好之后,系统会自动绑定并调起
*/
public class SyncService extends Service {
private SyncAdapter mSyncAdapter;
@Nullable
@Override
public IBinder onBind(Intent intent) {
return mSyncAdapter.getSyncAdapterBinder();
}
@Override
public void onCreate() {
super.onCreate();
mSyncAdapter = new SyncAdapter(getApplicationContext(), true);
}
static class SyncAdapter extends AbstractThreadedSyncAdapter{
public SyncAdapter(Context context, boolean autoInitialize) {
super(context, autoInitialize);
}
@Override
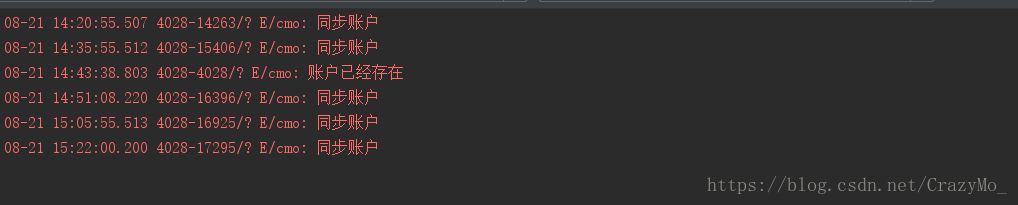
public void onPerformSync(Account account, Bundle extras, String authority, ContentProviderClient provider, SyncResult syncResult) {
//todo 账户同步 工作
Log.e("cmo","同步账户");
//与互联网 或者 本地数据库同步账户
}
}
}
contentAuthority属性是配置系统在进行账户同步的时候会查找此auth的ContentProvider,allowParallelSyncs 允许多个同步。
<!--res/xml/sync_adapter.xml-->
<?xml version="1.0" encoding="utf-8"?>
<sync-adapter xmlns:android="http://schemas.android.com/apk/res/android"
    android:accountType="com.crazymo.guardback"
    android:contentAuthority="com.crazymo.guardback.provider"
    android:allowParallelSyncs="false"
    android:isAlwaysSyncable="true"
    android:userVisible="false"/>
账户同步还需要提供一个ContentProvider
public class SyncContentProvider extends ContentProvider {
    @Override
    public boolean onCreate() {
        return false;
    }

    @Nullable
    @Override
    public Cursor query(@NonNull Uri uri, @Nullable String[] projection, @Nullable String selection, @Nullable String[] selectionArgs, @Nullable String sortOrder) {
        return null;
    }

    @Nullable
    @Override
    public String getType(@NonNull Uri uri) {
        return null;
    }

    @Nullable
    @Override
    public Uri insert(@NonNull Uri uri, @Nullable ContentValues values) {
        return null;
    }

    @Override
    public int delete(@NonNull Uri uri, @Nullable String selection, @Nullable String[] selectionArgs) {
        return 0;
    }

    @Override
    public int update(@NonNull Uri uri, @Nullable ContentValues values, @Nullable String selection, @Nullable String[] selectionArgs) {
        return 0;
    }
}
6、告知系统我们的Account需要进行同步服务
经过以上几步,基本完成了账户同步的机制的搭建,但是还需要主动告知系统我们,即通过调用AccountHelper.autoSyncAccount();
7、完整的清单配置文件和MainActivity代码
<?xml version="1.0" encoding="utf-8"?>
<manifest xmlns:android="http://schemas.android.com/apk/res/android"
    package="com.crazymo.guardback">


    <uses-permission
        android:name="android.permission.AUTHENTICATE_ACCOUNTS"
        android:maxSdkVersion="22" />
    <uses-permission
        android:name="android.permission.GET_ACCOUNTS"
        android:maxSdkVersion="22" />
    <uses-permission android:name="android.permission.WRITE_SYNC_SETTINGS" />

    <application
        android:allowBackup="true"
        android:icon="@mipmap/ic_launcher"
        android:label="@string/app_name"
        android:roundIcon="@mipmap/ic_launcher_round"
        android:supportsRtl="true"
        android:theme="@style/AppTheme">
        <activity android:name=".MainActivity">
            <intent-filter>
                <action android:name="android.intent.action.MAIN" />

                <category android:name="android.intent.category.LAUNCHER" />
            </intent-filter>
        </activity>
        <service android:name=".account.AuthenticationService" >
            <intent-filter>
                <action android:name="android.accounts.AccountAuthenticator"/>
            </intent-filter>
            <meta-data android:name="android.accounts.AccountAuthenticator"
                android:resource="@xml/accountauthenticator"/>
        </service>


        <service android:name=".account.SyncService">
            <intent-filter>
                <action android:name="android.content.SyncAdapter" />
            </intent-filter>
            <meta-data
                android:name="android.content.SyncAdapter"
                android:resource="@xml/sync_adapter" />
        </service>
        <provider
            android:authorities="com.crazymo.guardback.provider"
            android:name=".account.SyncContentProvider"/>
    </application>

</manifest>
MainActivity.java
public class MainActivity extends AppCompatActivity {

    @Override
    protected void onCreate(Bundle savedInstanceState) {
        super.onCreate(savedInstanceState);
        setContentView(R.layout.activity_main);
        AccountHelper.addAccount(this);//添加账户
        AccountHelper.autoSyncAccount();//调用告知系统自动同步
    }
}
以上就是利用账户同步进行拉活的主要核心思想(至于真正同步的代码不在此文章讨论),测试过程中发现(最高测试版本到Android 8.0),不同系统表现不同,至于同步周期完全是由系统进行控制的,虽然比较稳定但是周期不可控。
二、JobSchedule 机制拉活
JobScheduler允许在特定状态与特定时间间隔周期执行任务,所以我们也可以利用它的这个机制来完成拉活的功能,其效果就像是开启一个定时器,与普通定时器不同的是其调度由系统完成,也比较可靠稳定,但是会受到白名单等模式的影响,在某些ROM中甚至无法拉活。
1、实现JobService
package com.crazymo.guardback.jobschedule;

import android.app.job.JobInfo;
import android.app.job.JobParameters;
import android.app.job.JobScheduler;
import android.app.job.JobService;
import android.content.ComponentName;
import android.content.Context;
import android.os.Build;
import android.util.Log;

/**
 * Created by cmo on 2018/8/21  21:06
 */

public class GuardJobService extends JobService {
    @Override
    public boolean onStartJob(JobParameters params) {
        Log.e("cmo", "开启job");
        //如果7.0以上 轮询
        if (Build.VERSION.SDK_INT >= Build.VERSION_CODES.N) {
            startGuardJob(this);
        }
        return false;
    }

    @Override
    public boolean onStopJob(JobParameters params) {
        return false;
    }

    public static void startGuardJob(Context context) {
        if(context!=null) {
            JobScheduler jobScheduler = (JobScheduler) context.getSystemService(Context.JOB_SCHEDULER_SERVICE);
//        setPersisted 在设备重启依然执行
            JobInfo.Builder builder = new JobInfo.Builder(10, new ComponentName(context
                    .getPackageName(), GuardJobService.class
                    .getName())).setPersisted(true);
            //小于7.0
            if (Build.VERSION.SDK_INT < Build.VERSION_CODES.N) {
                // 每隔1s 执行一次 job
                builder.setPeriodic(1_000);
            } else {
                //延迟执行任务
                builder.setMinimumLatency(1_000);
            }

            jobScheduler.schedule(builder.build());
        }
    }
}
2、在清单中注册JobService
  <application>
	  ...
      <service
          android:name=".jobschedule.GuardJobService"
          android:permission="android.permission.BIND_JOB_SERVICE" />
  </application>
##3、手动开启JobSchedule
public class MainActivity extends AppCompatActivity {

    @Override
    protected void onCreate(Bundle savedInstanceState) {
        super.onCreate(savedInstanceState);
        setContentView(R.layout.activity_main);
        GuardJobService.startGuardJob(this);//通过JobSchedule 拉活
    }
}
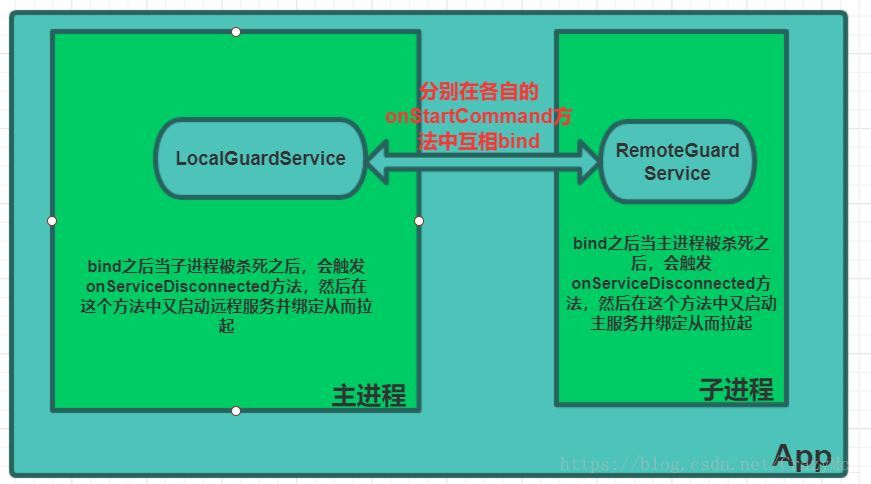
三、双进程Service互相拉活
这里所讲的双进程守护并非是以前通过Native fork子进程用于观察当前app主进程的存亡状态,那种Native形式对于5.0以上成功率极低。
如上图所述,所谓双进程Service互相拉活,本质就是利用了系统Binder机制并结合前台服务提权,目前此种方式也是成功率很高的一种方式。
1、实现一个AIDL文件
此处如果仅仅是为了拉活,不需要远程调用某些功能的话,可以不用具体实现,但是不能缺少。
// IGuardService.aidl
package com.crazymo.deguard;

// Declare any non-default types here with import statements

interface IGuardService {
    /**
     * Demonstrates some basic types that you can use as parameters
     * and return values in AIDL.
     */
    void basicTypes(int anInt, long aLong, boolean aBoolean, float aFloat,
            double aDouble, String aString);
}
2、实现运行在主进程的Service
package com.crazymo.deguard.service;

import android.app.Notification;
import android.app.Service;
import android.content.ComponentName;
import android.content.Intent;
import android.os.Build;
import android.os.IBinder;
import android.os.RemoteException;
import android.support.annotation.Nullable;
import android.util.Log;

import com.crazymo.deguard.IGuardService;

/**
 * Created by cmo on 2018/8/21  22:12
 * 提权Service
 */

public class LocalGuardService extends Service {
    private final static int SERVICE_ID=10;
    private GuardBinder mBinder;
    private ServiceConnection serviceConnection;
    @Nullable
    @Override
    public IBinder onBind(Intent intent) {
        return mBinder;
    }

    @Override
    public void onCreate() {
        super.onCreate();
        mBinder=new GuardBinder();
        serviceConnection=new ServiceConnection();
        startForeground(SERVICE_ID, new Notification());
        //如果 18 以上的设备 启动一个Service startForeground给相同的id,然后结束这个Service
        if (Build.VERSION.SDK_INT >= Build.VERSION_CODES.JELLY_BEAN_MR2) {
            startService(new Intent(this, InnnerService.class));
        }
    }

    @Override
    public int onStartCommand(Intent intent, int flags, int startId) {
        //绑定本地守护Service,必须实现AIDL否则bindService在这没有作用
        bindService(new Intent(this,RemoteGuardService.class),serviceConnection,BIND_AUTO_CREATE);
        return super.onStartCommand(intent, flags, startId);
    }

    class ServiceConnection implements android.content.ServiceConnection {

        @Override
        public void onServiceConnected(ComponentName name, IBinder service) {
            //服务连接后回调,即返回到GuardService的onBind方法中
        }

        @Override
        public void onServiceDisconnected(ComponentName name) {
            Log.e("cmo","远程子进程可能被干掉了,拉活");
            //连接中断后回调,再启动子进程所在的Service,并进行绑定,通过启动主进程的服务强行拉活
            startService(new Intent(LocalGuardService.this, RemoteGuardService.class));
            bindService(new Intent(LocalGuardService.this, RemoteGuardService.class),serviceConnection,
                    BIND_AUTO_CREATE);
        }
    }

    public static class InnnerService extends Service {

        @Override
        public void onCreate() {
            super.onCreate();
            startForeground(SERVICE_ID, new Notification());
            stopSelf();
        }

        @Nullable
        @Override
        public IBinder onBind(Intent intent) {
            return null;
        }
    }

    class GuardBinder extends IGuardService.Stub{

        @Override
        public void basicTypes(int anInt, long aLong, boolean aBoolean, float aFloat, double aDouble, String aString) throws RemoteException {

        }
    }
}
3、定义子进程的Service
package com.crazymo.deguard.service;

import android.app.Notification;
import android.app.Service;
import android.content.ComponentName;
import android.content.Intent;
import android.os.Build;
import android.os.IBinder;
import android.os.RemoteException;
import android.support.annotation.Nullable;
import android.util.Log;

import com.crazymo.deguard.IGuardService;

/**
 * Created by cmo on 2018/8/21  22:12
 * 提权Service
 */

public class RemoteGuardService extends Service {
    private final static int SERVICE_ID=10;
    private GuardBinder mBinder;
    private ServiceConnection serviceConnection;
    @Nullable
    @Override
    public IBinder onBind(Intent intent) {
        return mBinder;
    }

    @Override
    public void onCreate() {
        super.onCreate();
        mBinder=new GuardBinder();
        serviceConnection=new ServiceConnection();
        startForeground(SERVICE_ID, new Notification());
        //如果 18 以上的设备 启动一个Service startForeground给相同的id,然后结束这个Service
        if (Build.VERSION.SDK_INT >= Build.VERSION_CODES.JELLY_BEAN_MR2) {
            startService(new Intent(this, InnnerService.class));
        }
    }

    @Override
    public int onStartCommand(Intent intent, int flags, int startId) {
        //绑定本地守护Service
        bindService(new Intent(this,LocalGuardService.class),serviceConnection,BIND_AUTO_CREATE);
        return super.onStartCommand(intent, flags, startId);
    }

    class ServiceConnection implements android.content.ServiceConnection {

        @Override
        public void onServiceConnected(ComponentName name, IBinder service) {
            //服务连接后回调,即返回到GuardService的onBind方法中
        }

        @Override
        public void onServiceDisconnected(ComponentName name) {
            Log.e("cmo","主进程可能被干掉了,拉活");
            //连接中断后回调,再启动主进程所在的Service,再进行绑定,通过启动主进程的服务强行拉活,另外先start再bind是为了确保,在其他地方调用unbind时候不被停止掉
            startService(new Intent(RemoteGuardService.this, LocalGuardService.class));
            bindService(new Intent(RemoteGuardService.this, LocalGuardService.class),serviceConnection,
                    BIND_AUTO_CREATE);
        }
    }

    public static class InnnerService extends Service {

        @Override
        public void onCreate() {
            super.onCreate();
            startForeground(SERVICE_ID, new Notification());
            stopSelf();
        }

        @Nullable
        @Override
        public IBinder onBind(Intent intent) {
            return null;
        }
    }

    class GuardBinder extends IGuardService.Stub{

        @Override
        public void basicTypes(int anInt, long aLong, boolean aBoolean, float aFloat, double aDouble, String aString) throws RemoteException {

        }
    }
}
4、声明服务
<?xml version="1.0" encoding="utf-8"?>
<manifest xmlns:android="http://schemas.android.com/apk/res/android"
    package="com.crazymo.deguard">

    <application
        android:allowBackup="true"
        android:icon="@mipmap/ic_launcher"
        android:label="@string/app_name"
        android:roundIcon="@mipmap/ic_launcher_round"
        android:supportsRtl="true"
        android:theme="@style/AppTheme">
        <activity android:name=".MainActivity">
            <intent-filter>
                <action android:name="android.intent.action.MAIN" />

                <category android:name="android.intent.category.LAUNCHER" />
            </intent-filter>
        </activity>

        <service
            android:name=".service.LocalGuardService"
            android:exported="true" />
        <service
            android:name=".service.LocalGuardService$InnnerService"
            android:exported="true" />

        <service
            android:name=".service.RemoteGuardService"
            android:exported="true"
            android:process=":remote" />
        <service
            android:name=".service.RemoteGuardService$InnnerService"
            android:exported="true" />
    </application>

</manifest>
5、开启双进程
public class MainActivity extends AppCompatActivity {

    @Override
    protected void onCreate(Bundle savedInstanceState) {
        super.onCreate(savedInstanceState);
        setContentView(R.layout.activity_main);
        //双进程Service守护
        startService(new Intent(this, LocalGuardService.class));//启动主线程守护服务
        startService(new Intent(this, RemoteGuardService.class));//启动主线程守护服务
        GuardJobService.startGuardJob(this);
    }
}
6、再结合JobSchedule 进一步保活拉活
package com.crazymo.deguard.service;

import android.annotation.SuppressLint;
import android.app.job.JobInfo;
import android.app.job.JobParameters;
import android.app.job.JobScheduler;
import android.app.job.JobService;
import android.content.ComponentName;
import android.content.Context;
import android.content.Intent;
import android.os.Build;
import android.util.Log;

import com.crazymo.deguard.Utils;

/**
 * Created by Administrator on 2018/1/29 0029.
 */

@SuppressLint("NewApi")
public class GuardJobService extends JobService {

    public static void startGuardJob(Context context) {
        JobScheduler jobScheduler = (JobScheduler) context.getSystemService(Context
                .JOB_SCHEDULER_SERVICE);
//        setPersisted 在设备重启依然执行
        JobInfo.Builder builder = new JobInfo.Builder(10, new ComponentName(context
                .getPackageName(), GuardJobService.class
                .getName())).setPersisted(true);
        //小于7.0
        if (Build.VERSION.SDK_INT < Build.VERSION_CODES.N) {
            // 每隔1s 执行一次 job
            builder.setPeriodic(1_000);
        } else {
            //延迟执行任务
            builder.setMinimumLatency(1_000);
        }

        jobScheduler.schedule(builder.build());
    }

    private static final String TAG = "MyJobService";

    @Override
    public boolean onStartJob(JobParameters params) {
        Log.e(TAG, "开启job");
        //如果7.0以上 轮训
        if (Build.VERSION.SDK_INT >= Build.VERSION_CODES.N) {
            startGuardJob(this);
        }
        boolean isLocalRun = Utils.isRunningService(this, LocalGuardService.class.getName());
        boolean isRemoteRun = Utils.isRunningService(this, RemoteGuardService.class.getName());
        if (!isLocalRun || !isRemoteRun) {
            startService(new Intent(this, LocalGuardService.class));
            startService(new Intent(this, RemoteGuardService.class));
        }
        return false;
    }

    @Override
    public boolean onStopJob(JobParameters params) {
        return false;
    }
}
