zabbix逻辑架构
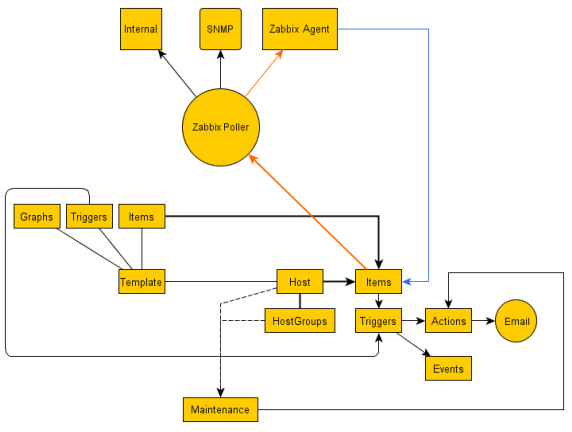
host:主机,要监控的网络设备,可由IP或DNS名称指定
host group:主机组,主机的逻辑容器,可以包含主机和模板,但同一个组内的主机和模板不能互相链接;通常在给用户或用户组指派监控权限时使用
item:监控项http://www.ttlsa.com/zabbix/zabbix-create-item/
trigger:触发器,评估某特定item所接收到的数据是否在合理范围内的表达式,即阀值;http://www.ttlsa.com/zabbix/zabbix-triggers-description/
event:事件,例如触发器的状态转变,新的agent或重新上线的agent的自动注册等
action:动作,对于特定事件预先定义的处理方法,需要设置Conditions(执行操作的条件)和Operations(如发送通知)
media:媒介,发送通知的手段和通道,如Email、Jabber或SMS
template:模板
http://www.ttlsa.com/zabbix/zabbix-templates-introduction/discovery
application:应用,一组item的集合
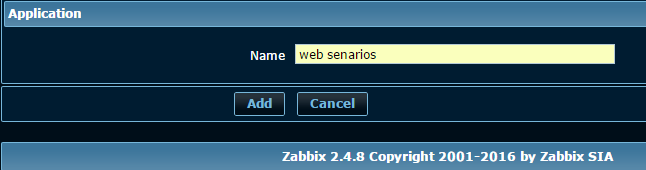
1、创建应用
在hosts或templates上创建应用,如在templates上创建应用需要将此templates链接至需要监控web的hosts上
http://www.ttlsa.com/zabbix/zabbix-application-introduction/
Configuration –>Host或者Templates–>选择需要创建应用程序的Hosts或者Templates–>点击Applications–>右上角点击Create application
2、创建监控项
Configuration –>Host–>选择需要创建web监控的主机–>点击web–>点击右上角Create scenario
web scennaro(web场景):检测web站点可用性的一个或多个http请求

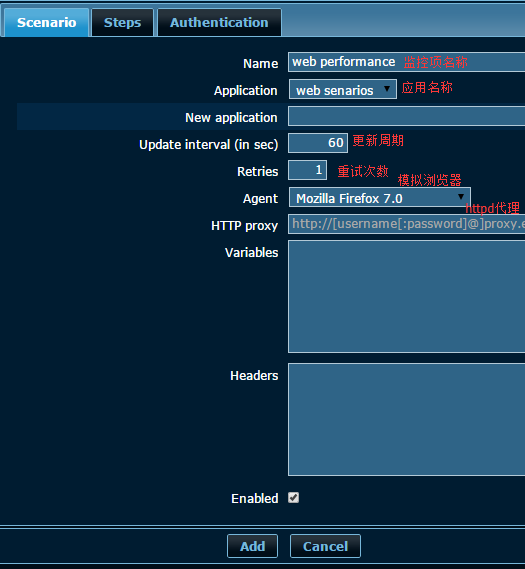
点击step添加信息
- name:当前step名称,item key中可以用到
- url:监控页面
- POST:需要post提交的内容
- variables:变量,这边定义宏变量后续的step可以使用
- Timeout:超时时间,默认15秒
- Required string:响应的内容中必须包含的字符串,否则失败,选填
- Required status codes:响应状态码,必填,多个响应代码用逗号分隔可根据实际情况添加多个Step,添加完成后可在Monitoring–>web中查看监控
方案创建完成后,zabbix会自动在链接的application中添加如下监控项
- Download speed for scenario “web performance”.
- Download speed for step “homepage” of scenario “web performance”.
- Failed step of scenario “web performance”.
- Response code for step “homepage” of scenario “web performance”.
- Response time for step “homepage” of scenario “web performance”.
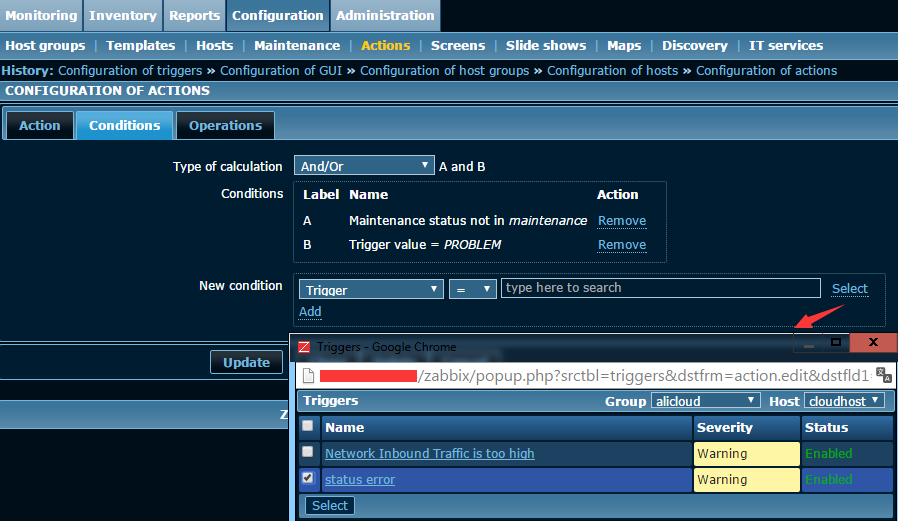
3、定义触发器
http://www.ttlsa.com/zabbix/zabbix-trigger-expression/
Configuration –>Host–>选择需要创建tigger的主机点击web–>点击tigger–>右上角Create tigger
4、定义媒介
http://www.ttlsa.com/zabbix/zabbix-custom-alertscripts/
Administrator->media types->create media types
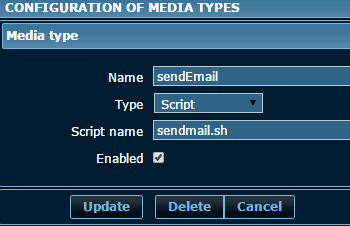
zabbix-server端安装sendEmail
# wget http://caspian.dotconf.net/menu/Software/SendEmail/sendEmail-v1.56.tar.gz
# tar -xzvf sendEmail-v1.56.tar.gz -C /usr/local
# ln -sv /usr/local/sendEmail-v1.56/sendEmail /usr/local/bin/
编写脚本发送邮件
# cat /etc/zabbix/zabbix_server.conf | grep -i aler |grep "^\s*[^# \t].*$"
AlertScriptsPath=/usr/lib/zabbix/alertscripts
# cd /usr/lib/zabbix/alertscripts
# vim sendmail.sh
# cat sendmail.sh
#!/bin/bash
dest=$1
subject=$2
content=$3
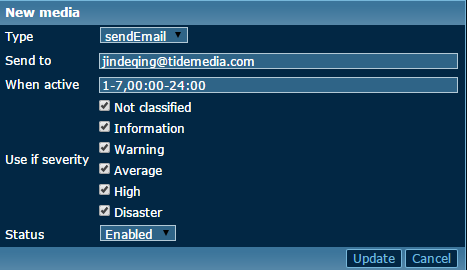
/usr/local/bin/sendEmail -f [email protected] -t "$dest" -s smtp.sina.com -u "$subject" -o message-content-type=html -o message-charset=utf8 -xu [email protected] -xp password -m "$content" 2 >> /var/log/sendEmail设置用户媒介
Administration–>Users–>选择用户表单,点击media
5、配置action
http://www.ttlsa.com/zabbix/zabbix-actions/
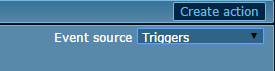
Configuration–>Actions–>选择事件来源为Trigger–>create action