The File Open Dialog
Electron不使用文件API,正如web应用一样,我们结合使用会话模块和Node的FS模块来完成文件操作。显示文件打开会话的基本方法是dialog.showOpenDialog。
首先将index.html的<body>中加入:
<button id="select-directory">Choose a directory</button>
<textarea id="selectedItem"></textarea>这个按钮会用于触发文件打开会话,效果会在下方显示。然后在<head>中加入样式:
<style>
  button {
    color: rebeccapurple;
    font-family: sans-serif;
    font-weight: bold;
    padding: .5rem;
    background-color: #ccc;
    box-shadow: 2px 2px 2px #ccc;
    display: block;
    margin: 1em;
  }
  textarea {
    width: 90%;
  }
</style>然后修改renderer.js。我们要添加一个监听按钮的事件监听器来与主进程通信。首先引入IPC模块:
const ipc = require('electron').ipcRenderer然后引用按钮:
const selectDirBtn = document.getElementById('select-directory')最后添加按钮的监听器:
selectDirBtn.addEventListener('click', function (event) {
    ipc.send('open-directory-dialog')
})
由于调用会话窗口时应用程序是被冻结的,所以我们选用同步IPC调用。
在main.js中应该相应的监听器来监听刚才编写的IPC事件。依然是先引入IPC模块,除此之外还要引入会话模块:
const ipc = require('electron').ipcMain
const dialog = electron.dialog
引入IPC模块和会话模块后就能编写事件监听器了。监听器的基本框架为:
ipc.on('open-directory-dialog', function (event) {})通过上述方法就能调用会话模块来显示文件打开对话框。这个方法有一些可选参数,但有两个是通常会使用的。
第一个参数是浏览器窗口BrowserWindow的引用。在macOS上,t is common for dialogs to appear as connected sheets to the active window, and not appear detached. 我们将会在后面关注这个参数,现在可以暂时将其忽略。
第二个参数是一个包含各种对话框设置的对象。我们将会在运行出第一个对话框后深入学习这个参数。先要设置初始样例的文件打开窗口的属性,表7.1列出了可被设置的属性:
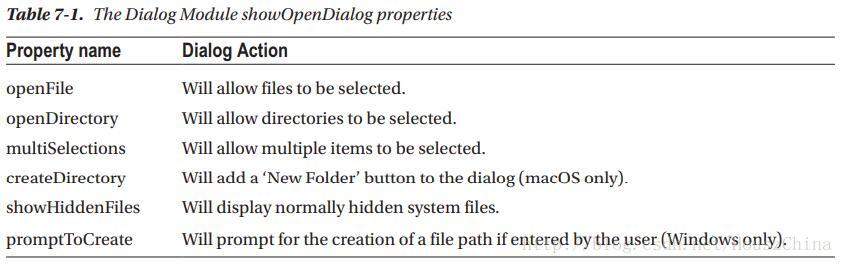
这些属性能被组合在一个数组中使用,只用一个字符串来使用单个属性。
在Windows和Linux中,一个打开对话框不能同时是文件选择器和目录选择器。所以如果在这两个平台上设置属性为['openFile', 'openDirectory'],就会只显示一个文件选择器。
回到我们的例子。我们要允许选择一个目录,选择对象写法大致为:
{
    properties: ['openDirectory']
}
最后一个参数是一个回调函数,如果你想操作选择的文件可以通过这个函数实现。这个回调函数可传入字符串或字符串数组,每个字符串代表所选项的路径。
在本例中,我们将把简单的结果通过IPC模块发送到渲染进程,代码如下:
ipc.on('open-directory-dialog', function (event) {
    dialog.showOpenDialog({
        properties: ['openDirectory']
    }, function (files) {
        if (files)
            event.sender.send('selectedItem', files)
    })
})最后要在renderer.js中添加‘selected-directory’IPC事件的事件监听器:
ipc.on('selectedItem', function (event, path) {
    document.getElementById('selectedItem').innerHTML = `You selected: ${path}`
})
这个函数会将用户所选路径显示出来。
保存所有文件并使用npm start命令运行项目。点击按钮选择一个路径。路径信息将会被从主进程送到渲染进程,然后显示在页面上,如图7.1:
这里写图片描述
Figure 7-1. The select directory style dialog
Additional Open Dialog Properties
dialog.showOpenDialog还有一些属性可以设置。如title属性。在Windows中,这个属性值会被显示在对话框的标题部分,如图7.2:
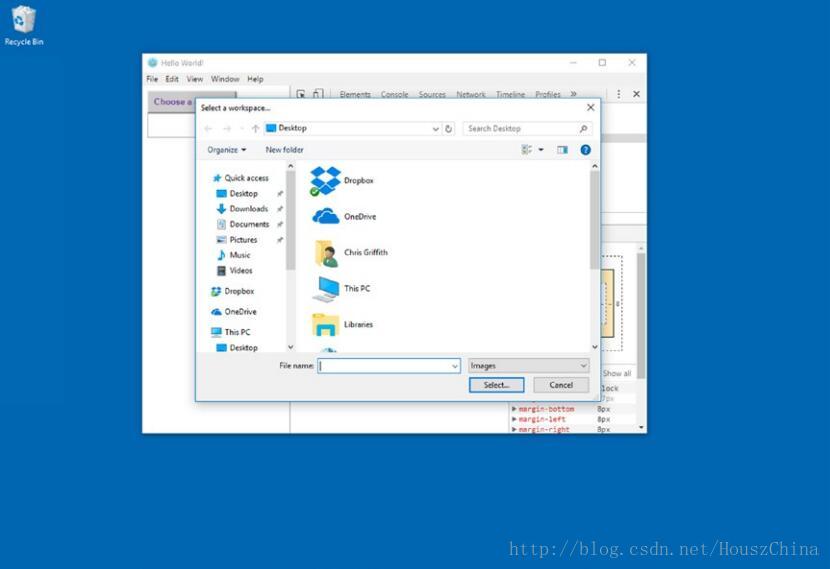
Figure 7-2. The title property being displayed
Note
title属性在macOS中无效

defaultPath属性能自定义对话框默认打开的路径。例如你想默认打开当前用户的文档路径,可以这么写:
dialog.showOpenDialog({
  title: 'Select a workspace...',
  properties: [ 'openFile'],
  defaultPath: '/Users/<username>/Documents/',
}, function (files) {
  if (files) event.sender.send('selectedItem', files)
})当然这个路径取决于平台,例如上例中用户文档目录是macOS平台的格式。推荐使用具体路径名或当前路径./,并使用path模块而不是写死默认路径:
let startPath = ''
if (process.platform === 'darwin') {
 let startPath
  = '/Users/<username>/Documents/'
}也可以用buttonLabel属性将选择按钮的文本修改,默认的选择会被覆盖:
dialog.showOpenDialog({
    title: 'Select a workspace...',
    properties: [ 'openFile'],
    defaultPath: '/Users/<username>/Documents/',
    buttonLabel: "Select..."
  }, function (files) {
    if (files) event.sender.send('selected-directory', files)
  })
Selecting a File
了解了目录选择,我们开始学习如何在本地文件系统中选择特定文件。首先在index.html中加入一个新按钮:
<button id="select-file">Choose an image file</button>然后在renderer.js里引用这个按钮:
const selectFileBtn = document.getElementById('select-file')
and also add the event listener
selectFileBtn.addEventListener('click', function (event) {
  ipc.send('open-file-dialog')
})在main.js中加入初始代码:
ipc.on('open-file-dialog', function (event) {
  let startPath = ''
  if (process.platform === 'darwin') {
    startPath = '/Users/<username>/Documents/'
  }
  dialog.showOpenDialog({
    title: 'Select a workspace...',
    properties: ['openFile'],
    defaultPath: startPath,
    buttonLabel: "Select...",
  }, function (files) {
    if (files) event.sender.send('selectedItem', files)
  })
})这些代码看起来与前文选择路径的代码很相似,唯一的不同在于properties属性数组变成了openFile。
最后一个常见的功能是文件筛选器,用来控制用户所选文件的类型。筛选器是一个对象数组,定义了允许选择的文件扩展名并显示在对话框上。定义扩展名时可只写类型而无须.号,代码如下:
ipc.on('open-file-dialog', function (event) {
    let startPath = '';
    if (process.platform === 'darwin') {
        startPath = '/Users/chrisgriffith/Documents/'
    }
    dialog.showOpenDialog({
        title: 'Select a file...',
        properties: ['openFile'],
        defaultPath: startPath,
        buttonLabel: "Select...",
        filters: [
            { name: 'Images', extensions: ['jpg', 'png', 'gif'] }
        ]
    }, function (files) {
        if (files) event.sender.send('selectedItem', files)
    })
})
在Windows平台,这些扩展名将会显示在可选文件类型的下拉菜单,如图7.3:
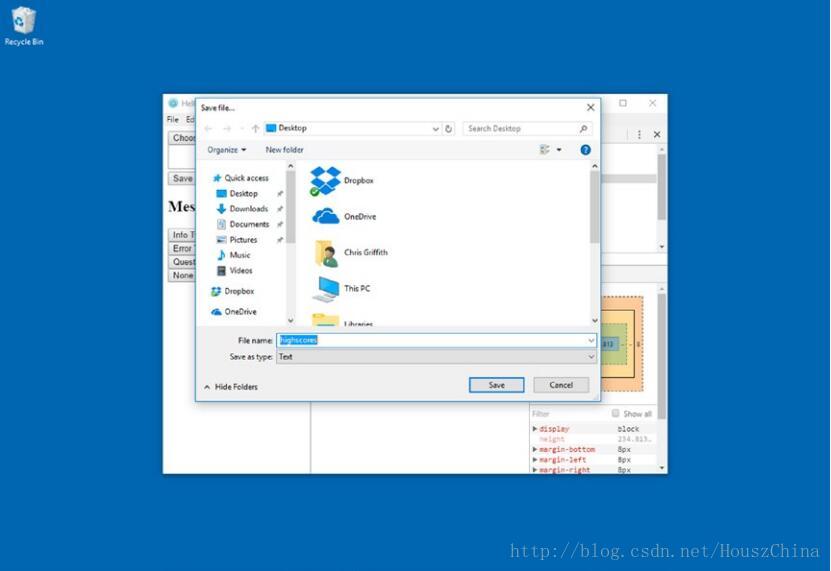
Figure 7-3. The Save as type option being displayed
而在macOS平台,这些扩展名不会被显示出来,但筛选机制依然有效。注意不要将openFile误写为openDirectory。
The BrowserWindow Parameter
前文我们略过了设置打开对话框的参数。在macOS平台,将打开对话框附着在应用程序窗口而不是新开一个单独窗口是很常见的,如图7.4:
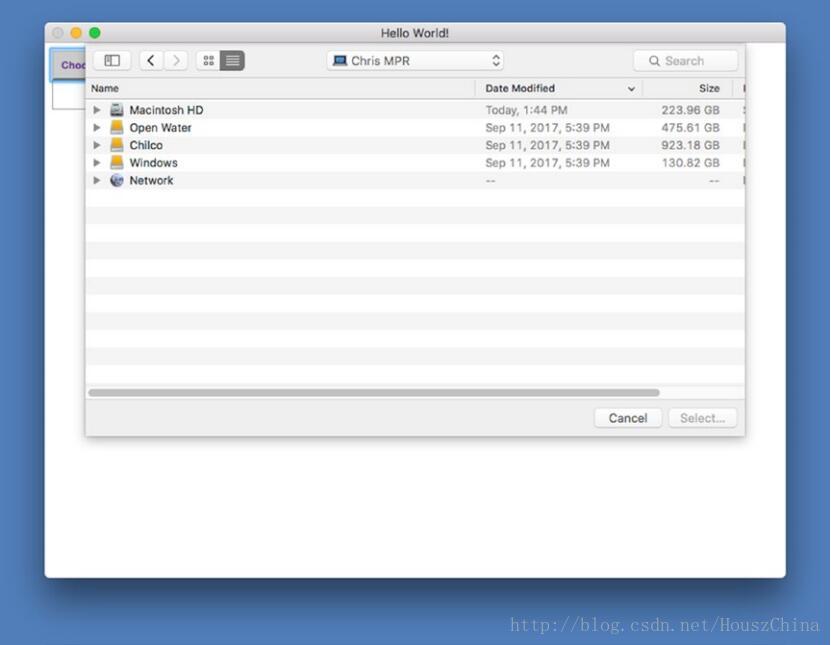
Figure 7-4. The Open File dialog on macOS attached to the Application Window
如果不将对话框附着在应用程序窗口,注意对话框不会自动居中,而需要手动定位。如果要将对话框直接附着在应用程序窗口,只需将程序窗口的引用传入对话框的show方法即可。以下是显示选择对话框的基本代码。一旦用户选择了一个文件,代码将想渲染进程发送一个包含所选文件信息的IPC事件:
dialog.showOpenDialog(mainWindow, {
  title: 'Select a file...',
  properties: ['openFile'],
  defaultPath: '/Users/<username>/Documents/',
  buttonLabel: "Select...",
  filters: [
    { name: 'Images', extensions: ['jpg', 'png', 'gif'] },
    { name: 'Text', extensions: ['txt'] }
  ]
}, function (files) {
  if (files) event.sender.send('selected-directory', files)
})
只要记住,如果你的应用要支持多窗口,就必须确保将正确的窗口实例附着到对话框上。