转载请注明出处,原文链接:https://blog.csdn.net/u013642500/article/details/80515227
【本文适用读者】
知道 Fragment 是什么,不知道如何用代码创建者。
【AS版本】

【前言】
在 Android 中有两个包含有 Fragment 类,分别是 android.support.v4.app.Fragment 和 android.app.Fragment。
他们的区别是兼容性问题,在最低版本 minSdkVersion 大于等于26时,大可以使用 android.app.Fragment,而最低版本 minSdkVersion 小于26时,强烈推荐使用 android.support.v4.app.Fragment,因为该包正是为了兼容低版本 Android 而出现的。
相信你们在网上查到了以下两点:
1、android.app.Fragment 兼容的最低版本 minSdkVersion 是 11,即Android 3.0。
2、android.support.v4.app.Fragment 兼容的最低版本 minSdkVersion 是 4,即 Android 1.6。
而现在的 Android Studio 新建项目时,可选择的最低版本 minSdkVersion 最少是 14,即 Android 4.0。即使你的项目的最低版本 minSdkVersion 大于 11,小于 26,却还是推荐使用 android.support.v4.app.Fragment 呢?
还是因为兼容性,FragmentManager 对象的诸如 getFragments 方法、unregisterFragmentLifecycleCallbacks 方法、registerFragmentLifecycleCallbacks 方法、getPrimaryNavigationFragment 方法、isStateSaved 方法等,都需要最低版本 minSdkVersion 大于等于 26。如果不使用这些方法,也大可以使用 android.app.Fragment。
【新建Fragment】
第一种方法:
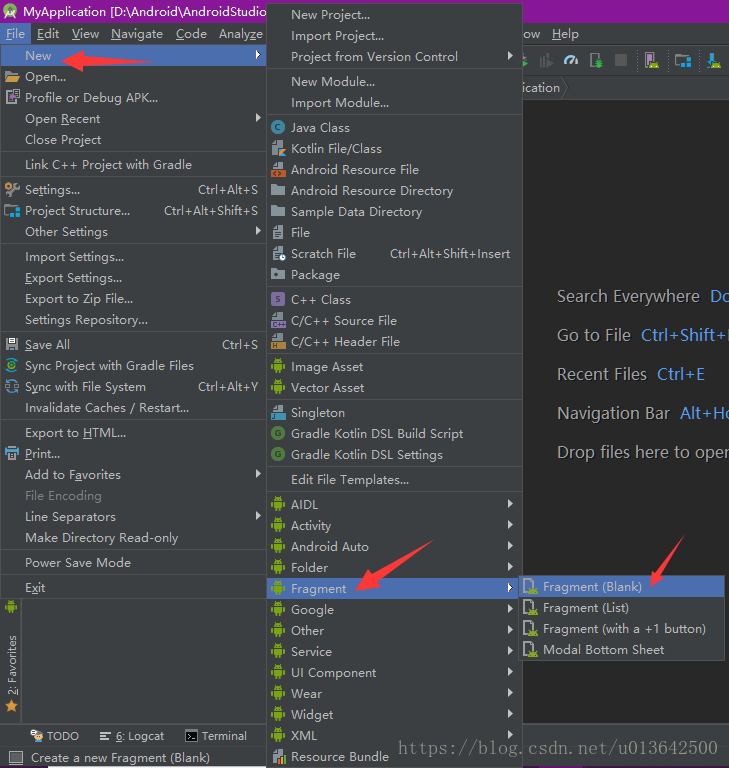
1、右键单击目录,或者打开菜单栏 File,然后 new → Fragment → Fragment(Blank)。

2、因为要使用最简单的 Fragment,所以取消勾选以下两个选项:
Include fragment factory method?
Include interface callbacks?
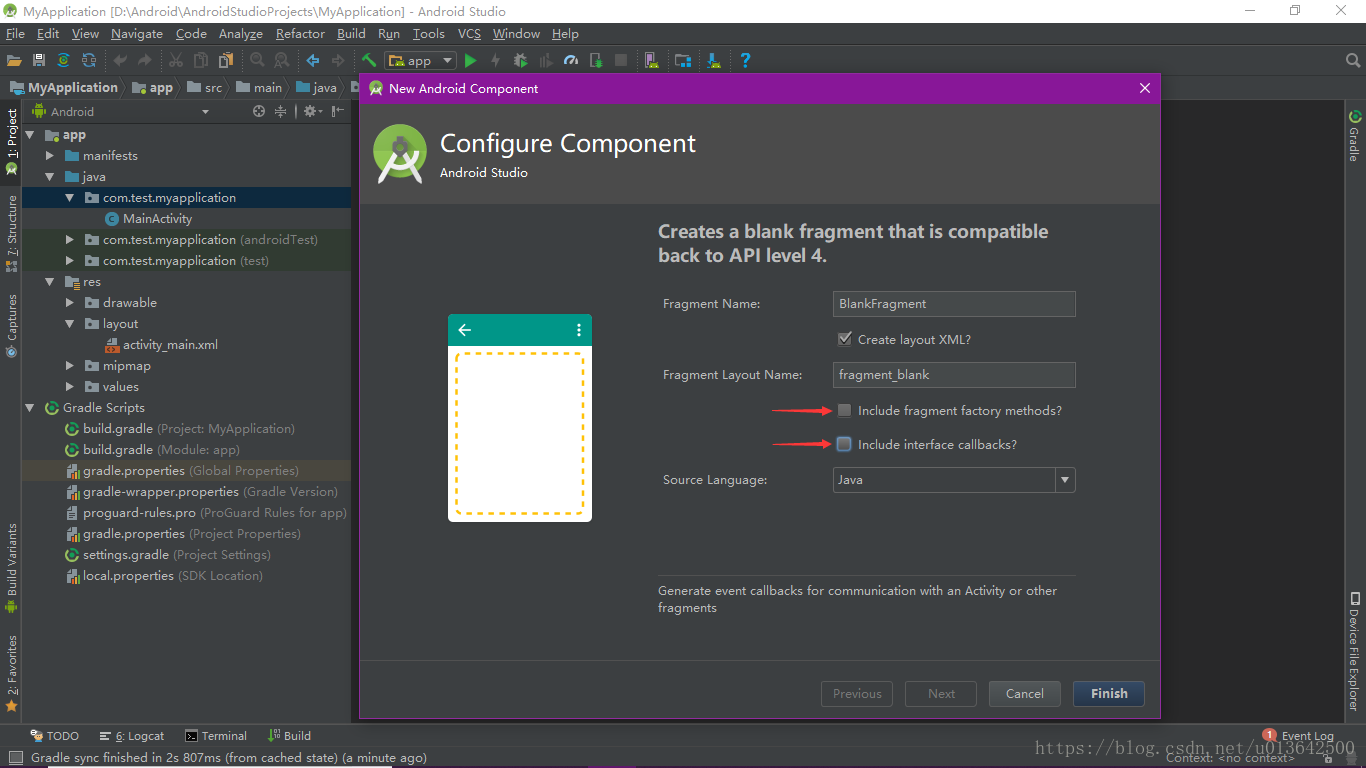
3、新建完毕,默认代码如下(继承自 android.support.v4.app.Fragment):
package com.test.myapplication;

import android.os.Bundle;
import android.support.v4.app.Fragment;
import android.view.LayoutInflater;
import android.view.View;
import android.view.ViewGroup;

/**
 * A simple {@link Fragment} subclass.
 */
public class BlankFragment extends Fragment {

    public BlankFragment() {
        // Required empty public constructor
    }

    @Override
    public View onCreateView(LayoutInflater inflater, ViewGroup container,
                             Bundle savedInstanceState) {
        // Inflate the layout for this fragment
        return inflater.inflate(R.layout.fragment_blank, container, false);
    }
}
第二种方法:
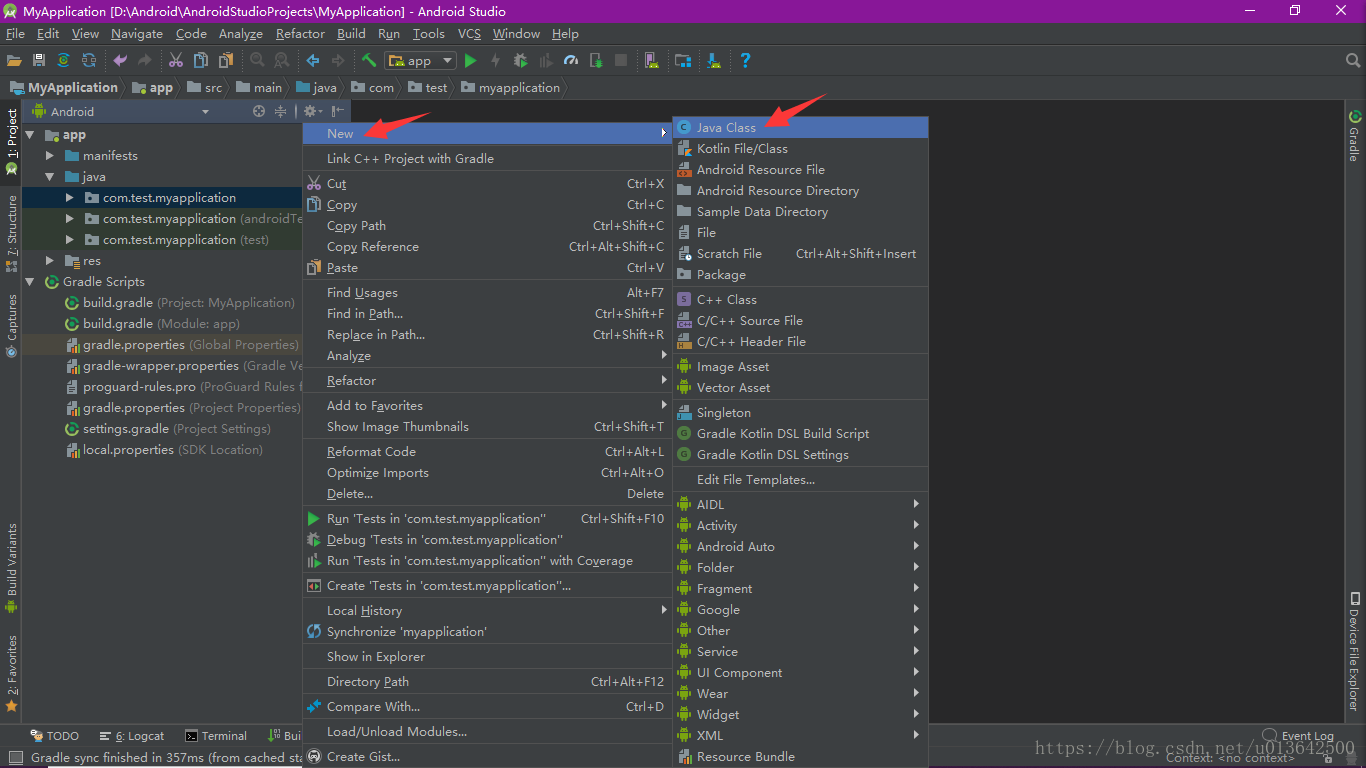
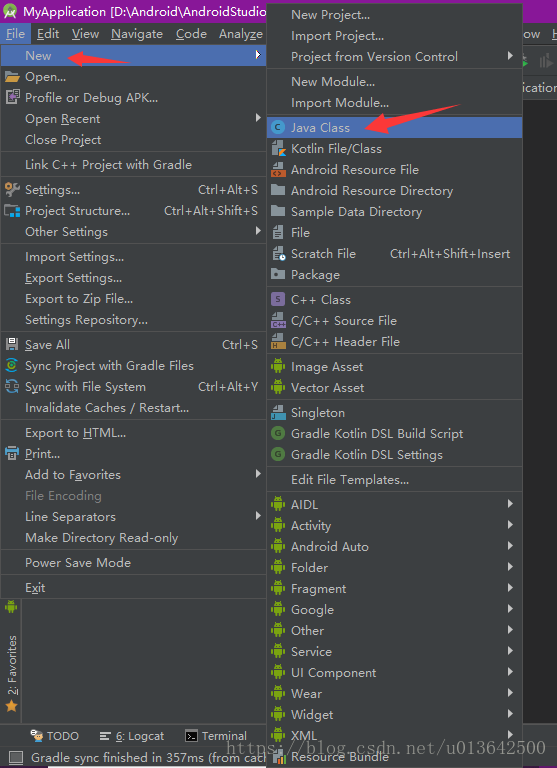
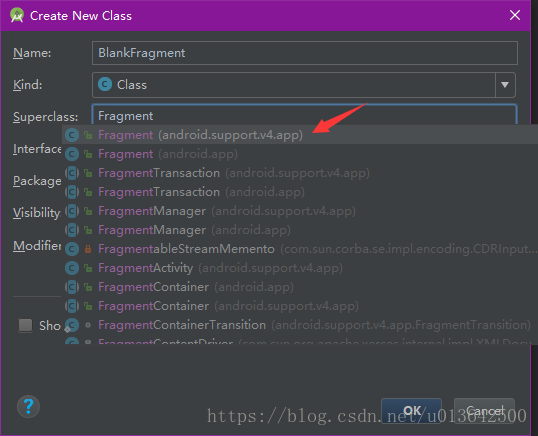
1、右键单击目录,或者打开菜单栏 File,然后 new → Java Class。
2、Name 处写 BlankFragment,Superclass 写 Fragment,然后选择 Fragment (android.support.v4.app)。
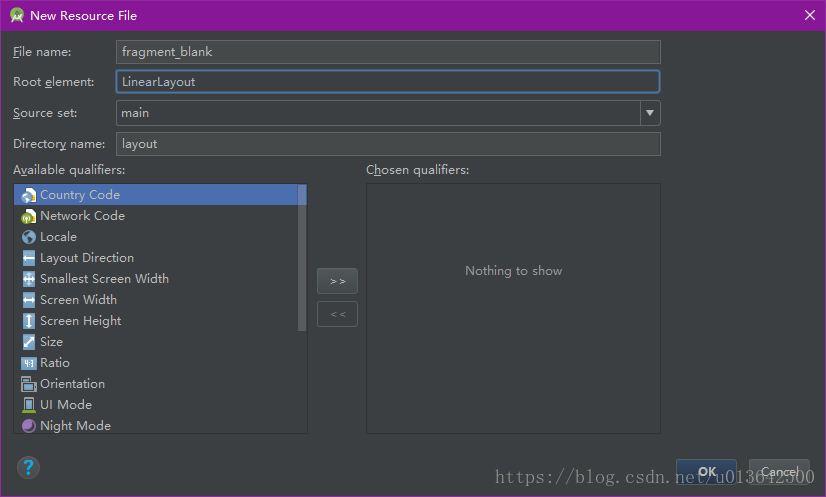
3、新建一个 Fragment 布局,命名为 fragment_blank.xml。
【使用Fragment】
1、修改随 Fragment 一起新建出来的(第一种方法),或自己新建出来的布局文件 fragment_blank.xml(第一种方法)。给其添加两个控件:一个 TextView,一个 Button。
<?xml version="1.0" encoding="utf-8"?>
<LinearLayout xmlns:android="http://schemas.android.com/apk/res/android"
    android:layout_width="match_parent"
    android:layout_height="match_parent"
    android:orientation="vertical">

    <TextView
        android:id="@+id/txtFragment"
        android:layout_width="match_parent"
        android:layout_height="wrap_content"
        android:text="@string/hello_blank_fragment" />

    <Button
        android:id="@+id/btnFragment"
        android:layout_width="wrap_content"
        android:layout_height="wrap_content"
        android:text="按钮" />
</LinearLayout>
2、回到我们新建 BlankFragment.java 文件中,修改其中的 onCreateView 方法。首先实例化一个 View 对象,最后返回这个 View 对象。其中的布局文件 fragment_blank 就是系统自带的(第一种方法)或自己新建的(第二种方法)。
    @Override
    public View onCreateView(LayoutInflater inflater, ViewGroup container,
                             Bundle savedInstanceState) {
        View view = inflater.inflate(R.layout.fragment_blank, container, false);

        return view;
    }
3、在 onCreateView 方法,通过 view.findViewById 方法,获取布局文件 fragment_blank.xml 中的控件。
    @Override
    public View onCreateView(LayoutInflater inflater, ViewGroup container,
                             Bundle savedInstanceState) {
        View view = inflater.inflate(R.layout.fragment_blank, container, false);

        TextView textView = view.findViewById(R.id.txtFragment);
        Button button = view.findViewById(R.id.btnFragment);

        return view;
    }
4、使用两个控件,这里我们写一个按钮点击事件监听。
    @Override
    public View onCreateView(LayoutInflater inflater, ViewGroup container,
                             Bundle savedInstanceState) {
        View view = inflater.inflate(R.layout.fragment_blank, container, false);

        final TextView textView = view.findViewById(R.id.txtFragment);
        Button button = view.findViewById(R.id.btnFragment);

        button.setOnClickListener(new View.OnClickListener() {
            @Override
            public void onClick(View v) {
                textView.setText("点击了按钮");
            }
        });

        return view;
    }
5、修改 MainActivity 的布局文件 activity_main.xml ,给最外层布局一个 id 为 container,然后添加一个按钮控件。
<?xml version="1.0" encoding="utf-8"?>
<android.support.constraint.ConstraintLayout xmlns:android="http://schemas.android.com/apk/res/android"
    xmlns:app="http://schemas.android.com/apk/res-auto"
    android:id="@+id/container"
    android:layout_width="match_parent"
    android:layout_height="match_parent">

    <Button
        android:id="@+id/btnActivity"
        android:layout_width="wrap_content"
        android:layout_height="wrap_content"
        android:text="呈现Fragment"
        app:layout_constraintBottom_toBottomOf="parent"
        app:layout_constraintEnd_toEndOf="parent"
        app:layout_constraintStart_toStartOf="parent"
        app:layout_constraintTop_toTopOf="parent" />
</android.support.constraint.ConstraintLayout>
6、回到 MainActivity.java(要绑定 Fragment 的 Activity),在 onCreate 方法中,写一个按钮的点击事件监听。
    @Override
    protected void onCreate(Bundle savedInstanceState) {
        super.onCreate(savedInstanceState);
        setContentView(R.layout.activity_main);

        findViewById(R.id.btnActivity).setOnClickListener(new View.OnClickListener() {
            @Override
            public void onClick(View v) {

            }
        });
    }
7、在点击事件监听中,首先获取 FragmentManager。
这里有两个方法:getFragmentManager 和 getSupportFragmentManager。
其中 getFragmentManager 方法对应的是 android.app.Fragment;
getSupportFragmentManager 方法对应的是 android.support.v4.app.Fragment。
这里使用的方法要与新建的 BlankFragment 继承的 Fragment 类所在包一致,即 android.support.v4.app.Fragment,所以使用 getSupportFragmentManager 方法。
FragmentManager fragmentManager = getSupportFragmentManager();
8、获取 FragmentTransaction。
FragmentTransaction fragmentTransaction = fragmentManager.beginTransaction();9、用 add 方法给 FragmentTransaction 添加新建的 BlankFragment。第一个参数传入 MainActivity 的布局文件中最外层布局的 id,第二个参数传入一个 BlankFragment 对象。
fragmentTransaction.add(R.id.container, new BlankFragment());10、提交 FragmentTransaction。
fragmentTransaction.commit();以上 9 - 10 步可以合并到一起写,这样就不用一个一个实例化对象了。
                getSupportFragmentManager().beginTransaction()
                        .add(R.id.container, new BlankFragment())
                        .commit();
【成果】
【注意事项】
如果完全按照本文所述操作,会出现一个小问题,详看下一篇文章:“【Android】从无到有:手把手一步步教你使用最简单的Fragment(二)”(https://blog.csdn.net/u013642500/article/details/80579389)
【源代码】
MainActivity.java:
package com.test.myapplication;

import android.os.Bundle;
import android.support.v7.app.AppCompatActivity;
import android.view.View;

public class MainActivity extends AppCompatActivity {

    @Override
    protected void onCreate(Bundle savedInstanceState) {
        super.onCreate(savedInstanceState);
        setContentView(R.layout.activity_main);

        findViewById(R.id.btnActivity).setOnClickListener(new View.OnClickListener() {
            @Override
            public void onClick(View v) {
                getSupportFragmentManager().beginTransaction()
                        .add(R.id.container, new BlankFragment())
                        .commit();
            }
        });
    }
}
activity_main.xml:
<?xml version="1.0" encoding="utf-8"?>
<android.support.constraint.ConstraintLayout xmlns:android="http://schemas.android.com/apk/res/android"
    xmlns:app="http://schemas.android.com/apk/res-auto"
    android:id="@+id/container"
    android:layout_width="match_parent"
    android:layout_height="match_parent">

    <Button
        android:id="@+id/btnActivity"
        android:layout_width="wrap_content"
        android:layout_height="wrap_content"
        android:text="呈现Fragment"
        app:layout_constraintBottom_toBottomOf="parent"
        app:layout_constraintEnd_toEndOf="parent"
        app:layout_constraintStart_toStartOf="parent"
        app:layout_constraintTop_toTopOf="parent" />
</android.support.constraint.ConstraintLayout>
BlankFragment.java:
package com.test.myapplication;

import android.os.Bundle;
import android.support.v4.app.Fragment;
import android.view.LayoutInflater;
import android.view.View;
import android.view.ViewGroup;
import android.widget.Button;
import android.widget.TextView;

/**
 * A simple {@link Fragment} subclass.
 */
public class BlankFragment extends Fragment {

    public BlankFragment() {
        // Required empty public constructor
    }

    @Override
    public View onCreateView(LayoutInflater inflater, ViewGroup container,
                             Bundle savedInstanceState) {
        View view = inflater.inflate(R.layout.fragment_blank, container, false);

        final TextView textView = view.findViewById(R.id.txtFragment);
        Button button = view.findViewById(R.id.btnFragment);

        button.setOnClickListener(new View.OnClickListener() {
            @Override
            public void onClick(View v) {
                textView.setText("点击了按钮");
            }
        });

        return view;
    }
}
fragment_blank.xml:
<?xml version="1.0" encoding="utf-8"?>
<LinearLayout xmlns:android="http://schemas.android.com/apk/res/android"
android:layout_width="match_parent"
android:layout_height="match_parent"
android:orientation="vertical">
<TextView
android:id="@+id/txtFragment"
android:layout_width="match_parent"
android:layout_height="wrap_content"
android:text="@string/hello_blank_fragment" />
<Button
android:id="@+id/btnFragment"
android:layout_width="wrap_content"
android:layout_height="wrap_content"
android:text="按钮" />
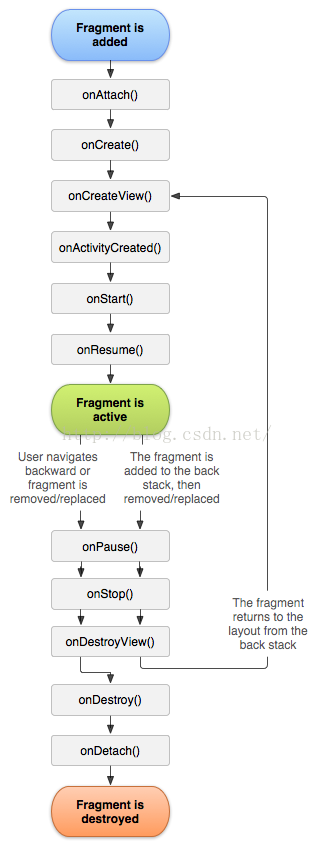
</LinearLayout>【附】
Fragment 生命周期图
【相关链接】
从无到有:手把手一步步教你使用最简单的Fragment(二)
https://blog.csdn.net/u013642500/article/details/80579389
从无到有:手把手一步步教你使用最简单的Fragment(三)
https://blog.csdn.net/u013642500/article/details/80585416
由于本人安卓知识及技术有限,本文如有错误或不足请评论指出,非常感谢!