一,mysql-mha环境准备
1.1 准备三台虚拟机
| 主机名 | IP地址 | 描述 |
| MySQL-Master | 192.168.200.130 | CentOS6.5 安装mysql5.6 |
| MySQL-SLaveA | 192.168.200.144 | CentOS6.5 安装mysql5.6 |
| MySQL-SLaveB | 192.168.200.145 | CentOS6.5 安装mysql5.6 |
1.2 准备软件包
(1)mha manager管理节点安装包
mha4mysql-manager-0.56-0.el6.noarch.rpm
mha4mysql-manager-0.56.tar.gz
(2)mha node节点安装包
mha4mysql-node-0.56-0.el6.noarch.rpm
mha4mysql-node-0.56.tar.gz
(3)mysql中间件
Atlas-2.2.1.el6.x86_64.rpm
(4)mysql源码包
mysql-5.6.17-linux-glibc2.5-x86_64.tar
1.3 主机名映射
1 [root@MySQL-Master ~]# echo "192.168.200.130 MySQL-Master" >> /etc/hosts
2 [root@MySQL-Master ~]# echo "192.168.200.144 MySQL-SlaveA" >> /etc/hosts
3 [root@MySQL-Master ~]# echo "192.168.200.144 MySQL-SlaveB" >> /etc/hosts
4 [root@MySQL-Master ~]# cat /etc/hosts
5 127.0.0.1   localhost localhost.localdomain localhost4 localhost4.localdomain4
6 ::1         localhost localhost.localdomain localhost6 localhost6.localdomain6
7 192.168.200.130 MySQL-Master
8 192.168.200.144 MySQL-SlaveA
9 192.168.200.144 MySQL-SlaveB
1.4 关闭selinux和iptables
 1 [root@MySQL-Master ~]# vim /etc/sysconfig/selinux
 2 [root@MySQL-Master ~]# cat /etc/sysconfig/selinux
 3
 4 # This file controls the state of SELinux on the system.
 5 # SELINUX= can take one of these three values:
 6 #     enforcing - SELinux security policy is enforced.
 7 #     permissive - SELinux prints warnings instead of enforcing.
 8 #     disabled - No SELinux policy is loaded.
 9 SELINUX=disabled
10 # SELINUXTYPE= can take one of these two values:
11 #     targeted - Targeted processes are protected,
12 #     mls - Multi Level Security protection.
13 SELINUXTYPE=targeted
14
15 [root@MySQL-Master ~]# setenforce 0
16 [root@MySQL-Master ~]# service iptables stop   #关闭防火墙
17 [root@MySQL-Master ~]# chkconfig iptables off  #关闭防火墙开机启动
18 [root@MySQL-Master ~]#
二,简介
2.1 软件介绍
(1)MHA(Master High Availability)目前在MySQL高可用方面是一个相对成熟的解决方案,是一套优 秀的作为MySQL高可用性环境下故障切换和主从提升的高可用软件。在MySQL故障切换过程中,MHA能做到0~30秒之内自动完成数据库的故障切换操作,并且在进行故障切换过程中,MHA能最大程度上保证数据库的一致性,以达到真正意义上的高可用。
(2)MHA由两部分组成:MHA Manager(管理节点)和MHA Node(数据节点)。MHA Manager可以独立部署在一台独立的机器上管理多个Master-Slave集群,也可以部署在一台Slave上。当Master出现故障时,它可以自动将最新数据的Slave提升为新的Master,然后将所有其他的Slave重新指向新的Master。整个故障转移过程对应程序是完全透明的。
2.2 工作流程
(1)从宕机崩溃的master保存二进制日志事件(binlog events)
(2)识别含有最新更新的slave
(3)应用差异的中继日志(relay log)到其他的slave
(4)应用从master保存的二进制日志事件(binlog events)
(5)提升一个slave为新的master
(6)使其他的slave连接新的master进行复制
2.3 MHA工具
 1 #Manager工具包主要包括以下几个工具:
 2
 3 masterha_check_ssh          #检查MHA的SSH配置状况
 4 masterha_check_repl         #检查MySQL复制状况
 5 masterha_check_status       #检测当前MHA运行状态
 6 masterha_master_monitor     #检测master是否宕机
 7 masterha_manger             #启动MHA
 8 masterha_master_switch      #控制故障转移(自动或者手动)
 9 masterha_conf_host          #添加或删除配置的server信息
10 masterha_secondary_check    #试图建立TCP连接从远程服务器
11 masterha_stop               #停止MHA
12
13 #Node工具包主要包括以下几个工具:
14
15 save_binary_logs            #保存和复制master的二进制日志
16 apply_diff_relay_logs       #识别差异的中继日志事件
17 filter_mysqlbinlog          #去除不必要的ROLLBACK事件
18 purge_relay_logs            #清除中继日志
三,MySQL环境准备
3.1 环境检查
MySQL-Master
#系统版本
1 [root@MySQL-Master ~]# cat /etc/redhat-release
2 CentOS release 6.5 (Final)
3 [root@MySQL-Master ~]# uname -r
4 2.6.32-431.el6.x86_64
5 [root@MySQL-Master ~]# hostname -I
6 192.168.200.130
7 [root@MySQL-Master ~]#
MySQL-SlaveA
#系统版本
1 [root@localhost ~]# cat /etc/redhat-release
2 CentOS release 6.5 (Final)
3 [root@localhost ~]# uname -r
4 2.6.32-431.el6.x86_64
5 [root@localhost ~]# hostname -I
6 192.168.200.144
MySQL-SlaveB
#系统版本
1 [root@localhost ~]# cat /etc/redhat-release
2 CentOS release 6.5 (Final)
3 [root@localhost ~]# uname -r
4 2.6.32-431.el6.x86_64
5 [root@localhost ~]# hostname -I
6 192.168.200.145
7 [root@localhost ~]#
3.2 安装MySQL
3.2.1 安装MYSQL( 由于mysql不能克隆,所以3台虚拟机都要安装)
 1 [root@MySQL-Master ~]# yum -y install ncurses-devel
 2 [root@MySQL-Master ~]# yum -y install libaio
 3 [root@MySQL-Master ~]# tar xf mysql-5.6.17-linux-glibc2.5-x86_64.tar.gz -C /usr/local/
 4 [root@MySQL-Master ~]# ln -s /usr/local/mysql-5.6.17-linux-glibc2.5-x86_64 /usr/local/mysql
 5 [root@MySQL-Master ~]# useradd mysql -s /sbin/nologin -M
 6 [root@MySQL-Master ~]# /usr/local/mysql/scripts/mysql_install_db --user=mysql --basedir=/usr/local/mysql --datadir=/usr/local/mysql/data/
 7 [root@MySQL-Master ~]# /bin/cp /usr/local/mysql/support-files/my-default.cnf /etc/my.cnf
 8 [root@MySQL-Master ~]# /bin/cp /usr/local/mysql/support-files/mysql.server /etc/init.d/mysqld
 9 [root@MySQL-Master ~]# ln -s /usr/local/mysql/bin/* /usr/local/bin/
10 [root@MySQL-Master ~]# which mysqladmin
11 /usr/local/bin/mysqladmin
3.2.2 加入开机自启动并启动mysql
1 [root@MySQL-Master ~]# chkconfig mysqld on
2 [root@MySQL-Master ~]# chkconfig mysqld --list
3 mysqld          0:off   1:off   2:on    3:on    4:on    5:on    6:off
4 [root@MySQL-Master ~]# /etc/init.d/mysqld start
5 Starting MySQL. SUCCESS!
3.2.2 设置mysql密码
1 [root@MySQL-Master ~]# mysqladmin -uroot password '123123'
四,配置基于GTID的主从复制
4.1 满足的条件
主库和从库都要开启binlog日志
主库和从库的server-id不能相同
要有主从复制账户
4.2 主库操作(MySQL-Master)
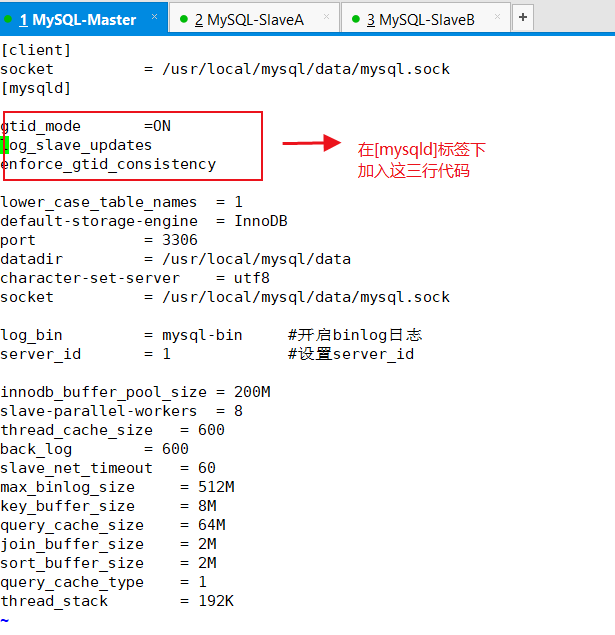
4.2.1 修改主库配置文件
 1 [root@MySQL-Master ~]# cat /etc//my.cnf
 2 [client]
 3 socket          = /usr/local/mysql/data/mysql.sock
 4 [mysqld]
 5 lower_case_table_names  = 1
 6 default-storage-engine  = InnoDB
 7 port            = 3306
 8 datadir         = /usr/local/mysql/data
 9 character-set-server    = utf8
10 socket          = /usr/local/mysql/data/mysql.sock
11
12 log_bin         = mysql-bin     #开启binlog日志
13 server_id       = 1             #设置server_id
14
15 innodb_buffer_pool_size = 200M
16 slave-parallel-workers  = 8
17 thread_cache_size   = 600
18 back_log        = 600
19 slave_net_timeout   = 60
20 max_binlog_size     = 512M
21 key_buffer_size     = 8M
22 query_cache_size    = 64M
23 join_buffer_size    = 2M
24 sort_buffer_size    = 2M
25 query_cache_type    = 1
26 thread_stack        = 192K
重启MySQL服务
1 [root@MySQL-Master ~]# /etc/init.d/mysqld restart
2 Shutting down MySQL.. SUCCESS!
3 Starting MySQL.. SUCCESS!
4.2.2 登录MySQL删除不必要的用户并创建主从复制账户
(1)删除不必要的用户
1 [root@MySQL-Master ~]# mysql -uroot -p123123 #登录MySQL
 1 mysql> select user,host from mysql.user;
 2 +------+--------------+
 3 | user | host         |
 4 +------+--------------+
 5 | root | 127.0.0.1    |
 6 | root | ::1          |
 7 |      | localhost    |
 8 | root | localhost    |
 9 |      | mysql-master |
10 | root | mysql-master |
11 +------+--------------+
12 6 rows in set (0.01 sec)
13
14 mysql> drop user root@127.0.0.1;
15 Query OK, 0 rows affected (0.32 sec)
16
17 mysql> drop user root@'::1';
18 Query OK, 0 rows affected (0.00 sec)
19
20 mysql> drop user ' '@'localhost';
21 Query OK, 0 rows affected (0.00 sec)
22
23 mysql> drop user ' '@'mysql-master';
24 Query OK, 0 rows affected (0.00 sec)
25
26 mysql> select user,host from mysql.user;
27 +------+--------------+
28 | user | host         |
29 +------+--------------+
30 | root | localhost    |
31 | root | mysql-master |
32 +------+--------------+
33 2 rows in set (0.00 sec)
(2)创建主从复制账户
 1 mysql> grant replication slave on *.* to rep@'192.168.200.%' identified by '123123';
 2 Query OK, 0 rows affected (0.01 sec)
 3
 4 mysql> select user,host from mysql.user;
 5 +------+---------------+
 6 | user | host          |
 7 +------+---------------+
 8 | rep  | 192.168.200.% |
 9 | root | localhost     |
10 | root | mysql-master  |
11 +------+---------------+
12 3 rows in set (0.00 sec)
13
14 mysql> show grants for rep@'192.168.200.%';
15 +----------------------------------------------------------------------------------------------------------------------------+
16 | Grants for rep@192.168.200.%                                                                                               |
17 +----------------------------------------------------------------------------------------------------------------------------+
18 | GRANT REPLICATION SLAVE ON *.* TO 'rep'@'192.168.200.%' IDENTIFIED BY PASSWORD '*E56A114692FE0DE073F9A1DD68A00EEB9703F3F1' |
19 +----------------------------------------------------------------------------------------------------------------------------+
20 1 row in set (0.00 sec)
4.3 从库操作(MySQL-SlaveA和MySQL-SlaveB)
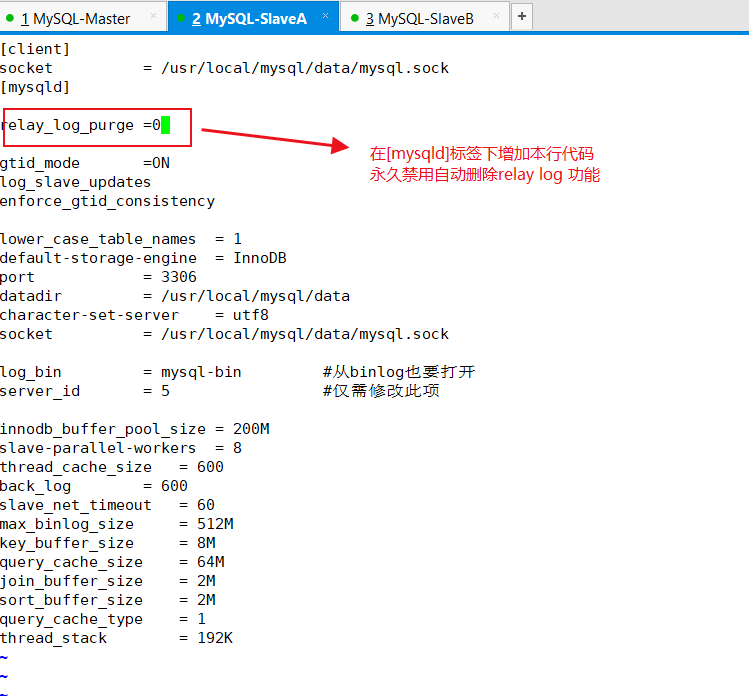
4.3.1 修改配置文件
MySQL-SlaveA配置文件与MySQL-Master相同,只需修改server-id=5 即可
 1 [root@MySQL-SlaveA ~]# cat /etc/my.cnf
 2 [client]
 3 socket          = /usr/local/mysql/data/mysql.sock
 4 [mysqld]
 5 lower_case_table_names  = 1
 6 default-storage-engine  = InnoDB
 7 port            = 3306
 8 datadir         = /usr/local/mysql/data
 9 character-set-server    = utf8
10 socket          = /usr/local/mysql/data/mysql.sock
11
12 log_bin         = mysql-bin         #从binlog也要打开
13 server_id       = 5                 #仅需修改此项
14
15 innodb_buffer_pool_size = 200M
16 slave-parallel-workers  = 8
17 thread_cache_size   = 600
18 back_log        = 600
19 slave_net_timeout   = 60
20 max_binlog_size     = 512M
21 key_buffer_size     = 8M
22 query_cache_size    = 64M
23 join_buffer_size    = 2M
24 sort_buffer_size    = 2M
25 query_cache_type    = 1
26 thread_stack        = 192K
1 [root@MySQL-SlaveA ~]# /etc/init.d/mysqld restart #重启mysql
2 Shutting down MySQL.. SUCCESS!
3 Starting MySQL. SUCCESS!
MySQL-SlaveB配置文件与MySQL-Master相同,只需修改server-id=10即可
 1 [root@MySQL-SlaveB ~]# cat /etc/my.cnf
 2 [client]
 3 socket          = /usr/local/mysql/data/mysql.sock
 4 [mysqld]
 5 lower_case_table_names  = 1
 6 default-storage-engine  = InnoDB
 7 port            = 3306
 8 datadir         = /usr/local/mysql/data
 9 character-set-server    = utf8
10 socket          = /usr/local/mysql/data/mysql.sock
11
12 log_bin         = mysql-bin     #从binlog也要打开
13 server_id       = 10            #只需修改此项
14
15 innodb_buffer_pool_size = 200M
16 slave-parallel-workers  = 8
17 thread_cache_size   = 600
18 back_log        = 600
19 slave_net_timeout   = 60
20 max_binlog_size     = 512M
21 key_buffer_size     = 8M
22 query_cache_size    = 64M
23 join_buffer_size    = 2M
24 sort_buffer_size    = 2M
25 query_cache_type    = 1
26 thread_stack        = 192K
1 [root@MySQL-SlaveB ~]# /etc/init.d/mysqld restart #重启mysql
2 Shutting down MySQL.. SUCCESS!
3 Starting MySQL. SUCCESS!
注:在以前如果是基于binlog日志的主从复制,则必须要记住主库的master状态,但是在MySQL5.6版本以后多了一个GTID功能,可以自动记录主从复制位置点的信息,并在日志中输出出来。
4.4 开启GTID
我们查看一下GTID的状态,发现是关闭的
 1 mysql> show global variables like '%gtid%';
 2 +--------------------------+-------+
 3 | Variable_name            | Value |
 4 +--------------------------+-------+
 5 | enforce_gtid_consistency | OFF   |
 6 | gtid_executed            |       |
 7 | gtid_mode                | OFF   |
 8 | gtid_owned               |       |
 9 | gtid_purged              |       |
10 +--------------------------+-------+
11 5 rows in set (0.01 sec)
修改MySQL配置文件(主库从库都要修改)
修改完配置文件重启数据库
1 [root@MySQL-Master ~]# /etc/init.d/mysqld restart
2 Shutting down MySQL.. SUCCESS!
3 Starting MySQL..................... SUCCESS!
4 [root@MySQL-SlaveA ~]# /etc/init.d/mysqld restart
5 Shutting down MySQL.. SUCCESS!
6 Starting MySQL. SUCCESS!
7 [root@MySQL-SlaveB ~]# /etc/init.d/mysqld restart
8 Shutting down MySQL.. SUCCESS!
9 Starting MySQL. SUCCESS!
再次查看GTID状态
 1 [root@MySQL-SlaveA ~]# mysql -uroot -p123123
 2 Warning: Using a password on the command line interface can be insecure.
 3 Welcome to the MySQL monitor.  Commands end with ; or \g.
 4 Your MySQL connection id is 1
 5 Server version: 5.6.17-log MySQL Community Server (GPL)
 6
 7 Copyright (c) 2000, 2014, Oracle and/or its affiliates. All rights reserved.
 8
 9 Oracle is a registered trademark of Oracle Corporation and/or its
10 affiliates. Other names may be trademarks of their respective
11 owners.
12
13 Type 'help;' or '\h' for help. Type '\c' to clear the current input statement.
14
15 mysql> show global variables like '%gtid%';
16 +--------------------------+-------+
17 | Variable_name            | Value |
18 +--------------------------+-------+
19 | enforce_gtid_consistency | ON    |
20 | gtid_executed            |       |
21 | gtid_mode                | ON    | #开启GTID模块
22 | gtid_owned               |       |
23 | gtid_purged              |       |
24 +--------------------------+-------+
25 5 rows in set (0.00 sec)
注:主库从库都要开启GTID,否则主从复制时会报错
4.5 配置主从复制(MySQL-SlaveA,MySQL-SlaveB)
1 mysql> change master to \
2     -> master_host='192.168.200.130',\     #主库IP
3     -> master_user='rep',\              #主库复制用户
4     -> master_password='123123',\       #主库复制用密码
5     -> master_auto_position=1;          #GTID位置点(自动追踪需要同步的position)
6 Query OK, 0 rows affected, 2 warnings (0.00 sec)
4.6 开启从库的主从复制功能(MySQL-SlaveA,MySQL-SlaveB)
 1 mysql> start slave;                      #开启主从同步功能
 2 Query OK, 0 rows affected, 1 warning (0.15 sec)
 3
 4 mysql> show slave status\G
 5 *************************** 1. row ***************************
 6                Slave_IO_State: Waiting for master to send event
 7                   Master_Host: 192.168.200.130
 8                   Master_User: rep
 9                   Master_Port: 3306
10                 Connect_Retry: 60
11               Master_Log_File: mysql-bin.000002
12           Read_Master_Log_Pos: 151
13                Relay_Log_File: MySQL-SlaveA-relay-bin.000002
14                 Relay_Log_Pos: 361
15         Relay_Master_Log_File: mysql-bin.000002
16              Slave_IO_Running: Yes       #yes表示成功
17             Slave_SQL_Running: Yes      #yes表示成功
18               Replicate_Do_DB:
19           Replicate_Ignore_DB:
20            Replicate_Do_Table:
21        Replicate_Ignore_Table:
22       Replicate_Wild_Do_Table:
23   Replicate_Wild_Ignore_Table:
24                    Last_Errno: 0
25                    Last_Error:
26                  Skip_Counter: 0
27           Exec_Master_Log_Pos: 151
28               Relay_Log_Space: 572
29               Until_Condition: None
30                Until_Log_File:
31                 Until_Log_Pos: 0
32            Master_SSL_Allowed: No
33            Master_SSL_CA_File:
34            Master_SSL_CA_Path:
35               Master_SSL_Cert:
36             Master_SSL_Cipher:
37                Master_SSL_Key:
38         Seconds_Behind_Master: 0
39 Master_SSL_Verify_Server_Cert: No
40                 Last_IO_Errno: 0
41                 Last_IO_Error:
42                Last_SQL_Errno: 0
43                Last_SQL_Error:
44   Replicate_Ignore_Server_Ids:
45              Master_Server_Id: 1
46                   Master_UUID: 34ea0409-eea5-11e8-b1b0-000c29812e4d
47              Master_Info_File: /usr/local/mysql/data/master.info
48                     SQL_Delay: 0
49           SQL_Remaining_Delay: NULL
50       Slave_SQL_Running_State: Slave has read all relay log; waiting for the slave I/O thread to update it
51            Master_Retry_Count: 86400
52                   Master_Bind:
53       Last_IO_Error_Timestamp:
54      Last_SQL_Error_Timestamp:
55                Master_SSL_Crl:
56            Master_SSL_Crlpath:
57            Retrieved_Gtid_Set:
58             Executed_Gtid_Set:
59                 Auto_Position: 1
60 1 row in set (0.00 sec)
4.7 从库设置(MySQL-SlaveA,MySQL-SlaveB)
 1 [root@MySQL-SlaveA ~]# mysql -uroot -p123123      #登录从库
 2 Warning: Using a password on the command line interface can be insecure.
 3 Welcome to the MySQL monitor.  Commands end with ; or \g.
 4 Your MySQL connection id is 12
 5 Server version: 5.6.17-log MySQL Community Server (GPL)
 6
 7 Copyright (c) 2000, 2014, Oracle and/or its affiliates. All rights reserved.
 8
 9 Oracle is a registered trademark of Oracle Corporation and/or its
10 affiliates. Other names may be trademarks of their respective
11 owners.
12
13 Type 'help;' or '\h' for help. Type '\c' to clear the current input statement.
14
15 mysql> set global relay_log_purge = 0;   #临时禁用自动删除relay log 功能
16 Query OK, 0 rows affected (0.00 sec)
17
18 mysql> set global read_only=1;         #设置只读
19 Query OK, 0 rows affected (0.00 sec)
编辑配置文件
修改完配置文件,重启MySQL服务
1 [root@MySQL-SlaveA ~]# /etc/init.d/mysqld restart
2 Shutting down MySQL.. SUCCESS!
3 Starting MySQL.. SUCCESS!
4
5 [root@MySQL-SlaveB ~]# /etc/init.d/mysqld restart
6 Shutting down MySQL.. SUCCESS!
7 Starting MySQL.. SUCCESS!
五,部署MHA
5.1 环境准备(三个都要装)
 1 #光盘安装依赖包
 2 [root@MySQL-Master ~]# yum -y install perl-DBD-MySQL
 3
 4 #安装mha4mysql-node-0.56-0.el6.noarch.rpm
 5 rpm -ivh rpm/mha4mysql-node-0.56-0.el6.noarch.rpm
 6 Preparing...                ########################################### [100%]
 7    1:mha4mysql-node         ########################################### [100%]
 8
 9 [root@MySQL-Master ~]# mysql -uroot -p123123
10 mysql> grant all privileges on *.* to mha@'192.168.200.%' identified by '123123';
11 Query OK, 0 rows affected (0.15 sec)
12
13 mysql> select user,host from mysql.user where user='mha';
14 +------+---------------+
15 | user | host          |
16 +------+---------------+
17 | mha  | 192.168.200.% |
18 +------+---------------+
19 1 row in set (0.12 sec)
注:主库上创建mha账户,从库自动复制
5.2 部署管理节点(mha-manager)
5.2.1 在MySQL-SlaveB上部署管理节点
 1 #使用阿里云源+epel源
 2 wget -O /etc/yum.repos.d/CentOS-Base.repo http://mirrors.aliyun.com/repo/Centos-6.repo
 3 wget -O /etc/yum.repos.d/epel-6.repo http://mirrors.aliyun.com/repo/epel-6.repo
 4
 5 #安装manager依赖包(需要公网源)
 6 yum -y install perl-Config-Tiny epel-release perl-Log-Dispatch perl-Parallel-ForkManager perl-Time-HiRes
 7
 8 #安装manager包
 9 [root@MySQL-SlaveB ~]# rpm -ivh rpm/mha4mysql-manager-0.56-0.el6.noarch.rpm
10 Preparing...                ########################################### [100%]
11    1:mha4mysql-manager      ########################################### [100%]
5.2.2 修改配置文件
 1 #创建配置文件目录
 2 [root@MySQL-SlaveB ~]# mkdir -p /etc/mha
 3
 4 #创建日志目录
 5 mkdir -p /var/log/mha/mhal
 6
 7 #创建配置文件(默认没有)
 8 [root@MySQL-SlaveB ~]# cd /etc/mha/
 9 [root@MySQL-SlaveB mha]# ls
10 [root@MySQL-SlaveB mha]# vim /etc/mha/mhal.cnf
11
12 [server default]
13 manager_log=/var/log/mha/mha1/manager     #manager管理日志存放路径
14 manager_workdir=/var/log/mha/mha1             #manager管理日志的目录路径
15 master_binlog_dir=/usr/local/mysql/data          #binlog日志的存放路径
16 user=mha                                                       #管理账户
17 password=123123                                            #管理账户密码
18 ping_interval=2                                                #存货检查的间隔时间
19 repl_user=rep                                                  #主从复制的授权账户
20 repl_password=123123                                      #主从复制的授权账户密码
21 ssh_user=root                                                  #用于ssh连接的账户
22
23 [server1]
24 hostname=192.168.200.130
25 port=3306
26
27 [server2]
28 #candidate_master=1                                #注释掉,后面解释
29 #check_repl_delay=0                                 #注释掉,后面解释
30 hostname=192.168.200.144
31 port=3306
32
33 [server3]
34 hostname=192.168.200.145
35 port=3306
36
####解释
参数:candidate_master=1
解释:设置为候选master,如果设置该参数以后,发生主从切换以后会将此从库提升为主库,即使这个主库不是集群中事件最新的slave
参数:check_repl_delay=0
解释:默认情况下如果一个slave落后master 100M的relay logs 的话,MHA将不会选择该slave作为一个新的master,因为对于这个slave的恢复需要花费很长时间,通过设置check_repl_delay=0,MHA触发切换在选择一个新的master的时候将会忽略复制延时,这个参数对于设置了candidate_master=1的主机非常有用,因为这个候选主在切换的过程中一定是新的master
5.3 配置ssh信任(3台虚拟机)
 1 #创建密钥对
 2 [root@MySQL-SlaveB ~]# ssh-keygen -t dsa -P "" -f ~/.ssh/id_dsa >/dev/null 2>&1
 3
 4 #发送MySQL-SlaveB 公钥,包括自己
 5 [root@MySQL-SlaveB  ~]# ssh-copy-id -i /root/.ssh/id_dsa.pub root@192.168.200.130
 6 [root@MySQL-SlaveB  ~]# ssh-copy-id -i /root/.ssh/id_dsa.pub root@192.168.200.144
 7 [root@MySQL-SlaveB  ~]# ssh-copy-id -i /root/.ssh/id_dsa.pub root@192.168.200.145
 8
 9 #发送MySQL-SlaveA公钥,包括自己
10 [root@MySQL-SlaveA ~]# ssh-copy-id -i /root/.ssh/id_dsa.pub root@192.168.200.130
11 [root@MySQL-SlaveA ~]# ssh-copy-id -i /root/.ssh/id_dsa.pub root@192.168.200.144
12 [root@MySQL-SlaveA ~]# ssh-copy-id -i /root/.ssh/id_dsa.pub root@192.168.200.145
13
14 #发送MySQL-Master公钥,包括自己
15 [root@MySQL-Maste ~]# ssh-copy-id -i /root/.ssh/id_dsa.pub root@192.168.200.130
16 [root@MySQL-Maste ~]# ssh-copy-id -i /root/.ssh/id_dsa.pub root@192.168.200.144
17 [root@MySQL-Maste ~]# ssh-copy-id -i /root/.ssh/id_dsa.pub root@192.168.200.145
5.4 启动测试
5.4.1 ssh检查测试
 1 [root@MySQL-SlaveB ~]# masterha_check_ssh --conf=/etc/mha/mhal.cnf
 2 Fri Nov 23 09:54:24 2018 - [warning] Global configuration file /etc/masterha_default.cnf not found. Skipping.
 3 Fri Nov 23 09:54:24 2018 - [info] Reading application default configuration from /etc/mha/mhal.cnf..
 4 Fri Nov 23 09:54:24 2018 - [info] Reading server configuration from /etc/mha/mhal.cnf..
 5 Fri Nov 23 09:54:24 2018 - [info] Starting SSH connection tests..
 6 Fri Nov 23 09:54:25 2018 - [debug]
 7 Fri Nov 23 09:54:24 2018 - [debug]  Connecting via SSH from root@192.168.200.130(192.168.200.130:22) to root@192.168.200.144(192.168.200.144:22)..
 8 Address 192.168.200.130 maps to localhost, but this does not map back to the address - POSSIBLE BREAK-IN ATTEMPT!
 9 Fri Nov 23 09:54:24 2018 - [debug]   ok.
10 Fri Nov 23 09:54:24 2018 - [debug]  Connecting via SSH from root@192.168.200.130(192.168.200.130:22) to root@192.168.200.145(192.168.200.145:22)..
11 Address 192.168.200.130 maps to localhost, but this does not map back to the address - POSSIBLE BREAK-IN ATTEMPT!
12 Address 192.168.200.145 maps to localhost, but this does not map back to the address - POSSIBLE BREAK-IN ATTEMPT!
13 Fri Nov 23 09:54:25 2018 - [debug]   ok.
14 Fri Nov 23 09:54:26 2018 - [debug]
15 Fri Nov 23 09:54:25 2018 - [debug]  Connecting via SSH from root@192.168.200.144(192.168.200.144:22) to root@192.168.200.130(192.168.200.130:22)..
16 Address 192.168.200.144 maps to localhost, but this does not map back to the address - POSSIBLE BREAK-IN ATTEMPT!
17 Address 192.168.200.130 maps to localhost, but this does not map back to the address - POSSIBLE BREAK-IN ATTEMPT!
18 Fri Nov 23 09:54:25 2018 - [debug]   ok.
19 Fri Nov 23 09:54:25 2018 - [debug]  Connecting via SSH from root@192.168.200.144(192.168.200.144:22) to root@192.168.200.145(192.168.200.145:22)..
20 Address 192.168.200.144 maps to localhost, but this does not map back to the address - POSSIBLE BREAK-IN ATTEMPT!
21 Address 192.168.200.145 maps to localhost, but this does not map back to the address - POSSIBLE BREAK-IN ATTEMPT!
22 Fri Nov 23 09:54:25 2018 - [debug]   ok.
23 Fri Nov 23 09:54:27 2018 - [debug]
24 Fri Nov 23 09:54:25 2018 - [debug]  Connecting via SSH from root@192.168.200.145(192.168.200.145:22) to root@192.168.200.130(192.168.200.130:22)..
25 Address 192.168.200.145 maps to localhost, but this does not map back to the address - POSSIBLE BREAK-IN ATTEMPT!
26 Address 192.168.200.130 maps to localhost, but this does not map back to the address - POSSIBLE BREAK-IN ATTEMPT!
27 Fri Nov 23 09:54:26 2018 - [debug]   ok.
28 Fri Nov 23 09:54:26 2018 - [debug]  Connecting via SSH from root@192.168.200.145(192.168.200.145:22) to root@192.168.200.144(192.168.200.144:22)..
29 Address 192.168.200.145 maps to localhost, but this does not map back to the address - POSSIBLE BREAK-IN ATTEMPT!
30 Address 192.168.200.144 maps to localhost, but this does not map back to the address - POSSIBLE BREAK-IN ATTEMPT!
31 Fri Nov 23 09:54:26 2018 - [debug]   ok.
32 Fri Nov 23 09:54:27 2018 - [info] All SSH connection tests passed successfully.
最后出现successfully表示成功
5.4.2 主从复制检测