MHA 简介
MHA(Master High Availability)它由日本DeNA公司youshimaton开发,是一套优秀的作为MySQL高可用性环境下故障切换和主从提升的高可用软件。在MySQL故障切换过程中,MHA能做到在0~30秒之内自动完成数据库的故障切换操作,并且在进行故障切换的过程中,MHA能在最大程度上保证数据的一致性,以达到真正意义上的高可用。
MHA软件由两部分组成:MHA Manager(管理节点)和MHA Node(数据节点)。MHA Manager可以单独部署在一台独立的机器上管理多个master-slave集群,也可以部署在一台slave节点上。MHA Node运行在每台MySQL服务器上,MHA Manager会定时探测集群中的master节点,当master出现故障时,它可以自动将最新数据的slave提升为新的master,然后将所有其他的slave重新指向新的master。整个故障转移过程对应用程序完全透明。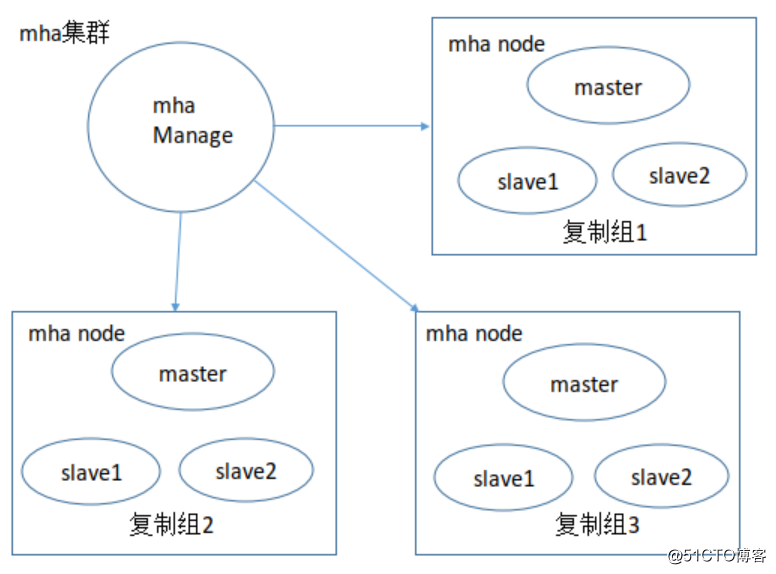
MHA工作原理
从宕机崩溃的master保存二进制日志事件(binlog events)
识别含有最新更新的slave
应用差异的中继日志(relay log)到其他的slave
应用从master保存的二进制日志事件(binlog events)
提升一个slave为新的master
使其他的slave连接新的master进行复制
MHA工具
masterha_check_ssh 检查MHA的SSH配置状况
masterha_check_repl 检查MySQL复制状况
masterha_manger 启动MHA
masterha_check_status 检测当前MHA运行状态
masterha_master_monitor 检测master是否宕机
masterha_master_switch 故障转移(自动或手动)
masterha_conf_host 添加或删除配置的server信息
MHA集群的搭建及恢复
环境准备:
- 4台centos 7主机,
172.18.153.7做mha manage主机
172.18.153.17做MySQL master主机
172.18.153.27做MySQL slave1主机
172.18.153.37做MySQL slave2主机 - mha manage服务器 安装mha4mysql-manager-0.56-0.el6.noarch.rpm和mha4mysql-node-0.56-0.el6.noarch.rpm,节点机安装mha4mysql-node-0.56-0.el6.noarch.rpm
mha下载
实验步骤
- 配置时间同步
#mha服务器上ntpServer [root@localhost ~]# vim /etc/ntp.conf restrict 127.0.0.1 #限制可以同步的主机 restrict ::1 restrict 172.18.153.0 mask 255.255.255.0 server 127.127.1.0 #以该主机的时间为标准 [root@localhost ~]#systemctl restart ntpd [root@localhost ~]#systemctl restart ntpd #开机自启动 #其他主机ntpclient [root@localhost ~]# vim /etc/ntp.conf server 172.18.153.7 iburst #确认ntpserver [root@localhost ~]# ntpdate 172.18.153.7 #生效 - 配置ssh的等效性(免密登陆)
#mha manage [root@localhost ~]# cd .ssh/ [root@localhost .ssh]# ssh-keygen [root@localhost .ssh]# ssh-copy-id localhost [root@localhost ~]# rsync -rav /root/.ssh [email protected]:/root/ [root@localhost ~]# rsync -rav /root/.ssh [email protected]:/root/ [root@localhost ~]# rsync -rav /root/.ssh [email protected]:/root/ #其他主机 [root@localhost ~]# vim /etc/ssh/ssh_config StrictHostKeyChecking no #ssh首次连接某主机不要询问yes|no - 配置主从服务器
#mysql master [root@localhost ~]# vim /etc/my.cnf [mysqld] server_id=1 datadir=/mysql/data innodb_file_per_table socket=/var/lib/mysql/mysql.sock log_bin=/mysql/logbin/master-bin binlog_format=row skip_name_resolve [root@localhost ~]# systemctl restart mariadb.service [root@localhost ~]# mysql MariaDB [(none)]> show master status; +-------------------+-----------+ | Log_name | File_size | +-------------------+-----------+ | master-bin.000001 | 245 | +-------------------+-----------+ MariaDB [(none)]> grant replication slave on *.* to repluser@'172.18.153.%' identified by 'centos'; #MySQL slave1与MySQLslave2一样 [root@localhost ~]# vim /etc/my.cnf [mysqld] [mysqld] server_id=2 datadir=/mysql/data log_bin=/mysql/logbin/slave-log read_only=1 relay_log_purge=0 skip_name_resolve=1 [root@localhost ~]# systemctl restart mariadb.service [root@localhost ~]# mysql MariaDB [(none)]> CHANGE MASTER TO -> MASTER_HOST='172.18.153.17', -> MASTER_USER='repluser', -> MASTER_PASSWORD='centos', -> MASTER_PORT=3306, -> MASTER_LOG_FILE='master-bin.000001', -> MASTER_LOG_POS=245, -> MASTER_CONNECT_RETRY=10; MariaDB [(none)]> start slave; MariaDB [(none)]> show slave status\G; - 配置mha
#mha manage安装mha manage 和mha node
[root@localhost ~]# yum -y localinstall mha4mysql-*   #安装软件
#其他主机安装mha node
[root@localhost ~]# yum localinstall mha4mysql-node-0.56-0.el6.noarch.rpm
#mha managae
[root@localhost ~]# mysql
MariaDB [(none)]> grant all on *.* to mhauser@'172.18.153.%' identified by 'centos';
[root@localhost ~]# mkdir /etc/mha
[root@localhost ~]# vim /etc/mha/app1.conf
[server default]
user=mhauser
password=centos
manager_workdir=/data/mastermha/app1/
manager_log=/data/mastermha/app1/manager.log
master_binlog_dir=/mysql/logbin
remote_workdir=/data/mastermha/app1/
ssh_user=root
repl_user=repluser
repl_password=centos
ping_interval=1
[server1]
hostname=172.18.153.17
candidate_master=1
[server2]
hostname=172.18.153.27
candidate_master=1
[server3]
hostname=172.18.153.37
mha 参数说明:
hostname
配置MySQL服务器的机器名或是IP地址,这个配置项是必须的,而且只能配置在[server_xxx]这个块下面。
candidate_master
这个参数的作用是当设计candidate_master = 1时,这个服务器有较高的优先级提升为新的master(还要具备: 开启binlog, 复制没有延迟)。 所以当设置了candidate_master = 1的机器在master故障时必然成为新的master. 但这是很有用的设置优先级的一个参数。
如果设置了多台机器的caddidate_master = 1 , 优先策略依赖于块名字([server_xxx]). [server_1] 优衔权高于[server_2].user
用于管理MySQL的用户名。这个最后需要root用户,因为它需要执行:stop slave; change master to , reset slave.
password
MySQL的管理用户的密码
repl_user
MySQL用于复制的用户,也是用于生成CHANGE MASTER TO 每个slave使用的用户。 这个用户必须有REPLICATION SLAVE权限在新的Master上。
master_binlog_dir
master上用于存储binary日志的全路径。这个参数用于当master上mysql死掉后,通过ssh连到mysql服务器上,找到需要binary日志事件
manager_workdir
用于指定mha manager产生相关状态文件全路径。 如果没设置 默认是/var/tmp
manager_log
指定mha manager的绝对路径的文件名日志文件
ping_interval
这个参数设置MHA Manager多长时间去ping一下master(执行一些SQL语句). 当失去和master三次偿试,MHA Manager会认为MySQL Master死掉了。也就是说,最大的故障切换时间是4次ping_interval的时间,默认是3秒。
remote_workdir
用于指定mha node产生相关状态文件全路径
- 检查mha
#mha manage [root@localhost ~]# masterha_check_ssh --conf=/etc/mha/app1.conf [root@localhost ~]# masterha_check_repl --conf=/etc/mha/app1.conf - 运行mha
#mha manage [root@localhost ~]# nohup masterha_manager --conf=/etc/mha/app1.conf > mharun.log & #放到后端运行,把运行结果放到文件里,检测文件 - 模拟故障,直接关掉mysql master
#mha manage上,监控日志文件,MySQL master 关闭以后日志文件立马刷新 [root@localhost ~]# tailf /data/mastermha/app1/manager.log Started automated(non-interactive) failover. The latest slave 172.18.153.27(172.18.153.27:3306) has all relay logs for recovery. Selected 172.18.153.27(172.18.153.27:3306) as a new master. 172.18.153.27(172.18.153.27:3306): OK: Applying all logs succeeded. 172.18.153.37(172.18.153.37:3306): This host has the latest relay log events. Generating relay diff files from the latest slave succeeded. 172.18.153.37(172.18.153.37:3306): OK: Applying all logs succeeded. Slave started, replicating from 172.18.153.27(172.18.153.27:3306) 172.18.153.27(172.18.153.27:3306): Resetting slave info succeeded. Master failover to 172.18.153.27(172.18.153.27:3306) completed successfully. [root@localhost ~]# tailf mharun.log Tue Oct 16 20:10:15 2018 - [warning] Global configuration file /etc/masterha_default.cnf not found. Skipping. Tue Oct 16 20:10:15 2018 - [info] Reading application default configuration from /etc/mha/app1.conf.. Tue Oct 16 20:10:15 2018 - [info] Reading server configuration from /etc/mha/app1.conf.. Tue Oct 16 20:15:12 2018 - [warning] Global configuration file /etc/masterha_default.cnf not found. Skipping. Tue Oct 16 20:15:12 2018 - [info] Reading application default configuration from /etc/mha/app1.conf.. Tue Oct 16 20:15:12 2018 - [info] Reading server configuration from /etc/mha/app1.conf.. - 在切换成功后,再开启旧的主,将旧的主设置为从。
[root@localhost ~]# vim /etc/my.cnf #增加两行配置 [mysqld] read_only=ON relay_log_purge=0 [root@localhost ~]# systemctl restart mariadb.service [root@localhost ~]# mysql Master [(none)]> CHANGE MASTER TO -> MASTER_HOST='172.18.153.27', -> MASTER_USER='repluser', -> MASTER_PASSWORD='centos', -> MASTER_PORT=3306, -> MASTER_LOG_FILE='slave-log.000003', -> MASTER_LOG_POS=245, -> MASTER_CONNECT_RETRY=10; Master [(none)]> start slave; Master [(none)]> show slave status\G; - 完成了mha数据库集群搭建和MySQL主从数据库破坏后的恢复。
错误解决
错误1:检查数据库复制情况的时候报错
Mon Jun 29 18:02:41 2015 - [error][/usr/local/share/perl5/MHA/ServerManager.pm, ln255] Got MySQL error when connecting 192.168.0.4(192.168.0.4:3306) :1045:Access denied for user 'monitor'@'192.168.0.4' (using password: YES), but this is not mysql crash. Check MySQL server settings.
解决方法:所有数据库节点都要创建监控用户,监控用户必须要
只在master上创建监控用户:但是会被复制,在MySQL主从服务器中执行
grant all on . to mhauser@'172.18.153.%' identified by 'centos';
错误2:检查数据库复制情况的时候报错
Tue Oct 16 20:06:17 2018 - [error][/usr/share/perl5/vendor_perl/MHA/ManagerUtil.pm, ln122] Got error when getting nod
Tue Oct 16 20:06:17 2018 - [error][/usr/share/perl5/vendor_perl/MHA/ManagerUtil.pm, ln123]
bash: apply_diff_relay_logs: command not found
Tue Oct 16 20:06:17 2018 - [error][/usr/share/perl5/vendor_perl/MHA/ManagerUtil.pm, ln150] node version on 172.18.153age installed ?
at /usr/share/perl5/vendor_perl/MHA/MasterMonitor.pm line 374.
Tue Oct 16 20:06:17 2018 - [error][/usr/share/perl5/vendor_perl/MHA/MasterMonitor.pm, ln424] Error happened on checki on 172.18.153.27 not found! Is MHA Node package installed ?
at /usr/share/perl5/vendor_perl/MHA/MasterMonitor.pm line 374.
...propagated at /usr/share/perl5/vendor_perl/MHA/ManagerUtil.pm line 151.
Tue Oct 16 20:06:17 2018 - [error][/usr/share/perl5/vendor_perl/MHA/MasterMonitor.pm, ln523] Error happened on monito
Tue Oct 16 20:06:17 2018 - [info] Got exit code 1 (Not master dead).
MySQL Replication Health is NOT OK!
解决方法:你的mha node服务器中没有检测到mha4mysql-node,重新安装即可,yum -y localinstall mha4mysql-node-0.56-0.el6.noarch.rpm
错误3:检查数据库复制情况的时候报错
Mon Apr 13 20:02:15 2015 - [warning] relay_log_purge=0 is not set on slave vdbsrv2(172.16.16.12:3306).
解决方法:在MySQL从服务器上mysql -e 'set global relay_log_purge=0'
relay_log_purge:是否自动清空不再需要中继日志时。默认值为1(启用)。