一. MHA简介
-
MHA ( Master High Availability )
①. 是由日本DeNA公司youshimaton开发 ,是一套优秀的实现MySQL高可用解决方案
②. 数据库的自动故障切换操作能做到在0~30秒之内完成
③. 能确保在故障切换过程中最大限度保证数据的一致性,以达到真正意义上的高可用。 -
MHA组成
①. MHA Manager ( 管理节点 ) : 管理所有数据库服务器; 可以单独部署在一台独立的机器上; 也可以部署在某台数据库服务器上
②. MHA Node ( 数据节点 ) : 存储数据的MySQL服务器 ; 运行在每台MySQL服务器上 -
MHA工作过程
由Manager管理主机定时探测集群中的master节点,当master故障时,Manager管理主机自动将拥有最新数据的slave提升为新的master
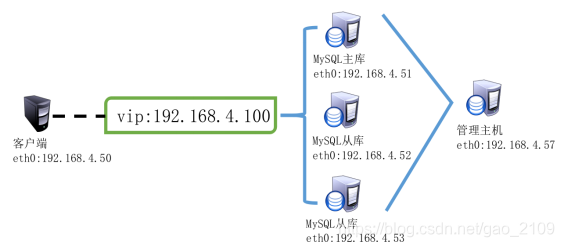
二. 搭建MHA高可用集群
1 .环境准备
步骤一: 配置ssh免密登录
[root@host51 ~]# ssh-keygen      //创建秘钥对
[root@host51 ~]# ssh-copy-id [email protected]   //传递公钥给host52主机
[root@host51 ~]# ssh-copy-id [email protected]   //传递公钥给host53主机
[root@host51 ~]# ssh [email protected]           //可以无密码连接52主机
[root@host51 ~]# ssh [email protected]           //可以无密码连接53主机

[root@host52 ~]# ssh-keygen      //创建秘钥对
[root@host52 ~]# ssh-copy-id [email protected]   //传递公钥给host51主机
[root@host52 ~]# ssh-copy-id [email protected]   //传递公钥给host53主机
[root@host52 ~]# ssh [email protected]           //可以无密码连接51主机
[root@host52 ~]# ssh [email protected]           //可以无密码连接53主机

[root@host53 ~]# ssh-keygen      //创建秘钥对
[root@host53 ~]# ssh-copy-id [email protected]   //传递公钥给host51主机
[root@host53 ~]# ssh-copy-id [email protected]   //传递公钥给host52主机
[root@host53 ~]# ssh [email protected]           //可以无密码连接51主机
[root@host53 ~]# ssh [email protected]           //可以无密码连接52主机
步骤二 : 安装依赖包(所有主机都安装,除客户端)
[root@host51 ~]# yum -y install perl-*  //安装系统自带的perl软件包
[root@host52 ~]# yum -y install perl-*  //安装系统自带的perl软件包
[root@host53 ~]# yum -y install perl-*  //安装系统自带的perl软件包
[root@mgm57 ~]# yum -y install perl-* //安装系统自带的perl软件包
步骤三: 配置MySQL一主多从结构
[root@host51 ~]# vim /etc/my.cnf
[mysqld]
log-bin=master51   //日志名
server_id=51       //指定server_id
[root@host51 ~]# systemctl restart mysqld
[root@host51 ~]# mysql -uroot -p123qqq…A
mysql> grant replication slave on *.* to repluser@"%" identified by “123qqq…A"; //添加从服务器同步数据连接用户
mysql> show master status;     //查看日志信息,偏移量
mysql: [Warning] Using a password on the command line interface can be insecure.
+-----------------+----------+--------------+------------------+-------------------+
| File            | Position | Binlog_Do_DB | Binlog_Ignore_DB | Executed_Gtid_Set |
+-----------------+----------+--------------+------------------+-------------------+
| master51.000001 |     441  |              |                  |                   |
+-----------------+----------+--------------+------------------+-------------------+


[root@host52 ~]# vim /etc/my.cnf
[mysqld]
server_id=52      //指定server_id
[root@host52 ~]# systemctl restart mysqld   //重启数据库服务
[root@host52 ~]# mysql -uroot –p123qqq…A    //数据库管理员登录
mysql> change master to                     //指定主服务器信息
master_host="192.168.4.51",                 //IP地址
master_user="repluser",                     //授权用户
master_password="123qqq...A",               //授权用户密码
master_log_file="master51.000001",          //binlog日志
master_log_pos=441;                         //偏移量
mysql> start slave;                         //启动slave进程
mysql> show slave status\G;
Master_Host: 192.168.4.51                   //主服务器Ip地址
Slave_IO_Running: Yes                       //I0线程正常
Slave_SQL_Running: Yes                      //SQL线程正常


[root@host53 ~]# vim /etc/my.cnf
[mysqld]
server_id=53      //指定server_id
[root@host53 ~]# systemctl restart mysqld   //重启数据库服务
[root@host53 ~]# mysql -uroot –p123qqq…A    //数据库管理员登录
mysql> change master to                     //指定主服务器信息
master_host="192.168.4.51",                 //IP地址
master_user="repluser",                     //授权用户
master_password="123qqq...A",               //授权用户密码
master_log_file="master51.000001",          //binlog日志
master_log_pos=441;                         //偏移量
mysql> start slave;                         //启动slave进程
mysql> show slave status\G;
Master_Host: 192.168.4.51                   //主服务器Ip地址
Slave_IO_Running: Yes                       //I0线程正常
Slave_SQL_Running: Yes                      //SQL线程正常
2 .部署MHA集群
步骤一:配置管理节点
安装软件
[root@mgm57 ~]# cd mha-soft-student/
[root@mgm57 mha-soft-student]# rpm -ivh  mha4mysql-node-0.56-0.el6.noarch.rpm     //安装mha-node软件包
[root@mgm57 mha-soft-student]# rpm -qa | grep  mha //查看是否安装成功
[root@mgm57 mha-soft-student]# tar -zxvf mha4mysql-manager-0.56.tar.gz //解压mha-manager软件包
[root@mgm57 mha-soft-student]# cd mha4mysql-manager-0.56  //进入源码目录
[root@mgm57 mha4mysql-manager-0.56]# ls  //查看文件列表
[root@mgm57 mha4mysql-manager-0.56]# perl Makefile.PL  //配置
[root@mgm57 mha4mysql-manager-0.56]#  make //编译
[root@mgm57 mha4mysql-manager-0.56]#  make install //安装
[root@mgm57 mha4mysql-manager-0.56]# ls /root/perl5/bin  //查看安装的命令
编辑主配置文件
[root@mgm57 ~ ]#  mkdir  /etc/mha  //创建工作目录
[root@mgm57 ~ ]#  cp mha4mysql-manager-0.56/sample/conf/app1.cnf /etc/mha/   //拷贝模板文件
[root@mgm57 ~ ]#  vim /etc/mha/app1.cnf   //编辑主配置文件
     [server default]                 //管理服务默认配置
                manager_workdir=/etc/mha     //工作目录
                manager_log=/etc/mha/manager.log   //日志文件
                master_ip_failover_script=/etc/mha/master_ip_failover //故障切换脚本
                 ssh_user=root  //访问ssh服务用户
                 ssh_port=22    //ssh服务端口
                 repl_user=repluser        //主服务器数据同步授权用户
                 repl_password=123qqq…A    //密码
                 user=root                 //监控用户
                 password=123qqq…A         //密码
     [server1]      //指定第1台数据库服务器
   hostname=192.168.4.51    //服务器ip地址
   port=3306                //服务端口
   candidate_master=1       //竞选主服务器

   [server2]  //指定第2台数据库服务器
   hostname=192.168.4.52
   port=3306
   candidate_master=1

   [server3]  //指定第3台数据库服务器
   hostname=192.168.4.53
     port=3306
     candidate_master=1
创建故障切换脚本
[root@mgm57 ~]# cp mha-soft-student/master_ip_failover /etc/mha/
[root@mgm57 ~]# vim +35 /etc/mha/master_ip_failover
my $vip = '192.168.4.100/24';          //Virtual IP  //定义VIP地址
my $key = "1";                   //定义变量$key
my $ssh_start_vip = "/sbin/ifconfig eth0:$key $vip"; //部署vip地址命令
my $ssh_stop_vip = "/sbin/ifconfig eth0:$key down"; //释放vip地址命令
[root@mgm57 ~]# chmod +x  /etc/mha/master_ip_failover   //给脚本加执行权限
在当前主服务器部署vip地址
    [root@host51 ~]# ifconfig  eth0:1  //部署之前查看
    eth0:1: flags=4163<UP,BROADCAST,RUNNING,MULTICAST>  mtu 1500
            ether 52:54:00:d8:10:d7  txqueuelen 1000  (Ethernet)
    [root@host51 ~]# ifconfig  eth0:1  192.168.4.100  //部署vip地址
    [root@host51 ~]# ifconfig  eth0:1 //部署后查看
    eth0:1: flags=4163<UP,BROADCAST,RUNNING,MULTICAST>  mtu 1500
            inet 192.168.4.100  netmask 255.255.255.0  broadcast 192.168.4.255
            ether 52:54:00:d8:10:d7  txqueuelen 1000  (Ethernet)
步骤二:配置数据节点
在所有数据库服务器上,安装mha-node软件包
]# cd /root/mha-soft-student/
]#  rpm -ivh mha4mysql-node-0.56-0.el6.noarch.rpm
在所有数据服务器上添加监控用户可以只在host51主机执行授权命令,host52和host53 会自动同步授权
]# mysql –uroot –p密码
mysql> grant all on  *.*  to root@"%" identified by "123qqq...A";
mysql> exit;
在2台从服务器上添加,数据同步连接用户
  [root@host52]# mysql –uroot –p密码
    mysql> grant replication slave on  *.*  to repluser@"%" identified by "123qqq...A";
    mysql> exit;

    [root@host53]# mysql –uroot –p密码
    mysql> grant replication slave on  *.*  to repluser@"%" identified by "123qqq...A";
    mysql> exit;
修改数据库服务运行参数
    [root@host51 ~]# vim /etc/my.cnf
    [mysqld]
    plugin-load="rpl_semi_sync_master=semisync_master.so;rpl_semi_sync_slave=semisync_slave.so" //加载模块
    rpl_semi_sync_master_enabled=1  //启用master模块
    rpl_semi_sync_slave_enabled=1     //启用slave模块
    relay_log_purge=0   //禁止自动删除中继日志文件
    :wq
    [root@host51 ~]#  systemctl  restart  mysqld  //重启服务

    [root@host52 ~]# vim /etc/my.cnf
    [mysqld]
    log-bin=master52
    plugin-load="rpl_semi_sync_master=semisync_master.so;rpl_semi_sync_slave=semisync_slave.so" //加载模块
    rpl_semi_sync_master_enabled=1  //启用master模块
    rpl_semi_sync_slave_enabled=1     //启用slave模块
    relay_log_purge=0   //禁止自动删除中继日志文件
    :wq
    [root@host52 ~]#  systemctl  restart  mysqld  //重启服务

  [root@host53 ~]# vim /etc/my.cnf
  [mysqld]
  log-bin=master53
  plugin-load="rpl_semi_sync_master=semisync_master.so;rpl_semi_sync_slave=semisync_slave.so" //加载模块
  rpl_semi_sync_master_enabled=1 //启用master模块
  rpl_semi_sync_slave_enabled=1 //启用slave模块
  relay_log_purge=0 //禁止自动删除中继日志文件
  :wq
  [root@host53 ~]# systemctl restart mysqld //重启服务