备注:本文基于Android5.1、Camera hal3学习,默认情况下参考代码都是5.1的,如有其它版本的源码,我会标出来的。博文是看代码分析和一些工作经验的总结,如有疑问,大家可以相互讨论,共同进步。
当前博文主要是为后续的StartPreview,takepicture等流程分析做铺垫的,在open camera->start preview过程中,其实做了很多事情。这里不去叙述上层app的事情,app五花八门不好统一介绍(等camera的博文整理完了,会结合一个案例分析Camera APP),这里只介绍一些通用的代码。这样后面看到其它版本的代码也不会那么陌生。好了,开始学习!
在进行代码流程之前我们现在来看看google给的一些猛料(camera.java注释),好让我们心里准备一下。在进行阅读源码之前,很有必要了解一下应用会做那些准备工作,以及正常的工作流程,google给的就是最权威文档,不好好看它的,那看谁的,话不多说,下面要翻译了一部分,英语过了四级,翻译不好别打我。
The Camera class is used to set image capture settings, start/stop preview,
snap pictures, and retrieve frames for encoding for video. This class is a
client for the Camera service, which manages the actual camera hardware.
To access the device camera, you must declare the
{@link android.Manifest.permission#CAMERA} permission in your Android
Manifest. Also be sure to include the uses-feature
manifest element to declare camera features used by your application.
For example, if you use the camera and auto-focus feature, your Manifest
should include the following:**uses-permission android:name=”android.permission.CAMERA”
uses-feature android:name=”android.hardware.camera”
uses-feature android:name=”android.hardware.camera.autofocus”**To take pictures with this class, use the following steps:
(为了用这个类拍照的话,请按着下面的步骤来)
- 1.Obtain an instance of Camera from {@link #open(int)}.(使用open获取一个camera.java对象)
- 2.Get existing (default) settings with {@link #getParameters()}.(获取默认的参数,这个不同平台都是能获取默认参数,例如默认支持的分辨率大小和帧率等)
- 3.If necessary, modify the returned {@link Camera.Parameters} object and call{@link #setParameters(Camera.Parameters)}.(如果需要的话,修改Parameters对象,并将参数发送给hal)
- 4.If desired, call {@link #setDisplayOrientation(int)}.(如果需要的话,设置屏幕显示方向)
- 5.Important: Pass a fully initialized {@link SurfaceHolder} to
{@link #setPreviewDisplay(SurfaceHolder)}. Without a surface, the camera
will be unable to start the preview.(这个是非常重要的,意思就是我们需要传递一个完全初始化的surfaceHolder对象给Camera.java,这样Camera native才能拿到预览buffer)- 6.Important: Call {@link #startPreview()} to start updating the
preview surface. Preview must be started before you can take a picture.(开始预览,拍照之前必须startPreview)- 7.When you want, call {@link #takePicture(Camera.ShutterCallback,
Camera.PictureCallback, Camera.PictureCallback, Camera.PictureCallback)} to
capture a photo. Wait for the callbacks to provide the actual image data.(当你调用了takePicture获取一张图片时,你必须等到图片数据传过来)- 8.After taking a picture, preview display will have stopped. To take more
photos, call {@link #startPreview()} again first.(按下拍照后,preview将停下来,如果想拍更多图片,必须重新startPreview,不过如果在ZSL模式下的话,是不需要停preview)- 9.Call {@link #stopPreview()} to stop updating the preview surface.(停止更新预览界面)
- 10.Important: Call {@link #release()} to release the camera for
use by other applications. Applications should release the camera
immediately in {@link android.app.Activity#onPause()} (and re-{@link #open()}
it in {@link android.app.Activity#onResume()}).To quickly switch to video recording mode, use these steps:
(为了快速切换录像模式,使用下面模式)
- 1.Obtain and initialize a Camera and start preview as described above.
- 2.Call {@link #unlock()} to allow the media process to access the camera.
- 3.Pass the camera to {@link android.media.MediaRecorder#setCamera(Camera)}.
See {@link android.media.MediaRecorder} information about video recording.- 4.When finished recording, call {@link #reconnect()} to re-acquire
and re-lock the camera.- 5.If desired, restart preview and take more photos or videos.
- 6.Call {@link #stopPreview()} and {@link #release()} as described above.
This class is not thread-safe, and is meant for use from one event thread.
**Most long-running operations (preview, focus, photo capture, etc) happen
asynchronously and invoke callbacks as necessary. Callbacks will be invoked
on the event thread {@link #open(int)} was called from**. This class’s methods
must never be called from multiple threads at once.Caution:Different Android-powered devices
may have different hardware specifications, such as megapixel ratings and
auto-focus capabilities. In order for your application to be compatible with
more devices, you should not make assumptions about the device camera
specifications.
有了上面的权威文档,就要按着它的来走,才不会错。
一、java fw如何响应open camera
1.camera fw open
java fw层open camera的操作都是在camera.java中实现的。如下2个open函数
//frameworks/base/core/java/android/hardware/camera.java
//第一打开制定的cameraId的camera设备
    public static Camera open(int cameraId) {
        return new Camera(cameraId);
    }

    /**
     * Creates a new Camera object to access the first back-facing camera on the
     * device. If the device does not have a back-facing camera, this returns
     * null.
     * @see #open(int)
     */
    public static Camera open() {
        int numberOfCameras = getNumberOfCameras();
        CameraInfo cameraInfo = new CameraInfo();
        for (int i = 0; i < numberOfCameras; i++) {
            getCameraInfo(i, cameraInfo);
            if (cameraInfo.facing == CameraInfo.CAMERA_FACING_BACK) {
                return new Camera(i);
            }
        }
        return null;
    }
上面2个open函数,第一个带参数是打开指定CameraID,并创建出java fw层的对象。第二个无参open方法默认打开后摄,如下根据代码看下面宏的解释.此外getNumberOfCameras()获取相机的个数,这个放到native 层去分析。
/**
 * The facing of the camera is opposite to that of the screen.
*/
 public static final int CAMERA_FACING_BACK = 0;
/**
 * The facing of the camera is the same as that of the screen.
 */
 public static final int CAMERA_FACING_FRONT = 1;
2.Java Camera构造函数
    /** used by Camera#open, Camera#open(int) */
    Camera(int cameraId) {
        int err = cameraInitNormal(cameraId);
        if (checkInitErrors(err)) {
            switch(err) {
                case EACCESS:
                    throw new RuntimeException("Fail to connect to camera service");
                case ENODEV:
                    throw new RuntimeException("Camera initialization failed");
                default:
                    // Should never hit this.
                    throw new RuntimeException("Unknown camera error");
            }
        }
} Camera.java中有3个Camera构造函数,他们基本差不多,这里我们只介绍上面这种方式(后面列举的例子就是调的这个因为Camera.open(mCameraId);)不过最后都是调用了cameraInitNormal()方法。上面只是简单直接调用cameraInitNormal()加上一些其他的参数检查,异常抛出的处理过程。
3.cameraInitNormal()
private int cameraInitNormal(int cameraId) {
        return cameraInitVersion(cameraId, CAMERA_HAL_API_VERSION_NORMAL_CONNECT);
}
private int cameraInitVersion(int cameraId, int halVersion) {
        mShutterCallback = null;
        mRawImageCallback = null;
        mJpegCallback = null;
        mPreviewCallback = null;
        mPostviewCallback = null;
        mUsingPreviewAllocation = false;
        mZoomListener = null;

        Looper looper;
        if ((looper = Looper.myLooper()) != null) {
            mEventHandler = new EventHandler(this, looper);
        } else if ((looper = Looper.getMainLooper()) != null) {
            mEventHandler = new EventHandler(this, looper);
        } else {
            mEventHandler = null;
        }

        String packageName = ActivityThread.currentPackageName();

        return native_setup(new WeakReference<Camera>(this), cameraId, halVersion, packageName);
    }
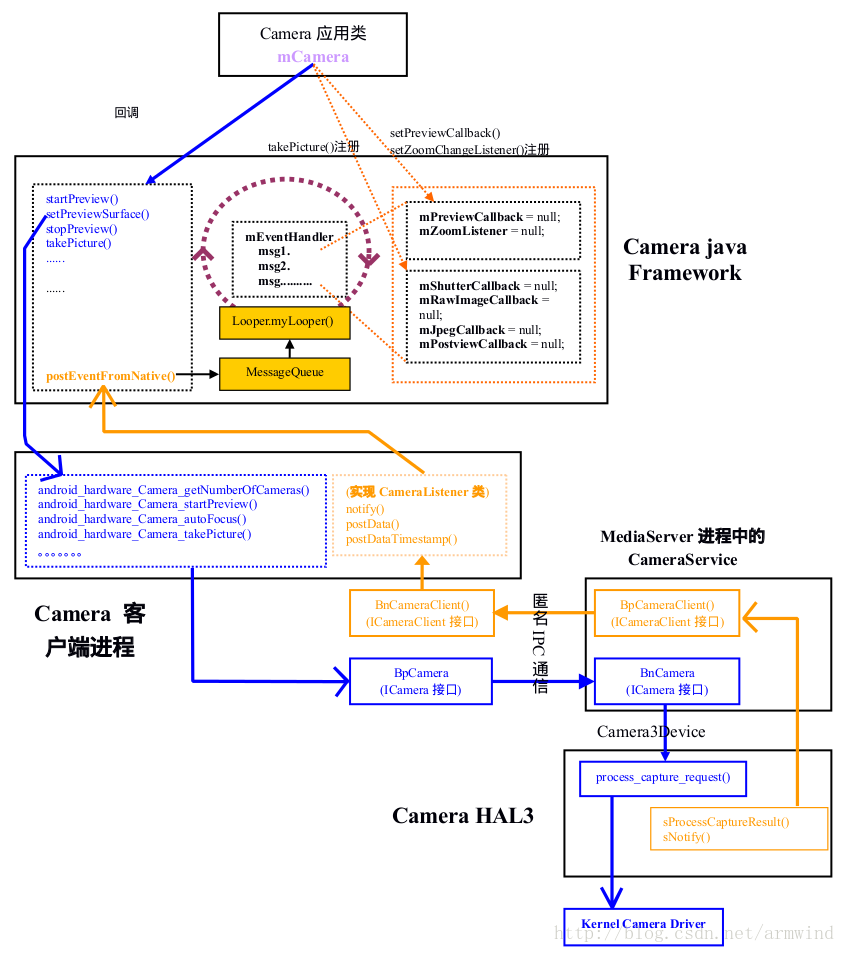
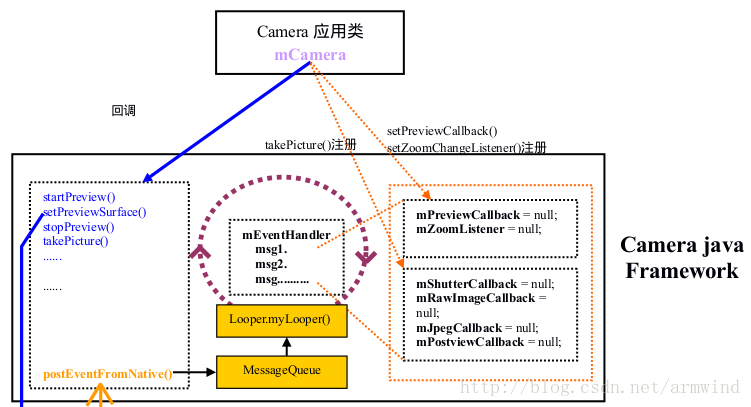
函数中初始化Camera的一些Callback,这些Callback都是camera应用中相关类来实现的。此外这里出现了一个Looper.myLooper(),这个函数中会创建一个线程,来处理时间消息。紧接着下面EventHandler对象,这个就是消息处理函数,在函数中回调我们之前注册过来的callback函数。所以我们脑海中打开可以有一个这样的整体印象,如下图所示。最后查找查找包名,进而调用native方法native_setup()做后续的初始化,这个方法我们放到下面分析。
二、jni&native fw open camera做了什么
1.getNumberOfCameras()
源码路径:/framework/base/core/jni/android_hardware_Camera.cpp
static jint android_hardware_Camera_getNumberOfCameras(JNIEnv *env, jobject thiz)
{
    return Camera::getNumberOfCameras();
}
//源码路径:/frameworks/av/camera/CameraBase.cpp
int CameraBase<TCam, TCamTraits>::getNumberOfCameras() {
    const sp<ICameraService> cs = getCameraService();

    if (!cs.get()) {
        // as required by the public Java APIs
        return 0;
    }
    return cs->getNumberOfCameras();
}
我们在调用java层无参open()函数时,会创建java层的camera对象,期间就会调到jni中的getNumberOfCameras(),该方法使用cameraservice代理对象,直接获取硬件camera个数。详情请看下面cameraService中如何处理的。
cameraService中直接就返回了camera的数量,蒙圈了,其实在手机开机过程中,mediaServer已经探测过支持多少硬件Camera了.
int32_t CameraService::getNumberOfCameras() {
    return mNumberOfCameras;
}
当手机开机时mediaServer注册CameraService时,在onFirstRef()已经探测过了。如果理解智能指针RefBase.cpp类如何使用,想必这里就好理解了。CameraService类继承了RefBase类,那么在创建CameraService对象时,onFirstRef()函数就会被调用。
void CameraService::onFirstRef()
{
    LOG1("CameraService::onFirstRef");
    BnCameraService::onFirstRef();
    //这里加载Camera的硬件抽象层动态库,系统Camera系统出现问题,最好先看看下面  //的错误log有没有打印出来。
    if (hw_get_module(CAMERA_HARDWARE_MODULE_ID,
                (const hw_module_t **)&mModule) < 0) {
        ALOGE("Could not load camera HAL module");
        mNumberOfCameras = 0;
    }
    else {
        ALOGI("Loaded \"%s\" camera module", mModule->common.name);
//这里调用对应平台HAL的标准接口,获取Camera数量,鄙人接触过的
//展讯平台HAL,会去逐个遍历所有Camera,然后将sensor的注册信息,写入一个配置文件,开机后就不需要重新扫描了,紧接着就返回Camera的数量。
        mNumberOfCameras = mModule->get_number_of_cameras();
        if (mNumberOfCameras > MAX_CAMERAS) {
            ALOGE("Number of cameras(%d) > MAX_CAMERAS(%d).",
                    mNumberOfCameras, MAX_CAMERAS);
            mNumberOfCameras = MAX_CAMERAS;
        }
        for (int i = 0; i < mNumberOfCameras; i++) {
            setCameraFree(i);//释放Camera忙原子变量
        }
        //这里CameraService继承了camera_module_callbacks_t 所以这里
        //注册到Hal的callback就是就是onDeviceStatusChanged(),主要是
        if (mModule->common.module_api_version >=
                CAMERA_MODULE_API_VERSION_2_1) {
            mModule->set_callbacks(this);
        }

        VendorTagDescriptor::clearGlobalVendorTagDescriptor();

        if (mModule->common.module_api_version >= CAMERA_MODULE_API_VERSION_2_2) {
            setUpVendorTags();
        }

        CameraDeviceFactory::registerService(this);
    }
}
上面函数主要做了硬件HAL模块加载和Camera数量探测等工作,概括就下面几条
- 1.hw_get_module(CAMERA_HARDWARE_MODULE_ID),这个函数就是专门用来加载动态库的,如果大家想了解一些细节的话,可以关注之前的博文android camera动态库加载过程.
- 2.当Hal版本大于CAMERA_MODULE_API_VERSION_2_1就将fw的onDeviceStatusChanged()callback注册到hal,用来hal通知fw,底层Camera的状态。下面是这个callback的官方解释。
Callback to the framework to indicate that the state of a specific camera
device has changed. At module load time, the framework will assume all
camera devices are in the CAMERA_DEVICE_STATUS_PRESENT state. The HAL
must call this method to inform the framework of any initially
NOT_PRESENT devices. - 3.最后还有工厂类管理类,用来注册当前服务,此外该类还用来自动的根据硬件版号创建Camera2Device,或者Camera3Device.详情请看工厂类frameworks/av/services/camera/libcameraservice/CameraDeviceFactory.h
void CameraDeviceFactory::registerService(wp<CameraService> service) {
    ALOGV("%s: Registered service %p", __FUNCTION__,
          service.promote().get());

    sService = service;
}
2.android_hardware_Camera_native_setup()
static jint android_hardware_Camera_native_setup(JNIEnv *env, jobject thiz,
    jobject weak_this, jint cameraId, jint halVersion, jstring clientPackageName)
{
    // Convert jstring to String16
    const char16_t *rawClientName = env->GetStringChars(clientPackageName, NULL);
    jsize rawClientNameLen = env->GetStringLength(clientPackageName);
    String16 clientName(rawClientName, rawClientNameLen);
    env->ReleaseStringChars(clientPackageName, rawClientName);
    //上面是从Java虚拟机运行环境中获取,应用名字,包名,这里我们不必过多关系。
    sp<Camera> camera;
    if (halVersion == CAMERA_HAL_API_VERSION_NORMAL_CONNECT) {
        // Default path: hal version is don't care, do normal camera connect.
        //这里说它不关心,其实在加载Camera hal动态模块后,就可以获取到硬件的版本号,进而创建对应版本的Camera_Device.
        camera = Camera::connect(cameraId, clientName,
                Camera::USE_CALLING_UID);
    } else {
        jint status = Camera::connectLegacy(cameraId, halVersion, clientName,
                Camera::USE_CALLING_UID, camera);
        if (status != NO_ERROR) {
            return status;
        }
    }

    if (camera == NULL) {
        return -EACCES;
    }
//这里做了一些判断Camera hal状态是否正常,以及Java fw Camera对象是否出现异常检测,此处省略代码--------------

    // We use a weak reference so the Camera object can be garbage collected.
    // The reference is only used as a proxy for callbacks.
    //这里创建了一个Camera jni的设备上下文,我们下面看看它的构造函数。
    sp<JNICameraContext> context = new JNICameraContext(env, weak_this, clazz, camera);
    context->incStrong((void*)android_hardware_Camera_native_setup);
    //设置监听
    camera->setListener(context);

    // save context in opaque field,将该对象保存到java fw camera对象中的mNativeContext变量中,便于后续其他jni获取该对象。
    env->SetLongField(thiz, fields.context, (jlong)context.get());
    return NO_ERROR;
}- (1).由java虚拟机运行环境获取客户端名字,包名等信息,为下面Camera::connect()做准备。
- (2).Camera::connect()获取native层的camera.cpp对象camera,以及操作Camera并实现ICamera.h接口的BpCamera代理对象,该对象保存到camera->mCamera成员中,便于后续与CameraService交互操作Camera.
- (3).创建jni层JNICameraContext Camera上下文对象,该对象保证了将jni层收到的底层消息和数据发送给java camera对象,这样消息,数据通路就明显了,hal->jni_native->java_fw。
- (4).设置监听函数,将由JNICameraContext实现的与java通信的函数,注册到native Camera的mListen成员中。然后在实现ICameraClient.h接口时,都是调用的mListen对象的方法,粗线条架构应该出现了。
一旦执行完毕android_hardware_Camera_native_setup()函数,camera运行过程中重量级的对象都创建完毕了。目前个人觉得重要对象如下表所示。
| 层 | 目前需要关注的对象 |
|---|---|
| Java framework | 1.目前需要关注的只有open()new出来的Camera对象(Camera.java),以及成员变量和一些由Camera应用注册过来的callback |
| JNI,native framework | 1.camera(camera.cpp) – native Camera对象 2.camera->mCamera(BpCamera) – Connect后获取到的BpCamera代理对象 3.camera->mListen(CameraListener) - -由JNICameraContext类实现的,并通过camera->setListener()设置给native camera 4.JNICameraContext对象 –专门负责与java Camera对象通信的对象 5.JNICameraContext->mCamera,就是上面创建的camera.cpp对象 |
| HAL | 这里不同平台有不同的实现,无非就是各个硬件模块的抽象对象了.针对展讯HAL将HAL抽象成各个功能模块,preview,snapshot,isp,sensor等功能模块,每一个功能模块都对应一个对象,支持多实例 |
3.Camera::connect()
(1).BpCamera代理对象
camera的连接过程使用cameraService代理对象的connect,并将BncameraClient对像,以及ICamera引用传送给CameraService,目的分别是为给client发送消息、事件做准备,以及为控制camera、获取Camera信息做准备。
    // connect to camera service (android.hardware.Camera)
    virtual status_t connect(const sp<ICameraClient>& cameraClient, int cameraId,
                             const String16 &clientPackageName, int clientUid,
                             /*out*/
                             sp<ICamera>& device)
    {
        Parcel data, reply;
        data.writeInterfaceToken(ICameraService::getInterfaceDescriptor());
        data.writeStrongBinder(cameraClient->asBinder());//这个在写binder对象后,kernel就会创建一个binder_node,并挂接到当前客户端进程的binder_proc中,同时创建引用了该binder_node对象的binder_ref对象,传送给CameraService.
        data.writeInt32(cameraId);
        data.writeString16(clientPackageName);
        data.writeInt32(clientUid);
        remote()->transact(BnCameraService::CONNECT, data, &reply);//(使用IPCThreadState)

        if (readExceptionCode(reply)) return -EPROTO;
        status_t status = reply.readInt32();
        if (reply.readInt32() != 0) {
            device = interface_cast<ICamera>(reply.readStrongBinder());//这里就返回了BpCamera代理对象,稍后我们去CameraService 里面看看。
        }
        return status;
    }
(2).BnCamera本地对象
本地对象的onTransact()实现在ICameraService,这里省略其它处理过程。
status_t BnCameraService::onTransact(
    uint32_t code, const Parcel& data, Parcel* reply, uint32_t flags)
{
    switch(code) {
    //......
        case CONNECT: {
            CHECK_INTERFACE(ICameraService, data, reply);
            sp<ICameraClient> cameraClient =
                    interface_cast<ICameraClient>(data.readStrongBinder()); //如我们上面说的,这里拿到bpCameraClient代理对象,为后面给Camera客户端进程发消息用。
            int32_t cameraId = data.readInt32();
            const String16 clientName = data.readString16();
            int32_t clientUid = data.readInt32();
            sp<ICamera> camera;
            status_t status = connect(cameraClient, cameraId, //这里本地connect()实现是在CameraService中。
                    clientName, clientUid, /*out*/camera);
            reply->writeNoException();
            reply->writeInt32(status);
            if (camera != NULL) {
                reply->writeInt32(1);
                reply->writeStrongBinder(camera->asBinder());//这里拿到的是bnCamera(ICamera),注意和上面代理对象做对比理解。
            } else {
                reply->writeInt32(0);
            }
            return NO_ERROR;
        } break;
    //......
总体上干了3件事情
- 1.获取BpCameraClient代理对象,为后续和Camera客户端进程通信做准备。
- 2.调用CameraService中的Connect,获取BnCamera本地对象。下面会进一步介绍
- 3.将BnCamera本地对象,匿名注册到mediaServer进程中的binder_proc中,然后将新生成的binder_ref对象,传送给客户端进程,以使客户端拿到BpCamera.
(3).CameraService::connect()
status_t CameraService::connect(
        const sp<ICameraClient>& cameraClient, //还记得是bpCameraClient吧,注意是代理对象
        int cameraId,
        const String16& clientPackageName,
        int clientUid,
        /*out*/
        sp<ICamera>& device) { //引用

    String8 clientName8(clientPackageName);
    int callingPid = getCallingPid();

//去掉log和校验连接的操作,详情还是去看源码吧
    sp<Client> client;
    {
        Mutex::Autolock lock(mServiceLock);
        sp<BasicClient> clientTmp;
        if (!canConnectUnsafe(cameraId, clientPackageName, //检查之前是否已经连接过,如果设备忙,直接返回
                              cameraClient->asBinder(),
                              /*out*/clientTmp)) {
            return -EBUSY;
        } else if (client.get() != NULL) { //如果之前注册过,而且设备空闲,可以直接拿到bnCamera(camera2Client)对象。
            device = static_cast<Client*>(clientTmp.get());
            return OK;
        }
        status = connectHelperLocked(/*out*/client,//如果之前没链接过,这里会生成bnCamera对象,进去看看。
                                     cameraClient,
                                     cameraId,
                                     clientPackageName,
                                     clientUid,
                                     callingPid);
        if (status != OK) {
            return status;
        }

    }
    // important: release the mutex here so the client can call back
    //    into the service from its destructor (can be at the end of the call)

    device = client;
    return OK;
}
上面主要做的是检查,确保对象唯一性,如果之前已经连接过Camera,而且设备不忙,则直接返回BnCamera对象。反之如果之前根本没注册过,那么就会重新new出来一个BnCamera对象,即Camera2client(),具体请看下面源代码。
status_t CameraService::connectHelperLocked(
        /*out*/
        sp<Client>& client,
        /*in*/
        const sp<ICameraClient>& cameraClient,
        int cameraId,
        const String16& clientPackageName,
        int clientUid,
        int callingPid,
        int halVersion,
        bool legacyMode) {

    int facing = -1;
    int deviceVersion = getDeviceVersion(cameraId, &facing);

    if (halVersion < 0 || halVersion == deviceVersion) {
        // Default path: HAL version is unspecified by caller, create CameraClient
        // based on device version reported by the HAL.
        switch(deviceVersion) {
          case CAMERA_DEVICE_API_VERSION_1_0:
            client = new CameraClient(this, cameraClient,
                    clientPackageName, cameraId,
                    facing, callingPid, clientUid, getpid(), legacyMode);
            break;
          case CAMERA_DEVICE_API_VERSION_2_0:
          case CAMERA_DEVICE_API_VERSION_2_1:
          case CAMERA_DEVICE_API_VERSION_3_0:
          case CAMERA_DEVICE_API_VERSION_3_1:
          case CAMERA_DEVICE_API_VERSION_3_2:
          //这里我是使用的google的HAL3例子来介绍的(详情请看google给的camera HAL3 例子),这里deviceVersion = CAMERA_DEVICE_API_VERSION_3_0
            client = new Camera2Client(this, cameraClient,
                    clientPackageName, cameraId,
                    facing, callingPid, clientUid, getpid(), legacyMode);
            break;
          case -1:
            ALOGE("Invalid camera id %d", cameraId);
            return BAD_VALUE;
          default:
            ALOGE("Unknown camera device HAL version: %d", deviceVersion);
            return INVALID_OPERATION;
        }
    } else {
        // A particular HAL version is requested by caller. Create CameraClient
        // based on the requested HAL version.
        if (deviceVersion > CAMERA_DEVICE_API_VERSION_1_0 &&
            halVersion == CAMERA_DEVICE_API_VERSION_1_0) {
            // Only support higher HAL version device opened as HAL1.0 device.
            client = new CameraClient(this, cameraClient,
                    clientPackageName, cameraId,
                    facing, callingPid, clientUid, getpid(), legacyMode);
        } else {
            // Other combinations (e.g. HAL3.x open as HAL2.x) are not supported yet.
            ALOGE("Invalid camera HAL version %x: HAL %x device can only be"
                    " opened as HAL %x device", halVersion, deviceVersion,
                    CAMERA_DEVICE_API_VERSION_1_0);
            return INVALID_OPERATION;
        }
    }
    //连接成功后,进行后续的初始化和注册死亡通知处理函数binderDied()
    status_t status = connectFinishUnsafe(client, client->getRemote());//
    if (status != OK) {
        // this is probably not recoverable.. maybe the client can try again
        return status;
    }

    mClient[cameraId] = client; //根据CameraID,保存当前本地对象
    LOG1("CameraService::connect X (id %d, this pid is %d)", cameraId,
         getpid());

    return OK;
}
上面主要做了,根据硬件设备的版本号,创建对应的Camera本地对象,并初始化设备,以及绑定死亡通知函数。
status_t CameraService::connectFinishUnsafe(const sp<BasicClient>& client,
                                            const sp<IBinder>& remoteCallback) {
    status_t status = client->initialize(mModule); //这里做了进一步初始化工作。
    if (status != OK) {
        ALOGE("%s: Could not initialize client from HAL module.", __FUNCTION__);
        return status;
    }
    if (remoteCallback != NULL) {
        remoteCallback->linkToDeath(this);//连接死亡通知函数指针。
    }

    return OK;
}
上面函数结构简单,请看下面初始化函数。
status_t Camera2Client::initialize(camera_module_t *module)
{
    ATRACE_CALL();
    ALOGV("%s: Initializing client for camera %d", __FUNCTION__, mCameraId);
    status_t res;

    res = Camera2ClientBase::initialize(module);
    if (res != OK) {
        return res;
    }

    {
        SharedParameters::Lock l(mParameters);

        res = l.mParameters.initialize(&(mDevice->info()), mDeviceVersion);
        if (res != OK) {
            ALOGE("%s: Camera %d: unable to build defaults: %s (%d)",
                    __FUNCTION__, mCameraId, strerror(-res), res);
            return NO_INIT;
        }
    }

    String8 threadName;

    mStreamingProcessor = new StreamingProcessor(this);
    threadName = String8::format("C2-%d-StreamProc",
            mCameraId);
    mStreamingProcessor->run(threadName.string());

    mFrameProcessor = new FrameProcessor(mDevice, this);
    threadName = String8::format("C2-%d-FrameProc",
            mCameraId);
    mFrameProcessor->run(threadName.string());

    mCaptureSequencer = new CaptureSequencer(this);
    threadName = String8::format("C2-%d-CaptureSeq",
            mCameraId);
    mCaptureSequencer->run(threadName.string());

    mJpegProcessor = new JpegProcessor(this, mCaptureSequencer);
    threadName = String8::format("C2-%d-JpegProc",
            mCameraId);
    mJpegProcessor->run(threadName.string());

    switch (mDeviceVersion) {
        case CAMERA_DEVICE_API_VERSION_2_0: {
            sp<ZslProcessor> zslProc =
                    new ZslProcessor(this, mCaptureSequencer);
            mZslProcessor = zslProc;
            mZslProcessorThread = zslProc;
            break;
        }
        case CAMERA_DEVICE_API_VERSION_3_0:
        case CAMERA_DEVICE_API_VERSION_3_1:
        case CAMERA_DEVICE_API_VERSION_3_2: { //这里我们是3_0
            sp<ZslProcessor3> zslProc =
                    new ZslProcessor3(this, mCaptureSequencer);
            mZslProcessor = zslProc;
            mZslProcessorThread = zslProc;
            break;
        }
        default:
            break;
    }
    threadName = String8::format("C2-%d-ZslProc",
            mCameraId);
    mZslProcessorThread->run(threadName.string());

    mCallbackProcessor = new CallbackProcessor(this);
    threadName = String8::format("C2-%d-CallbkProc",
            mCameraId);
    mCallbackProcessor->run(threadName.string());

    if (gLogLevel >= 1) {
        SharedParameters::Lock l(mParameters);
        ALOGD("%s: Default parameters converted from camera %d:", __FUNCTION__,
              mCameraId);
        ALOGD("%s", l.mParameters.paramsFlattened.string());
    }

    return OK;
}
上面的初始化工作非常主要,这里创建了Camera运行时需要的6大线程,每一个线程负责一个功能模块,这个后面我们会专门挑出几个模块来分析,这里只列出他们的大致功能。
- 1.StreamingProcessor:用来处理preview和录像 stream的线程。
- 2.FrameProcessor:用来处理3A和人脸识别的线程。
- 3.CaptureSequencer:拍照流程状态机线程,拍照的场景非常多,后面会发出状态机的运转流程,这里就不说了。
- 4.JpegProcessor:用来处理拍照 jpeg stream 线程
- 5.ZslProcessor3:这个处理零延时zsl stream使用的线程
- 6.mCallbackProcessor:处理callback的线程,主要包含对 callback stream 的创建函数
updateStream()以及处理 HAL 层传上来的 callback stream 的线程
4.JNICameraContext构造函数
JNICameraContext::JNICameraContext(JNIEnv* env, jobject weak_this, jclass clazz, const sp<Camera>& camera)
{ //上面weak_this就是传下来的java fw Camera弱引用,clazz
    mCameraJObjectWeak = env->NewGlobalRef(weak_this);
    mCameraJClass = (jclass)env->NewGlobalRef(clazz);//camera.java类的弱引用
    mCamera = camera;//native Camera对象保存下来
  //查找android/hardware.Camera类中的内部类Face对象的标识id.下面一些操作都是找到一些与Camera相关的类的id,进而在native可以创建java支持的并解析的数据类型。
    jclass faceClazz = env->FindClass("android/hardware/Camera$Face");
    mFaceClass = (jclass) env->NewGlobalRef(faceClazz);//

    jclass rectClazz = env->FindClass("android/graphics/Rect");
    mRectClass = (jclass) env->NewGlobalRef(rectClazz);

    jclass pointClazz = env->FindClass("android/graphics/Point");
    mPointClass = (jclass) env->NewGlobalRef(pointClazz);

    mManualBufferMode = false;
    mManualCameraCallbackSet = false;
}
JNICameraContext构造中,做了一些很关键性的工作,除了保存native Camera对象,最重要的就是找到Camera需要使用的相关类,使得Camera Client可以在native创建java能使用的数据类型(callback回去后,可以直接使用的)
5.非常重要的-设置监听
JNICameraContext类实现了CameraListener方法,而继承CameraListener类需要实现下面3个虚函数,与此同时大家在看看ICameraClient接口类中的3个方法。你也许已经猜到他们之间有暧昧关系了。先不要讲话,看源码再体会一下。
//源码路径:frameworks/av/include/camera/camera.h
class CameraListener: virtual public RefBase
{
public:
virtual void notify(int32_t msgType, int32_t ext1, int32_t ext2) = 0;
virtual void postData(int32_t msgType, const sp<IMemory>& dataPtr,
camera_frame_metadata_t *metadata) = 0;
virtual void postDataTimestamp(nsecs_t timestamp, int32_t msgType, const sp<IMemory>& dataPtr) = 0;
};
//--------------------------------------------------------------
//源码路径:frameworks/av/include/camera/ICameraClient.h
class ICameraClient: public IInterface
{
/**
* Keep up-to-date with ICameraClient.aidl in frameworks/base
*/
public:
DECLARE_META_INTERFACE(CameraClient);
virtual void notifyCallback(int32_t msgType, int32_t ext1, int32_t ext2) = 0;
virtual void dataCallback(int32_t msgType, const sp<IMemory>& data,
camera_frame_metadata_t *metadata) = 0;
virtual void dataCallbackTimestamp(nsecs_t timestamp, int32_t msgType, const sp<IMemory>& data) = 0;
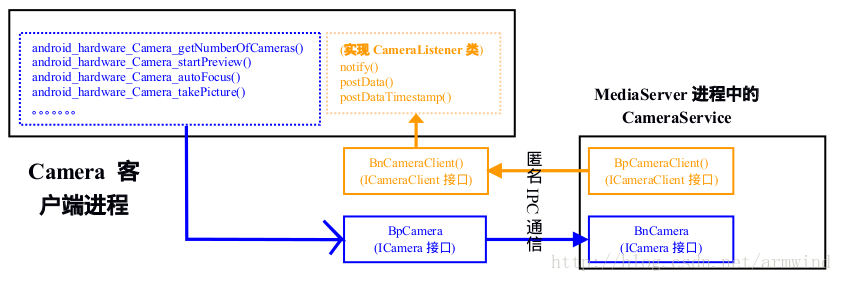
}; 实际上它俩真的有暧昧关系,如下图,我们知道CameraListener方法是与上层java fw通信的,包括消息,数据发送。然而native camera 实现了ICameraClient本地方法,并在方法中间接调用了JNICameraContext注册下来监听方法。就这样CameraService端的bpCameraClient就可以通过Binder通信方式向camera native对象发消息和数据,进而消息又通过postEventFromNative)会转发给java camera对象。整个链路如下图所示。
三、hal 如何open camera
1.camera_module_t介绍
这里就拿Android5.1 google提供的hal3模板说事吧。
extern "C" {
camera_module_t HAL_MODULE_INFO_SYM __attribute__ ((visibility("default"))) = {
    common : {
        tag                : HARDWARE_MODULE_TAG,
        module_api_version : CAMERA_MODULE_API_VERSION_2_2,
        hal_api_version    : HARDWARE_HAL_API_VERSION,
        id                 : CAMERA_HARDWARE_MODULE_ID,
        name               : "Default Camera HAL",
        author             : "The Android Open Source Project",
        methods            : &gCameraModuleMethods,
        dso                : NULL,
        reserved           : {0},
    },
    get_number_of_cameras : get_number_of_cameras,
    get_camera_info       : get_camera_info,
    set_callbacks         : set_callbacks,
    get_vendor_tag_ops    : get_vendor_tag_ops,
    open_legacy           : NULL,
    reserved              : {0},
};
主要上面结构体是每一个硬件HAL都必须实现的,google提供标准的模块接口和ops,各大终端厂商必须遵守。
- 1.get_number_of_cameras:这个是加载模块时第一个被调用的接口,获取Camera数量
- 2.get_camera_info:这个在startPreview之前,获取Camera硬件信息。
- 3.更重要的就是methods成员,当Android加载动态库后,会通过methods open方法打开设备,进而获取标准的camera3_device_ops_t结构体指针,这样cameraService native才能控制Camera 模块。
设备是在初始化Camera3Device时悄悄打开的。这里现在有些同学可能对代码还不是很熟,先了解一下就行,后面我们在分析,只要知道这样下去Camera3Device已经拿到了hal3的camera3_device_ops_t对象了。
status_t Camera3Device::initialize(camera_module_t *module) {
    ATRACE_BEGIN("camera3->open");
    res = CameraService::filterOpenErrorCode(module->common.methods->open(
        &module->common, deviceName.string(),
        reinterpret_cast<hw_device_t**>(&device)));
    ATRACE_END();
}
2.camera3_device_ops_t简介
const camera3_device_ops_t Camera::sOps = {
    .initialize = default_camera_hal::initialize,
    .configure_streams = default_camera_hal::configure_streams,
    .register_stream_buffers = default_camera_hal::register_stream_buffers,
    .construct_default_request_settings
        = default_camera_hal::construct_default_request_settings,
    .process_capture_request = default_camera_hal::process_capture_request,
    .get_metadata_vendor_tag_ops = NULL,
    .dump = default_camera_hal::dump,
    .flush = default_camera_hal::flush,
    .reserved = {0},
};这是hal3标准接口,前面5个接口的调用顺序正如他们的排列顺序一样,他们的详细解释最好看看google在头文件中介绍hardware/libhardware/include/hardware/camera3.h介绍的非常好。
- 1.construct_default_request_settings:在startpreview之前先获取硬件的一些参数,帧率,preview_size,picture_size 将这些打包成camerametadata 供app使用
- 2.configure_streams:在startpreview之前,native 要创建preview数据流,其中包含了当前请求的CameraMetadata,buffer fd及数量等信息。这里的configure_streams接口会在hal创建preview数据通道,目前发现高通和展讯的hal都是这样的。
- 3.process_capture_request:当运行环境准备好后,CameraService 会不断发送帧捕获请求,期间包含当前配置信息,帧buffer和数量,让底层去消费buffer.
四、总结
open过程道路艰辛,主要为了后续Camera正常工作,添砖加瓦,铺路。下面我们列举一下,主要都准备了什么。
- 1.Camera应用将一些Callback函数,注册到Camera.java中,以使在线程处理函数中可以调用到相应的回调函数。
- 2.camera connect成功后,创建了BpCamera代理对象和BnCameraClient本地对象。
- 3.在JNICameraContext实现CameraListener接口,并将接口注册到客户端camera本地对象中,并在BnCameraClient本地对象中回调这些接口。
- 4.CameraService connect过程中,根据hal硬件版本,创建对应的CameraClient对象。在后续的初始化过程中,创建6大线程。
最后以一个简单的工作流程图来结束博文
加油……………………