1- 下载与安装
CMD
To run Scala from the command-line, simply download the binaries and unpack the archive.
CMD : SBT(Simple Build Tool)
专门为scala语言设计的构建工具,包括运行环境,能够进行依赖管理、编译、打包等工作。
下载安装,重启系统,确认Path 变量和Classpath 变量已正确设置后,在命令行下直接运行sbt命令即可。
- http://www.scala-sbt.org/
- http://www.scala-sbt.org/documentation.html
- http://www.scala-lang.org/documentation/getting-started-sbt-track/getting-started-with-scala-and-sbt-on-the-command-line.html
- http://www.scala-lang.org/documentation/getting-started-sbt-track/testing-scala-with-sbt-on-the-command-line.html
IDE:The Scala IDE (based on Eclipse)
- SDK(http://scala-ide.org/download/sdk.html),其实是为Scala定制的Eclipse版本(将Scala及插件集成到Eclipse),解压后是一个直接可用的Eclipse。在Help---》Installation details可以查看已安装的插件包。
- Update site installation(http://scala-ide.org/download/current.html),对于已有Eclipse可以选择插件方式安装,但要注意版本匹配关系。
IDE:IntelliJ IDEA with the Scala plugin
- https://www.jetbrains.com/idea/
- https://www.jetbrains.com/help/idea/creating-and-running-your-scala-application.html
- http://www.scala-lang.org/documentation/getting-started-intellij-track/getting-started-with-scala-in-intellij.html
- http://www.scala-lang.org/documentation/getting-started-intellij-track/building-a-scala-project-with-intellij-and-sbt.html
- http://www.scala-lang.org/documentation/getting-started-intellij-track/testing-scala-in-intellij-with-scalatest.html
参考信息
- 利用IntelliJ IDEA与Maven开始你的Scala之旅:http://www.jianshu.com/p/ecc6eb298b8f
- Scala + IntelliJ IDEA:http://www.cnblogs.com/wjcx-sqh/p/6551248.html
2- 在Windows系统安装Scala
2.1- 确认已成功安装配置Java环境
C:\Users\guowli>java -version
java version "1.8.0_101"
Java(TM) SE Runtime Environment (build 1.8.0_101-b13)
Java HotSpot(TM) 64-Bit Server VM (build 25.101-b13, mixed mode)

C:\Users\guowli>javac -version
javac 1.8.0_101
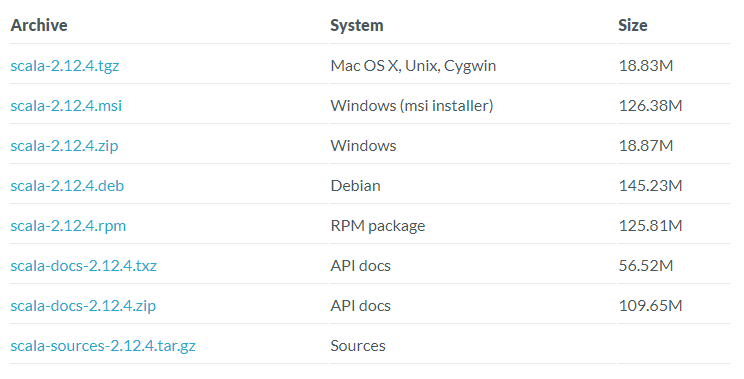
2.2- 下载安装Scala安装包
注意:
一般情况下,msi版本会自动配置环境变量,zip版本需要手动配置环境变量。
为了避免莫名其妙的问题,建议使用zip版本手动配置并确认环境变量。
2.3- 设置环境变量
我的电脑---》属性---》高级系统设置---》环境变量
新建 SCALA_HOME变量:
- 变量名:SCALA_HOME
- 变量值:Scala的安装目录

设置 Path 变量
找到系统变量下的"Path",单击编辑,添加路径:“ %SCALA_HOME%\bin;”,注意后面的分号 不要漏掉。
设置 Classpath 变量
(也可能为CLASSPATH,不区分大小写):找到找到系统变量下的"Classpath",单击编辑,添加如下内容
;%SCALA_HOME%\bin;%SCALA_HOME%\lib\dt.jar;%SCALA_HOME%\lib\tools.jar.;
如果没有,则单击"新建":
- "变量名":ClassPath
- "变量值":.;%SCALA_HOME%\bin;%SCALA_HOME%\lib\dt.jar;%SCALA_HOME%\lib\tools.jar.;
注意:"变量值"最前面的 .; 不要漏掉。最后单击确定即可。
2.4-验证
Microsoft Windows [Version 6.1.7601]
Copyright (c) 2009 Microsoft Corporation.  All rights reserved.

C:\Users\guowli>scala -version
Scala code runner version 2.12.4 -- Copyright 2002-2017, LAMP/EPFL and Lightbend, Inc.

C:\Users\guowli>sclac -version
'sclac' is not recognized as an internal or external command,
operable program or batch file.

C:\Users\guowli>scala
Welcome to Scala 2.12.4 (Java HotSpot(TM) 64-Bit Server VM, Java 1.8.0_101).
Type in expressions for evaluation. Or try :help.

scala> println("Hello Scala!")
Hello Scala!

scala> :quit

C:\Users\guowli>
2.5-scala命令帮助信息
C:\Users\guowli>scala -help
Usage: scala <options> [<script|class|object|jar> <arguments>]
   or  scala -help

All options to scalac (see scalac -help) are also allowed.

The first argument to scala after the options designates what to run.

If no argument is given, the Scala REPL, an interactive shell, is started.

Otherwise, the Scala runner will try to run the named target, either as
a compiled class with a main method, a jar file with a Main-Class manifest
header, or as a Scala source file to compile and run.

The REPL accepts expressions to evaluate. Try `:help` to see more commands.

The script runner will invoke the main method of a top-level object if
it finds one; otherwise, the script code is run locally to a synthetic
main method with arguments available in a variable `args`.

Options to scala which reach the Java runtime:

 -Dname=prop  passed directly to Java to set system properties
 -J<arg>      -J is stripped and <arg> passed to Java as-is
 -nobootcp    do not put the Scala jars on the boot classpath (slower)

Other startup options:

 -i <file>    preload <file> before starting the REPL
 -I <file>    preload <file>, enforcing line-by-line interpretation
 -e <string>  execute <string> as if entered in the REPL
 -save        save the compiled script in a jar for future use
 -nc          no compilation daemon: do not use the fsc offline compiler

If the runner does not correctly guess how to run the target:

 -howtorun    what to run <script|object|jar|guess> (default: guess)

When running a script or using -e, an already running compilation daemon
(fsc) is used, or a new one started on demand.  Use the -nc option to
create a fresh compiler instead.


C:\Users\guowli>
3- 运行第一个scala程序
3.1- 官网示例
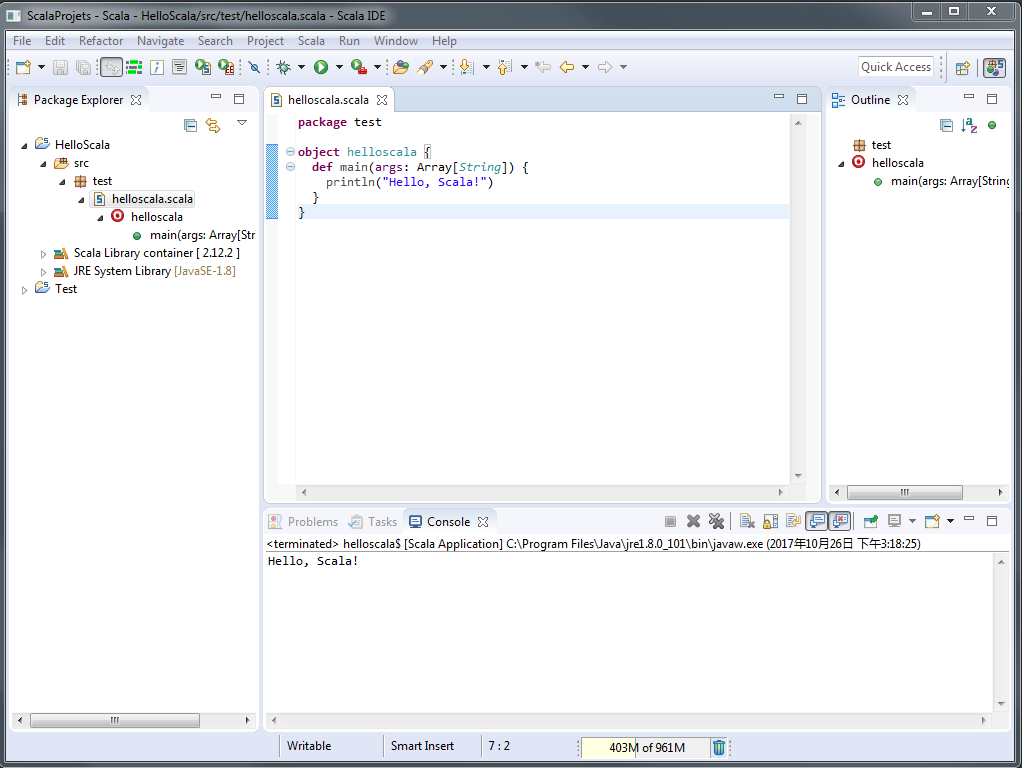
3.2- 利用Scala-IDE
- Create Scala Project : File--》New--》Scala Project--》Enter a project name.--》Next--》Check or Define the Scala build settings.---》Finsh
- Create Package : Choose src folder--》right-click,New--》Package--》Enter a package name.--》Finsh.
- Create Scala Object : Choose package--》right-click,New--》Scala Object--》Enter a object name.--》Finsh.
- Run code : Choose Scala file--》right-click,Run As--》Scala Application.
package test

object helloscala {
  def main(args: Array[String]) {
    println("Hello, Scala!")
  }
}
3.3- 命令行下的编译与执行
anliven@DESKTOP-68OFQFP MINGW64 /d/Anliven/Anliven-Code/ScalaProjects
$ mkdir Testing

anliven@DESKTOP-68OFQFP MINGW64 /d/Anliven/Anliven-Code/ScalaProjects
$ cd Testing/

anliven@DESKTOP-68OFQFP MINGW64 /d/Anliven/Anliven-Code/ScalaProjects/Testing
$ ls -l
total 0

anliven@DESKTOP-68OFQFP MINGW64 /d/Anliven/Anliven-Code/ScalaProjects/Testing
$ vim Testing.scala

anliven@DESKTOP-68OFQFP MINGW64 /d/Anliven/Anliven-Code/ScalaProjects/Testing
$ cat Testing.scala
object Testing extends App {
  println("Hello, "+args(0)+"!")
}

anliven@DESKTOP-68OFQFP MINGW64 /d/Anliven/Anliven-Code/ScalaProjects/Testing
$ scalac Testing.scala

anliven@DESKTOP-68OFQFP MINGW64 /d/Anliven/Anliven-Code/ScalaProjects/Testing
$ ls -l
total 13
-rw-r--r-- 1 anliven 197121 2752 10月 25 23:58 'Testing$.class'
-rw-r--r-- 1 anliven 197121  767 10月 25 23:58 'Testing$delayedInit$body.class'
-rw-r--r-- 1 anliven 197121  768 10月 25 23:58  Testing.class
-rw-r--r-- 1 anliven 197121   64 10月 25 23:58  Testing.scala

anliven@DESKTOP-68OFQFP MINGW64 /d/Anliven/Anliven-Code/ScalaProjects/Testing
$ scala Testing Anliven
Hello, Anliven!

anliven@DESKTOP-68OFQFP MINGW64 /d/Anliven/Anliven-Code/ScalaProjects/Testing
$ ls -l
total 13
-rw-r--r-- 1 anliven 197121 2752 10月 25 23:58 'Testing$.class'
-rw-r--r-- 1 anliven 197121  767 10月 25 23:58 'Testing$delayedInit$body.class'
-rw-r--r-- 1 anliven 197121  768 10月 25 23:58  Testing.class
-rw-r--r-- 1 anliven 197121   64 10月 25 23:58  Testing.scala

anliven@DESKTOP-68OFQFP MINGW64 /d/Anliven/Anliven-Code/ScalaProjects/Testing
$
4- REPL(Read Evaluate Print Loop)
REPL(Read-Eval-Print Loop,交互式解释器)是轻量级的交互式的程序运行环境,适用于小段程序的实验和验证。
4.1-命令行方式
$ scala
Welcome to Scala 2.12.2 (Java HotSpot(TM) 64-Bit Server VM, Java 1.8.0_131).
Type in expressions for evaluation. Or try :help.

scala> println("Hello, Scala!")
Hello, Scala!

scala> val x=1
x: Int = 1

scala> println(x)
1

scala> :quit
4.2-sbt方式
获取SBT的帮助信息:在命令行下执行“sbt -h”,或者执行“sbt”后输入help并回车。
anliven@DESKTOP-68OFQFP MINGW64 /d/Anliven
$ sbt console
[warn] No sbt.version set in project/build.properties, base directory: D:\Anliven
[info] Set current project to anliven (in build file:/D:/Anliven/)
[info] Starting scala interpreter...
Welcome to Scala 2.12.3 (Java HotSpot(TM) 64-Bit Server VM, Java 1.8.0_131).
Type in expressions for evaluation. Or try :help.

scala> println("Hello, Scala!")
Hello, Scala!

scala> val x=2
x: Int = 2

scala> println(x)
2

scala> :quit

[success] Total time: 41 s, completed 2017-10-25 23:52:39

anliven@DESKTOP-68OFQFP MINGW64 /d/Anliven
$
4.3-IDE方式
- Create Scala Project : File--》New--》Scala Project--》Enter a project name.--》Finsh
- Create Package : Choose project 》right-click,New--》Scala Worksheet--》Enter a Worksheet name.--》Finsh.
- Create code in .sc file: Save .sc file and check the output in the .sc file.
  println("Welcome to the Scala worksheet")       //> Welcome to the Scala worksheet
  var x = 1                                       //> x  : Int = 1
  println(x)                                      //> 1

5- 在Ubuntu系统安装Scala
5.1-安装JDK
root@Ubuntu16:~# apt-get update
root@Ubuntu16:~#
root@Ubuntu16:~# apt-get install openjdk-8-jre openjdk-8-jdk
root@Ubuntu16:~#
root@Ubuntu16:~# java -version
openjdk version "1.8.0_151"
OpenJDK Runtime Environment (build 1.8.0_151-8u151-b12-0ubuntu0.16.04.2-b12)
OpenJDK 64-Bit Server VM (build 25.151-b12, mixed mode)
root@Ubuntu16:~#
5.2-配置环境变量JAVA_HOME
root@Ubuntu16:~# dpkg -L openjdk-8-jdk | grep '/bin'|head -1
/usr/lib/jvm/java-8-openjdk-amd64/bin
root@Ubuntu16:~# vim ~/.bashrc
root@Ubuntu16:~# source ~/.bashrc
root@Ubuntu16:~# cat ~/.bashrc|head -1
export JAVA_HOME=/usr/lib/jvm/java-8-openjdk-amd64
root@Ubuntu16:~#
root@Ubuntu16:~# echo $JAVA_HOME
/usr/lib/jvm/java-8-openjdk-amd64
root@Ubuntu16:~#
root@Ubuntu16:~# $JAVA_HOME/bin/java -version
openjdk version "1.8.0_151"
OpenJDK Runtime Environment (build 1.8.0_151-8u151-b12-0ubuntu0.16.04.2-b12)
OpenJDK 64-Bit Server VM (build 25.151-b12, mixed mode)
root@Ubuntu16:~#
root@Ubuntu16:~# javac -version
javac 1.8.0_151
root@Ubuntu16:~# $JAVA_HOME/bin/javac -version
javac 1.8.0_151
root@Ubuntu16:~#
5.3-安装Scala
wget https://downloads.lightbend.com/scala/2.12.4/scala-2.12.4.tgz
root@Ubuntu16:~# ls -l scala-2.12.4.tgz
-rw-r--r-- 1 root root 19741785 10月 11 16:05 scala-2.12.4.tgz
root@Ubuntu16:~#
root@Ubuntu16:~# tar -zxf scala-2.12.4.tgz -C /usr/local
root@Ubuntu16:~# cd /usr/local
root@Ubuntu16:/usr/local#
root@Ubuntu16:/usr/local# mv ./scala-2.12.4/ ./scala
root@Ubuntu16:/usr/local#
root@Ubuntu16:/usr/local# chown -R root ./scala
root@Ubuntu16:/usr/local#
命令说明:“ tar -zxf scala-2.12.4.tgz -C /usr/local”
- x : 从 tar 包中把文件提取出来;
- z : 表示 tar 包是被 gzip 压缩过的,所以解压时需要用gunzip解压;
- f : 表示后面跟着的是文件;
- C:表示文件解压后转到指定的目录下
5.4-配置环境变量PATH并运行scala
root@Ubuntu16:/usr/local# vim ~/.bashrc
root@Ubuntu16:/usr/local# source ~/.bashrc
root@Ubuntu16:/usr/local# cat ~/.bashrc |head -1
export PATH=$PATH:/usr/local/scala/bin
root@Ubuntu16:/usr/local#
root@Ubuntu16:/usr/local# scala
Welcome to Scala 2.12.4 (OpenJDK 64-Bit Server VM, Java 1.8.0_151).
Type in expressions for evaluation. Or try :help.

scala> :help
All commands can be abbreviated, e.g., :he instead of :help.
:edit <id>|<line>        edit history
:help [command]          print this summary or command-specific help
:history [num]          show the history (optional num is commands to show)
:h? <string>            search the history
:imports [name name ...] show import history, identifying sources of names
:implicits [-v]          show the implicits in scope
:javap <path|class>      disassemble a file or class name
:line <id>|<line>        place line(s) at the end of history
:load <path>            interpret lines in a file
:paste [-raw] [path]    enter paste mode or paste a file
:power                  enable power user mode
:quit                    exit the interpreter
:replay [options]        reset the repl and replay all previous commands
:require <path>          add a jar to the classpath
:reset [options]        reset the repl to its initial state, forgetting all session entries
:save <path>            save replayable session to a file
:sh <command line>      run a shell command (result is implicitly => List[String])
:settings <options>      update compiler options, if possible; see reset
:silent                  disable/enable automatic printing of results
:type [-v] <expr>        display the type of an expression without evaluating it
:kind [-v] <type>        display the kind of a type. see also :help kind
:warnings                show the suppressed warnings from the most recent line which had any

scala> :quit
root@Ubuntu16:/usr/local#
5.5-运行示例
root@Ubuntu16:~/testcode# ls -l
总用量 4
-rw-r--r-- 1 root root 96 11月 14 17:10 test.scala
root@Ubuntu16:~/testcode#
root@Ubuntu16:~/testcode# cat test.scala
object HelloWorld {
    def main(args: Array[String]){
        println("Hello, World!")
    }
}
root@Ubuntu16:~/testcode#
root@Ubuntu16:~/testcode# scalac test.scala
root@Ubuntu16:~/testcode# ls -l
总用量 12
-rw-r--r-- 1 root root 602 11月 14 17:11 HelloWorld.class
-rw-r--r-- 1 root root 665 11月 14 17:11 HelloWorld$.class
-rw-r--r-- 1 root root  96 11月 14 17:10 test.scala
root@Ubuntu16:~/testcode#
root@Ubuntu16:~/testcode# scala -classpath . HelloWorld
Hello, World!
root@Ubuntu16:~/testcode# ls -l
总用量 12
-rw-r--r-- 1 root root 602 11月 14 17:11 HelloWorld.class
-rw-r--r-- 1 root root 665 11月 14 17:11 HelloWorld$.class
-rw-r--r-- 1 root root  96 11月 14 17:10 test.scala
root@Ubuntu16:~/testcode#
注意:
- 关于main()方法的定义,Scala中则必须使用对象方法,而在Java中是用静态方法(public static void main(String[] args))。
- 对象的命名HelloWorld可以不用和文件名称一致,这点和Java不同。
scalac test.scala  # 编译的时候使用的是Scala文件名称
scala -classpath . HelloWorld  # 执行的时候使用的是HelloWorld对象名称