11月29日任务
12.17 Nginx负载均衡
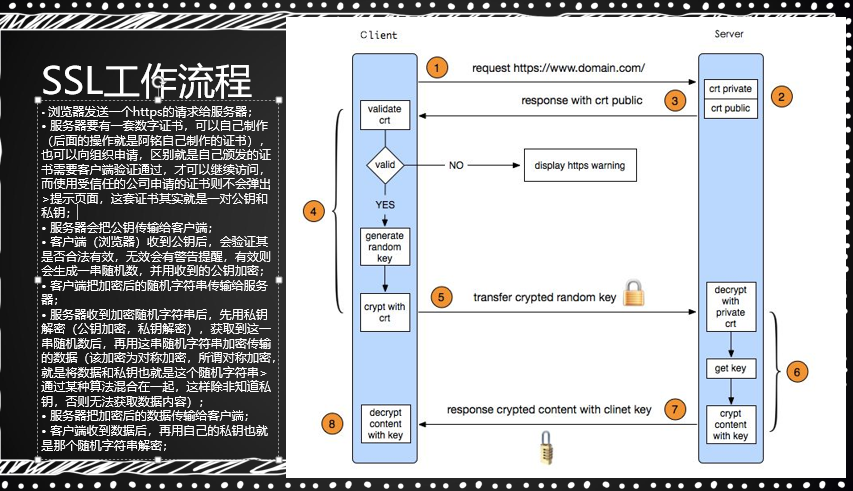
12.18 ssl原理
12.19 生成ssl密钥对
12.20 Nginx配置ssl
12.17 Nginx负载均衡
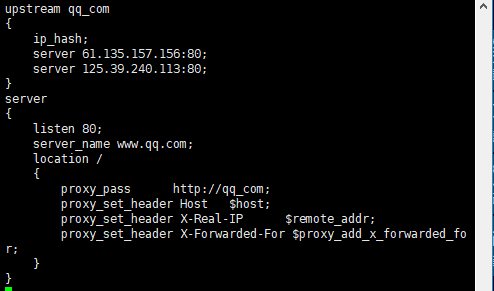
- vim /usr/local/nginx/conf/vhost/load.conf // 写入如下内容
upstream qq_com
{
ip_hash;
server 61.135.157.156:80;
server 125.39.240.113:80;
}
server
{
listen 80;
server_name www.qq.com;
location /
{
proxy_pass http://qq_com;
proxy_set_header Host $host;
proxy_set_header X-Real-IP $remote_addr;
proxy_set_header X-Forwarded-For $proxy_add_x_forwarded_for;
}
}
- upstream来指定多个web server

#操作过程
[root@zgxlinux-01 ~]# yum install -y bind-utils #安装dig命令,Dig是linux中的域名解析工具。
[root@zgxlinux-01 ~]# dig qq.com
; <<>> DiG 9.9.4-RedHat-9.9.4-61.el7_5.1 <<>> qq.com
;; global options: +cmd
;; Got answer:
;; ->>HEADER<<- opcode: QUERY, status: NOERROR, id: 49057
;; flags: qr rd ra; QUERY: 1, ANSWER: 2, AUTHORITY: 0, ADDITIONAL: 1
;; OPT PSEUDOSECTION:
; EDNS: version: 0, flags:; udp: 4096
;; QUESTION SECTION:
;qq.com. IN A
;; ANSWER SECTION:
qq.com. 138 IN A 111.161.64.48
qq.com. 138 IN A 111.161.64.40
;; Query time: 20 msec
;; SERVER: 119.29.29.29#53(119.29.29.29)
;; WHEN: 日 12月 02 12:41:31 CST 2018
;; MSG SIZE rcvd: 67
[root@zgxlinux-01 ~]# cd /usr/local/nginx/conf/vhost/
[root@zgxlinux-01 vhost]# vi ld.conf
[root@zgxlinux-01 vhost]# curl -x127.0.0.1:80 www.qq.com
This is the default site.
[root@zgxlinux-01 vhost]# /usr/local/nginx/sbin/nginx -t
nginx: the configuration file /usr/local/nginx/conf/nginx.conf syntax is ok
nginx: configuration file /usr/local/nginx/conf/nginx.conf test is successful
[root@zgxlinux-01 vhost]# /usr/local/nginx/sbin/nginx -s reload
[root@zgxlinux-01 vhost]# curl -x127.0.0.1:80 www.qq.com #这时候反馈的就是QQ主页的源代码
12.18 ssl原理
12.19 生成ssl密钥对
- cd /usr/local/nginx/conf
- openssl genrsa -des3 -out tmp.key 2048//key文件为私钥
- openssl rsa -in tmp.key -out aminglinux.key //转换key,取消密码
- rm -f tmp.key
- openssl req -new -key aminglinux.key -out aminglinux.csr//生成证书请求文件,需要拿这个文件和私钥一起生产公钥文件
- openssl x509 -req -days 365 -in aminglinux.csr -signkey aminglinux.key -out aminglinux.crt
- 这里的aminglinux.crt为公钥
#操作过程
[root@zgxlinux-01 conf]# openssl genrsa -des3 -out tmp.key 2048
Generating RSA private key, 2048 bit long modulus
......................................................................+++
..................................................................................................................+++
e is 65537 (0x10001)
Enter pass phrase for tmp.key:
Verifying - Enter pass phrase for tmp.key:
[root@zgxlinux-01 conf]# rm -f tmp.key
[root@zgxlinux-01 conf]# openssl req -new -key aminglinux.key -out aminglinux.csr
You are about to be asked to enter information that will be incorporated
into your certificate request.
What you are about to enter is what is called a Distinguished Name or a DN.
There are quite a few fields but you can leave some blank
For some fields there will be a default value,
If you enter '.', the field will be left blank.
-----
Country Name (2 letter code) [XX]:china
string is too long, it needs to be less than 2 bytes long
Country Name (2 letter code) [XX]:11
State or Province Name (full name) []:shanghai
Locality Name (eg, city) [Default City]:shanghai
Organization Name (eg, company) [Default Company Ltd]:zhangguoxiang
Organizational Unit Name (eg, section) []:
Common Name (eg, your name or your server's hostname) []:zhangguoxiang
Email Address []:
Please enter the following 'extra' attributes
to be sent with your certificate request
A challenge password []:123456
An optional company name []:zhangguoxiang
[root@zgxlinux-01 conf]# openssl x509 -req -days 365 -in aminglinux.csr -signkey aminglinux.key -out aminglinux.crt
Signature ok
subject=/C=11/ST=shanghai/L=shanghai/O=zhangguoxiang/CN=zhangguoxiang
Getting Private key
[root@zgxlinux-01 conf]# ls aminglinux.key
aminglinux.key
12.20 Nginx配置ssl
- vim /usr/local/nginx/conf/vhost/ssl.conf//加入如下内容
- server
- {
- listen 443;
- server_name aming.com;
- index index.html index.php;
- root /data/wwwroot/aming.com;
- ssl on;
- ssl_certificate aminglinux.crt;
- ssl_certificate_key aminglinux.key;
- ssl_protocols TLSv1 TLSv1.1 TLSv1.2;
- }
- -t && -s reload //若报错unknown directive “ssl” ,需要重新编译nginx,加上--with-http_ssl_module
- mkdir /data/wwwroot/aming.com
- echo “ssl test page.”>/data/wwwroot/aming.com/index.html
- 编辑hosts,增加127.0.0.1 aming.com
- curl https://aming.com/
#操作过程
[root@zgxlinux-01 conf]# cd vhost/
[root@zgxlinux-01 vhost]# vim ssl.conf

[1]+ 已停止 vim ssl.conf
[root@zgxlinux-01 vhost]# mkdir /data/wwwroot/zhangguoxiang.com
[root@zgxlinux-01 vhost]# /usr/local/nginx/sbin/nginx -t
nginx: [emerg] unknown directive "erver" in /usr/local/nginx/conf/vhost/ssl.conf:2
nginx: configuration file /usr/local/nginx/conf/nginx.conf test failed
[root@zgxlinux-01 vhost]# cd /usr/local/src/nginx-1.14.0/
[root@zgxlinux-01 nginx-1.14.0]# ./configure --prefix=/usr/local/nginx --with-http_ssl_module
[root@zgxlinux-01 nginx-1.14.0]# make && make install
[root@zgxlinux-01 nginx-1.14.0]# /usr/local/nginx/sbin/nginx -V
nginx version: nginx/1.14.0
built by gcc 4.8.5 20150623 (Red Hat 4.8.5-28) (GCC)
built with OpenSSL 1.0.2k-fips 26 Jan 2017
TLS SNI support enabled
configure arguments: --prefix=/usr/local/nginx --with-http_ssl_module
[root@zgxlinux-01 vhost]# /usr/local/nginx/sbin/nginx -t
nginx: the configuration file /usr/local/nginx/conf/nginx.conf syntax is ok
nginx: configuration file /usr/local/nginx/conf/nginx.conf test is successful
[root@zgxlinux-01 vhost]# /etc/init.d/nginx restart
Restarting nginx (via systemctl): [ 确定 ]
[root@zgxlinux-01 vhost]# netstat -lntp
Active Internet connections (only servers)
Proto Recv-Q Send-Q Local Address Foreign Address State PID/Program name
tcp 0 0 0.0.0.0:80 0.0.0.0:* LISTEN 4530/nginx: master
tcp 0 0 0.0.0.0:22 0.0.0.0:* LISTEN 959/sshd
tcp 0 0 127.0.0.1:25 0.0.0.0:* LISTEN 1332/master
tcp 0 0 0.0.0.0:443 0.0.0.0:* LISTEN 4530/nginx: master
tcp6 0 0 :::3306 :::* LISTEN 1196/mysqld
tcp6 0 0 :::22 :::* LISTEN 959/sshd
tcp6 0 0 ::1:25 :::* LISTEN 1332/master
[root@zgxlinux-01 vhost]# cd /data/wwwroot/zhangguoxiang.com/
[root@zgxlinux-01 zhangguoxiang.com]# ls
[root@zgxlinux-01 zhangguoxiang.com]# vim 1.txt
[root@zgxlinux-01 zhangguoxiang.com]# curl -x127.0.0.1:443 https://zhangguxoiang.com
curl: (56) Received HTTP code 400 from proxy after CONNECT
[root@zgxlinux-01 zhangguoxiang.com]# vi /etc/hosts

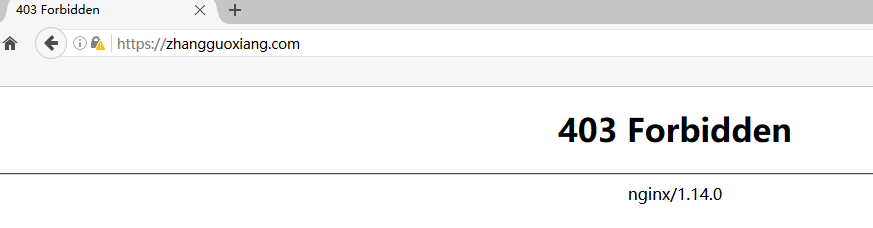
[root@zgxlinux-01 zhangguoxiang.com]# curl https://zhangguoxiang.com/
curl: (60) Peer's certificate issuer has been marked as not trusted by the user.
More details here: http://curl.haxx.se/docs/sslcerts.html
curl performs SSL certificate verification by default, using a "bundle"
of Certificate Authority (CA) public keys (CA certs). If the default
bundle file isn't adequate, you can specify an alternate file
using the --cacert option.
If this HTTPS server uses a certificate signed by a CA represented in
the bundle, the certificate verification probably failed due to a
problem with the certificate (it might be expired, or the name might
not match the domain name in the URL).
If you'd like to turn off curl's verification of the certificate, use
the -k (or --insecure) option.
#修改一下本机的hosts文档,添加以下内容
![]()
#清空防火墙
[root@zgxlinux-01 zhangguoxiang.com]# iptables -F
#这个时候就可以用浏览器访问,只不过我本机浏览器限制了,无法正常显示。