Nginx-基础篇
一、Nginx简述:
- Nginx是一个
开源且高性能、可靠的HTTP中间件、代理服务。
二、常见的HTTP服务:
- HTTPD - Apache 基金会的产品
- IIS - 微软的产品
- GWS -Google的产品
三、Nginx特性、实现优点
原因一、IO多路复用epoll
- 什么是IO多路复用:

- 多个描述符的I/O操作都能再一个线程内并发交替地顺序完成,这就叫I/O多路复用,这里的
复用指的是复用同一个线程。 - epoll模型
- 1)每当FD就绪,采用系统的回调函数之间将fd放入,效率更高。
- 2)最大连接无限制。
原因二、轻量级
- 功能模块少
- 代码模块化
- 易读、容易二次开发
原因三、CPU亲和(affinity)
- 是一种把CPU核心和Nginx工作进程绑方式,把每个
worker进程固定再一个CPU上执行,减少切换CPU和ache miss,获得更好的性能。
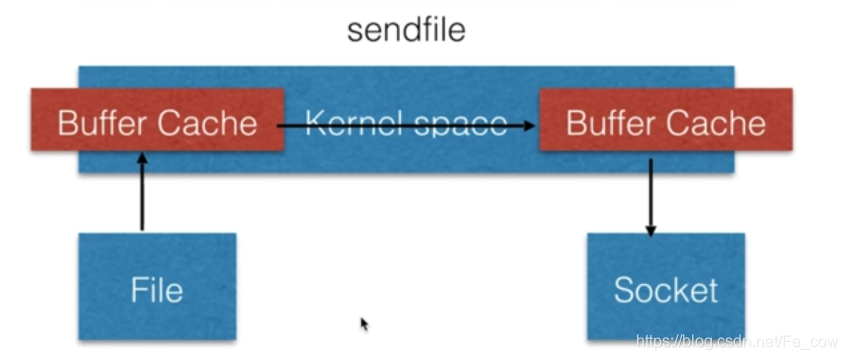
原因四、sendfile
- 文件通过内核传递给用户内核空间:
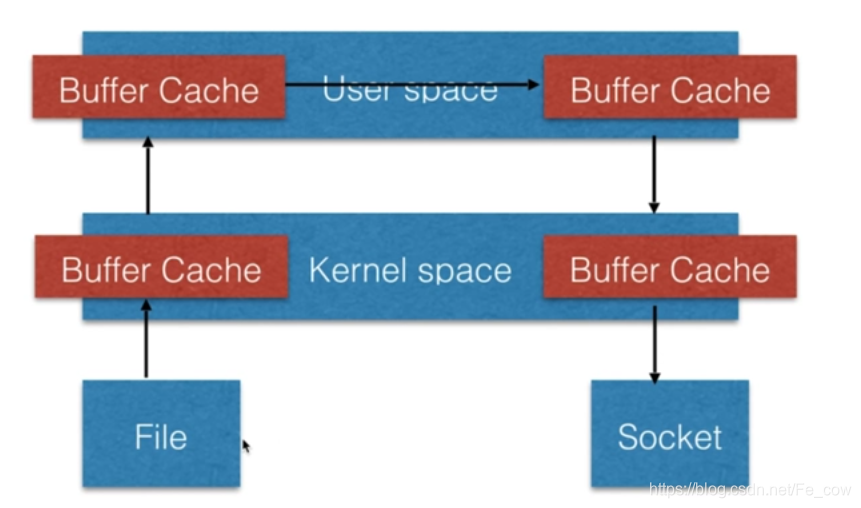
- 从Nginx2.2以后通过零拷贝,静态文件不需要用户内核:
四、Nginx搭建与基本参数使用
- Mainline version - 开发版
- Stable version - 稳定版 (开发使用)
- Legacy version - 历史版本
- nginx官方网站:http://nginx.org/
基本参数使用:
安装目录:
-
whereis nginx
-
nginx: /usr/sbin/nginx /etc/nginx /usr/share/nginx
- etc/:主要放置一些核心的配置
| 路径 | 类型 | 作用 |
|---|---|---|
| /etc/logrotate.d/nginx | 配置文件 | Nginx日志轮转,用于logrotate服务的日志切割 |
| /etc/nginx/nginx.conf | 配置文件 | 主要配置 |
| /etc/nginx/conf.d/default.conf | 配置文件 | 默认的配置文件 |
| /etc/nginx/conf.d | 目录 | |
| /etc/nginx/fastcgi_params | 配置文件 | cgi配置相关、fastcgi配置 |
| /etc/nginx/uwsgi_params | 配置文件 | cgi配置相关、fastcgi配置 |
| /etc/nginx/scgi_params | 配置文件 | cgi配置相关、fastcgi配置 |
| /etc/nginx/koi_utf | 配置文件 | 编码转换映射文件 |
| /etc/nginx/koi_win | 配置文件 | 编码转换映射文件 |
| /etc/nginx/win_utf | 配置文件 | 编码转换映射文件 |
| /etc/nginx/mime.types | 配置文件 | 设置http协议的Countent-Type与扩展名对应关系 |
| /usr/sbin/nginx | 命令 | Nginx服务启动管理的终端命令 |
| /usr/sbin/nignx-debug | 命令 | Nginx服务启动管理的终端命令 |
| /var/cache/nginx | 目录 | Nginx缓存目录 |
| /var/log/nginx | 目录 | Nginx日志目录 |
编辑参数:
-
nginx -v: 查看Nginx安装的版本号
-
nginx -V:查看编译相关的参数
(--with-xxx)nginx开启的模块
| 编译选项 | 作用 |
|---|---|
| –prefix=/etc/nginx | nginx主目录 |
| –sbin-path=/usr/sbin/nginx | nginx执行目录 |
| –modules-path=/usr/lib64/nginx/modules | nginx模块 |
| –conf-path=/etc/nginx/nginx.conf | nginx配置目录 |
| –error-log-path=/var/log/nginx/error.log | nginx错误日志 |
| –http-log-path=/var/log/nginx/access.log | nginx访问日志 |
| –pid-path=/var/run/nginx.pid | nginx的PID文件 |
| –lock-path=/var/run/nginx.lock | nginx的锁放到哪个路径下 |
| –http-client-body-temp-path=/var/cache/nginx/clinent_temp | 执行对应模块时,Nginx所保留的临时文件 |
| –http-proxy-temp-path=/var/cache/nginx/proxy_temp | … |
| –http-fastcgi-temp-path=/var/cache/nginx/fastcgi_temp | … |
| –http-uwsgi-temp-path=/var/cache/nginx/uwsgi_temp | … |
| –http-scgi-temp-path=/var/cache/nginx/scgi_temo | … |
| –user=nginx | 设定Nginx进程启动的用户和用户组 |
| –group=nginx | … |
| –with-cc-opt=parameters | 设置额外的参数将被添加到CFLAGS变量 |
| –with-ld-opt=parameters | 设置附加的参数,链接系统库 |
Nginx基本配置语法:
-
第一部分
系统模块:user 设置nginx服务的系统使用用户 worker_processes 工作进程数(一般跟服务器的CPU保持一致就可以) error_log nginx的错误日志 warn:表示nginx错误日志的级别 pid nginx服务启动时候pid -
第二部分
事件模块:events worker_connections 每个进程最大连接数 user 工作进程数 -
第三部分
http{}内容:http { .................. include /etc/nginx/conf.d/*.conf; server { listen 80 ; # 监听的是80端口 server_name localhost; # 主机名或者独立域名 location / { # 默认访问的路径一些配置 root /usr/share/nginx/html; index index.html index.html; } # 下面就是访问错误页面 error_page 500 502 503 504 /50x.html; location = /50x.html { root /usr/share/nginx/html; # 存放在系统的路径下面 } } }
HTTP请求:

- request - 包括
请求行,请求头部,请求数据 - response - 包括
状态行、消息报头、响应正文
五、Nginx日志类型:
error.log
- 记录nginx错误的状态
access_log
-
记录http请求访问的状态,分析客户每一回的访问,行为的请求
log_format main '$remote_addr(客户端地址) - $remote_user(http客户端请求的认证名) [$time_local](nginx时间) "$request(请求行)" ' '$status(response返回的状态) $body_bytes_sent(服务端返回给客户端body信息的大小) "$http_referer(上一级页面的url地址)" ' '"$http_user_agent(客户端用什么来访问)" "$http_x_forwarded_for(携带请求的信息)"'; access_log /var/log/nginx/access.log main; # http请求访问的状态, main就是名字(跟log_format后面名字相同 ), log_format后面的格式(请求的格式),会打入到access.log里面 -
HTTP请求变量 -arg_PARAMETER、http_HEDER(request里面的heder)、sent_http_HEADER(response里面的heder)
再main后面添加$http_user_agent': 把大写变成小写把-变成_
-
内置变量 - Nginx内置的
- 去官网看
-
自定义变量 - 自己定义
六、Nginx模块讲解:
Nginx官方模块:
- nginx -V:查看编辑的参数。
--with--xxx就是开启的模块
| 编译选项 | 作用 |
|---|---|
| –with-http_stub_status_module | Nginx的客户端状态 |
location /my {
                stub_status;
                }
# 输入127.0.0.1/my
-
random_index_module:
- 语法:
- Syntax:random_index on | off
- Default:random_index off ;
- Context:location;
编译选项 作用 –with-http_random_index_module 目录中选择一个随机主页 location / { root /opt/app/code; random_index on; # index index.html index.htm; } # 再/opt/app/code/ 有三个html文件, 当访问/ 的时候出随机出现下面这三个html(注意如果html是隐藏文件的话,识别不了) - 语法:
-
http_sub_module模块:
编辑选项 作用 –with-http_sub_module HTTP内容替换 -
语法:
-
Syntax: sub_filter string replacement;
-
Default:-
-
Context:http, server, location
location / { root /opt/app/code; index index.html index.htm; sub_filter '<a>json' '<a>JSON'; } # 再root /opt/app/code 新创建sub.html 文件就是下面的栗子 替换<a>json 变成<a>JSON<html> <head> <mate charset="utf-8"> <title>heihei</title> </head> <a>json</a> <a>at</a> <a>heihei</a> <a>at</a> <a>json</a> </body> </html># 再网页上输入127.0.0.1/sub.html JSON at heihei at json # 代表已经替换成功了 可是发现一个文件就是有两个json 只是替换了一个
-
-
语法(主要用于cache):
- Syntax: sub_filter_last_modified on|off;
- Default:sub_filter_last_moduified off;
- Context:http, server , location
-
语法(匹配所有html代码中如果是on就匹配第一个,如果是off匹配所有的):
-
Syntax: sub_filter_once on| off;
-
Default: sub_filter_once or;
-
Context: http ,server ,location
 location / {
                    root   /opt/app/code;
                    index  index.html index.htm;
                    sub_filter '<a>json' '<a>JSON';
                    sub_filter_once off;   # 添加这个配置项,再重新打开浏览器(127.0.0.1/sub.html)
                 }
# 就会出现JSON at heihei at JSON 都已经完成了替换
-
-
Nginx第三方模块:
七、Nginx的请求限制:
HTTP协议的连接与请求:
-
HTTP请求建立再一次TCP连接基础上
-
一次TCP请求至少产生一次HTTP请求
- 图表:
HTTP协议请求 连接关系 HTTP1.0 TCP不能复用 HTTP1.1 顺序性TCP复用 HTTP2.0 多路复用TCP复用
连接频率的限制 -limit_conn_module
-
语法:
- Syntax: limit_conn_zone key zone=name:size;
- Default:-
- Context:http
-
语法:
-
Syntax:limit_conn_zone number;
-
Default:-
-
Context: http, server , location
 limit_conn_zone $binary_remote_addr zone=conn_zone:1m;
        # HTTP 服务器
        server {

                # 监听80端口, 80端口是知名端口, 用于HTTP协议
                listen 80;
                # 定义使用www.xx.com访问
                server_name localhost;
                location / {
                    root   html;
                    index  index.html index.htm;
                    limit_conn conn_zone 1;  # 指服务端,同一时刻只允许连接一个ip过来
                }
-
请求频率的限制 -limit_req_module
-
语法:
-
Syntax:limit_req_zone key zone=name:size rate=rate;
-
Default:-
-
Context:http
limit_req_zone $binary_remote_addr zone=req_zone:1m rate=1r/s;  # 请求频率的限制
        # HTTP 服务器
        server {

                # 监听80端口, 80端口是知名端口, 用于HTTP协议
                listen 80;
                # 定义使用www.xx.com访问
                server_name localhost;
                location / {
                      root   /opt/app/code;
                    index  index.html index.htm;
                    limit_req  zone=req_zone; # 只能访问一次,当再访问403
                 }
-
-
语法:
-
Syntax:limit_req zone=name [burst=number], [ nodelay]
-
Defalut:-
-
Context:http, server ,location
  location / {
                    root   /opt/app/code;
                    index  index.html index.htm;
                    limit_req zone=req_zone burst=3 nodelay;  # burst=3:表示客户端访问3次后,在一秒执行,启到延迟作用    nodelay:就是直接返回503
  }
-
八、Nginx的访问控制:
基于IP的访问控制 - http_access_module(允许哪些ip来访问)
-
允许访问语法:
-
Syntax:allow address(IP地址) | CIDR(网段进行配置) |unix:(socket) |all(所有的);
-
Default:-
-
Context:http, server , location, limit_except
               location / {
                    root   html;
                    index  index.html index.htm;
                 }
                location ~ ^/admin.html  {
                    root   /opt/app/code;
                    allow   192.168.37.129;  # 只允许192.168.37.129访问
                    deny all;   # 除了上面的都不能访问
                    index  index.html index.htm;
                }
-
-
不允许访问的语法:
-
Syntax: deny address | CIDR | unix: | all;
-
Default: -
-
Context:http , server , location, limit_except
 			   location / {
                    root   html;
                    index  index.html index.htm;
                 }
                location ~ ^/admin.html  {
                    root   /opt/app/code;
                    deny   192.168.37.129;  # 不允许访问的IP地址
                    allow all;  # 除了deny中的IP地址以外都可以访问
                    index  index.html index.htm;
                }
-
-
http_access_module
局限性:
-
http_x_forwarded_for:- http常用的一个变量

- http_x_forwarded_for =
Client IP, Proxy(1)IP(表示经过第一台代理的时候), Proxy(2)IP.....
- http常用的一个变量
-
解决http_access_module局限性:
- 方法一:采用别的HTTP头信息控制访问,如
HTTP_X_FORWARD_FOR - 方法二:结合
geo模块作 - 方法三:通过
HTTP自定义变量传递
- 方法一:采用别的HTTP头信息控制访问,如
基于用户的信任登录 - http_auth_basic_module
-
语法(前端字符串认证):
- Syntax:auth_basic string | off;
- Default:auth_basic off;
- Context:http , server , location, limit_except
-
语法(通过文件,存储用户密码信息的文件):
- Syntax: auth_basic_user_file file ;
- Default:-
- Context: http, server , location, limit_except
-
首先我再ubuntu系统:
- 安装
htpasswd:apt install apache2-utils
- 再
/etc/nginx/创建一个用户名密码文件:- 再上级目录下输入 lh9就是用户名,会输入2次密码:
htpasswd -c ./auth_conf lh9
- 查看密码:
- more ./auth_conf
- 安装
-
举个栗子(当再打开127.0.0.1/admin.html 会有账号密码,输入成功就会跳转到这个页面):
location ~ ^/admin.html { root /opt/app/code; auth_basic "Auth access test! input your passward!"; # 前端字符串认证 auth_basic_user_file /etc/nginx/auth_conf; # 通过文件,存储用户密码信息的文件 index index.html index.htm; } -
http_auth_basic_module局限性:-
一、用户信息依赖文件方式
-
二、操作管理机械、效率低下
-
解决方案:
-
一、Nginx结合LUA实现高效验证
-
二、Nginx和LDAP打通,利用nginx-auth-ldap模块
-
-