Nginx-架构篇
一、Nginx常见问题:
1、相同server_name多个虚拟主机优先级访问:
- 首先再conf.d中配置3个配置文件, 再root 下面目录存储三个不同的index.html文件,用于请求时查看不同的页面,作为区分。
server {
    listen       80;
    server_name  testserver1  192.168.37.130;

    #charset koi8-r;
    #access_log  /var/log/nginx/log/host.access.log;

    location / {
        root   /opt/app/code1;  # 下面有存储页面
        index  index.html index.htm;
    }
server {
    listen       80;
    server_name  testserver2  192.168.37.130;

    #charset koi8-r;
    #access_log  /var/log/nginx/log/host.access.log;

    location / {
        root   /opt/app/code1;  # 下面有存储页面
        index  index.html index.htm;
    }
server {
    listen       80;
    server_name  testserver3  192.168.37.130;

    #charset koi8-r;
    #access_log  /var/log/nginx/log/host.access.log;

    location / {
        root   /opt/app/code1;  # 下面有存储页面
        index  index.html index.htm;
    }
-
当你访问192.168.37.130时候,会出现testserver1中的内容,无论怎么访问都会先访问testserver1的配置文件
-rw-r--r-- 1 root root 463 12月 9 12:20 test_server1.conf -rw-r--r-- 1 root root 463 12月 9 12:20 test_server2.conf -rw-r--r-- 1 root root 463 12月 9 12:20 test_server3.conf # 当把test_server1.conf 改为 test_server5.conf 再进行访问的时候 -rw-r--r-- 1 root root 463 12月 9 12:20 test_server2.conf -rw-r--r-- 1 root root 463 12月 9 12:20 test_server3.conf -rw-r--r-- 1 root root 463 12月 9 12:20 test_server5.conf # 里面是testserver1的内容 -
就会优先访问到test_server2.conf的配置文件
-
server_name多个虚拟主机优先级,根据
配置文件的顺序进行优先级的访问
2、location匹配优先级:
-
一个server里面有多个location时候匹配优先级
-
=: 进行普通字符精确匹配,也就是完全匹配优先级较高 -
^~:表示普通字符匹配,使用前缀匹配优先级较高 -
~\~*:表示执行一个正则匹配() -
我的域名是IP是192.168.37.130, 所以我添加完配置项后 访问192.168.37.130/code1/
    location = /code1/ {  # 精确匹配, 先匹配这个
        rewrite ^(.*)$ /code1/index.html break;
    }
    location ~ /code.* {  # 正则匹配最后才会匹配这个
        rewrite ^(.*)$ /code3/index.html break;
    }
    location ^~ /code {  # 前缀匹配当注释掉精确匹配后, 就会先访问code2,而不会先访问code3
        rewrite ^(.*)$ /code2/index.html break;
    }
3、try_files使用:
-
按顺序检查文件是否存在location / { root /opt/app/code; # 首先这个code目录下有个index.html静态文件 try_files /cache $uri @python_data; # 访问这个url的时候 首先会去code/cache下面找uri的静态文件, 如果存在就放回给客户端一个页面, 如果不存在就会去访问@python_data } location @python_data{ # 就会访问后端的服务器 proxy_pass http://127.0.0.1:8000; }
4、Nginx的alias和root区别:
-
root:是指定程序的目录所在哪个位置 -
实际上就是
root路径请求+ request_path/image/这个路径组合,最后去这个路径下面寻找这个图片。location /request_path/image/ { root/local_path/image/ } # 当问访问时候 http://192.168.37.130/request_path/image/cow.png # 其实就会去 /local_path/image/request_path/image/cow.png去这里访问 -
alias跟root相比就没有那么复杂了,不加用户请求的request_pathlocation /request_path/image/ { alias/local_path/image/cow.png } # 当访问 http://192.168.37.130/request_path/image/cow.png # 其实就是访问/local_path/image/cow.png
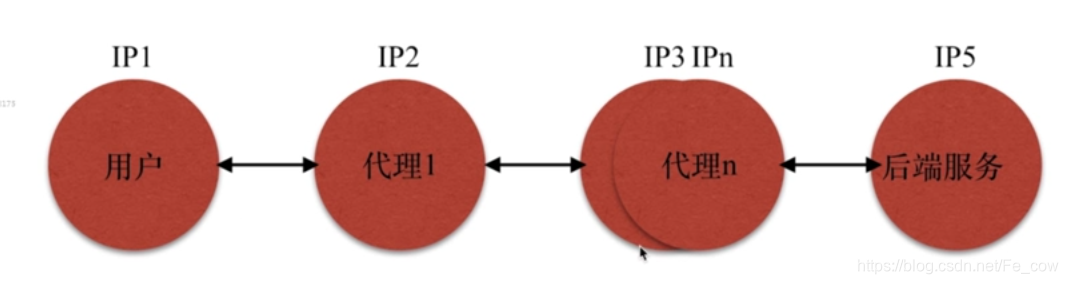
5、用什么方法传递用户的真实IP:
-
图解:
-
当一个用户通过代理1到代理N再到后端的时候通过了很多层的代理IP,但是后端服务,往往取不到第一层的IP,做法如下:
再第一层代理的服务器Nginx的时候配置 set x_real_ip=$remote_addr
再后端服务 $x_real_ip=IP1就能取到IP1的真实IP
-
6、Nginx中常见错误码:
Nginx:413 Request Entity Too Large:- 用户上传文件限制,上传过大:
client_max_body_size
- 用户上传文件限制,上传过大:
502 bad gateway:- 后台的网关错误,
后端服务没有响应
- 后台的网关错误,
504 Gateway Time out:- 后端服务执行
超时,过载较高或请求时间较长,默认时间是60s
- 后端服务执行
403 forbidden:- 请求时,被Nginx所
拒绝
- 请求时,被Nginx所
404 Not found:- 请求路径错误
400:- 请求参数错误
二、Nginx性能优化:
1、性能优化的优点:
1.1、性能优化考虑点:
- 当前系统结构瓶颈:
- 观察指标(通过top快捷键)、压力测试
- 了解业务模式:
- 接口业务类型、系统层次化结构
- 性能与安全:
- 如果防火墙过于严密,可能对性能有很大影响,权衡好性能与安全
2、压测工具ab:
-
ab接口压力测试工具:
-
1:安装
yum install httpd-tools
-
2:使用
- ab-n 2000 -c 2 http://127.0.0.1/
- -n:总的请求数
- -c:并发数
- -k:是否开启长连接
- ab-n 2000 -c 2 http://127.0.0.1/
-
ab -n 2000 -c 2 http://127.0.0.1/
This is ApacheBench, Version 2.3 <$Revision: 1706008 $>
Copyright 1996 Adam Twiss, Zeus Technology Ltd, http://www.zeustech.net/
Licensed to The Apache Software Foundation, http://www.apache.org/

Benchmarking 127.0.0.1 (be patient)
Completed 200 requests # 表示输出的进度,完成了多少
Completed 400 requests
Completed 600 requests
Completed 800 requests
Completed 1000 requests
Completed 1200 requests
Completed 1400 requests
Completed 1600 requests
Completed 1800 requests
Completed 2000 requests
Finished 2000 requests


Server Software:        nginx/1.10.3 # 工具所探测到的服务软件
Server Hostname:        127.0.0.1
Server Port:            80

Document Path:          /  # 压测文件的路径
Document Length:        153 bytes  #  压测文件返回的大小

# 以下就是关注性能接口的信息
Concurrency Level:      2 # 并发的当前级别
Time taken for tests:   0.469 seconds  # 总的时间, 花费多少时间进行压测
Complete requests:      2000  # 总的请求个数
Failed requests:        0  # 请求时失败了多少个数
Total transferred:      788000 bytes
HTML transferred:       306000 bytes
Requests per second:    4268.07 [#/sec] (mean) # 每秒有多少个请求/平均数
Time per request:       0.469 [ms] (mean) # 一个请求所需要的时间,表示是客户端而言访问服务端
Time per request:       0.234 [ms] (mean, across all concurrent requests) # 服务端处理这个请求的时间,不包括客户端跟服务端建立连接的时间
Transfer rate:          1642.21 [Kbytes/sec] received  # 传输的速率

Connection Times (ms)
              min  mean[+/-sd] median   max
Connect:        0    0   0.2      0       6
Processing:     0    0   0.6      0       7
Waiting:        0    0   0.6      0       7
Total:          0    0   0.6      0       8

Percentage of the requests served within a certain time (ms)
  50%      0
  66%      0
  75%      0
  80%      0
  90%      1
  95%      1
  98%      2
  99%      3
 100%      8 (longest request)
-
3、系统与Nginx性能优化:
- 网络:
- 包括网络的流量,发送的包
- 系统:
- 有没有磁盘的损坏,速率等
- 服务器:
- 连接的优化,内核性能的优化,Http服务请求的优化
- 程序:
- 接口性能,处理速度,
- 数据库、底层服务:
- 分布式存储,数据库的性能
3.1、文件句柄:
-
Linux\Unix 一切皆文件,文件句柄就是一个索引 -
设置方式:
-
系统全局性修改、用户局部性修改、进程局部性修改修改文件句柄配置文件:-
vim /etc/security/limits.conf -
打开后再最后添加:
root soft nofile 65535  #soft 表示软 超过文件数就发送邮箱
root hard nofile 65535  #hard 表示硬 超过文件数就不让你继续操作
# 以上2个是对于root用户而言
* soft nofile 25535  # 代表全局
* hard nofile 25535
-
-
根据进程文件句柄的限制:
-
vim /etc/nginx/nginx.confworker_rlimit_nofile 35535; # 对于nginx 进程所作的限制
-
-
3.2、CPU的亲和:
-
把进程通常不会再处理器之间频繁迁移进程迁移的频率小,减少性能损耗。- 查看当前有多少个CPU:
cat /proc/cpuinfo | grep 'physical id' | sort | uniq|wc -l- 打出的结果就是看有多少物理CPU的ID号
- 查看CPU有几核:
cat /proc/cpuinfo | grep 'cpu cores' | uniq
- top 然后再按1键,就能看到当前系统有多少核心
- 查看当前有多少个CPU:
-
打开
vim /etc/nginx/nginx.conf配置文件:# 启动进程,通常设置成和cpu的数量相等 worker_processes auto; -
再Nginx 配置项, cpu亲和的绑定:
worker_cpu_affinity:auto(是nginx1.9版本以后出现的)
4、Nginx通用配置优化:
user  nginx;  # 表示的是运行用户
worker_processes  16; # CPU亲和跟进程数, 通常是跟CPU核数相等的
#worker_cpu_affinity 0000000000000010 0000000000000010 0000000000000100 0000000000001000 0000000000010000 0000000000100000 0000000001000000 0000000010000000 0000000100000000 0000001000000000 0000010000000000 0000100000000000 0001000000000000 0010000000000000 0100000000000000 1000000000000000;
#worker_cpu_affinity 1010101010101010 0101010101010101;
worker_cpu_affinity auto;


error_log  /var/log/nginx/error.log warn;  # 日志级别
pid        /var/run/nginx.pid; # nginx停止和启动 pid

worker_rlimit_nofile 35535;

events {
    use epoll;
    worker_connections  10240;  # 单个后台worker_process进程的最大链接数
}


http {
    include       /etc/nginx/mime.types;
    default_type  application/octet-stream;
    #######
    #Charset
    charset utf-8;  # 字符集编码

    log_format  main  '$remote_addr - $remote_user [$time_local] "$request" '
                      '$status $body_bytes_sent "$http_referer" '
                      '"$http_user_agent" "$http_x_forwarded_for" "$request_uri"';

    access_log  /var/log/nginx/access.log  main;

    #######
    #Core modlue
    sendfile        on;
    #tcp_nopush     on;  #
    #tcp_nodeny     on;
    keepalive_timeout  65;

    ########
    #Gzip module
    gzip  on;
    gzip_disable "MSIE [1-6]\.";
    gzip_http_version 1.1;

    ########
    #Virtal Server
    include /etc/nginx/conf.d/*.conf;
}
三、基于Nginx架构的安全:
1、常见的恶意行为:
- 爬虫行为和恶意抓取、资源盗用
- 再http网页中经尝会用到,不受法律,但也不是正常的访问
- 基础防盗链功能—目的不让恶意用户能轻易的爬取网站对外数据
- secure_link_module—对数据安全性提高加密验证和实效性,适合如核心重要数据
- access_module—对后台、部分用户服务的数据提供IP防控
2、常见的应用层攻击手段:
-
攻击手段
- 已经触发到了法律
-
后台密码撞库—通过猜测密码字典不断对后台系统登录性尝试,获取后台登录密码
- 方法一:
- 后台登录密码复杂度
- 采用较新算法加密
- 方法二:
- access_module—对后台提供IP防控
- 方法三:
- 预警机制
- 方法一:
-
文件上传漏洞—利用这些可以上传的接口将恶意代码植入到服务器中,再通过url去访问可执行代码
-
解决方法:
location ^~/upload {
	root /opt/app/images;
if($request_filename) ~*(.*)\.py {
    	return 403;
	}
}
# 判断上传文件如是.py结尾就直接给他返回403,只是再访问Upload上传路径
-
-
SQL注入—利用未过滤/未审核用户输入的攻击方法,让应用运行本不应该运行的SQL代码
- 对语言字段的严格审查,
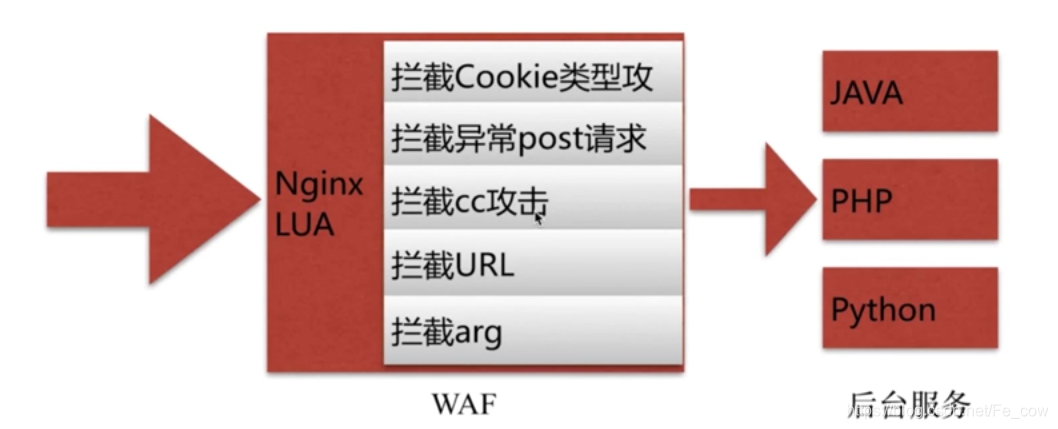
3、场景:Nginx+Lua的安全waf防火墙:
- 图解:
四、基于Nginx的中间件架构:
1、了解需求:
- 1:定义Nginx再服务体系中角色
- 第一类:
- 静态资源服务
- 第二类:
- 代理服务
- 第三类:
- 动静分离
- 第一类:
- 2:静态资源服务的功能设计
- 静态资源服务:
- 1.类型分类
- 2.浏览器缓存
- 3.防盗链
- 4.流量限制
- 5.防资源盗用
- 6.静态资源压缩
- 静态资源服务:
- 3:代理服务:
- 1.协议类型:
- http
- https
- rtmp
- websocket等
- 2.正向代理:
- 3.反向代理:
- 4.负载均衡
- 5.代理缓存
- 6.头信息处理
- cookie
- session
- 7.分片请求
- 8.LNMP
- 9.Proxypass
- 1.协议类型:
2、设计评估:
- 硬件:CPU、内存、硬盘(存入日志)
- 系统:用户权限、日志目录存放
- 关联服务:LVS(负载均衡)、keeplive(负载均衡)、syslog、Fastcgi