版权声明:本文为博主原创文章,未经博主允许不得转载。 https://blog.csdn.net/u014534808/article/details/82315766
前言
接上一篇《从零开始造Spring05—实现spring注解-1》,今天我们接着学习spring注解。这是学习刘欣老师《从零开始造Spring》课程的学习笔记。上一篇我们实现了Bean的生成,这一篇我们将接着来实现Bean的注入,也叫依赖注入。
具体实现
数据结构
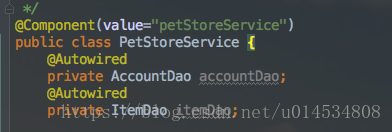
注: @Autowired 应用的地方有多处,此处我们只实现了应用于Field上。Member对象来自于java.lang.reflect 包,其相当于Field,Method,Constructor的子类。
关键代码
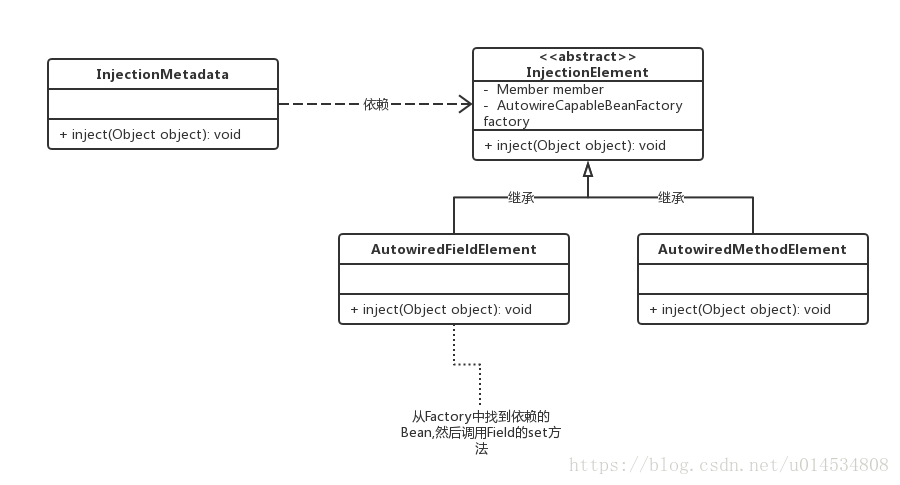
InjectionMetadata类
public class InjectionMetadata {

    private final Class<?> targetClass;
    private List<InjectionElement> injectionElementList;

    public InjectionMetadata(Class<?> targetClass, List<InjectionElement> injectionElementList) {
        this.targetClass = targetClass;
        this.injectionElementList = injectionElementList;
    }

    public List<InjectionElement> getInjectionElementList() {
        return injectionElementList;
    }
       /**
     * 核心的inject,在Bean生命周期的postProcessPropertyValues方法中被调用
     * @param target
     */
    public void inject(Object target) {
        if (injectionElementList == null || injectionElementList.isEmpty()) {
            return;
        }
        for (InjectionElement ele : injectionElementList) {
            ele.inject(target);
        }
    }
}
AutowiredFieldElement 类
public class AutowiredFieldElement extends InjectionElement {
    boolean required;

    public AutowiredFieldElement(Field f, boolean required, AutowireCapableBeanFactory factory) {
        super(f,factory);
        this.required = required;
    }
    public Field getField() {
        return (Field) this.member;
    }

     @Override
    public void inject(Object target) {
        Field field = this.getField();
        try {
            DependencyDescriptor desc = new DependencyDescriptor(field, this.required);
            //获取Bean的实例
            Object value = factory.resolveDependency(desc);
            if (value != null) {
                //将field 置于可访问的
                ReflectionUtils.makeAccessible(field);
                // 将被依赖的Bean注入到依赖的Bean中
                field.set(target, value);
            }
        } catch (Throwable ex) {
            throw new BeanCreationException("Could not autowire field: " + field, ex);
        }

    }
}
DependencyDescriptor 类是用来描述依赖的。相关类图如下:
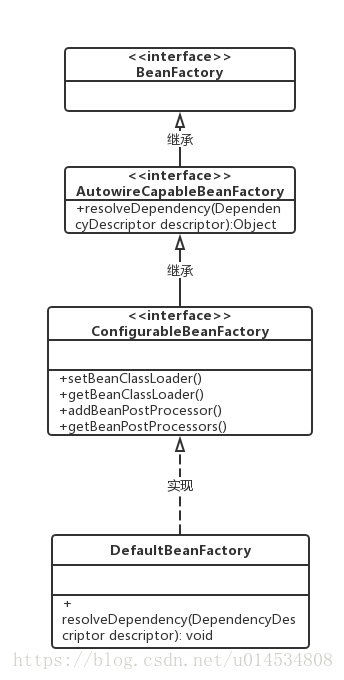
这里扩展AutowireCapableBeanFactory 新接口主要是为了将resolveDependency方法隐藏于Spring内部,因为BeanFactory 主要是面向使用Spring的程序员。resolveDependency方法于他们没有实际用途。
关键代码:DefaultBeanFactory 类
@Override
public Object resolveDependency(DependencyDescriptor descriptor) {
Class<?> typeToMatch = descriptor.getDepencyType();
for (BeanDefinition bd : this.beanDefinitionMap.values()) {
//确保BeanDefinition 有class对象
resolveBeanClass(bd);
Class<?> beanClass = bd.getBeanClass();
if (typeToMatch.isAssignableFrom(beanClass)) {
return getBean(bd.getID());
}
}
return null;
}
public void resolveBeanClass(BeanDefinition bd) {
if (bd.hasBeanClass()) {
return;
} else {
try {
bd.resolveBeanClass(this.getBeanClassLoader());
} catch (ClassNotFoundException e) {
throw new RuntimeException("can't load class:"+bd.getBeanClassName());
}
}
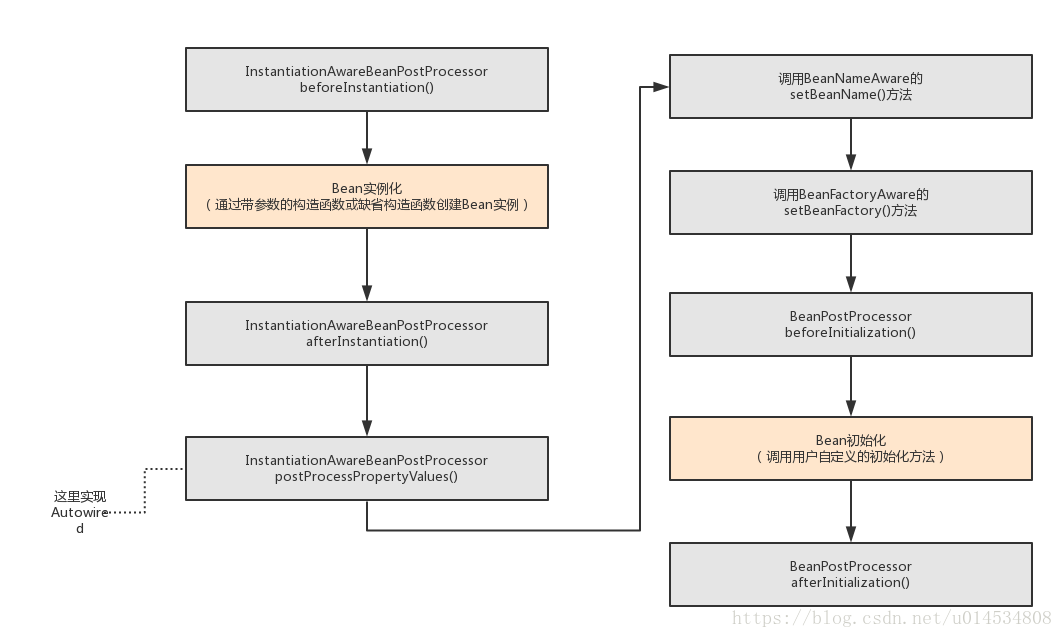
}Bean的生命周期
Bean的生命周期共有四个阶段:
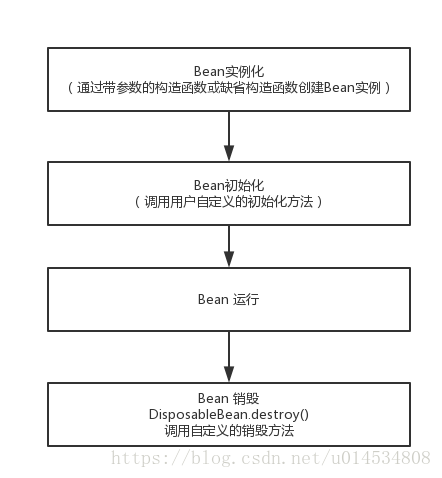
在此处我们只关注Bean的实例化和初始化阶段。
关键代码:AutowiredAnnotationProcessor 类
    @Override
    public void postProcessPropertyValues(Object bean, String beanName) throws BeansException {
        InjectionMetadata metadata = buildAutowiringMetadata(bean.getClass());
        try {
            metadata.inject(bean);
        } catch (Exception ex) {
            throw new BeanCreationException(beanName, "Injection of autowired dependencies failed", ex);
        }

    }
    public InjectionMetadata buildAutowiringMetadata(Class<?> clazz) {
        LinkedList<InjectionElement> elements = new LinkedList<InjectionElement>();
        Class<?> targetClass = clazz;

        LinkedList<InjectionElement> currentElements = new LinkedList<InjectionElement>();
        for (Field field : targetClass.getDeclaredFields()) {
            Annotation ann = findAutowiredAnnotation(field);
            if (ann != null) {
                if (Modifier.isStatic(field.getModifiers())) {
                    continue;
                }
                boolean required = determineRequiredStatus(ann);
                currentElements.add(new AutowiredFieldElement(field, required, beanFactory));

            }
        }
        for (Method method : targetClass.getDeclaredMethods()) {
            //TODO 处理方法注入
        }
        elements.addAll(0, currentElements);
        targetClass = targetClass.getSuperclass();
        while (targetClass != null && targetClass != Object.class) ;

        return new InjectionMetadata(clazz, elements);

}那么怎么使用这些PostProcessor呢?
1. 创建PostProcessor
    public AbstractApplicationContext(String configFile) {
        factory = new DefaultBeanFactory();
        XmlBeanDefinitionReader reader = new XmlBeanDefinitionReader(factory);
        Resource resource = getResourceByPath(configFile);
        reader.loadBeanDefinitions(resource);
        factory.setBeanClassLoader(this.getBeanClassLoader());
        registerBeanPostProcessors(factory);
    }
 protected void registerBeanPostProcessors(ConfigurableBeanFactory beanFactory) {
        AutowiredAnnotationProcessor postProcessor = new AutowiredAnnotationProcessor();
        postProcessor.setBeanFactory(beanFactory);
        beanFactory.addBeanPostProcessor(postProcessor);
    }
加到
BeanFactory
在ConfigurableBeanFactory上加入在
DefaultBeanFactory. populateBean()调用
DefaultBeanFactory类实现了ConfigurableBeanFactory接口
    protected void populateBean(BeanDefinition bd, Object bean) {
        for (BeanPostProcessor processor : this.getBeanPostProcessors()) {
            if (processor instanceof InstantiationAwareBeanPostProcessor) {
                ((InstantiationAwareBeanPostProcessor)processor).postProcessPropertyValues(bean, bd.getID());
            }
        }
        .....
        }