一、scrapy项目的目录结构
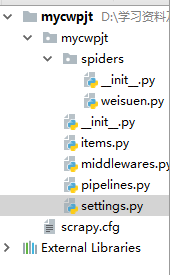
包括了一个spiders文件夹,以及__init__.py、items.py、pipelines.py、settings.py等python文件。
- items.py是爬虫项目的数据容器文件,用来定义我们要获取的数据。
- pipelines.py 是爬虫项目的管道文件,用来对items里面定义的数据进行进一步的加工与处理。
- settinng.py是项目的设置文件。
- spiders文件夹下面放置的是爬虫部分相关的文件。
二、spider的编写
1.创建项目
在命令行中输入scrapy startproject 项目名,如下我创建了一个名为mypjt1的scrapy爬虫项目
PS D:\学习资料及空间> scrapy startproject mypjt1
New Scrapy project 'mypjt1', using template directory 'd:\\users\\administrator\\anaconda3\\lib\\site-packages\\scrapy\\templates\\project', created in:
    D:\学习资料及空间\mypjt1
2.items的编写
import scrapy


class Mypjt1Item(scrapy.Item):
    # define the fields for your item here like:
    # name = scrapy.Field()
    title = scrapy.Field()
3.spider的编写
在爬虫项目中通过genspider命令创建一个爬虫文件,然后我们在对该爬虫文件进行相应的修改与编写。
在命令行中切换到相应的项目目录下,然后输入scrapy genspider -t 模板 新爬虫名 爬取的域名
PS D:\学习资料及空间> cd mypjt1
PS D:\学习资料及空间\mypjt1> scrapy genspider -t basic myspd sina.com.cn
Created spider 'myspd' using template 'basic' in module:
  mypjt1.spiders.myspd
打开后,该文件的默认代码为
# -*- coding: utf-8 -*-
import scrapy


class MyspdSpider(scrapy.Spider):
    name = 'myspd'
    allowed_domains = ['sina.com.cn']
    start_urls = ['http://sina.com.cn/']

    def parse(self, response):
        pass
name 是爬虫的名称,此时我的爬虫名称为myspd,allowed_domains代表的是允许爬行的域名, start_urls代表的是爬行的起始网址, parse方法是处理Scrapy爬虫爬行到的网页响应默认方法,该方法可以对响应进行处理和返回处理后的数据,在该属性中,我们可以定义多个起始网址,中间用逗号隔开。
进行简单的修改后:
# -*- coding: utf-8 -*-
import scrapy
from mypjt1.items import Mypjt1Item

class MyspdSpider(scrapy.Spider):
    name = 'myspd'
    allowed_domains = ['sina.com.cn']
    start_urls = (
        'http://sina.com.cn/',
        'https://mil.news.sina.com.cn/'
    )

    def parse(self, response):
        item = Mypjt1Item()
        item['title'] = response.xpath("/html/head/title").extract()
        print(item['title'])
我们的提取方式是Xpath,Xpath学习网址:http://www.w3school.com.cn/xpath/index.asp
4.运行
输入及相应的输出结果
PS D:\学习资料及空间\mypjt1> scrapy crawl myspd --nolog
['<title>军事频道_最多军迷首选的军事门户_新浪网</title>']
['<title>新闻中心首页_新浪网</title>']
5.对爬取的数据进行进一步的加工
这时候我们用到了pipelines.py文件,但在这之前我们应该对settings.py文件配置。
# Configure item pipelines
# See https://doc.scrapy.org/en/latest/topics/item-pipeline.html
#ITEM_PIPELINES = {
#    'mypjt1.pipelines.Mypjt1Pipeline': 300,
#}
将默认配置修改如下:
# Configure item pipelines
# See https://doc.scrapy.org/en/latest/topics/item-pipeline.html
ITEM_PIPELINES = {
   'mypjt1.pipelines.Mypjt1Pipeline': 300,
}
编写pipelines.py文件将爬取的数据存储到mydata.txt文件中
# -*- coding: utf-8 -*-
import codecs
# Define your item pipelines here
#
# Don't forget to add your pipeline to the ITEM_PIPELINES setting
# See: https://doc.scrapy.org/en/latest/topics/item-pipeline.html


class Mypjt1Pipeline(object):
    def __init__(self):
        #初始化,开始时调用,打开一个文件用于存储爬取到的数据
        self.file = codecs.open('D:\\python35\\crawler\\mydata.txt',"wb",encoding="utf-8")

    #是pipeline的主要处理方法,默认会自动调用
    def process_item(self, item, spider):
        l = str(item) + '\n'
        #写入到相应的文件中
        self.file.write(l)
        return item

    #close_spider()方法一般在关闭蜘蛛时调用
    def close_spider(self):
        #关闭文件
        self.file.close()
之后在myspd,py的parse方法加上yield item如下
    def parse(self, response):
        item = Mypjt1Item()
        item['title'] = response.xpath("/html/head/title").extract()
        print(item['title'])
        yield item
运行之后结果
