一、简介
Thrift server是HBase中的一种服务,主要用于对多语言API的支持。基于Apache Thrift(多语言支持的通信框架)开发,目前有两种版本thrift和thrift2。
thrift2是当时为了适应新的Java API,提出来的。由于种种原因,thrift2没有完美兼容并替代thrift,所有就留下了两个版本。
Thrift2没有DDL方面的接口,所以现在Hue还是用Thrift的接口。如果你只想读写数据,建议用Thrift2。
hbase用java来操作是最方便,也效率最高的方式。但java并非轻量级,不方便在任何环境下调试。而且不同的开发人员熟悉的语言不一样,开发效率也不一样。hbase 通过thrift,还可以用python,ruby,cpp,perl等语言来操作。
thrift是facebook开发开源的类似google的protobuf的远程调用组件。但protobuf只有数据的序列化,且只支持二进制协议,没有远程调用部分。protobuf原生支持cpp,python,java,另外还有第三方实现的objectc,ruby等语言。而thrift是实现了序列化,传输,协议定义,远程调用等功能,跨语言能力更多。某些方面二者可以互相替代,但一些方面则各有适用范围。
二、原理
Thrfit其实就是个代理,你的请求发到Thrift server上后,server通过Java API再帮你访问HBase。
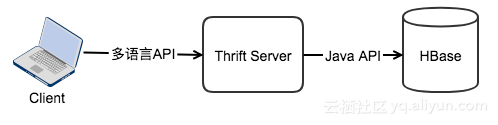
Thrift实现类是org.apache.hadoop.hbase.thrift.ThriftServer,thrift2的实现类是org.apache.hadoop.hbase.thrift2.ThriftServer。它们访问HBase使用的也是普通的HBase client API,所以当你的请求到达Thrift server后,它通过client API去帮你定位数据,然后读取数据。这么来看,Thrift Server比较灵活,你可以部署在客户机上,也可以独立部署一个thrift集群。
三、操作
开启thrift:
 hbase thrift -p 9090 start
./hbase-daemons.sh start thrift
代码编写:
from thrift.transport import TSocket,TTransport
from thrift.protocol import TBinaryProtocol
from hbase import Hbase

# thrift默认端口是9090
socket = TSocket.TSocket('192.168.186.48',9090)
socket.setTimeout(5000)
print("连接成功!")

transport = TTransport.TBufferedTransport(socket)
protocol = TBinaryProtocol.TBinaryProtocol(transport)

client = Hbase.Client(protocol)
socket.open()
print(client.getTableNames())
print(client.get('xmstest','xms','f1:name'))

socket.close()


整套代码执行:
# 使用前需要启动hbase和thrift服务器
from thrift.transport import TSocket,TTransport
from thrift.protocol import TBinaryProtocol
from hbase import Hbase

# thrift默认端口是9090
socket = TSocket.TSocket('192.168.186.48',9090)
socket.setTimeout(5000)

transport = TTransport.TBufferedTransport(socket)
protocol = TBinaryProtocol.TBinaryProtocol(transport)

client = Hbase.Client(protocol)
socket.open()


# print(client.get('table1','row1','cf:a'))

from hbase.ttypes import ColumnDescriptor

alltable = client.getTableNames()   # 获取所有表名
print('所有表格',alltable)
if('test' in alltable):
    allcf = client.getColumnDescriptors('test')  # 获取表的所有列族
    print('test表的列族',allcf)
    allregions = client.getTableRegions('test') # 获取所有与表关联的regions
    print('test表的所有regions',allregions)
else:
    column1 = ColumnDescriptor(name='cf1')    # 定义列族
    column3 = ColumnDescriptor(name='cf2')  # 定义列族
    client.createTable('test', [column1,column3])   # 创建表
    print('创建表test')


# 验证表是否被启用
if(not client.isTableEnabled('test')):
    client.enableTable('test')  # 启用表
    print('启用表test')


# =======插入/修改数据=======
from hbase.ttypes import Mutation

mutation = Mutation(column='cf1:a', value='1')

# 插入数据。如果在test表中row行cf1:a列存在,将覆盖
client.mutateRow('test', 'row1', [mutation])  # 在表中指定行执行一系列的变化操作。
client.mutateRowTs('test','row2',[mutation],1513070735669)  # 可以自己添加时间戳
print('插入数据')

from hbase.ttypes import Mutation,BatchMutation
mutation1 = Mutation(column='cf1:b',value='2')
mutation2 = Mutation(column='cf2:a',value='3')
mutation3 = Mutation(column='cf2:b',value='4')
batchMutation = BatchMutation('row3',[mutation])
client.mutateRows('test',[batchMutation])   # 在表中执行一系列批次(单个行上的一系列突变)
client.mutateRowsTs('test',[batchMutation],timestamp=1513135651874)  # 也可以自己添加时间戳
print('插入数据')

result = client.atomicIncrement('test','row1','cf1:c',1)  # 原子递增的列进行一次递增。返回当前列的值
print(result)

# ============获取数据=========
result = client.get('test', 'row1', 'cf1:a')  # 为一个列表,其中只有一个hbase.ttypes.TCell对象的数据
result = client.getVer('test', 'row1', 'cf1:a', numVersions = 2)  # 为一个列表,其中只有一个hbase.ttypes.TCell对象的数据
result = client.getVerTs('test', 'row1', 'cf1:a', timestamp=0,numVersions = 2)  # 为一个列表,其中只有一个hbase.ttypes.TCell对象的数据
print(result)


# 行
row = 'row1'
# 列
column = 'cf1:a'
# 查询结果
result = client.getRow('test',row)      # result为一个列表,获取表中指定行在最新时间戳上的数据
for item in result:                     # item为hbase.ttypes.TRowResult对象
    print('行索引:',item.row)
    print('列值:',item.columns.get(column).value)        # 获取值。item.columns.get('cf:a')为一个hbase.ttypes.TCell对象
    print('时间戳:',item.columns.get(column).timestamp)    # 获取时间戳。item.columns.get('cf:a')为一个hbase.ttypes.TCell对象


# 获取指定行指定列上的数据
result = client.getRowWithColumns('test','row1',['cf1:a','cf2:a'])  #获取表中指定行与指定列在最新时间戳上的数据
for item in result:
    print('行索引:',item.row)
    cf1_a = item.columns.get('cf1:a')
    if (cf1_a != None):
        print('cf1:a列值:',cf1_a.value)
        print('时间戳:',cf1_a.timestamp)
    cf2_a = item.columns.get('cf2:a')
    if(cf2_a!=None):
        print('cf2:a列值:',cf2_a.value)
        print('时间戳:',cf2_a.timestamp)


result = client.getRowTs('test','row1',1513069831512)   # 获取表中指定行并且小于这个时间戳的所有数据
print(result)


result = client.getRowWithColumnsTs('test','row1',['cf1:a','cf1:b','cf2:a'],1513069831512)  # 获取指定行与指定列,并且小于这个时间戳的所有数据
print(result)

# ==============扫描数据==================
scannerId = client.scannerOpen('test','row1',["cf1:b","cf2:a"])   # 在指定表中,从指定行开始扫描,到表中最后一行结束,扫描指定列的数据。
scannerId = client.scannerOpenTs('test','row1',["cf1:b","cf2:a"],timestamp=1513579065365)  # 在指定表中,从指定行开始扫描,获取所有小于指定时间戳的所有数据,扫描指定列的数据
scannerId = client.scannerOpenWithStop('test','row1','row2',["cf1:b","cf2:a"])   # 在指定表中,从指定行开始扫描,扫描到结束行结束(并不获取指定行的数据),扫描指定列的数据
scannerId = client.scannerOpenWithStopTs('test','row1','row2',["cf1:b","cf2:a"],timestamp=1513579065365)  # 获取所有小于指定时间戳的所有数据
scannerId = client.scannerOpenWithPrefix('test','row',["cf1:b","cf2:a"])   #在指定表中,扫描具有指定前缀的行,扫描指定列的数据

while True:
    result = client.scannerGet(scannerId)   # 根据ScannerID来获取结果
    if not result:
        break
    print(result)

result = client.scannerGetList(scannerId,2)   # 根据ScannerID来获取指定数量的结果

client.scannerClose(scannerId)  # 关闭扫描器


# ===============删除数据==============
client.deleteAll('test','row1','cf1:a')  # 删除指定表指定行与指定列的所有数据
client.deleteAllTs('test','row1','cf2:a',timestamp=1513569725685)  # 删除指定表指定行与指定列中,小于等于指定时间戳的所有数据
client.deleteAllRowTs('test','row1',timestamp=1513568619326)   # 删除指定表指定行中,小于等于此时间戳的所有数据
client.deleteAllRow('test','row1')  # 删除整行数据
if(not client.isTableEnabled('test')):
    client.disableTable('test')
    print('禁用表test')
    client.deleteTable('test')  # 删除表.必须确保表存在,且被禁用
    print('删除表test')
四、执行结果
