1.首先在idea中创建一个springboot的项目
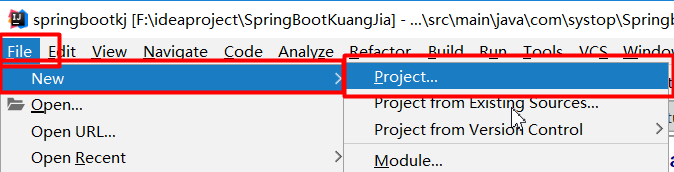


选择新建的目录就好了
2.在application.properties中连接好数据库。
spring.datasource.url=jdbc:mysql://localhost:3306/student?useUnicode=true&characterEncoding=utf-8&serverTimezone=GMT%2B8
spring.datasource.username=***
spring.datasource.password=***
spring.jpa.hibernate.ddl-auto=update
2.在项目中新建文件夹。moudle包中的是测试BaseDao中封装的方法。

3.接下来就是封装EntityManager成为最主要的BaseDao。
package com.systop.core.dao;

import org.hibernate.Session;
import javax.persistence.EntityManager;
import javax.persistence.PersistenceContext;
import javax.persistence.Query;
import javax.transaction.Transactional;
import java.io.Serializable;
import java.lang.reflect.ParameterizedType;
import java.lang.reflect.Type;
import java.util.List;
import java.util.Map;


@Transactional
public class BaseDao<T,ID extends Serializable> {

    //首先是注入EntityManager
    @PersistenceContext
    private EntityManager entitymanager;

    private Class<T> entityClass;

    /**
     * 构造方法
     */
    public BaseDao() {
        //通过反射获取当前类表示的实体(类,接口,基本类型或void)的直接父类的Type
        Type genType = getClass().getGenericSuperclass();
        //返回参数数组
        Type[] params = ((ParameterizedType)genType).getActualTypeArguments();
        entityClass=(Class)params[0];
    }

    public EntityManager getEntityManager() {
        return entitymanager;
    }

    /**
     * 保存
     */
    public void executeSave(T entity){
        //调用EntityManager中的保存方法persist
        this.entitymanager.persist(entity);
        //及时的存入数据库,如果不写这句的话,不会保存到数据库中
        this.entitymanager.flush();
    }

    /**
     * 修改
     */
    public void executeUpdate(T entity){
        //调用Merge修改的方法
        this.entitymanager.merge(entity);
        this.entitymanager.flush();
    }

    /**
     * 删除
     */
    public void executeDelete(ID id){
        //根据id查询出一个对象,然后删除这个对象
        T entity = find(id);
        this.entitymanager.remove(entity);
        this.entitymanager.flush();
    }

    /**
     * 查询
     * @param id
     * @return
     */
    public T find(ID id){
         T pojo = this.entitymanager.find(entityClass,id);
        return pojo;
    }

    /**
     * 查询所有
     * @param qlString
     * @return
     */
    public List<T> findAll(String qlString){
        //这个是根据自己写的sql语句查询所有
        Query query = this.entitymanager.createQuery(qlString);
        //转化为List集合
        return query.getResultList();
}4.在Student文件中写实体类。注意:在封装好的BaseDao在测试的时候,实体类中必须有id这个字段,还有写注解。
package com.systop.moudle.student.entity;

import javax.persistence.Entity;
import javax.persistence.Id;
import javax.persistence.Table;

@Entity
@Table(name = "student")
public class Student {

    @Id
    private Long id;
    private String name;
    private int age;
    private String address;

    public String getName() {
        return name;
    }

    public void setName(String name) {
        this.name = name;
    }

    public int getAge() {
        return age;
    }

    public void setAge(int age) {
        this.age = age;
    }

    public String getAddress() {
        return address;
    }

    public void setAddress(String address) {
        this.address = address;
    }

    @Override
    public String toString() {
        return "Student{" +
                "id=" + id +
                ", name='" + name + '\'' +
                ", age=" + age +
                ", address='" + address + '\'' +
                '}';
    }

    public Student() {
        super();
    }

    public Student(String name) {
        this.name = name;
    }

    public Long getId() {
        return id;
    }

    public void setId(Long id) {
        this.id = id;
    }
}
5.在StudentService文件中写接口。注意:这是一个接口文件。
public interface StudentService {
//  entityManager
    void save(Student student);//保存
    void delete(Long id);//根据id删除
    void update(Student student);//修改
    Student find(Long id);//查询一条
    List<Student> findAll();//查询所有
}6.在StudentServiceImpl中调用baseDao中的方法。注意:写注解
package com.systop.moudle.student.service.impl;

import com.systop.core.dao.BaseDao;
import com.systop.moudle.student.entity.Student;
import com.systop.moudle.student.service.StudentService;
import org.springframework.beans.factory.annotation.Autowired;
import org.springframework.stereotype.Service;
import java.util.HashMap;
import java.util.List;
import java.util.Map;

@Service("studentService")
public class StudentServiceImpl implements StudentService {

    @Autowired
    private BaseDao baseDao;//注入BaseDao

    @Override
    public void save(Student student) {
        baseDao.executeSave(student);
    }

    @Override
    public void update(Student student) {
        baseDao.executeUpdate(student);
    }

    @Override
    public void delete(Long id) {
        baseDao.executeDelete(id);
    }

    @Override
    public Student find(Long id) {
       Student student = (Student) baseDao.find(id);
        return student;
    }

    @Override
    public List<Student> findAll() {
        String jql = "from Student";
        List<Student> studentsList =  baseDao.findAll(jql);
        return studentsList;
    }
}
7.在StudentDao中去继承BaseDao. 注意:记得写@Repository注解
package com.systop.moudle.student.dao;

import com.systop.core.dao.BaseDao;
import com.systop.moudle.student.entity.Student;
import org.springframework.stereotype.Repository;

@Repository
public class StudentDao extends BaseDao<Student,Long> {

}
8.在StudentController中测试。写注解
package com.systop.moudle.student.controller;

import com.systop.moudle.student.entity.Student;
import com.systop.moudle.student.service.StudentService;
import org.springframework.beans.factory.annotation.Autowired;
import org.springframework.web.bind.annotation.PathVariable;
import org.springframework.web.bind.annotation.RequestMapping;
import org.springframework.web.bind.annotation.RequestParam;
import org.springframework.web.bind.annotation.RestController;
import java.util.List;

@RestController
public class StudentController {

    //注入StudentService
    @Autowired
    private StudentService studentService;

    @RequestMapping("/save")
    public void save(Student student){
        student.setId(7L);
        student.setAddress("石家庄辛集市");
        student.setAge(20);
        student.setName("王五");
        studentService.save(student);
    }

    @RequestMapping("/update")
    public void update(Student student){
        student.setId(7L);
        student.setAddress("石家庄11111");
        student.setAge(20);
        student.setName("张伟");
        studentService.update(student);
    }

    @RequestMapping("/delete/{id}")
    public void delete(@PathVariable("id") Long id){
        studentService.delete(id);
    }

    @RequestMapping("/find/{id}")
    public void find(@PathVariable("id") Long id){
        Student student = studentService.find(id);
    }

    @RequestMapping("/findAll")
    public void findAll(){
        List<Student> students = studentService.findAll();
        System.out.println(students);
    }
}
9.在浏览器中输入:http://localhost:8080/save就可以保存到数据库中。别的方法同理。