我使用的技术栈是:react-native(0.57.8)+ react-navigation + react-redux + ant-design + axios
我在做的ReactNative项目需要实现扫码功能以及从相册读取本地二维码的功能
我实现这两个功能使用的插件有
扫码功能
扫描页面黑屏
首先是使用react-native-camera完成扫码功能,根据git文档进行安装和配置,摄像头处理权限等配置不再赘述,遇到问题可以在Issue中看看是否有解决。下面称我实现的扫描页面为Scan页。
](https://img-blog.csdnimg.cn/20190302122827170.jpg?x-oss-process=image/watermark,type_ZmFuZ3poZW5naGVpdGk,shadow_10,text_aHR0cHM6Ly9ibG9nLmNzZG4ubmV0L3NpbmF0XzMxMjMxOTU1,size_16,color_FFFFFF,t_70)
我遇到的第一个问题是重复进入Scan页,相机加载有问题,会出现黑屏现象。解决办法是,根据navigation判断,当进入页面时,再显示RNCamera.
componentDidMount() {
    const { navigation } = this.props;
    navigation.addListener("willFocus", () =>
      this.setState({ focusedScreen: true })
    );
    navigation.addListener("willBlur", () =>
      this.setState({ focusedScreen: false, showModal: false })
    );
  }

// render函数中:
this.state.focusedScreen && RNCameraComponent
相机布局
第二个问题是相机布局,设计给的图是像微信的二维码扫描一样,中间有一块透明区域做扫码。RNCamera无法设置宽高,视图是全屏,需要自己布局。我将页面分为了上中下三块,中间又分为左中右三块,大概是这样:
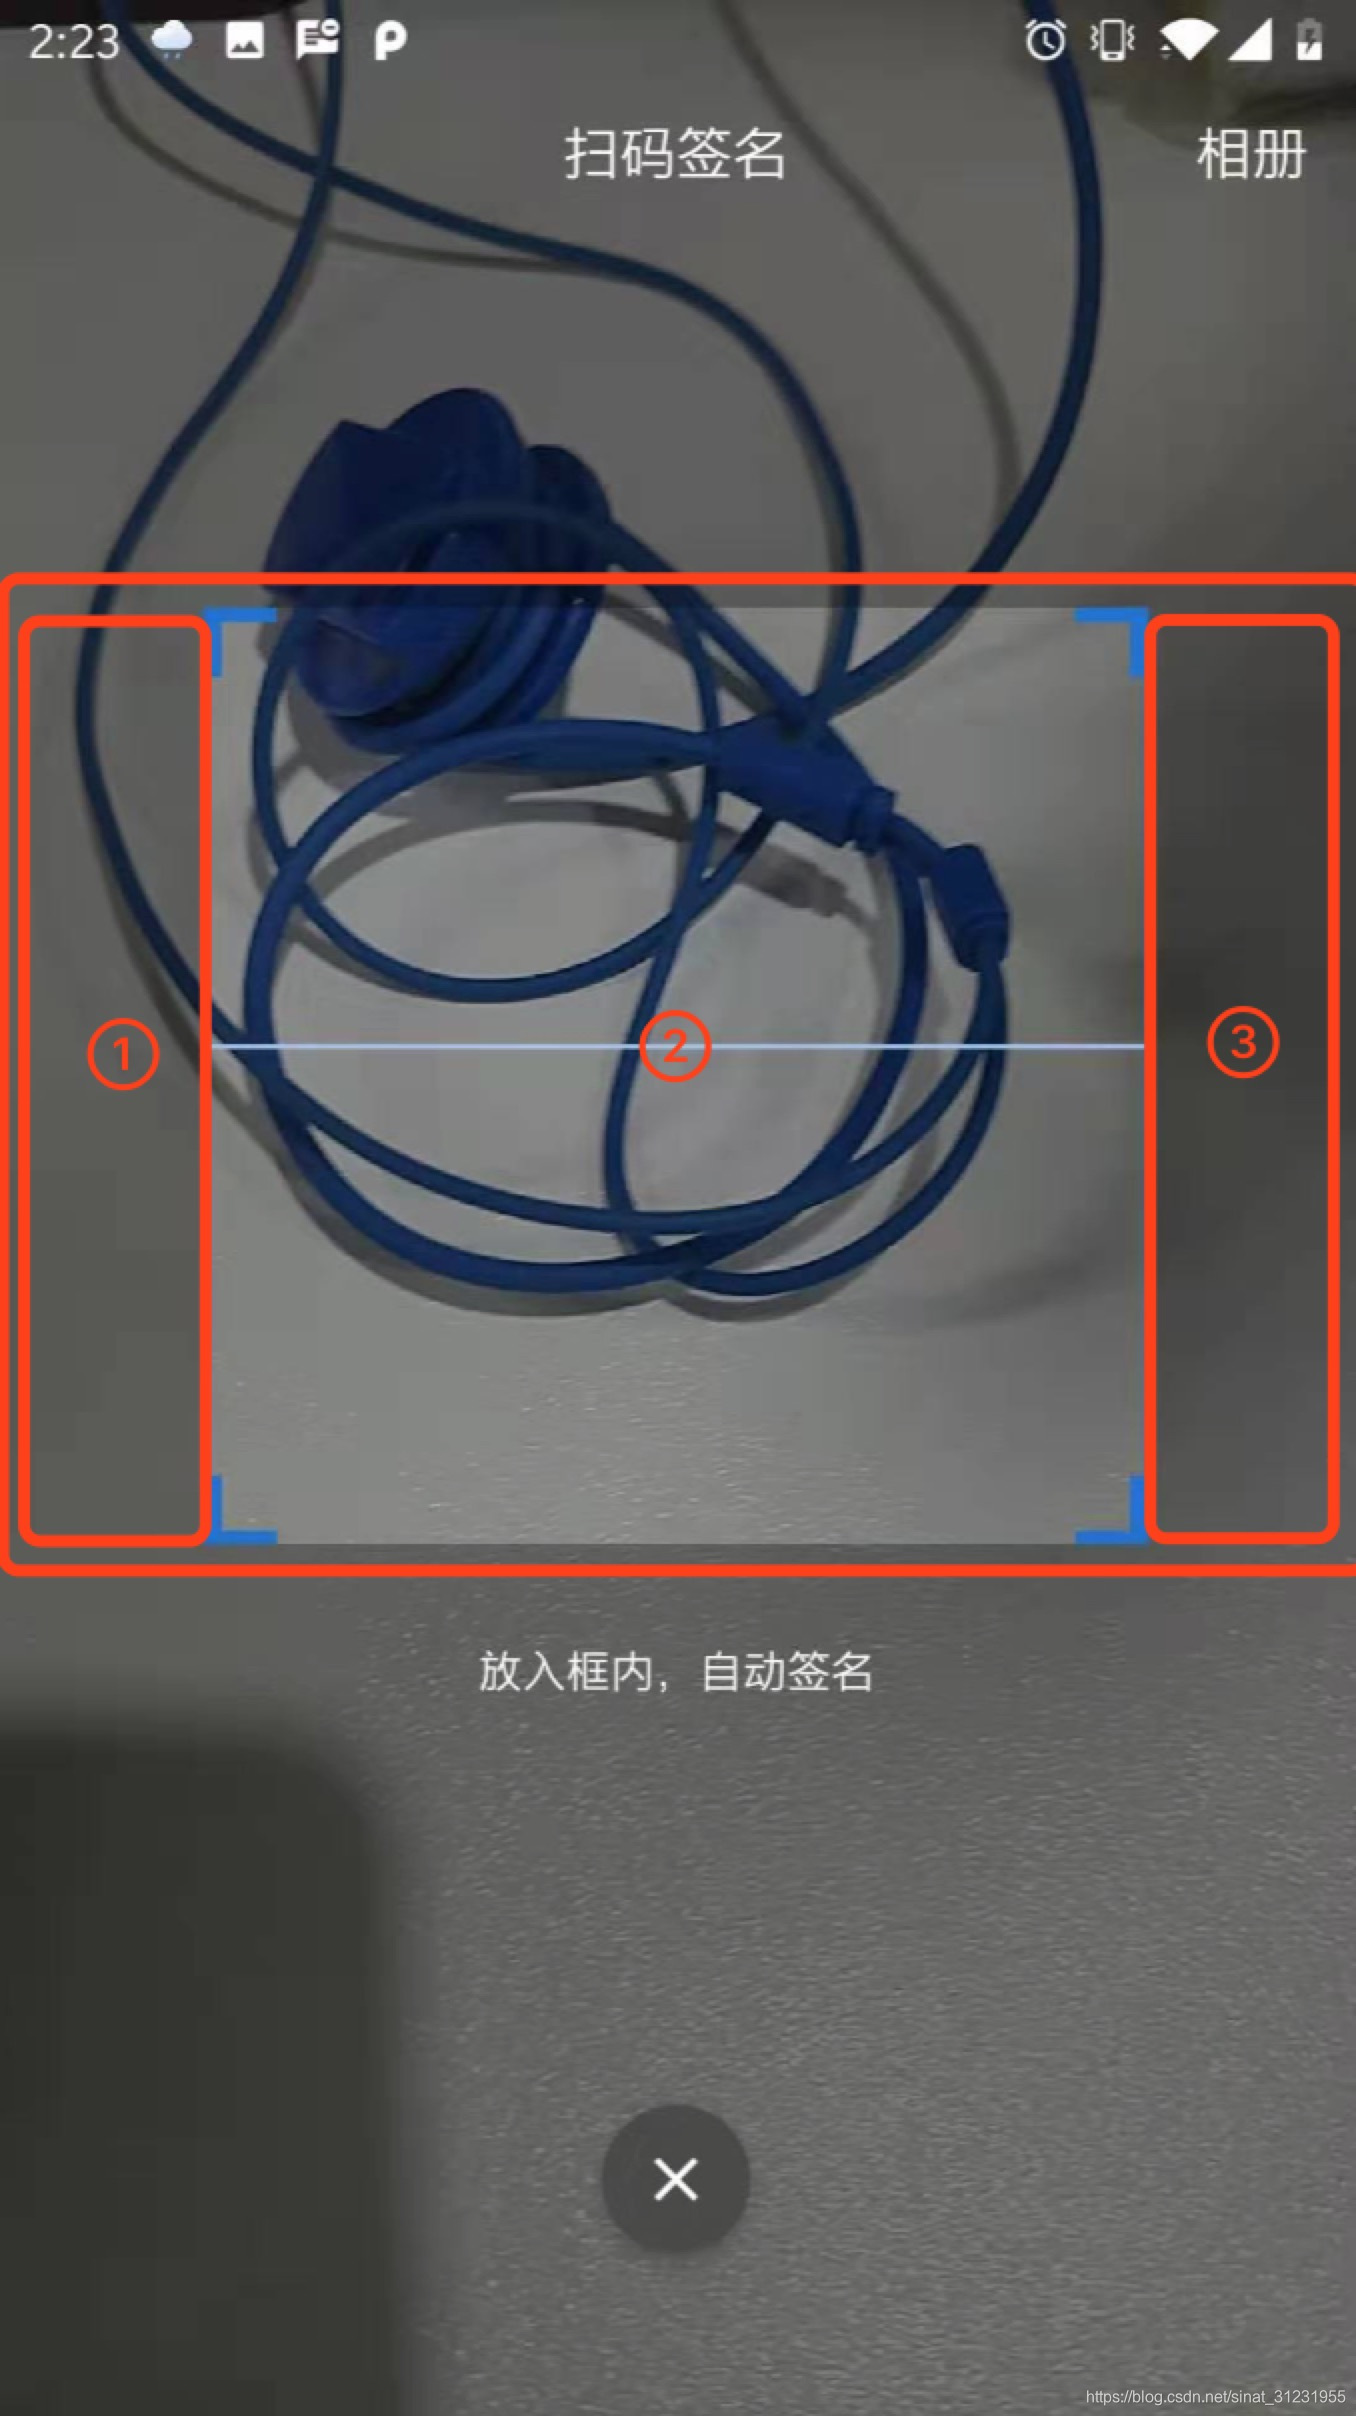
中间②区域背景用UI给的透明图片,加上扫描动画,就像模像样啦~
扫描动画用的是RN原生的Animated
// 初始化
 this.state = {
      moveAnim: new Animated.Value(0), // 扫描动画
};

// 设置扫描高度,速度等
startAnimation = () => {
    this.state.moveAnim.setValue(258);
    Animated.timing(this.state.moveAnim, {
      toValue: 0,
      duration: 1500,
      easing: Easing.linear
    }).start(() => this.startAnimation());
  };

// render函数中
  <Animated.View
      style={[styles.border,
      { transform: [{ translateY:this.state.moveAnim }] }
      ]}
    />
完成了相机布局,将onBarCodeRead函数写好自己的回调,扫描二维码部分就告一段落了。
相册读取二维码
这一部分我用了react-native-image-picker和react-native-local-barcode-recognizer,首先用react-native-image-picker读取相册并选取想要扫描的图片,再将图片信息使用react-native-local-barcode-recognizer解析,其实解析部分也可以自己使用Zxing库,react-native-local-barcode-recognizer本身也是对Zxing的封装。
引入两个库的过程git上有,很方便的一点是image-picker读取图片数据可以直接获取Base64数据,格式刚好是local-barcode-recognizer解析需要的。
部分二维码无法识别
local-barcode-recognizer库解析时,有些二维码无法识别,我刚开始一直以为是二维码数据过长,不好解析,后来发现是现在的手机拍照像素高照片过大。于是在local-barcode-recognizer库的源码解析代码中加入一个缩小图片数据的函数。果然,缩小图片后可以解析之前拍下的二维码啦~
public static Bitmap getSmallerBitmap(Bitmap bitmap) {
        int size = bitmap.getWidth() * bitmap.getHeight() / 160000;
        if (size <= 1)
            return bitmap; // 如果小于
        else {
            Matrix matrix = new Matrix();
            matrix.postScale((float) (1 / Math.sqrt(size)), (float) (1 / Math.sqrt(size)));
            Bitmap resizeBitmap = Bitmap.createBitmap(bitmap, 0, 0, bitmap.getWidth(), bitmap.getHeight(), matrix,
                    true);
            return resizeBitmap;
        }
    }
二维码识别率低
二维码识别率低的问题困扰了我很久,毕竟用react-native-camera扫描的时候,很快就识别了相应二维码。
我找了很久原因,发现react-native-camera解析时用的格式是YUV,而react-native-local-barcode-recognizer中用的是ARGB
网上也有博客说YUV格式解析识别率会更高,于是我更改了react-native-local-barcode-recognizer源码中decode的函数,确实提高了一定的识别率。(但是还是达不到react-native-camera的程度,好想直接知道微信的识别算法哦)
private BinaryBitmap generateBitmapFromImageData(Bitmap bitmap) {
        bitmap = getSmallerBitmap(bitmap);
        int[] mImageData = new int[bitmap.getWidth() * bitmap.getHeight()];
        bitmap.getPixels(mImageData, 0, bitmap.getWidth(), 0, 0, bitmap.getWidth(), bitmap.getHeight());
        int inputWidth = bitmap.getWidth();
        int inputHeight = bitmap.getHeight();
        byte[] yuv = new byte[inputWidth * inputHeight + ((inputWidth % 2 == 0 ? inputWidth : (inputWidth + 1))
                * (inputHeight % 2 == 0 ? inputHeight : (inputHeight + 1))) / 2];
        encodeYUV420SP(yuv, mImageData, inputWidth, inputHeight);
        bitmap.recycle();
        PlanarYUVLuminanceSource source = new PlanarYUVLuminanceSource(yuv, // byte[] yuvData
                inputWidth, // int dataWidth
                inputHeight, // int dataHeight
                0, // int left
                0, // int top
                inputWidth, // int width
                inputHeight, // int height
                false // boolean reverseHorizontal
        );
        return new BinaryBitmap(new);
    }

    private static void encodeYUV420SP(byte[] yuv420sp, int[] argb, int width, int height) {
        // 帧图片的像素大小
        final int frameSize = width * height;
        // Y的index从0开始
        int yIndex = 0;
        // UV的index从frameSize开始
        int uvIndex = frameSize;
        // YUV数据, ARGB数据
        int Y, U, V, a, R, G, B;
        ;
        int argbIndex = 0;
        // ---循环所有像素点,RGB转YUV---
        for (int j = 0; j < height; j++) {
            for (int i = 0; i < width; i++) {

                // a is not used obviously
                a = (argb[argbIndex] & 0xff000000) >> 24;
                R = (argb[argbIndex] & 0xff0000) >> 16;
                G = (argb[argbIndex] & 0xff00) >> 8;
                B = (argb[argbIndex] & 0xff);
                argbIndex++;

                // well known RGB to YUV algorithm
                Y = ((66 * R + 129 * G + 25 * B + 128) >> 8) + 16;
                U = ((-38 * R - 74 * G + 112 * B + 128) >> 8) + 128;
                V = ((112 * R - 94 * G - 18 * B + 128) >> 8) + 128;

                Y = Math.max(0, Math.min(Y, 255));
                U = Math.max(0, Math.min(U, 255));
                V = Math.max(0, Math.min(V, 255));
                yuv420sp[yIndex++] = (byte) Y;
                // ---UV---
                if ((j % 2 == 0) && (i % 2 == 0)) {
                    yuv420sp[uvIndex++] = (byte) V;
                    yuv420sp[uvIndex++] = (byte) U;
                }
            }
        }
    }
小提示
如果你像我一样直接修改 node_modules 内依赖源码,记得重新发包哦。因为线上自动化构建时,拉取的是未经修改的依赖。
我的解决办法是:fork 依赖的 git 源码,修改后发布新的npm包,再link 到业务项目中。
以上就是我使用React-Native 实现扫描二维码及读取相册二维码的小结,感谢阅读。