android提供给我们的View很多,但是在开发中我们会遇到各种不同的需求,对View的样式也会有不同的要求。这时系统提供给我们的View就不够用了,最好的方法就是使用自定义View,这样的View是可控的,可以根据我们的需求去定制它的样式。
而要自定义View就必须对View整个绘制过程了解透彻,这样才能在自定义View的时候得心应手,而要了解其绘制过程当然是需要从源码追踪的,理解其绘制过程和步骤。
MeasureSpec
在看View的绘制过程前,我们必须知道一些东西。如我们经常用的wrap_content,match_parent等,它们不是具体的值,因此,在测量的过程中就需要对其做特殊的操作来获取宽高尺寸。
而View内部进行测量的时候都是采用的MeasureSpec进行传递测量值和测量模式。而MeasureSpec实际上只是一个int值,但是在这里它确实存储着两个参数:测量值和测量模式。它通过将一个32位的整数拆分,其中用高2位来存放布局模式,而剩余30位则用来存储尺寸大小。
而MeasureSpec则是提供用于拆解组合这个值和模式的一个工具类,它是View的一个静态内部类,其中包括三种模式和多个方法,这些方法就是用于将模式和尺寸组合成int值的。
// View.java

public static class MeasureSpec {
    private static final int MODE_SHIFT = 30;
    private static final int MODE_MASK  = 0x3 << MODE_SHIFT;

	// 无限制模式,通常是系统所使用的,对大小没有限制
    public static final int UNSPECIFIED = 0 << MODE_SHIFT;

   // 精确模式,对应于layoutParams的match_parent和具体的dp值
    public static final int EXACTLY     = 1 << MODE_SHIFT;

	// 最大模式,这个模式提供一个建议尺寸,这只是View所能取到的最大的值,实际上这个值应当
	// 根据实际的占用来设置,对应wrao_content
    public static final int AT_MOST     = 2 << MODE_SHIFT;

    // 组合尺寸和模式
    public static int makeMeasureSpec(int size, int mode) {
        if (sUseBrokenMakeMeasureSpec) {
            return size + mode;
        } else {
            return (size & ~MODE_MASK) | (mode & MODE_MASK);
        }
    }

    public static int makeSafeMeasureSpec(int size, int mode) {
        if (sUseZeroUnspecifiedMeasureSpec && mode == UNSPECIFIED) {
            return 0;
        }
        return makeMeasureSpec(size, mode);
    }
    // 获取模式
    public static int getMode(int measureSpec) {
        return (measureSpec & MODE_MASK);
    }
    // 获取尺寸
    public static int getSize(int measureSpec) {
        return (measureSpec & ~MODE_MASK);
    }
	...
}
从这个工具类可以看到,它一共有三种模式,UNSPECIFIED ,EXACTLY,AT_MOST ,然后其他的就是用来拆分合成数据的工具方法。
UNSPECIFIED
翻译过来是未指明的。这种模式是系统布局所使用的,对于宽高没有限制,想要多大都可以的那种。
EXACTLY
精确模式,即尺寸是精确大小的,对应起来的话是布局文件中的match_parent和具体dp值。
AT_MOST
最大模式,就是有个最大的限制值,不能超过该值。对应wrap_content。
在View中对应的布局参数会放置在ViewGroup.LayoutParams中,其中宽高对应的模式就在其中。
 	public static final int MATCH_PARENT = -1;
    public static final int WRAP_CONTENT = -2;
在我们使用的时候,可以通过LayoutParams.width/height 来获取布局文件设置的宽高。
了解了这些后就可以继续向下看View的绘制流程了。
Measure
我们知道,对于View而言,显示在屏幕上要经历三个步骤,measure,layout和draw。而这个过程,是ViewRootImpl通过依次调用performMeasure/Layout/Draw这三个方法实现的,他们分别对应着View的再这三个过程。而这三个步骤也将会从顶层View开始,然后逐步分发到其子View,从而实现整个绘制的过程。
而顶层View则是DecorView,也就是说,绘制的整个流程都是从DecorView开始的。那么,接下来就开始分析DecorView的绘制过程。
通过源码我们可以知道,measure方法是被final所修饰的,也就是说不会被override,那么DecorView的measure其实也就是View的measure。
// View.java

public final void measure(int widthMeasureSpec, int heightMeasureSpec) {
    /* widthMeasureSpec ,heightMeasureSpec
	* 这两个参数是父View传递进来的,该值是根据父View的尺寸和模式然后结合子View的尺寸和模式计算所得
	* 这两个参数是父View所给的建议尺寸,子View应当根据这两个值进行适当的测量处理
	* 对于顶层View,由于没有父View,因此这两个值是根据屏幕大小来生成的。
	* 每一个View测量子View的时候都应当为子View生成该尺寸模式传递下去,而这个尺寸模式实际上可以理解为
	* 约束条件,子View需要准守这个约束条件来进行自己的测量过程
	*/
	boolean optical = isLayoutModeOptical(this);
    if (optical != isLayoutModeOptical(mParent)) {
        Insets insets = getOpticalInsets();
        int oWidth  = insets.left + insets.right;
        int oHeight = insets.top  + insets.bottom;
        widthMeasureSpec  = MeasureSpec.adjust(widthMeasureSpec,  optical ? -oWidth  : oWidth);
        heightMeasureSpec = MeasureSpec.adjust(heightMeasureSpec, optical ? -oHeight : oHeight);
    }

    // Suppress sign extension for the low bytes
    long key = (long) widthMeasureSpec << 32 | (long) heightMeasureSpec & ffffffL;
    if (mMeasureCache == null) mMeasureCache = new LongSparseLongArray(2);

	// 强制布局,在View#requestLayout中会设置该标志
    final boolean forceLayout = (mPrivateFlags & PFLAG_FORCE_LAYOUT) == PFLAG_FORCE_LAYOUT;

    // 布局参数是否发生了变化
    final boolean specChanged = widthMeasureSpec != mOldWidthMeasureSpec
            || heightMeasureSpec != mOldHeightMeasureSpec;
    // 宽高的模式是否都是Exactly,即固定值或者match_parent
    final boolean isSpecExactly = MeasureSpec.getMode(widthMeasureSpec) == MeasureSpec.EXACTLY
            && MeasureSpec.getMode(heightMeasureSpec) == MeasureSpec.EXACTLY;
    // 是否已经测量过了,并且尺寸没有发生变化
    final boolean matchesSpecSize = getMeasuredWidth() == MeasureSpec.getSize(widthMeasureSpec)
            && getMeasuredHeight() == MeasureSpec.getSize(heightMeasureSpec);

    final boolean needsLayout = specChanged
            && (sAlwaysRemeasureExactly || !isSpecExactly || !matchesSpecSize);

	// 当需要重新测量的时候,即View调用了requestLayout或者布局发生了变化
    if (forceLayout || needsLayout) {
        // first clears the measured dimension flag
        mPrivateFlags &= ~PFLAG_MEASURED_DIMENSION_SET;

        resolveRtlPropertiesIfNeeded();

		// 若不是因为requestLayout而引起的重新布局,则先从缓存中查找
        int cacheIndex = forceLayout ? -1 : mMeasureCache.indexOfKey(key);
        if (cacheIndex < 0 || sIgnoreMeasureCache) {
            // measure ourselves, this should set the measured dimension flag back
            // 若是requestLayout或者忽略缓存,则重新测量自身
            onMeasure(widthMeasureSpec, heightMeasureSpec);
            mPrivateFlags3 &= ~PFLAG3_MEASURE_NEEDED_BEFORE_LAYOUT;
        } else {
            long value = mMeasureCache.valueAt(cacheIndex);
            // Casting a long to int drops the high 32 bits, no mask needed
           // 否则的话直接设置为缓存中获取的值
           setMeasuredDimensionRaw((int) (value >> 32), (int) value);
            mPrivateFlags3 |= PFLAG3_MEASURE_NEEDED_BEFORE_LAYOUT;
        }

        // flag not set, setMeasuredDimension() was not invoked, we raise
        // an exception to warn the developer
        if ((mPrivateFlags & PFLAG_MEASURED_DIMENSION_SET) != PFLAG_MEASURED_DIMENSION_SET) {
            throw new IllegalStateException("View with id " + getId() + ": "
                    + getClass().getName() + "#onMeasure() did not set the"
                    + " measured dimension by calling"
                    + " setMeasuredDimension()");
        }

        mPrivateFlags |= PFLAG_LAYOUT_REQUIRED;
    }

    mOldWidthMeasureSpec = widthMeasureSpec;
    mOldHeightMeasureSpec = heightMeasureSpec;

	// 将测量结果保存在缓存中
    mMeasureCache.put(key, ((long) mMeasuredWidth) << 32 |
            (long) mMeasuredHeight & 0xffffffffL); // suppress sign extension
}
我们可以看到,在measure中主要做了两件事,测量自身和设置测量结果值。
在需要测量的时候,会调用onMeasure方法进行测量;不需要测量的时候直接设置测量结果为从缓存中读取到的值setMeasuredDimensionRaw。因此,当需要调用onMeasure测量的时候,我们必须要通过setMeasuredDimension/Raw设置测量结果。
继续看View的onMeasure方法。
// View.java

// 多层嵌套,最终调用setMeasuredDimensionRaw将结果保存下来
protected void onMeasure(int widthMeasureSpec, int heightMeasureSpec) {
    setMeasuredDimension(
        getDefaultSize(getSuggestedMinimumWidth(), widthMeasureSpec),
        getDefaultSize(getSuggestedMinimumHeight(), heightMeasureSpec));
}

protected final void setMeasuredDimension(int measuredWidth, int measuredHeight) {
    boolean optical = isLayoutModeOptical(this);
    if (optical != isLayoutModeOptical(mParent)) {
        Insets insets = getOpticalInsets();
        int opticalWidth  = insets.left + insets.right;
        int opticalHeight = insets.top  + insets.bottom;

        measuredWidth  += optical ? opticalWidth  : -opticalWidth;
        measuredHeight += optical ? opticalHeight : -opticalHeight;
    }
    setMeasuredDimensionRaw(measuredWidth, measuredHeight);
}

private void setMeasuredDimensionRaw(int measuredWidth, int measuredHeight) {
    mMeasuredWidth = measuredWidth;
    mMeasuredHeight = measuredHeight;

    mPrivateFlags |= PFLAG_MEASURED_DIMENSION_SET;
}
从上面可以看到,在View的onMeasure中并没有做什么太多的测量,只是将获取的默认值(这个值是父View所传递进来的,父View通过计算所传递给子View的建议尺寸)通过setMeasuredDimension继而调用setMeasuredDimensionRaw方法进行设置,这就完成了保存测量值的过程。
另外可以看到在setMeasuredDimensionRaw中,直接将测量的结果值保存在了mMeasureWidth和mMeasureHeight中,此时就可以通过View的getMeasuredWidth和getMeasuredHeight方法来获取View的测量宽高了。但是注意的是,这个宽高并不一定是View的实际大小。实际大小是以布局时的坐标而定的,当然大部分情况下它们是一致的。
public final int getMeasuredWidth() {
    return mMeasuredWidth & MEASURED_SIZE_MASK;
}
public final int getMeasuredHeight() {
    return mMeasuredHeight & MEASURED_SIZE_MASK;
}
View的onMeasure方法还没有分析完,这里只是分析了最外层的setMeasuredDimension方法。而内层的对于宽高的处理还没有分析,那么继续看内层的方法。
// View.java

/*
* 这个方法是View提供的用于获取View的实际宽高的方法
* 该方法没有具体计算View本身应该的宽高,而是直接拿来父View给的建议宽高来直接当作本身的宽高
* 而对于系统方法所提供的UNSPECIFIED模式,则设置自身宽高为minWidth/Height和背景宽高相比的较大值
*/
public static int getDefaultSize(int size, int measureSpec) {
    // measureSpec : 父View给的建议宽高
    // size :默认最小值,android:minWidth和背景宽高相比的,该值的获取在后面有说明

	int result = size;
    int specMode = MeasureSpec.getMode(measureSpec);
    int specSize = MeasureSpec.getSize(measureSpec);

    switch (specMode) {
    case MeasureSpec.UNSPECIFIED:
        result = size;
        break;
    case MeasureSpec.AT_MOST:
    case MeasureSpec.EXACTLY:
        result = specSize;
        break;
    }
    return result;
}

protected int getSuggestedMinimumWidth() {
    return (mBackground == null) ? mMinWidth : max(mMinWidth, mBackground.getMinimumWidth());
}
getDefaultSize方法有两个参数,第一个是getSuggestedMinimumWidth()的返回值,第二个是父View给的建议尺寸参数。可以看到,当测量模式是UNSPECIFIED的时候,获取的默认值就是getSuggestedMinimumWidth的值。而在AT_MOST和EXACTLY模式中的值都是一样的,是父View传递的建议值的大小。
getSuggestedMinimumWidth则会先判断View是否设置了背景,若是没设置,则使用mMinWidth 的值,该值是在布局中的android:minWidth设置的,默认为0。若是设置了背景,则比较该值与背景的宽,取较大的值,高的尺寸也是一样。
另外可以看出在AT_MOST和EXACTLY模式的时候值是一样的,也就是说在默认情况下,View的宽高就是父View给的建议值。因此,如是我们自定义View的时候应该重写onMeasure方法,然后在原测量的基础上处理wrap_content的情况。至于match_parent和具体数值则可以直接使用默认的这种测量情况,因为match_parent的时候构建的子View的测量参数是父View的宽高,具体数值的时候构建的子View的宽高也是该具体数值,这都是满足我们条件的。而构建子View的测量参数的规则在ViewGroup中,我们稍后会分析。
而我们知道在布局文件中设置View的宽高为wrap_content和match_parent的结果是一样的,都是铺满父View的,其中就与这里有关。那么就可以推断在ViewGroup中,构建子View的测量参数的时候,在子View为的宽高为match_parent和wrap_content的时候,所构建的宽高是一样的,而且都是与父View的宽高一致。
到这里就可以看出了View的测量过程:
1,首先调用measure方法判断是否需要重新测量。
2,需要重新测量先从缓存中查找,有的话直接设置缓存中的值。
3,缓存中没有的话则使用onMeasure方法进行测量,然后设置测量值。
由于View没有子View,所以它的测量比较简单,但是ViewGroup就不一样了(虽然ViewGroup也是View,但是由于它可以包含子View,故这里将它与普通View区分开来),它不仅需要测量自身,还需要测量子View。
由上面的分析可以知道,measure是final修饰的不能重写的。也就是说View与ViewGroup的测量的过程的区别只在onMeasure中会有所区分。而是在ViewGroup中又没有重写onMeasure,所以需要我们自己进行测量的实现。但是在ViewGroup中却为我们定义了一些方法来辅助我们进行测量。
常用的是measureChildWithMargins
// ViewGroup.java

// 参数分别是父View的布局参数和已使用过的宽高
protected void measureChildWithMargins(View child,
        int parentWidthMeasureSpec, int widthUsed,
        int parentHeightMeasureSpec, int heightUsed) {
    // 子View的属性参数
    final MarginLayoutParams lp = (MarginLayoutParams) child.getLayoutParams();
    // 设置margin,构建给子View的建议宽高模式参数
    final int childWidthMeasureSpec = getChildMeasureSpec(parentWidthMeasureSpec,
            mPaddingLeft + mPaddingRight + lp.leftMargin + lp.rightMargin
                    + widthUsed, lp.width);
    final int childHeightMeasureSpec = getChildMeasureSpec(parentHeightMeasureSpec,
            mPaddingTop + mPaddingBottom + lp.topMargin + lp.bottomMargin
                    + heightUsed, lp.height);
	// 调用子View的测量方法进行测量
    child.measure(childWidthMeasureSpec, childHeightMeasureSpec);
}
该方法通过 getChildMeasureSpec方法生成给子View的建议测量参数,然后再交给子View去进行自己的测量。注意的是该方法在获取子View的测量参数的时候是去掉了margin和padding的。
// ViewGroup.java

// 参数是父View的spec参数,padding,子View的布局参数的宽高
public static int getChildMeasureSpec(int spec, int padding, int childDimension) {
    // 父布局的测量模式和尺寸
    int specMode = MeasureSpec.getMode(spec);
    int specSize = MeasureSpec.getSize(spec);

	// 去掉了padding(在measureChildWithMargins中该值还包括了margin)后的父布局的大小。
    int size = Math.max(0, specSize - padding);

    int resultSize = 0;
    int resultMode = 0;

    switch (specMode) {
    // 父布局是精确模式,对应match_parent或者具体值
    case MeasureSpec.EXACTLY:
    	// 子布局是具体值,则大小为子布局的大小,并设为精确模式
        if (childDimension >= 0) {
            resultSize = childDimension;
            resultMode = MeasureSpec.EXACTLY;
        // 子布局为match_parent,则设置为父布局的大小(size在上面已经计算过),设为精确模式。
        } else if (childDimension == LayoutParams.MATCH_PARENT) {
            resultSize = size;
            resultMode = MeasureSpec.EXACTLY;
         // 子布局为wrap_content,则设为父布局大小(该设置的是实际大小最大只能取到这个值),设为最大模式。
        } else if (childDimension == LayoutParams.WRAP_CONTENT) {
            resultSize = size;
            resultMode = MeasureSpec.AT_MOST;
        }
        break;

    // 父布局是最大模式值,对应wrap_content
    case MeasureSpec.AT_MOST:
        // 子布局是具体值,则大小为子布局的大小,并设为精确模式
        if (childDimension >= 0) {
            resultSize = childDimension;
            resultMode = MeasureSpec.EXACTLY;
        // 子View为match_parent,则设为父布局大小(该设置的是实际大小最大只能取到这个值),设为最大模式。
        } else if (childDimension == LayoutParams.MATCH_PARENT) {
            resultSize = size;
            resultMode = MeasureSpec.AT_MOST;

        } else if (childDimension == LayoutParams.WRAP_CONTENT) {
            resultSize = size;
            resultMode = MeasureSpec.AT_MOST;
        }
        break;

    // 未指定模式,无限制模式,由系统设置调用,
    case MeasureSpec.UNSPECIFIED:
        if (childDimension >= 0) {
            // Child wants a specific size... let him have it
            resultSize = childDimension;
            resultMode = MeasureSpec.EXACTLY;
        } else if (childDimension == LayoutParams.MATCH_PARENT) {
            // Child wants to be our size... find out how big it should
            // be
            resultSize = View.sUseZeroUnspecifiedMeasureSpec ? 0 : size;
            resultMode = MeasureSpec.UNSPECIFIED;
        } else if (childDimension == LayoutParams.WRAP_CONTENT) {
            // Child wants to determine its own size.... find out how
            // big it should be
            resultSize = View.sUseZeroUnspecifiedMeasureSpec ? 0 : size;
            resultMode = MeasureSpec.UNSPECIFIED;
        }
        break;
    }
    //noinspection ResourceType
    return MeasureSpec.makeMeasureSpec(resultSize, resultMode);
}
上面的方法就是生成子View 的建议测量参数的规则,它不单纯是根据父View或者子View来进行构建,而是基于二者共同的影响下进行构建,返回值就是构建出的给子View的建议测量宽高。一直在说建议测量宽高,因为这个值是父View给子View传递的宽高模式,子View将会根据这个参数来设置自己宽高,而建议二字则是说子View并不一定必须根据这两个参数进行设置,只不过大部分情况下子View都要准守的。
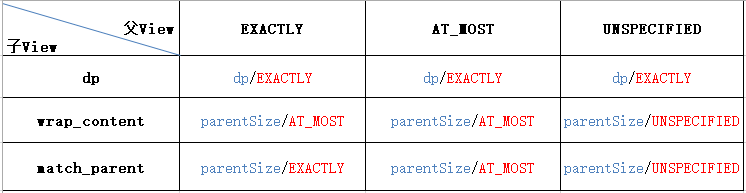
上述图片就是构建子View测量参数的规则,这是在父View 和子View共同影响下产生的。是从ViewGroup的getMeasureSpec方法中总结出的。
规则:
1,尺寸:
当子View为具体的数值的时候,构建的参数的尺寸就是该数值,其余情况都是父View的尺寸。
2,模式
A:父View非UNSPECIFIED模式下:
a1,当子View为具体的数值的时候,构建的模式都是EXACTLY
a2,当子View为match_parent并且父View为EXACTLY的时候,构建的模式是EXACTLY
a3,其余均是AT_MOST
B:父View为UNSPECIFIED 模式下:
b1,子View为具体数值的时候模式为EXACTLY
b2,其余情况为UNSPECIFIED
上述为生成子View的建议测量参数时的规则,当我们自定义View的时候也应当遵守这种规则。
这就是measureChildWithMargins的流程。在上面说到View的测量过程的时候说到在方法getDefaultSize中,子View的match_parent和wrap_content的结果是一样的,是因为在ViewGroup的getChildMeasureSpec方法中,只要子View是wrap_content和match_parent,ViewGroup所给的大小都是父布局的大小。因此,若是不重写View的onMeasure而是由默认的onMeasure测量的话,wrap_content模式和match_parent 模式就都是一样的填充父布局。这也满足上面分析子View时提到的猜测。
此外ViewGroup还有一个方法用来测量子View,与measureChildWithMargins类似,只不过是少测量了margin而已。
//ViewGroup.java

// 循环遍历子View进行测量(几乎用不到)
protected void measureChildren(int widthMeasureSpec, int heightMeasureSpec) {
    final int size = mChildrenCount;
    final View[] children = mChildren;
    // 循环遍历测量子View
    for (int i = 0; i < size; ++i) {
        final View child = children[i];
        if ((child.mViewFlags & VISIBILITY_MASK) != GONE) {
            measureChild(child, widthMeasureSpec, heightMeasureSpec);
        }
    }
}

protected void measureChild(View child, int parentWidthMeasureSpec,
        int parentHeightMeasureSpec) {
    final LayoutParams lp = child.getLayoutParams();

    final int childWidthMeasureSpec = getChildMeasureSpec(parentWidthMeasureSpec,
            mPaddingLeft + mPaddingRight, lp.width);
    final int childHeightMeasureSpec = getChildMeasureSpec(parentHeightMeasureSpec,
            mPaddingTop + mPaddingBottom, lp.height);

    child.measure(childWidthMeasureSpec, childHeightMeasureSpec);
}
上面的方法measureChild可以看出与measureChildWithMargins是一致的,区别就是measureChild没有测量margin。另外measureChild还提供了一个遍历的方法measureChildren来帮助遍历子View进行测量。而带margin的则没有,需要我们手动遍历。这两个方法都是ViewGroup提供给我们的,我们可以选择合适的方法去调用,但是普遍情况下,对于View而言还是带有margin属性比较友好一些。因此在使用measureChild的时候,我们最好自己计算它的margin然后进行设置。而measureChildren则用的很少,它只适用于不含margin属性的View。
到这里测量的过程就已经结束了,那么接下来就可以继续走流程了。继续上面的,我们知道DecorView的measure实际上是调用了View的measure方法,而View的measure又调用了onMeasure方法。那么接着看DecorView吧,而DecorView是继承自FrameLayout的,那么实际上它的onMeasure也就是FrameLayout的onMeasure。
// FrameLayout.java

protected void onMeasure(int widthMeasureSpec, int heightMeasureSpec) {
    int count = getChildCount();

    final boolean measureMatchParentChildren =
            MeasureSpec.getMode(widthMeasureSpec) != MeasureSpec.EXACTLY ||
            MeasureSpec.getMode(heightMeasureSpec) != MeasureSpec.EXACTLY;
    mMatchParentChildren.clear();

    int maxHeight = 0;
    int maxWidth = 0;
    int childState = 0;

	// 循环遍历子View进行测量
    for (int i = 0; i < count; i++) {
        final View child = getChildAt(i);
		// mMeasureAllChildren是在FrameLayout的属性android:measureAllChildren,默认为false
		// 若是不指定测量所有子View,则只会测量不是GONE的View
        if (mMeasureAllChildren || child.getVisibility() != GONE) {
            // 测量View的具体实现,上面已经介绍过
			measureChildWithMargins(child, widthMeasureSpec, 0, heightMeasureSpec, 0);
            // 记录子View的最大宽高
			final LayoutParams lp = (LayoutParams) child.getLayoutParams();
            maxWidth = Math.max(maxWidth,
                    child.getMeasuredWidth() + lp.leftMargin + lp.rightMargin);
            maxHeight = Math.max(maxHeight,
                    child.getMeasuredHeight() + lp.topMargin + lp.bottomMargin);
            childState = combineMeasuredStates(childState, child.getMeasuredState());
            if (measureMatchParentChildren) {
                if (lp.width == LayoutParams.MATCH_PARENT ||
                        lp.height == LayoutParams.MATCH_PARENT) {
                    mMatchParentChildren.add(child);
                }
            }
        }
    }


    maxWidth += getPaddingLeftWithForeground() + getPaddingRightWithForeground();
    maxHeight += getPaddingTopWithForeground() + getPaddingBottomWithForeground();

    // 比较获取到的最大宽高和建议宽高的大小,其中建议宽高在上面也有提过
	// 返回的结果是android:minHeight/Width和background的宽高中的较大值
    maxHeight = Math.max(maxHeight, getSuggestedMinimumHeight());
    maxWidth = Math.max(maxWidth, getSuggestedMinimumWidth());

    // 比较前景与获取的最大值
    final Drawable drawable = getForeground();
    if (drawable != null) {
        maxHeight = Math.max(maxHeight, drawable.getMinimumHeight());
        maxWidth = Math.max(maxWidth, drawable.getMinimumWidth());
    }

	// 设置自身的测量结果
    setMeasuredDimension(resolveSizeAndState(maxWidth, widthMeasureSpec, childState),
            resolveSizeAndState(maxHeight, heightMeasureSpec,
                    childState << MEASURED_HEIGHT_STATE_SHIFT));

    count = mMatchParentChildren.size();
    if (count > 1) {
		// 对于子View含有match_parent模式的进行再次测量
        for (int i = 0; i < count; i++) {
            final View child = mMatchParentChildren.get(i);
            final MarginLayoutParams lp = (MarginLayoutParams) child.getLayoutParams();

			//宽的模式
            final int childWidthMeasureSpec;
			// 若是为match_parent,则设置父View的模式为EXACTLY。
            if (lp.width == LayoutParams.MATCH_PARENT) {
                final int width = Math.max(0, getMeasuredWidth()
                        - getPaddingLeftWithForeground() - getPaddingRightWithForeground()
                        - lp.leftMargin - lp.rightMargin);
                childWidthMeasureSpec = MeasureSpec.makeMeasureSpec(
                        width, MeasureSpec.EXACTLY);
            } else {
                childWidthMeasureSpec = getChildMeasureSpec(widthMeasureSpec,
                        getPaddingLeftWithForeground() + getPaddingRightWithForeground() +
                        lp.leftMargin + lp.rightMargin,
                        lp.width);
            }

            final int childHeightMeasureSpec;
			// 若是为match_parent,则设置父View的模式为EXACTLY。
            if (lp.height == LayoutParams.MATCH_PARENT) {
                final int height = Math.max(0, getMeasuredHeight()
                        - getPaddingTopWithForeground() - getPaddingBottomWithForeground()
                        - lp.topMargin - lp.bottomMargin);
                childHeightMeasureSpec = MeasureSpec.makeMeasureSpec(
                        height, MeasureSpec.EXACTLY);
            } else {
                childHeightMeasureSpec = getChildMeasureSpec(heightMeasureSpec,
                        getPaddingTopWithForeground() + getPaddingBottomWithForeground() +
                        lp.topMargin + lp.bottomMargin,
                        lp.height);
            }
			// 测量子View的时候
			// 以父ViewGroup为EXACTLY模式,进行测量
            child.measure(childWidthMeasureSpec, childHeightMeasureSpec);
        }
    }
}
从上面的分析可以看到,FrameLayout也是循环子View然后调用measureChildWithMargins方法来测量子View的,这与我们的分析是一致的,通过measureChildWithMargins内部又调用child.measure进行子View的测量,从而将测量过程传递下去。
另外可以看到,在FrameLayout中对于部分子View的测量不只是一次,而是两次。也就是对于宽/高模式为match_parent的子View进行了二次测量,这次的测量中,是以父View(也就是FrameLayout)的对应的宽/高模式设为EXACTLY来进行测量的。
从这里看,measure的过程就已经结束了,可以总结出measure的过程最重要的就是onMeasure方法,这是布局的主要方法。这里只分析了FrameLayout的onMeasure方法,但是和其他的View大同小异,都是根据自身特性进行不同的测量。
总结:
自定义View的话布局阶段需要以下几个步骤:
	1,重写onMeasure方法,在onMeasure中实现测量
	2,若是ViewGroup则需要循环遍历子View
		2.1,对子View进行measureChildWithMargins,该方法会测量子View的宽高并将测量过程传递下去
		2.2,通过子View的getMeasuredWidth/Height获取子View的测量宽高,然后进行测量自己的宽高
	3,测量自己的时候需要处理宽高为wrap_content的情况
	4,将测量结果通过setMeasuredDimension保存
	5,测量结束
测量结束,那么接下来继续看layout方法:
// View.java

public void layout(int l, int t, int r, int b) {
    if ((mPrivateFlags3 & PFLAG3_MEASURE_NEEDED_BEFORE_LAYOUT) != 0) {
        onMeasure(mOldWidthMeasureSpec, mOldHeightMeasureSpec);
        mPrivateFlags3 &= ~PFLAG3_MEASURE_NEEDED_BEFORE_LAYOUT;
    }

    int oldL = mLeft;
    int oldT = mTop;
    int oldB = mBottom;
    int oldR = mRight;

	// 最终会调用setFram来设置位置
    boolean changed = isLayoutModeOptical(mParent) ?
            setOpticalFrame(l, t, r, b) : setFrame(l, t, r, b);

	// 若是位置发生了改变,则调用onLayout方法进行重新布局
    if (changed || (mPrivateFlags & PFLAG_LAYOUT_REQUIRED) == PFLAG_LAYOUT_REQUIRED) {
        onLayout(changed, l, t, r, b);

        ...
    }
	...
}
同样的,layout方法虽然不是final修饰的,但是也是没有View覆写它,实际上,measure,layout,draw都没有被覆写,他们是android提供的一套布局框架。从它的实现来看,首先通过setFrame(setOpticalFrame内部也是调用setFrame)方法进行设置,该方法会判断View的位置是否发生变化,若是发生了变化就会返回true,然后在layout中就会调用onLayout 方法进行重新布局。
在View中,onLayout方法是个空实现,而在ViewGroup中,该方法是被重写为抽象方法。因为ViewGroup可以存在子View,因此必须实现该方法来对子View进行布局。
// View.java

protected boolean setFrame(int left, int top, int right, int bottom) {
    boolean changed = false;

    if (DBG) {
        Log.d(VIEW_LOG_TAG, this + " View.setFrame(" + left + "," + top + ","
                + right + "," + bottom + ")");
    }

	// 新设置的位置与原来的坐标不一致
    if (mLeft != left || mRight != right || mTop != top || mBottom != bottom) {
        changed = true;

        // Remember our drawn bit
        int drawn = mPrivateFlags & PFLAG_DRAWN;

		// 获取新旧的宽高,并且判断是否是宽高发生的变化
        int oldWidth = mRight - mLeft;
        int oldHeight = mBottom - mTop;
        int newWidth = right - left;
        int newHeight = bottom - top;
        boolean sizeChanged = (newWidth != oldWidth) || (newHeight != oldHeight);

        // 若是不一致则进行重绘
        invalidate(sizeChanged);

		// 重新赋值新的位置
        mLeft = left;
        mTop = top;
        mRight = right;
        mBottom = bottom;
        mRenderNode.setLeftTopRightBottom(mLeft, mTop, mRight, mBottom);

        mPrivateFlags |= PFLAG_HAS_BOUNDS;

        if (sizeChanged) {
            sizeChange(newWidth, newHeight, oldWidth, oldHeight);
        }

        if ((mViewFlags & VISIBILITY_MASK) == VISIBLE || mGhostView != null) {
            mPrivateFlags |= PFLAG_DRAWN;
            invalidate(sizeChanged);
            invalidateParentCaches();
        }
        mPrivateFlags |= drawn;

        mBackgroundSizeChanged = true;
        mDefaultFocusHighlightSizeChanged = true;
        if (mForegroundInfo != null) {
            mForegroundInfo.mBoundsChanged = true;
        }

        notifySubtreeAccessibilityStateChangedIfNeeded();
    }
    return changed;
}
从setFrame中可以看到的当layout的位置发生变化的时候,会保存新的位置,然后根据尺寸是否发生变化进行不同的重绘过程。这与View的measure一样,都是默认的一种方法,而我们想要自己布局的话,只需要在onLayout方法中改变即可。
在setFrame中,若是位置发生了变化,则会进行保存新的位置,这时候View的宽高就确定了,可以通过getWidth/Height方法进行获取。
// View.java

public final int getWidth() {
    return mRight - mLeft;
}
public final int getHeight() {
    return mBottom - mTop;
}
布局的过程相对于测量比较简单,就只有这些。
所以我们接着看DecorView的onLayout方法进行了什么操作。
DecorView的onLayout方法依旧是FrameLayout提供的。
//FrameLayout.java

@Override
protected void onLayout(boolean changed, int left, int top, int right, int bottom) {
    layoutChildren(left, top, right, bottom, false /* no force left gravity */);
}

// 对子View进行布局,前四个参数是自己的坐标,最后一个参数可以从名字看出是强制使用left的gravity进行布局
void layoutChildren(int left, int top, int right, int bottom, boolean forceLeftGravity) {
    final int count = getChildCount();

    final int parentLeft = getPaddingLeftWithForeground();
    final int parentRight = right - left - getPaddingRightWithForeground();

    final int parentTop = getPaddingTopWithForeground();
    final int parentBottom = bottom - top - getPaddingBottomWithForeground();

    for (int i = 0; i < count; i++) {
        final View child = getChildAt(i);
		// 循环遍历非Gone的子View
        if (child.getVisibility() != GONE) {
            final LayoutParams lp = (LayoutParams) child.getLayoutParams();

            // 获取子View的测量后的宽高
			final int width = child.getMeasuredWidth();
            final int height = child.getMeasuredHeight();

			// 存储View左上角的坐标
            int childLeft;
            int childTop;

            int gravity = lp.gravity;
            if (gravity == -1) {
                gravity = DEFAULT_CHILD_GRAVITY;
            }

            final int layoutDirection = getLayoutDirection();
            final int absoluteGravity = Gravity.getAbsoluteGravity(gravity, layoutDirection);
            final int verticalGravity = gravity & Gravity.VERTICAL_GRAVITY_MASK;

			// 根据不同的gravity进行布局
			// 从下面可以看出,layout的位置都是相对于父View的。也就是设父View的左上角的位置为坐标零点。
			// 同样的,它并没有对子View的位置进行其他的操作,这里也就满足了FrameLayout的特性,
			// 即所有的子View都会摆放在左上角甚至重叠
            switch (absoluteGravity & Gravity.HORIZONTAL_GRAVITY_MASK) {
                case Gravity.CENTER_HORIZONTAL:
                    childLeft = parentLeft + (parentRight - parentLeft - width) / 2 +
                    lp.leftMargin - lp.rightMargin;
                    break;
                case Gravity.RIGHT:
                    if (!forceLeftGravity) {
                        childLeft = parentRight - width - lp.rightMargin;
                        break;
                    }
                case Gravity.LEFT:
                default:
                    childLeft = parentLeft + lp.leftMargin;
            }

            switch (verticalGravity) {
                case Gravity.TOP:
                    childTop = parentTop + lp.topMargin;
                    break;
                case Gravity.CENTER_VERTICAL:
                    childTop = parentTop + (parentBottom - parentTop - height) / 2 +
                    lp.topMargin - lp.bottomMargin;
                    break;
                case Gravity.BOTTOM:
                    childTop = parentBottom - height - lp.bottomMargin;
                    break;
                default:
                    childTop = parentTop + lp.topMargin;
            }

			// 调用子View的layout将布局过程传递下去
            child.layout(childLeft, childTop, childLeft + width, childTop + height);
        }
    }
}
在FrameLayout中,onLayout的布局全部由layoutChildren来实现。而在layoutChildren中也只是循环子View对于非GONE的View进行layout,而layout的依据就是measure的测量结果mMeasuredWidth/mMeasuredHeight。
相比于measure而言Layout可以说很简单了,另外在这里分析的是FrameLayout,因此布局过程比较简单,直接相对于左上角的坐标进行设置就行了。但是对于像LinearLayout这种,布局过程就会有所不同了,此时就不会放置在左上角而是根据上一个View的放置位置来设置下一个位置了。
总结:
	1,layout阶段只需要重写onLayout方法并在其中进行布局的操作
	2,若是普通View甚至可以不重写onLayout方式,默认方式进行布局即可
	3,若是ViewGroup,则需要在onLayout中进行循环遍历子View,然后计算子View的位置并调用子View的layout将布局分发下去
	4,layout结束
Draw
measure和Layout都已经分析了一遍了,剩下的就只剩一个draw了。
// View.java

public void draw(Canvas canvas) {
    final int privateFlags = mPrivateFlags;
    final boolean dirtyOpaque = (privateFlags & PFLAG_DIRTY_MASK) == PFLAG_DIRTY_OPAQUE &&
            (mAttachInfo == null || !mAttachInfo.mIgnoreDirtyState);
    mPrivateFlags = (privateFlags & ~PFLAG_DIRTY_MASK) | PFLAG_DRAWN;

    /*
     * Draw traversal performs several drawing steps which must be executed
     * in the appropriate order:
     *
     *      1. Draw the background
     *      2. If necessary, save the canvas' layers to prepare for fading
     *      3. Draw view's content
     *      4. Draw children
     *      5. If necessary, draw the fading edges and restore layers
     *      6. Draw decorations (scrollbars for instance)
     */

    // Step 1, draw the background, if needed
    int saveCount;

    if (!dirtyOpaque) {
        drawBackground(canvas);
    }

    // skip step 2 & 5 if possible (common case)
    final int viewFlags = mViewFlags;
    boolean horizontalEdges = (viewFlags & FADING_EDGE_HORIZONTAL) != 0;
    boolean verticalEdges = (viewFlags & FADING_EDGE_VERTICAL) != 0;
    if (!verticalEdges && !horizontalEdges) {
        // Step 3, draw the content
        if (!dirtyOpaque) onDraw(canvas);

        // Step 4, draw the children
        dispatchDraw(canvas);

        drawAutofilledHighlight(canvas);

        // Overlay is part of the content and draws beneath Foreground
        if (mOverlay != null && !mOverlay.isEmpty()) {
            mOverlay.getOverlayView().dispatchDraw(canvas);
        }

        // Step 6, draw decorations (foreground, scrollbars)
        onDrawForeground(canvas);

        // Step 7, draw the default focus highlight
        drawDefaultFocusHighlight(canvas);

        if (debugDraw()) {
            debugDrawFocus(canvas);
        }

        // we're done...
        return;
    }
	...
}
从上面的Draw方法可以看到,绘制过程分为6个部分:
	1,绘制背景
	2, 如果必要,保存canvas的layer来准备fading
	3, 绘制本身
	4, 绘制孩子View
	5, 如果必要,绘制衰退效果并恢复layer
	6, 绘制装饰效果,例如滚动条等
而就上面的6条而言,2和5通常是不必要的,可以忽略的。那么绘制的重点就留在了1346这几条上了。
其中,绘制背景和绘制装饰一般也是不需要我们关注的。所以我们主要关注的就是绘制本身和绘制子View。
// View.java

 // 绘制自身
 protected void onDraw(Canvas canvas) {
}

// 绘制子View
protected void dispatchDraw(Canvas canvas) {
}
在View中这两个方法都是空实现,因为每个View的绘制都各不相同,因此这里没有具体的实现,而是交由我们自己来实现的。
另外对于普通子View而言,它是不会有子View,那么dispatchDraw方法当然也是一个空实现。上面说到onDraw是因为每个view的表现都不一样,所以必须交由它的子类进行实现,但是绘制子View却是可以保持一致的,那么,在ViewGroup中肯定会重写这个方法进行具体的实现。
// ViewGroup.java

protected void dispatchDraw(Canvas canvas) {
    boolean usingRenderNodeProperties = canvas.isRecordingFor(mRenderNode);
    final int childrenCount = mChildrenCount;
    final View[] children = mChildren;
    int flags = mGroupFlags;

    if ((flags & FLAG_RUN_ANIMATION) != 0 && canAnimate()) {
        final boolean buildCache = !isHardwareAccelerated();
        // 循环子View,绑定本身带的动画
        for (int i = 0; i < childrenCount; i++) {
            final View child = children[i];
            if ((child.mViewFlags & VISIBILITY_MASK) == VISIBLE) {
                final LayoutParams params = child.getLayoutParams();
                attachLayoutAnimationParameters(child, params, i, childrenCount);
                bindLayoutAnimation(child);
            }
        }

        final LayoutAnimationController controller = mLayoutAnimationController;
        if (controller.willOverlap()) {
            mGroupFlags |= FLAG_OPTIMIZE_INVALIDATE;
        }

        controller.start();

        mGroupFlags &= ~FLAG_RUN_ANIMATION;
        mGroupFlags &= ~FLAG_ANIMATION_DONE;

        if (mAnimationListener != null) {
            mAnimationListener.onAnimationStart(controller.getAnimation());
        }
    }

    int clipSaveCount = 0;
    final boolean clipToPadding = (flags & CLIP_TO_PADDING_MASK) == CLIP_TO_PADDING_MASK;
    if (clipToPadding) {
        clipSaveCount = canvas.save(Canvas.CLIP_SAVE_FLAG);
        canvas.clipRect(mScrollX + mPaddingLeft, mScrollY + mPaddingTop,
                mScrollX + mRight - mLeft - mPaddingRight,
                mScrollY + mBottom - mTop - mPaddingBottom);
    }

    // We will draw our child's animation, let's reset the flag
    mPrivateFlags &= ~PFLAG_DRAW_ANIMATION;
    mGroupFlags &= ~FLAG_INVALIDATE_REQUIRED;

    boolean more = false;
    final long drawingTime = getDrawingTime();

    if (usingRenderNodeProperties) canvas.insertReorderBarrier();
    final int transientCount = mTransientIndices == null ? 0 : mTransientIndices.size();
    int transientIndex = transientCount != 0 ? 0 : -1;
    // Only use the preordered list if not HW accelerated, since the HW pipeline will do the
    // draw reordering internally
    final ArrayList<View> preorderedList = usingRenderNodeProperties
            ? null : buildOrderedChildList();
    final boolean customOrder = preorderedList == null
            && isChildrenDrawingOrderEnabled();
    for (int i = 0; i < childrenCount; i++) {
        while (transientIndex >= 0 && mTransientIndices.get(transientIndex) == i) {
            final View transientChild = mTransientViews.get(transientIndex);
            if ((transientChild.mViewFlags & VISIBILITY_MASK) == VISIBLE ||
                    transientChild.getAnimation() != null) {
                more |= drawChild(canvas, transientChild, drawingTime);
            }
            transientIndex++;
            if (transientIndex >= transientCount) {
                transientIndex = -1;
            }
        }

        final int childIndex = getAndVerifyPreorderedIndex(childrenCount, i, customOrder);
        final View child = getAndVerifyPreorderedView(preorderedList, children, childIndex);
        if ((child.mViewFlags & VISIBILITY_MASK) == VISIBLE || child.getAnimation() != null) {
            more |= drawChild(canvas, child, drawingTime);
        }
    }
    while (transientIndex >= 0) {
        // there may be additional transient views after the normal views
        final View transientChild = mTransientViews.get(transientIndex);
        if ((transientChild.mViewFlags & VISIBILITY_MASK) == VISIBLE ||
                transientChild.getAnimation() != null) {
            more |= drawChild(canvas, transientChild, drawingTime);
        }
        transientIndex++;
        if (transientIndex >= transientCount) {
            break;
        }
    }
    if (preorderedList != null) preorderedList.clear();

    // Draw any disappearing views that have animations
    if (mDisappearingChildren != null) {
        final ArrayList<View> disappearingChildren = mDisappearingChildren;
        final int disappearingCount = disappearingChildren.size() - 1;
        // Go backwards -- we may delete as animations finish
        for (int i = disappearingCount; i >= 0; i--) {
            final View child = disappearingChildren.get(i);
            more |= drawChild(canvas, child, drawingTime);
        }
    }
    if (usingRenderNodeProperties) canvas.insertInorderBarrier();

    if (debugDraw()) {
        onDebugDraw(canvas);
    }

    if (clipToPadding) {
        canvas.restoreToCount(clipSaveCount);
    }

    // mGroupFlags might have been updated by drawChild()
    flags = mGroupFlags;

    if ((flags & FLAG_INVALIDATE_REQUIRED) == FLAG_INVALIDATE_REQUIRED) {
        invalidate(true);
    }

    if ((flags & FLAG_ANIMATION_DONE) == 0 && (flags & FLAG_NOTIFY_ANIMATION_LISTENER) == 0 &&
            mLayoutAnimationController.isDone() && !more) {
        // We want to erase the drawing cache and notify the listener after the
        // next frame is drawn because one extra invalidate() is caused by
        // drawChild() after the animation is over
        mGroupFlags |= FLAG_NOTIFY_ANIMATION_LISTENER;
        final Runnable end = new Runnable() {
           @Override
           public void run() {
               notifyAnimationListener();
           }
        };
        post(end);
    }
}
上面的dispatchDraw比较复杂,考虑的比较多,包括隐藏的View,以及View的动画,但是我们可以看到的是它最终都是是调用了drawChild方法从而进一步调用child的draw方法进行绘制子View。因此,对于绘制过程,我们也只需要关注onDraw方法,即只绘制自身,而不用担心子View的分发绘制。
总结
View的绘制过程分为六步
其中大部分的都不用我们去关注,而只用关心onDraw方法即可,通过onDraw方法绘制自身。
总结:
View整个表现在屏幕上总共有三个过程,分别是measure,layout和draw。其中,measure过程要根据父View的模式和子View的宽高模式共同计算,得出measuredWidth/Height。而layout过程则根据measuredWidth/Height来设置View的位置,一旦layout结束,View的大小也就确定了。draw按照绘制背景->自身->子View->装饰,这个过程进行绘制。