实验环境
iptables和selinux关闭
redhat6.5
nginx:server1 172.25.35.51
服务器:
server2:172.25.35.52
server3:172.25.35.53
安装nginx
[root@server1 ~]# ls
nginx-1.14.0.tar.gz
[root@server1 ~]# tar zxf nginx-1.14.0.tar.gz
[root@server1 ~]# cd nginx-1.14.0/src/core
[root@server1 core]# vim nginx.h //改变显示
#define NGINX_VER "nginx"
[root@server1 core]# cd ..
[root@server1 src]# cd ..
[root@server1 nginx-1.14.0]# cd auto/cc
[root@server1 cc]# vim gcc //注释
172 #CFLAGS="$CFLAGS -g"
[root@server1 cc]# ./configure --help
[root@server1 nginx-1.14.0]# ./configure --prefix=/usr/local/nginx --with-http_ssl_module --with-http_stub_status_module --with-threads --with-file-aio //检测编译环境是否完善
[root@server1 nginx-1.14.0]# make
[root@server1 nginx-1.14.0]# make install
[root@server1 nginx-1.14.0]# ./configure --prefix=/usr/local/nginx --with-http_ssl_module --with-http_stub_status_module --with-threads --with-file-aio
[root@server1 nginx-1.14.0]# cd /usr/local/nginx/sbin/
[root@server1 sbin]# ln -s /usr/local/nginx/sbin/nginx /sbin/
[root@server1 sbin]# nginx -t //检测语法错误
[root@server1 sbin]# nginx //打开nginx
[root@server1 sbin]# nginx -s reload //重新加载
[root@server1 sbin]# nginx -s stop //关闭nginx
[root@server1 sbin]# cd ..
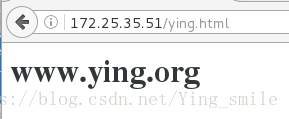
[root@server1 nginx]# cd html
[root@server1 html]# vim ying.html
<h1>www.ying.org<h1>
[root@server1 html]# nginx浏览器测试:
nginx做调度器
[root@server1 ~]# cd /usr/local/nginx/conf
[root@server1 conf]# lscpu
CPU(s): 2
[root@server1 conf]# vim nginx.conf
user nginx nginx;
worker_processes 2;
worker_cpu_affinity 01 10;
events {
worker_connections 65535;
}
http {
upstream ying {
#ip_hash; //Ip不变后端服务器不变,持续的后端连接
server 172.25.35.52:80;
server 172.25.35.53:80;
server 127.0.0.1;
}
server{
listen 80;
server_name www.westos.org; //域名访问
location / {
proxy_pass http://ying; //调度ying
}
}
[root@server1 conf]# vim /etc/security/limits.conf
nginx - nofile 65536
[root@server1 conf]# useradd -M -d /usr/local/nginx/ nginx
[root@server1 conf]# id nginx
uid=500(nginx) gid=500(nginx) groups=500(nginx)
[root@server1 conf]# nginx -t
[root@server1 conf]# nginx
[root@server1 conf]# nginx -s reload
打开服务器的httpd服务:
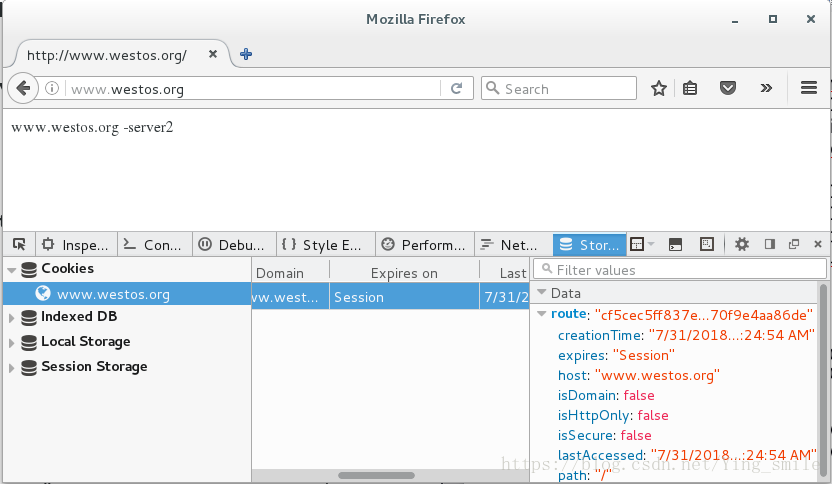
[root@server2 ~]# cat /var/www/html/index.html
www.westos.org -server2
[root@server3 ~]# cat /var/www/html/index.html
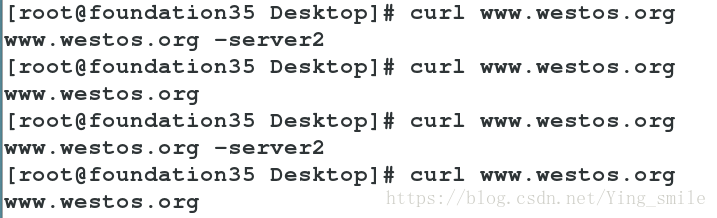
www.westos.org客户端测试:访问的主机是通过nginx不停调度实现
扩展模块
[root@server1 ~]# nginx -s stop
[root@server1 ~]# tar zxf nginx-1.10.1.tar.gz
[root@server1 ~]# tar zxf nginx-sticky-module-ng.tar.gz
[root@server1 ~]# cd nginx-1.10.1
[root@server1 nginx-1.10.1]# ./configure --prefix=/opt/nginx --with-http_ssl_module --with-http_stub_status_module --with-threads --with-file-aio --add-module=/root/nginx-sticky-module-ng
[root@server1 nginx-1.10.1]# make
[root@server1 nginx-1.10.1]# make install
[root@server1 conf]# cd /opt/nginx/conf
[root@server1 conf]# cp /usr/local/nginx/conf/nginx.conf .
[root@server1 conf]# vim nginx.conf
http {
        upstream ying {
        sticky;  //上面14版本不支持本算法
        server 172.25.35.52:80;
        server 172.25.35.53:80;
        #server 127.0.0.1;
        }
[root@server1 conf]# /opt/nginx/sbin/nginx -t
[root@server1 conf]# /opt/nginx/sbin/nginx
客户端测试:
在终端curl测试的内容是变化的,不能体现
在浏览器测试:因为10版本中使用了sticky函数而使访问落在同一台主机而不轮询