本文单纯从简单的技术实现来讲,不涉及开放平台的多维度的运营理念。
什么是开放平台
通过开放自己平台产品服务的各种API接口,让其他第三方开发者在开发应用时根据需求直接调用,例如微信登录、QQ登录、微信支付、微博登录、热门等。
让第三方应用通过开发平台,使得自身海量数据资源得到沉淀(变现)
目前国内主流的网站的的开放平台,都是基于oauth2.0 协议进行做的开放平台
- 微信开放平台授权机制流程图

- 微博开放平台授权机制流程图
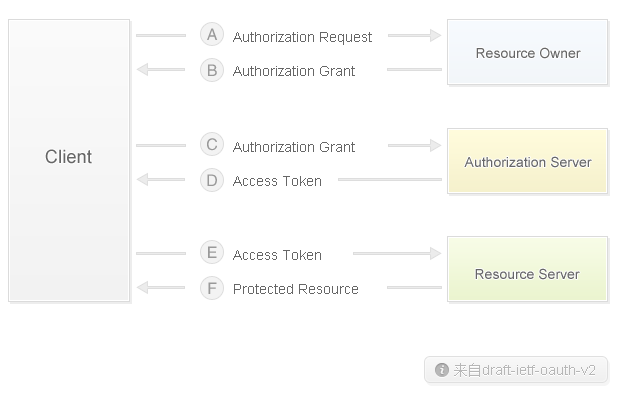
oauth2.0 授权码模式
授权码模式(authorization code)是功能最完整、流程最严密的授权模式。 它的特点就是通过客户端的后台服务器,与"服务提供商"的认证服务器进行互动,能够满足绝大多数开放平台认证授权的需求。
引入相关依赖
<dependency>
         <groupId>org.springframework.cloud</groupId>
         <artifactId>spring-cloud-starter-oauth2</artifactId>
 </dependency>

<dependency>
        <groupId>org.springframework.cloud</groupId>
        <artifactId>spring-cloud-starter-security</artifactId>
</dependency>
配置认证服务器
通过内存模式,初始化一个支持授权码模式的客户端
@Configuration
@AllArgsConstructor
@EnableAuthorizationServer
public class AuthorizationServerConfig extends AuthorizationServerConfigurerAdapter {

    @Override
    @SneakyThrows
    public void configure(ClientDetailsServiceConfigurer clients) {
        clients.inMemory()
                .withClient("pigx") // client_id
                .secret("pigx") // client_secret
                .authorizedGrantTypes("authorization_code") // 该client允许的授权类型
                .scopes("app"); // 允许的授权范围
    }
}
初步完成,测试一下
注意这里是 /oauth/authorize 不是 /oauth/token 接口,只需要带 client_id 即可。
localhost:9999/oauth/authorize?client_id=pigx&response_type=code&redirect_uri=https://pig4cloud.com- 先进行basic 登录,默认用户user,密码已经打在控制台自己查即可

- 授权确认

- 登录成功带着code回调到目标接口

- 通过/oauth/token获取登录令牌
简单的几步就完成上图微信或者其他网站的授权流程,不过目前为止 略显简陋
- 登录没有界面,用户密码数据库没有保存
- 确认授权界面太丑,没有个性化
配置安全登录
- 配置未登录拦截重定向到 loginPage
- 配置登录完成提交的页面路径 这里会被spring security 接管
@Primary
@Order(90)
@Configuration
public class WebSecurityConfigurer extends WebSecurityConfigurerAdapter {
    @Override
    @SneakyThrows
    protected void configure(HttpSecurity http) {
        http
            .formLogin()
            .loginPage("/token/login")
            .loginProcessingUrl("/token/form")
            .and()
            .authorizeRequests()
            .anyRequest().authenticated();
    }
}
认证服务器配置用户加载规则实现
@Override
public void configure(AuthorizationServerEndpointsConfigurer endpoints) {
    endpoints.userDetailsService(pigxUserDetailsService)
}

// 通过这步去加载数据的用户名密码
public interface UserDetailsService {
    UserDetails loadUserByUsername(String var1) throws UsernameNotFoundException;
}
重写原有认证页面
默认逻辑/oauth/confirm_access,让他重定向到我们自己的路径,然后进行个性哈
@Override
    public void configure(AuthorizationServerEndpointsConfigurer endpoints) {
        endpoints
                .userDetailsService(pigxUserDetailsService)
                .pathMapping("/oauth/confirm_access", "/token/confirm_access")
    }
获取上下文中的授权信息,传给前端
    /**
     * 确认授权页面
     *
     * @param request
     * @param session
     * @param modelAndView
     * @return
     */
    @GetMapping("/confirm_access")
    public ModelAndView confirm(HttpServletRequest request, HttpSession session, ModelAndView modelAndView) {
        Map<String, Object> scopeList = (Map<String, Object>) request.getAttribute("scopes");
        modelAndView.addObject("scopeList", scopeList.keySet());

        Object auth = session.getAttribute("authorizationRequest");
        if (auth != null) {
            AuthorizationRequest authorizationRequest = (AuthorizationRequest) auth;
            ClientDetails clientDetails = clientDetailsService.loadClientByClientId(authorizationRequest.getClientId());
            modelAndView.addObject("app", clientDetails.getAdditionalInformation());
            modelAndView.addObject("user", SecurityUtils.getUser());
        }

        modelAndView.setViewName("ftl/confirm");
        return modelAndView;
    }
最终效果
- 把用户头像等信息展示出来就蛮好看了

总结
- 以上源码参考个人项目 基于Spring Cloud、OAuth2.0开发基于Vue前后分离的开发平台