OAuth2
OAuth2所涉及到的对象主要有以下四个:
- Client 第三方应用,我们的应用就是一个Client
- Resource Owner 资源所有者,即用户
- Authorization Server 授权服务器,即提供第三方登录服务的服务器,如Github
- Resource Server 拥有资源信息的服务器,通常和授权服务器属于同一应用
OAuth2的基本流程为:
- 第三方应用请求用户授权。
- 用户同意授权,并返回一个凭证(code)
- 第三方应用通过第二步的凭证(code)向授权服务器请求授权
- 授权服务器验证凭证(code)通过后,同意授权,并返回一个资源访问的凭证(Access Token)。
- 第三方应用通过第四步的凭证(Access Token)向资源服务器请求相关资源。
- 资源服务器验证凭证(Access Token)通过后,将第三方应用请求的资源返回。
Github对应用开放授权
进入github中的Settings/Developer settings中创建一个应用,表示你的应用会使用github授权。
填写好相关的信息后,填写Authorization callback URL为http://localhost:8080/oauth/github/callback(后面授权会用到),可以得到Client ID 和 Client Secret,结果如下:

github授权第三方应用的过程
根据 GitHub 登录链接可以回调获得 code
根据Client ID 、Client Secret 和 code 可获得 token
根据 token 获得用户信息
必要的URL:
登录页面授权URL:
https://github.com/login/oauth/authorize?client_id=%s&redirect_uri=%s&state=%s
扫描二维码关注公众号,回复: 5860486 查看本文章
获得Token的URL:
https://github.com/login/oauth/access_token?client_id=%s&client_secret=%s&code=%s&redirect_uri=%s&state=%s
获得用户信息的URL:
https://api.github.com/user?access_token=%s
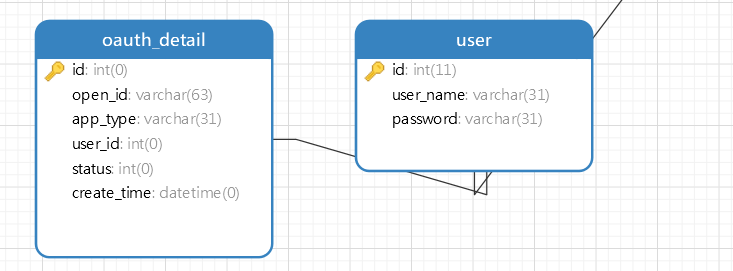
应用获得用户的信息时,会返回一个唯一的标识,用于唯一标识资源所有者即用户,于是我们可以将此标识与数据库中我们自己的本地用户相关联。
测试
在进行编码之前,我们首先访问上面的几种URL,并分析流程及返回结果。
首先访问https://github.com/login/oauth/authorize?client_id=50d7f61132da7f8574a1&redirect_uri=http://localhost:8080/oauth/github/callback&state=thisisrandomstring
分析:该URL为引导用户对应用授权github信息,参数client_id为该应用创建时的Client ID,redirect_uri为该应用创建时填写的Authorization callback URL,state为随机字符串,它用于防止跨站点请求伪造攻击。访问时结果如下:

响应结果能够理解,然后点击授权按钮,就会自动跳转到http://localhost:8080/oauth/github/callback?code=107b7d2f85201535880c&state=thisisrandomstring,URL为我们填写的回调URL,code参数即为凭证,
state为上一步的随机字符串。
接下来,我们应该获取token,根据github官方文档,我们需要发起一个POST请求,URL为https://github.com/login/oauth/access_token,
需要携带的参数如下:
| Name | Type | Description |
|---|---|---|
client_id |
string |
Required. The client ID you received from GitHub for your GitHub App. |
client_secret |
string |
Required. The client secret you received from GitHub for your GitHub App. |
code |
string |
Required. The code you received as a response to Step 1. |
redirect_uri |
string |
The URL in your application where users are sent after authorization. |
state |
string |
The unguessable random string you provided in Step 1. |
接下来,我们通过Postman模拟这一个过程,结果如下:
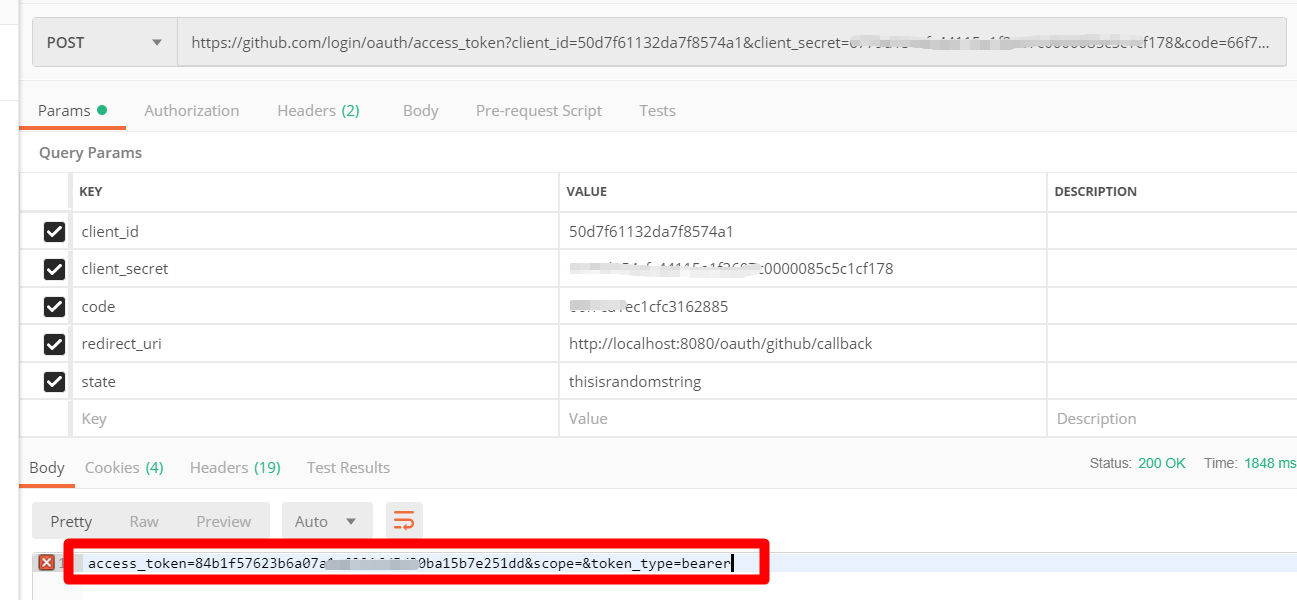
您还可以根据Accept标头接收不同格式的内容:
Accept: application/json
{"access_token":"e72e16c7e42f292c6912e7710c838347ae178b4a", "scope":"repo,gist", "token_type":"bearer"}

Accept: application/xml
<OAuth>
  <token_type>bearer</token_type>
  <scope>repo,gist</scope>
  <access_token>e72e16c7e42f292c6912e7710c838347ae178b4a</access_token>
</OAuth>嗯,成功获取到了Token无误,接下来该获取用户的信息了。发起GET请求,URL为https://api.github.com/user,携带参数access_token=获取到的token,结果如下,可以获取到用户的基本信息。

编码
首先需要一个service用来定义oauth的一些方法,如获取token,获取用户信息等。
package com.yunche.novels.service;

import com.yunche.novels.vo.AuthUserVO;
import org.springframework.util.MultiValueMap;

/**
 * @author yunche
 * @date 2019/04/04
 */
public interface AuthService {

    String getToken(MultiValueMap<String, String> params);

    AuthUserVO getUserInfo(String token);

    boolean checkIsExistsOpenId(String openId);

    boolean storeOpenIdByUser(String openId, Integer userId);

    String getUserNameByOpenId(String openId);
}
接着,使用GitHub来完成具体的service的实现。
package com.yunche.novels.service.impl;

import com.yunche.novels.mapper.AuthForGitHubMapper;
import com.yunche.novels.service.AuthService;
import com.yunche.novels.util.AuthHelper;
import com.yunche.novels.vo.AuthTokenVO;
import com.yunche.novels.vo.AuthUserVO;
import org.springframework.beans.factory.annotation.Autowired;
import org.springframework.stereotype.Service;
import org.springframework.util.LinkedMultiValueMap;
import org.springframework.util.MultiValueMap;

import java.sql.Timestamp;
import java.util.Date;
import java.util.HashMap;
import java.util.Map;

/**
 * @author yunche
 * @date 2019/04/04
 */
@Service
public class GitHubAuthServiceImpl implements AuthService {
    @Autowired
    private AuthForGitHubMapper gitHubMapper;

    private static final String GET_TOKEN_URL = "https://github.com/login/oauth/access_token";

    private static final String GET_USER_URL = "https://api.github.com/user";

    private static final String CLIENT_ID = "50d7f61132da7f8574a1";

    private static final String CLIENT_SECRET = "6779d154cfc44115e1f3607c0000085c5c1cf178";

    private static final String REDIRECT_URI = "http://localhost:8080/oauth/github/callback";

    @Override
    public String getToken(MultiValueMap<String, String> params) {
        params.add("client_id", CLIENT_ID);
        params.add("client_secret", CLIENT_SECRET);
        params.add("redirect_uri", REDIRECT_URI);
        AuthTokenVO authTokenVO = AuthHelper.sendPostGetToken(GET_TOKEN_URL, params);
        String token = authTokenVO.getAccess_token();
        return token;
    }

    @Override
    public AuthUserVO getUserInfo(String token) {
       Map<String, String> map = new HashMap<>();
        map.put("access_token", token);
        return AuthHelper.sendGetToUser(GET_USER_URL, map);
    }

    @Override
    public boolean checkIsExistsOpenId(String openId) {
        return gitHubMapper.checkIsExists(openId) > 0;
    }

    @Override
    public boolean storeOpenIdByUser(String openId, Integer userId) {
        Date date = new Date();
        Timestamp timeStamp = new Timestamp(date.getTime());
        return gitHubMapper.storeOpenIdByUser(openId, userId, timeStamp) > 0;
    }

    @Override
    public String getUserNameByOpenId(String openId) {
        return gitHubMapper.getUserNameByOpenId(openId);
    }
}
将需要获取的token和用户信息的json封装成对象。
package com.yunche.novels.vo;

/**
 * @author yunche
 * @date 2019/04/04
 */
public class AuthTokenVO {

    private String access_token;

    private String token_type;

    private String scope;

    public String getAccess_token() {
        return access_token;
    }

    public void setAccess_token(String access_token) {
        this.access_token = access_token;
    }

    public String getToken_type() {
        return token_type;
    }

    public void setToken_type(String token_type) {
        this.token_type = token_type;
    }

    public String getScope() {
        return scope;
    }

    public void setScope(String scope) {
        this.scope = scope;
    }

    public AuthTokenVO() {
    }

    public AuthTokenVO(String access_token, String token_type, String scope) {
        this.access_token = access_token;
        this.token_type = token_type;
        this.scope = scope;
    }
}
package com.yunche.novels.vo; /** * @author yunche * @date 2019/04/04 */ public class AuthUserVO { /** * 用户第三方应用名 */ private String login; /** * 用户第三方唯一标识 */ private String id; /** * 用户第三方头像 */ private String avatar_url; public String getLogin() { return login; } public void setLogin(String login) { this.login = login; } public String getId() { return id; } public void setId(String id) { this.id = id; } public String getAvatar_url() { return avatar_url; } public void setAvatar_url(String avatar_url) { this.avatar_url = avatar_url; } }mapper类操作数据库。
package com.yunche.novels.mapper;

import org.apache.ibatis.annotations.*;

import java.util.Date;

/**
 * @author yunche
 * @date 2019/04/05
 */
@Mapper
public interface AuthForGitHubMapper {

    /**
     * 检查该openId是否已经注册过
     * @param openId
     * @return
     */
    @Select("SELECT COUNT(*) FROM oauth_detail WHERE open_id=#{openId} and app_type='github'")
    Integer checkIsExists(String openId);

    /**
     * 存储该OpenId
     * @param openId
     * @param userId
     * @return
     */
    @Insert("INSERT INTO oauth_detail(open_id, app_type, user_id, status, create_time) VALUES(#{openId},'github',#{userId},1,#{createTime})")
    Integer storeOpenIdByUser(@Param(value = "openId") String openId, @Param(value = "userId") Integer userId, @Param(value = "createTime") Date createTime);

    @Select("SELECT user_name FROM user, oauth_detail WHERE user_id=user.id AND open_id = #{openId}")
    String getUserNameByOpenId(String openId);
}
package com.yunche.novels.mapper; import com.yunche.novels.bean.User; import org.apache.ibatis.annotations.*; /** * @author yunche * @date 2019/04/05 */ @Mapper public interface UserMapper { @Insert("INSERT INTO user(user_name, password) VALUES(#{userName}, #{password}) ") @Options(useGeneratedKeys = true, keyProperty = "id", keyColumn = "id") Integer storeUser(User user); @Select("SELECT COUNT(*) FROM user where user_name=#{name}") Integer checkUserNameIsExists(String name); }Controller类。
package com.yunche.novels.controller;


import com.yunche.novels.bean.User;
import com.yunche.novels.service.UserService;
import com.yunche.novels.service.impl.GitHubAuthServiceImpl;
import com.yunche.novels.util.MD5Utils;
import com.yunche.novels.util.StringHelper;
import com.yunche.novels.vo.AuthUserVO;

import org.springframework.beans.factory.annotation.Autowired;
import org.springframework.stereotype.Controller;
import org.springframework.util.LinkedMultiValueMap;
import org.springframework.util.MultiValueMap;

import org.springframework.web.bind.annotation.GetMapping;
import org.springframework.web.bind.annotation.RequestParam;
import org.springframework.web.bind.annotation.ResponseBody;

import javax.servlet.http.HttpSession;

/**
 * @author yunche
 * @date 2019/04/04
 */
@Controller
public class AuthController {

    @Autowired
    private GitHubAuthServiceImpl authService;
    @Autowired
    private UserService userService;

    @GetMapping("/oauth/github/callback")
    public String authorizeForGitHub(@RequestParam("code") String code, @RequestParam("state") String state, HttpSession session) {
        MultiValueMap<String, String> map = new LinkedMultiValueMap<>();
        map.add("code", code);
        map.add("state", state);
        String token = authService.getToken(map);
        //获取用户在第三方的信息
        AuthUserVO userVO = authService.getUserInfo(token);
        String openId = userVO.getId();
        //注册该openId
        if(!authService.checkIsExistsOpenId(openId)) {
            User u = new User();
            String userName = userVO.getLogin();
            //确保用户的用户名唯一
            while (userService.IsExistsName(userName)) {
                userName += StringHelper.getRandomString(3);
            }
            u.setUserName(userName);
            //生成一个随机的一定长度的字符串并使用MD5加密,由于第三方的密码不可用,故随机。
            u.setPassword(MD5Utils.getMD5(StringHelper.getRandomString(16)));

            //注册用户
            if(userService.insertUser(u)) {
                //将本地用户与OpenId相关联
                if(authService.storeOpenIdByUser(openId, u.getId())) {
                    //存储用户session
                    session.setAttribute("user", u.getUserName());
                }
            }
        }
        else {
            session.setAttribute("user", authService.getUserNameByOpenId(openId));
        }
        // 重定向到之前需要授权的页面
        return "redirect:" + state;
    }
}