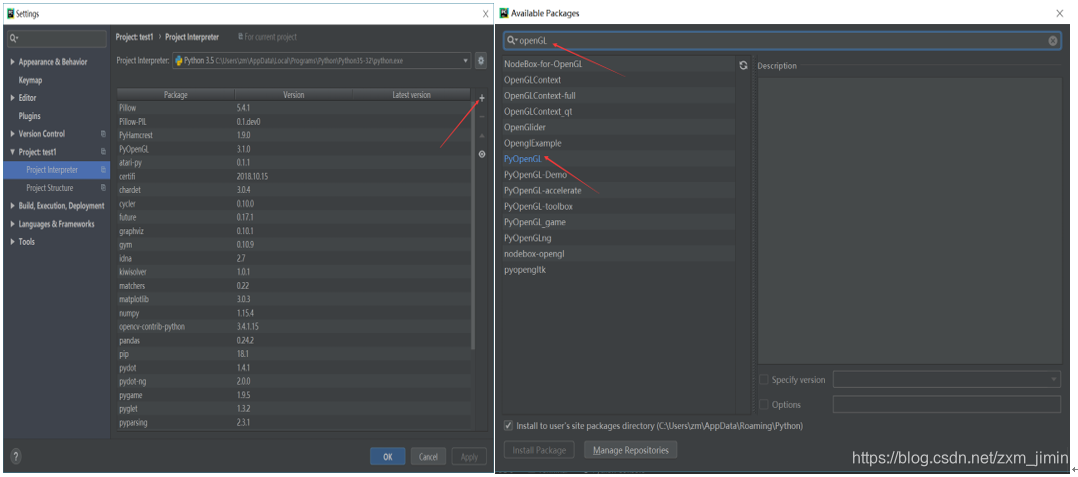
在实验开始前,应该先安装:
openGL与pyGame
如果是PyCharm环境下
可以采取如下简便方式,亲测有效。
首先我们可以先实现:
实现代码如下:(较为简单,且与后面重复,这里不做过多分析)
from pylab import *
from PIL import Image
# If you have PCV installed, these imports should work
from PCV.geometry import homography, camera
from PCV.localdescriptors import sift
"""
This is the augmented reality and pose estimation cube example from Section 4.3.
"""
def cube_points(c, wid):
""" Creates a list of points for plotting
a cube with plot. (the first 5 points are
the bottom square, some sides repeated). """
p = []
# bottom
p.append([c[0] - wid, c[1] - wid, c[2] - wid])
p.append([c[0] - wid, c[1] + wid, c[2] - wid])
p.append([c[0] + wid, c[1] + wid, c[2] - wid])
p.append([c[0] + wid, c[1] - wid, c[2] - wid])
p.append([c[0] - wid, c[1] - wid, c[2] - wid]) # same as first to close plot
# top
p.append([c[0] - wid, c[1] - wid, c[2] + wid])
p.append([c[0] - wid, c[1] + wid, c[2] + wid])
p.append([c[0] + wid, c[1] + wid, c[2] + wid])
p.append([c[0] + wid, c[1] - wid, c[2] + wid])
p.append([c[0] - wid, c[1] - wid, c[2] + wid]) # same as first to close plot
# vertical sides
p.append([c[0] - wid, c[1] - wid, c[2] + wid])
p.append([c[0] - wid, c[1] + wid, c[2] + wid])
p.append([c[0] - wid, c[1] + wid, c[2] - wid])
p.append([c[0] + wid, c[1] + wid, c[2] - wid])
p.append([c[0] + wid, c[1] + wid, c[2] + wid])
p.append([c[0] + wid, c[1] - wid, c[2] + wid])
p.append([c[0] + wid, c[1] - wid, c[2] - wid])
return array(p).T
def my_calibration(sz):
"""
Calibration function for the camera (iPhone4) used in this example.
"""
row, col = sz
fx = 2555 * col / 2592
fy = 2586 * row / 1936
K = diag([fx, fy, 1])
K[0, 2] = 0.5 * col
K[1, 2] = 0.5 * row
return K
# compute features
sift.process_image('../data/book_frontal.JPG', 'im0.sift')
l0, d0 = sift.read_features_from_file('im0.sift')
sift.process_image('../data/book_perspective.JPG', 'im1.sift')
l1, d1 = sift.read_features_from_file('im1.sift')
# match features and estimate homography
matches = sift.match_twosided(d0, d1)
ndx = matches.nonzero()[0]
fp = homography.make_homog(l0[ndx, :2].T)
ndx2 = [int(matches[i]) for i in ndx]
tp = homography.make_homog(l1[ndx2, :2].T)
model = homography.RansacModel()
H, inliers = homography.H_from_ransac(fp, tp, model)
# camera calibration
K = my_calibration((747, 1000))
# 3D points at plane z=0 with sides of length 0.2
box = cube_points([0, 0, 0.1], 0.1)
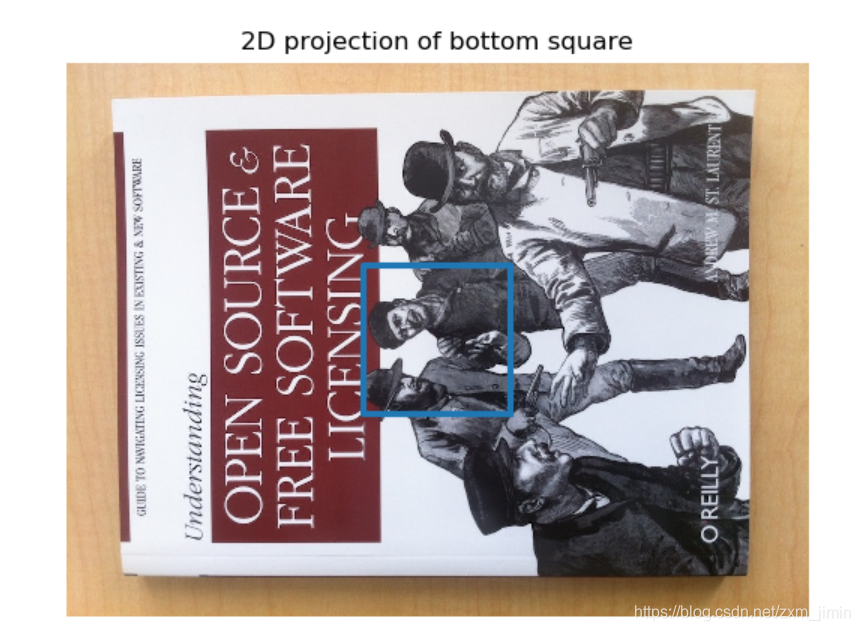
# project bottom square in first image
cam1 = camera.Camera(hstack((K, dot(K, array([[0], [0], [-1]])))))
# first points are the bottom square
box_cam1 = cam1.project(homography.make_homog(box[:, :5]))
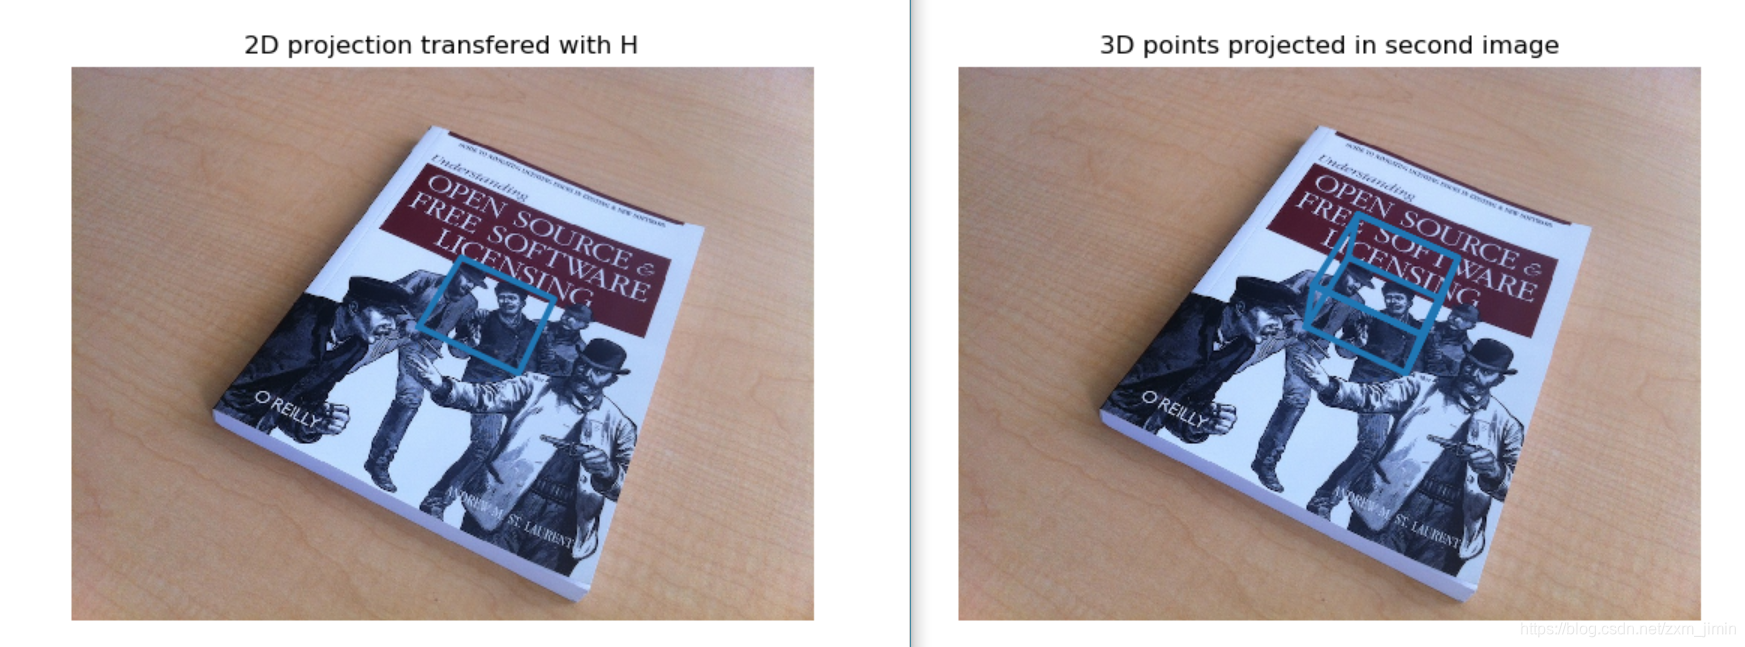
# use H to transfer points to the second image
box_trans = homography.normalize(dot(H, box_cam1))
# compute second camera matrix from cam1 and H
cam2 = camera.Camera(dot(H, cam1.P))
A = dot(linalg.inv(K), cam2.P[:, :3])
A = array([A[:, 0], A[:, 1], cross(A[:, 0], A[:, 1])]).T
cam2.P[:, :3] = dot(K, A)
# project with the second camera
box_cam2 = cam2.project(homography.make_homog(box))
# plotting
im0 = array(Image.open('../data/book_frontal.JPG'))
im1 = array(Image.open('../data/book_perspective.JPG'))
figure()
imshow(im0)
plot(box_cam1[0, :], box_cam1[1, :], linewidth=3)
title('2D projection of bottom square')
axis('off')
figure()
imshow(im1)
plot(box_trans[0, :], box_trans[1, :], linewidth=3)
title('2D projection transfered with H')
axis('off')
figure()
imshow(im1)
plot(box_cam2[0, :], box_cam2[1, :], linewidth=3)
title('3D points projected in second image')
axis('off')
show()
2.在小视频实现现实增强(小茶壶)
效果:
代码实现:
参考:https://blog.csdn.net/titansm/article/details/89057184
第一步(sift匹配)
from pylab import *
from PCV.localdescriptors import sift
import cv2

def makesift(setin,loadvideo,output):
	# compute features
    sift.process_image(setin+'.jpg', setin+'.sift')

    cap = cv2.VideoCapture(loadvideo)
    i = 1
    while(cap.isOpened()):
        ret, frame = cap.read()
        cv2.imwrite(output+str(i)+".jpg",frame)
        cv2.imwrite(output+str(i)+".bmp",frame)
        sift.process_image(output+str(i)+".jpg", output+str(i)+'.sift',)
        i=i+1

    cap.release()
    cv2.destroyAllWindows()

  makesift('所测物体的正面照''要裁剪的视频','输出结果的目录')

# setin = 'book_frontal' ## 所测物体的正面照地址
# loadvideo = 'test1.mp4' ## 要裁剪的视频地址
# output = 'test2/' ## 裁剪后的图片和sift特征的保存地址
第二步(实现增强现实)画小茶壶:
注意点1:
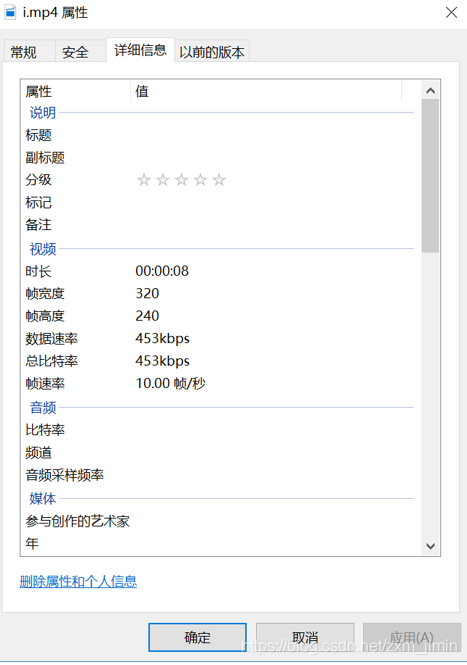
width,height = 320,240 #图像的分辨率
可以通过属性查看
注意点2:
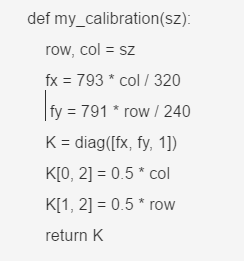
上图中的fx,fy与具体拍摄设备有关,求解过程之后补充。
import math
import pickle
from pylab import *
from OpenGL.GL import *
from OpenGL.GLU import *
from OpenGL.GLUT import *
import pygame, pygame.image
from pygame.locals import *
from PCV.geometry import homography, camera
from PCV.localdescriptors import sift
import cv2
width,height = 320,240 #图像的分辨率
def cube_points(c, wid):
    """ Creates a list of points for plotting
        a cube with plot. (the first 5 points are
        the bottom square, some sides repeated). """
    p = []
    # bottom
    p.append([c[0] - wid, c[1] - wid, c[2] - wid])
    p.append([c[0] - wid, c[1] + wid, c[2] - wid])
    p.append([c[0] + wid, c[1] + wid, c[2] - wid])
    p.append([c[0] + wid, c[1] - wid, c[2] - wid])
    p.append([c[0] - wid, c[1] - wid, c[2] - wid])  # same as first to close plot

    # top
    p.append([c[0] - wid, c[1] - wid, c[2] + wid])
    p.append([c[0] - wid, c[1] + wid, c[2] + wid])
    p.append([c[0] + wid, c[1] + wid, c[2] + wid])
    p.append([c[0] + wid, c[1] - wid, c[2] + wid])
    p.append([c[0] - wid, c[1] - wid, c[2] + wid])  # same as first to close plot

    # vertical sides
    p.append([c[0] - wid, c[1] - wid, c[2] + wid])
    p.append([c[0] - wid, c[1] + wid, c[2] + wid])
    p.append([c[0] - wid, c[1] + wid, c[2] - wid])
    p.append([c[0] + wid, c[1] + wid, c[2] - wid])
    p.append([c[0] + wid, c[1] + wid, c[2] + wid])
    p.append([c[0] + wid, c[1] - wid, c[2] + wid])
    p.append([c[0] + wid, c[1] - wid, c[2] - wid])

    return array(p).T


def my_calibration(sz):
    row, col = sz
    fx = 793 * col / 320
     fy = 791 * row / 240
    K = diag([fx, fy, 1])
    K[0, 2] = 0.5 * col
    K[1, 2] = 0.5 * row
    return K


def set_projection_from_camera(K):
    glMatrixMode(GL_PROJECTION)
    glLoadIdentity()
    fx = K[0, 0]
    fy = K[1, 1]
    fovy = 2 * math.atan(0.5 * height / fy) * 180 / math.pi
    aspect = (width * fy) / (height * fx)
    near = 0.1
    far = 100.0
    gluPerspective(fovy, aspect, near, far)
    glViewport(0, 0, width, height)


def set_modelview_from_camera(Rt):
    glMatrixMode(GL_MODELVIEW)
    glLoadIdentity()
    Rx = np.array([[1, 0, 0], [0, 0, -1], [0, 1, 0]])
    R = Rt[:, :3]
    U, S, V = np.linalg.svd(R)
    R = np.dot(U, V)
    R[0, :] = -R[0, :]
    t = Rt[:, 3]
    M = np.eye(4)
    M[:3, :3] = np.dot(R, Rx)
    M[:3, 3] = t
    M = M.T
    m = M.flatten()
    glLoadMatrixf(m)


def draw_background(imname):
    bg_image = pygame.image.load(imname).convert()
    bg_data = pygame.image.tostring(bg_image, "RGBX", 1)
    glMatrixMode(GL_MODELVIEW)
    glLoadIdentity()

    glClear(GL_COLOR_BUFFER_BIT | GL_DEPTH_BUFFER_BIT)
    glEnable(GL_TEXTURE_2D)
    glBindTexture(GL_TEXTURE_2D, glGenTextures(1))
    glTexImage2D(GL_TEXTURE_2D, 0, GL_RGBA, width, height, 0, GL_RGBA, GL_UNSIGNED_BYTE, bg_data)
    glTexParameterf(GL_TEXTURE_2D, GL_TEXTURE_MAG_FILTER, GL_NEAREST)
    glTexParameterf(GL_TEXTURE_2D, GL_TEXTURE_MIN_FILTER, GL_NEAREST)
    glBegin(GL_QUADS)
    glTexCoord2f(0.0, 0.0);
    glVertex3f(-1.0, -1.0, -1.0)
    glTexCoord2f(1.0, 0.0);
    glVertex3f(1.0, -1.0, -1.0)
    glTexCoord2f(1.0, 1.0);
    glVertex3f(1.0, 1.0, -1.0)
    glTexCoord2f(0.0, 1.0);
    glVertex3f(-1.0, 1.0, -1.0)
    glEnd()
    glDeleteTextures(1)


def draw_teapot(size):
    # 画茶壶
    glEnable(GL_LIGHTING)
    glEnable(GL_LIGHT0)
    glEnable(GL_DEPTH_TEST)
    glClear(GL_DEPTH_BUFFER_BIT)
    glMaterialfv(GL_FRONT, GL_AMBIENT, [0, 0, 0, 0])
    glMaterialfv(GL_FRONT, GL_DIFFUSE, [0.5, 0.0, 0.0, 0.0])
    glMaterialfv(GL_FRONT, GL_SPECULAR, [0.7, 0.6, 0.6, 0.0])
    glMaterialf(GL_FRONT, GL_SHININESS, 0.25 * 128.0)
    glutSolidTeapot(size)


def main(mm, barch, path, output):

    l0, d0 = sift.read_features_from_file('test2/1.sift')

    while mm <= barch:
      #  print(path + str(mm) + '.sift')
        l1, d1 = sift.read_features_from_file(path + str(mm) + '.sift')
        matches = sift.match_twosided(d0, d1)
        if sum(matches) <= 1:
            mm = mm + 1
            continue
        try:
            pygame.init()
            win = pygame.display.set_mode((width, height), OPENGL | DOUBLEBUF)
            pygame.display.set_caption("OpenGL AR demo")
            ndx = matches.nonzero()[0]
            fp = homography.make_homog(l0[ndx, :2].T)
            ndx2 = [int(matches[i]) for i in ndx]
            tp = homography.make_homog(l1[ndx2, :2].T)
            model = homography.RansacModel()
            H, inliers = homography.H_from_ransac(fp, tp, model)
            K = my_calibration((640, 480))
            cam1 = camera.Camera(hstack((K, dot(K, array([[0], [0], [-1]])))))
            box = cube_points([0, 0, 0.1], 0.1)
            box_cam1 = cam1.project(homography.make_homog(box[:, :5]))
            box_trans = homography.normalize(dot(H, box_cam1))
            cam2 = camera.Camera(dot(H, cam1.P))
            A = dot(linalg.inv(K), cam2.P[:, :3])
            A = array([A[:, 0], A[:, 1], cross(A[:, 0], A[:, 1])]).T
            cam2.P[:, :3] = dot(K, A)
            Rt = dot(linalg.inv(K), cam2.P)
            draw_background(path + str(mm) + '.bmp')
            # draw_background("book_perspective.bmp")
            set_projection_from_camera(K)
            set_modelview_from_camera(Rt)
            draw_teapot(0.05)

            pygame.image.save(win, output + str(mm) + '.jpg')
            pygame.display.flip()
            mm = mm + 1

        except ValueError:
            print('im' + str(mm) + "   Error!!!")
            mm = mm + 1
            continue

mm = 2    #  用来计数的变量,我代码生成的图片是用数字来作为保存的名称,用mm来表示要读取的图片名称
path = 'test2/' #  要读取的bmp格式的图片的路径
barch = 90  # 用来表示要循环的次数,也就是读取的图片的最大编号
output = 'test2/' # 这个是保存增强现实的图片的地址
main(mm,barch,path,output)
第三步(生成视频)
# -*- coding: UTF-8 -*-
import os
import cv2

# 图片合成视频
def image2video(path,size,file_path):
    filelist = os.listdir(path)  # 获取该目录下的所有文件名
    fps = 10
    fourcc = cv2.VideoWriter_fourcc(*'XVID')
    video = cv2.VideoWriter(file_path, fourcc, fps, size)

    m=90 # 与生成的图片张数有关
    i=1
    while (i<m):
        item= path + '/' +str(i)+ ".jpg"
        img = cv2.imread(item)
        video.write(img)  # 把图片写进视频
        print(item)
        i = i + 1
    video.release()  # 释放

#调用函数(图片路径,分辨率,要保存的视频名称)
image2video('D:\\workspace\\Computer Vision\\test1\\ch4_2\\test2',(320,240),'i.avi')
最后效果
发现,茶壶”飞”出去,初步判断,与fx,fy的求解有关。
之后在做改进。