先说在前头,最近忙,随想随记,所以有些博客写了一半就发了,后续会慢慢补齐的。抱歉!
前端使用uniapp开发,后台挂在阿里云。选uniapp开发的原因是我这边人手不够,同时也不想维护这么多客户端,故选之。
新建一个uniapp工程,选择hello demo,找到pages/API/upload-file.vue文件
<template>
	<view>
		<page-head :title="title"></page-head>
		<view class="uni-padding-wrap uni-common-mt">
			<view class="demo">
				<block v-if="imageSrc">
					<image :src="imageSrc" class="image" mode="widthFix"></image>
				</block>
				<block v-else>
					<view class="uni-hello-addfile" @click="chooseImage">+ 选择图片</view>
				</block>
			</view>
		</view>
	</view>
</template>
<script>
	export default {
		data() {
			return {
				title: 'uploadFile',
				imageSrc: ''
			}
		},
		onUnload() {
			this.imageSrc = '';
		},
		methods: {
			chooseImage: function() {
				uni.chooseImage({
					count: 1,
					sizeType: ['compressed'],
					sourceType: ['album'],
					success: (res) => {
						console.log('chooseImage success, temp path is', res.tempFilePaths[0])
						var imageSrc = res.tempFilePaths[0]
						uni.uploadFile({
							url: 'http://yourbucketname.oss-cn-shanghai.aliyuncs.com',
							filePath: imageSrc,
							fileType: 'image',
							name: 'file',
							formData:{
								name: res.tempFilePaths[0],
								'key' : "${filename}",
								'policy': 'yourpolicycaculated',
								'OSSAccessKeyId': 'yourosskeyid',
								'success_action_status' : '200',
								//让服务端返回200,不然,默认会返回204
								'signature': 'yoursignaturecaculated',
							},
							success: (res) => {
								console.log('uploadImage success, res is:', res)
								uni.showToast({
									title: '上传成功',
									icon: 'success',
									duration: 1000
								})
								this.imageSrc = imageSrc
							},
							fail: (err) => {
								console.log('uploadImage fail', err);
								uni.showModal({
									content: err.errMsg,
									showCancel: false
								});
							}
						});
					},
					fail: (err) => {
						console.log('chooseImage fail', err)
					}
				})
			}
		}
	}
</script>

<style>
	.image {
		width: 100%;
	}

	.demo {
		background: #FFF;
		padding: 50upx;
	}
</style>
问题来了,这些需要计算的formdata怎么来的,最简单的就是
阿里云官方案例
在阿里的upload.js文件中,加个函数,如下:
function consoleinfo()
{
    console.log('policy:'+this.policyBase64)
    console.log('keyid:'+this.accessid)
    console.log('signature:'+this.signature)
}
阿里的例子会给出计算的结果,你直接对应填进去就可以了。然而,在OSS端得到的是奇怪的文件名,
问题来自微信:
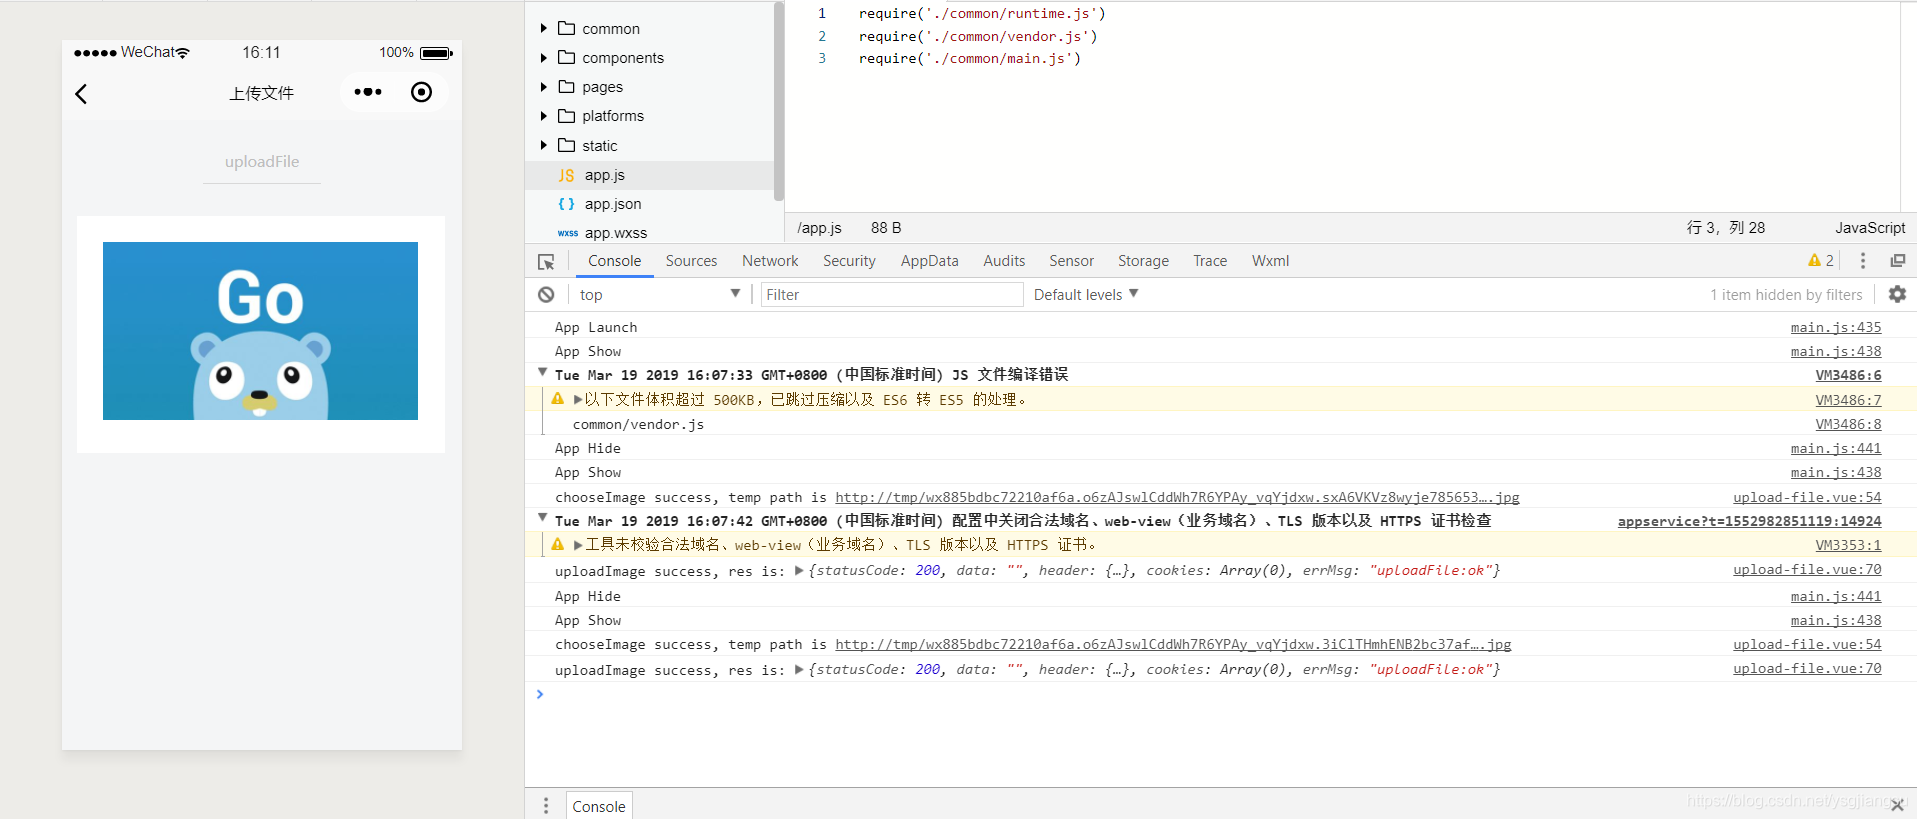
在上图可以看到,temp path已经被微信小程序改了,所以啊我们OSS获得的就是被改掉的名字了。一般地,我们自己应该对上传到OSS的文件进行命名。如果一定要真实的名字,我找找解决办法再补上来
第二个问题:签名密钥放前端肯定是不行的,那如何放在后台呢,pages/API/upload-file.vue文件修改后如下:
<template>
	<view>
		<page-head :title="title"></page-head>
		<view class="uni-padding-wrap uni-common-mt">
			<view class="demo">
				<block v-if="imageSrc">
					<image :src="imageSrc" class="image" mode="widthFix"></image>
				</block>
				<block v-else>
					<view class="uni-hello-addfile" @click="chooseImage">+ 选择图片</view>
				</block>
			</view>
		</view>
	</view>
</template>
<script>
	const requestUrl = 'http://xxx.xx.xxx.xxx:xxxx'//用你自己的server + port
	export default {
		data() {
			return {
				title: 'uploadFile',
				imageSrc: ''
			}
		},
		onUnload() {
			this.imageSrc = '';
		},
		methods: {
			sendRequest: async function() {
				let that = this
				return await new Promise((resolve,reject)=>{
					uni.request({
						url: requestUrl,
						dataType: 'text',
						data: {
							noncestr: Date.now()
						},
						success: (res) => {
							console.log('request success', res)
							uni.showToast({
								title: '请求成功',
								icon: 'success',
								mask: true,
								duration: 2000
							});
							resolve(JSON.parse(res.data))
						},
						fail: (err) => {
							console.log('request fail', err);
							uni.showModal({
								content: err.errMsg,
								showCancel: false
							});
						},
						complete: () => {
							this.loading = false;
						}
					});
				})
			},
			chooseImage: function() {
				let that = this
				uni.chooseImage({
					count: 1,
					sizeType: ['compressed'],
					sourceType: ['album'],
					success: (res) => {
						console.log('chooseImage success, temp path is', res.tempFilePaths[0])
						var imageSrc = res.tempFilePaths[0]
						that.sendRequest().then((resdata)=>{
							console.log('wearehere')
							console.log(that === this)
							uni.uploadFile({
								url: resdata.host,
								filePath: imageSrc,
								fileType: 'image',
								name: 'file',
								formData:{
									name: res.tempFilePaths[0],
									key : "root/20190319.jpg",//我放在root下,你视情况而定
									policy: resdata.policy,
									OSSAccessKeyId: resdata.accessid,
									success_action_status : '200',
									//让服务端返回200,不然,默认会返回204
									signature: resdata.signature,
								},
								success: (res) => {
									console.log('uploadImage success, res is:', res)
									uni.showToast({
										title: '上传成功',
										icon: 'success',
										duration: 1000
									})
									console.log(that === this)
									this.imageSrc = imageSrc
								},
								fail: (err) => {
									console.log('uploadImage fail', err);
									uni.showModal({
										content: err.errMsg,
										showCancel: false
									});
								}
							});
						});

					},
					fail: (err) => {
						console.log('chooseImage fail', err)
					}
				})
			}
		}
	}
</script>

<style>
	.image {
		width: 100%;
	}

	.demo {
		background: #FFF;
		padding: 50upx;
	}
</style>
老生常谈的几个问题:
-
this指向:
我在好几处都console了that === this,真心被搞得懵逼,微信的代码风格是:进函数就先来个
let that = this,这确实是个规避this作用域的好办法。然而,uniapp有时候在内部还在用this,这个this到底指向哪里,所以我加了判断输出
结论:this指向当前的执行对象或者说执行环境。执行对象不变,指向也不变。在chooseimage后,函数层层调用,执行对象一直没变,因此this指向不变。具体this辨析,可参考阮一峰大神的博客 -
var let const对比:
假定你有C/C++基础哈,在C/C++中,你用{}扩起一段原本已经是个整体的代码是多此一举的,比如:
a = 0;
{
	a ++;
}
a++;
这个大括号去掉也不影响,但是在js中,{}表示块,也就引入了块作用域的概念。
var定义的变量,没有块的概念,可以跨块访问, 不能跨函数访问。这个跟C/C++中的局部变量一回事
let定义的变量,只能在块作用域里访问,不能跨块访问,也不能跨函数访问。let类似于var,只不过是用在块里的局部变量
const用来定义常量,使用时必须初始化(即必须赋值),只能在块作用域里访问,而且不能修改。简言之,const是一个具有初值且不能被修改的let
关于三者对比,可参考阮一峰大神博客
- 异步实现:
之前代码的思路是,直接request 我的server,拿到签名报上去。然而,这是不行的。因为,request是异步的,不是立马就能拿到返回结果的。而后续的upload参数依赖request的返回值,所以必须在request完成后才能搞upload的事情。因此,我加入了promise.then结构。
下面再说服务器配置:
A. 请参考阿里云官方案例Go
B. 请按要求改写服务器地址以及端口
C. 启动服务器端口侦听,注意注意注意:
执行这条语句开启侦听1234端口,go run appserver.go 0.0.0.0 1234
作为一个小白,我按阿里云的案例多次尝试都不行,找了一些资料,有人说是0 0 0 0就OK。虽然没问题了,但是没找到原因。路过的朋友知道的帮个忙解释一下啊,多谢多谢