参考教材:《微信小程序开发入门与实践》 雷磊
前置知识:JavaScript,CSS
为了更好的学习后续知识,先来新建一个页面。(以下代码来自《微信小程序开发入门与实践》,下载地址:https://pan.baidu.com/s/1cxQXie, 源代码和图片资源在里面都可以找到)
我们先新建一个post界面,并作为首页,用到图片资源如resource目录所示
 |
 |
并修改其中的post.wxml和post.wxss
post.wxml代码如下:
其中< swiper >是滑块视图容器, 这里用来实现轮播图的效果,具体用法说明请查看官方api https://developers.weixin.qq.com/miniprogram/dev/component/swiper.html
<!--pages/post/post.wxml-->
<view>
<swiper indicator-dots="true" autoplay="true" interval="5000" circular="true">
<swiper-item>
<image src="../resource/[email protected]"/>
</swiper-item>
<swiper-item>
<image src="../resource/[email protected]" />
</swiper-item>
<swiper-item>
<image src="../resource/[email protected]"/>
</swiper-item>
</swiper>
<view class="post-container">
<view class="post-author-date">
<image src="../resource/my.jpg" />
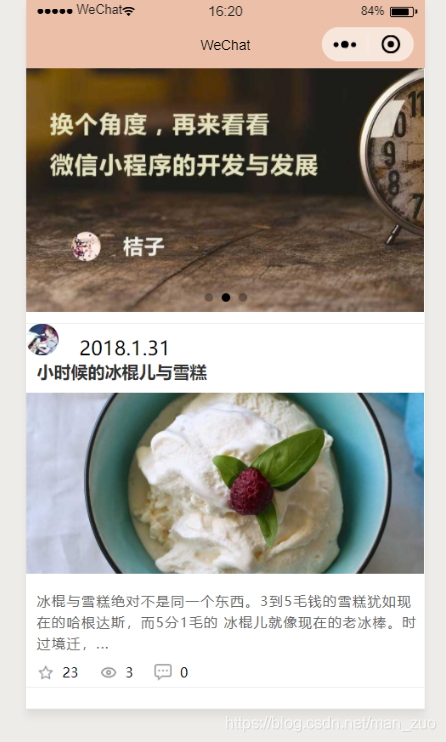
<text>2018.1.31</text>
</view>
<text class="post-title">小时候的冰棍儿与雪糕</text>
<image class="post-image" src="../resource/post-4.jpg" mode="aspectFill" />
<text class="post-content">冰棍与雪糕绝对不是同一个东西。3到5毛钱的雪糕犹如现在的哈根达斯,而5分1毛的 冰棍儿就像现在的老冰棒。时过境迁,...</text>
<view class="post-like">
<image src="../resource/icon/wx_app_collect.png" />
<text>23</text>
<image src="../resource/icon/wx_app_view.png"></image>
<text>3</text>
<image src="../resource/icon/wx_app_message.png"></image>
<text>0</text>
</view>
</view>
</view>
post.wxss如下
/* pages/post/post.wxss */
swiper{
     width:100%;
     height:600rpx;
 }

  swiper image{
     width:100%;
     height:600rpx;
 }
.post-container{
    flex-direction:column;
    display:flex;
    margin:20rpx 0 40rpx;
    background-color:#fff;
    border-bottom: 1px solid #ededed;
    border-top: 1px solid #ededed;
    padding-bottom: 5px;
}

.post-author-date-{
    margin: 10rpx 0 20rpx 10px;
    display:flex;
    flex-direction: row;
    align-items: center;
}

.post-author-date image{
    border-radius: 50rpx;
    width:60rpx;
    height:60rpx;
}
.post-author-date text{
    margin-left: 20px;
}

.post-image{
    width:100%;
    height:340rpx;
    margin-bottom: 15px;
}

.post-date{
    font-size:26rpx;
    margin-bottom: 10px;
}
.post-title{
    font-size:16px;
    font-weight: 600;
    color:#333;
    margin-bottom: 10px;
    margin-left: 10px;
}
.post-content{
    color:#666;
    font-size:26rpx;
    margin-bottom:20rpx;
    margin-left: 20rpx;
    letter-spacing:2rpx;
    line-height: 40rpx;
}
.post-like{
    display:flex;
    flex-direction: row;
    font-size:13px;
    line-height: 16px;
    margin-left: 10px;
    align-items: center;
}

.post-like image{
    height:16px;
    width:16px;
    margin-right: 8px;
}

.post-like text{
    margin-right: 20px;
}
界面运行结果如图
现在文章的数据都写在wxml文件里了,但是wxml文件的担任的角色应该是视图层,不应该包含太多的业务数据.所以我们现在要把这些业务数据放到js文件里,然后在wxml文件里引用这些数据,这个过程就叫数据绑定.
初始化数据绑定
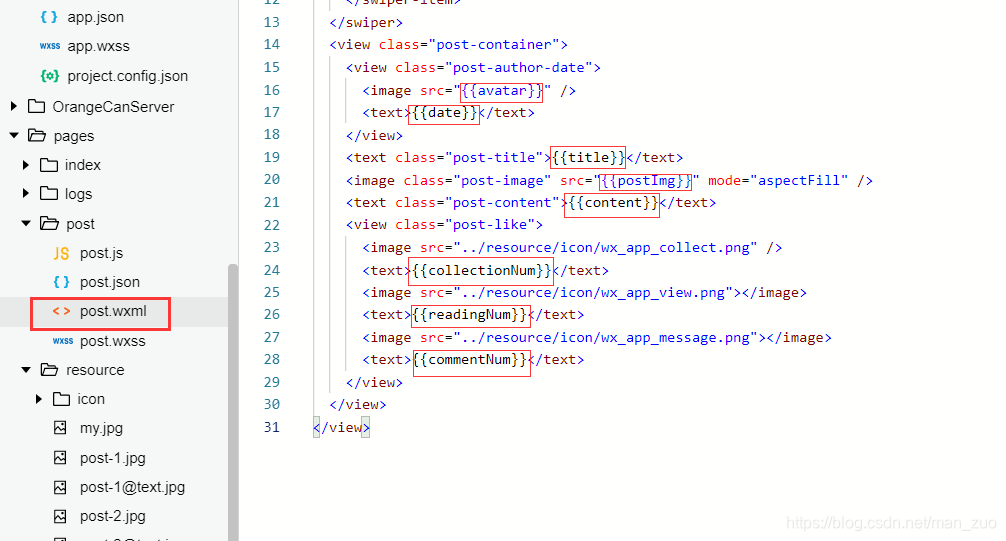
初始化数据绑定是将业务数据放在page方法参数的data对象下面,然后在wxml文件中引用这些数据.小程序使用双大括号{{}}在wxml组件里进行数据的绑定. 双括号里的名称对应data对象里的属性名.可见,数据绑定非常简单,只要将data对象的属性名填入到双大括号{{}}中即可.MINA框架会自动在运行时用data数据替换这些{{}}.
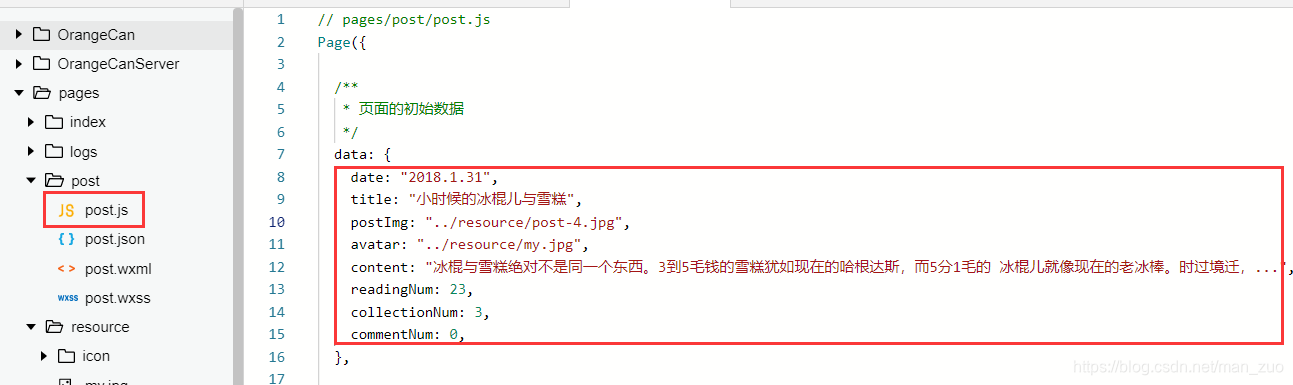
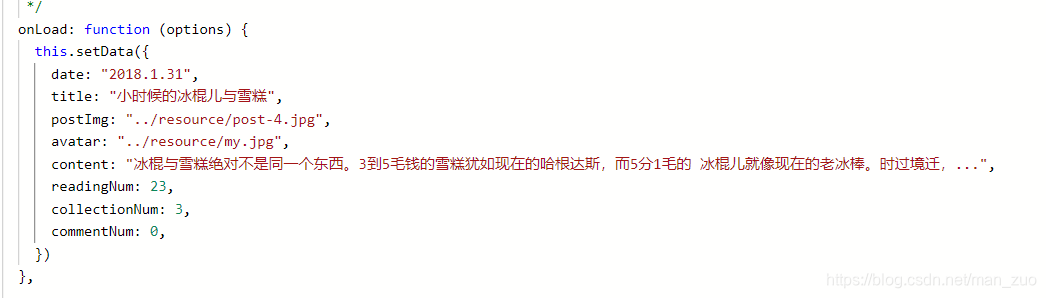
// pages/post/post.js
Page({

  /**
   * 页面的初始数据
   */
  data: {
    date: "2018.1.31",
    title: "小时候的冰棍儿与雪糕",
    postImg: "../resource/post-4.jpg",
    avatar: "../resource/my.jpg",
    content: "冰棍与雪糕绝对不是同一个东西。3到5毛钱的雪糕犹如现在的哈根达斯,而5分1毛的 冰棍儿就像现在的老冰棒。时过境迁,...",
    readingNum: 23,
    collectionNum: 3,
    commentNum: 0,
  },

  /**
   * 生命周期函数--监听页面加载
   */
  onLoad: function (options) {

  },

  /**
   * 生命周期函数--监听页面初次渲染完成
   */
  onReady: function () {

  },

  /**
   * 生命周期函数--监听页面显示
   */
  onShow: function () {

  },

  /**
   * 生命周期函数--监听页面隐藏
   */
  onHide: function () {

  },

  /**
   * 生命周期函数--监听页面卸载
   */
  onUnload: function () {

  },

  /**
   * 页面相关事件处理函数--监听用户下拉动作
   */
  onPullDownRefresh: function () {

  },

  /**
   * 页面上拉触底事件的处理函数
   */
  onReachBottom: function () {

  },

  /**
   * 用户点击右上角分享
   */
  onShareAppMessage: function () {

  }
})
更改后的post.wxml,图片路径看个人目录路径.
<!--pages/post/post.wxml-->
<view>
  <swiper indicator-dots="true" autoplay="true" interval="5000" circular="true">
    <swiper-item>
      <image src="../resource/[email protected]" />
    </swiper-item>
    <swiper-item>
      <image src="../resource/[email protected]" />
    </swiper-item>
    <swiper-item>
      <image src="../resource/[email protected]" />
    </swiper-item>
  </swiper>
  <view class="post-container">
    <view class="post-author-date">
      <image src="{{avatar}}" />
      <text>{{date}}</text>
    </view>
    <text class="post-title">{{title}}</text>
    <image class="post-image" src="{{postImg}}" mode="aspectFill" />
    <text class="post-content">{{content}}</text>
    <view class="post-like">
      <image src="../resource/icon/wx_app_collect.png" />
      <text>{{collectionNum}}</text>
      <image src="../resource/icon/wx_app_view.png"></image>
      <text>{{readingNum}}</text>
      <image src="../resource/icon/wx_app_message.png"></image>
      <text>{{commentNum}}</text>
    </view>
  </view>
</view>
开发工具为我们提供了一个AppData面板用来查看和调试数据绑定变量.建议当读者遇到数据绑定相关问题时,首先打开这个面板查看具体的数据绑定情况.
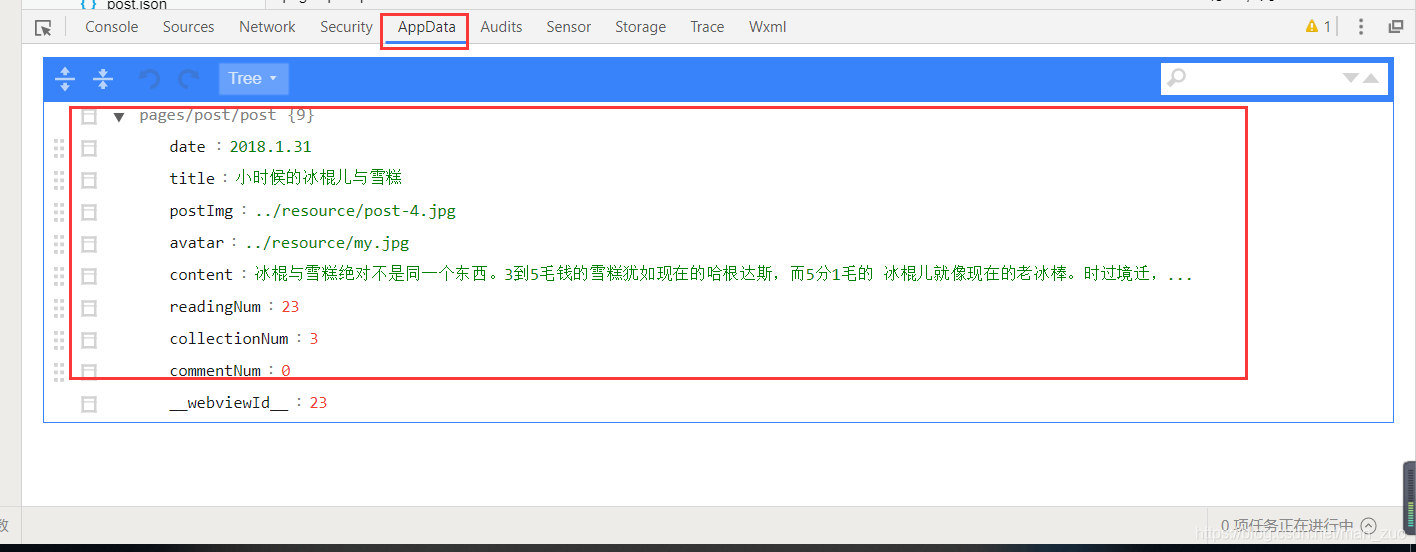
值得一提的是,data对象的属性可以是简单的文本和数字,也可以是一个对象或者数组.
 |
 |
数据绑定更新
还可以用setData函数来做数据绑定.这种方法可以理解韦"数据更新". 大多数情况下,我们使用this.setData的方式来调用这个函数.
setData的参数结构一个对象,以key和value的 形式将page下data对象中的key对应的内容设置成value. 这样说可能有点难以理解,下面举个具体的例子
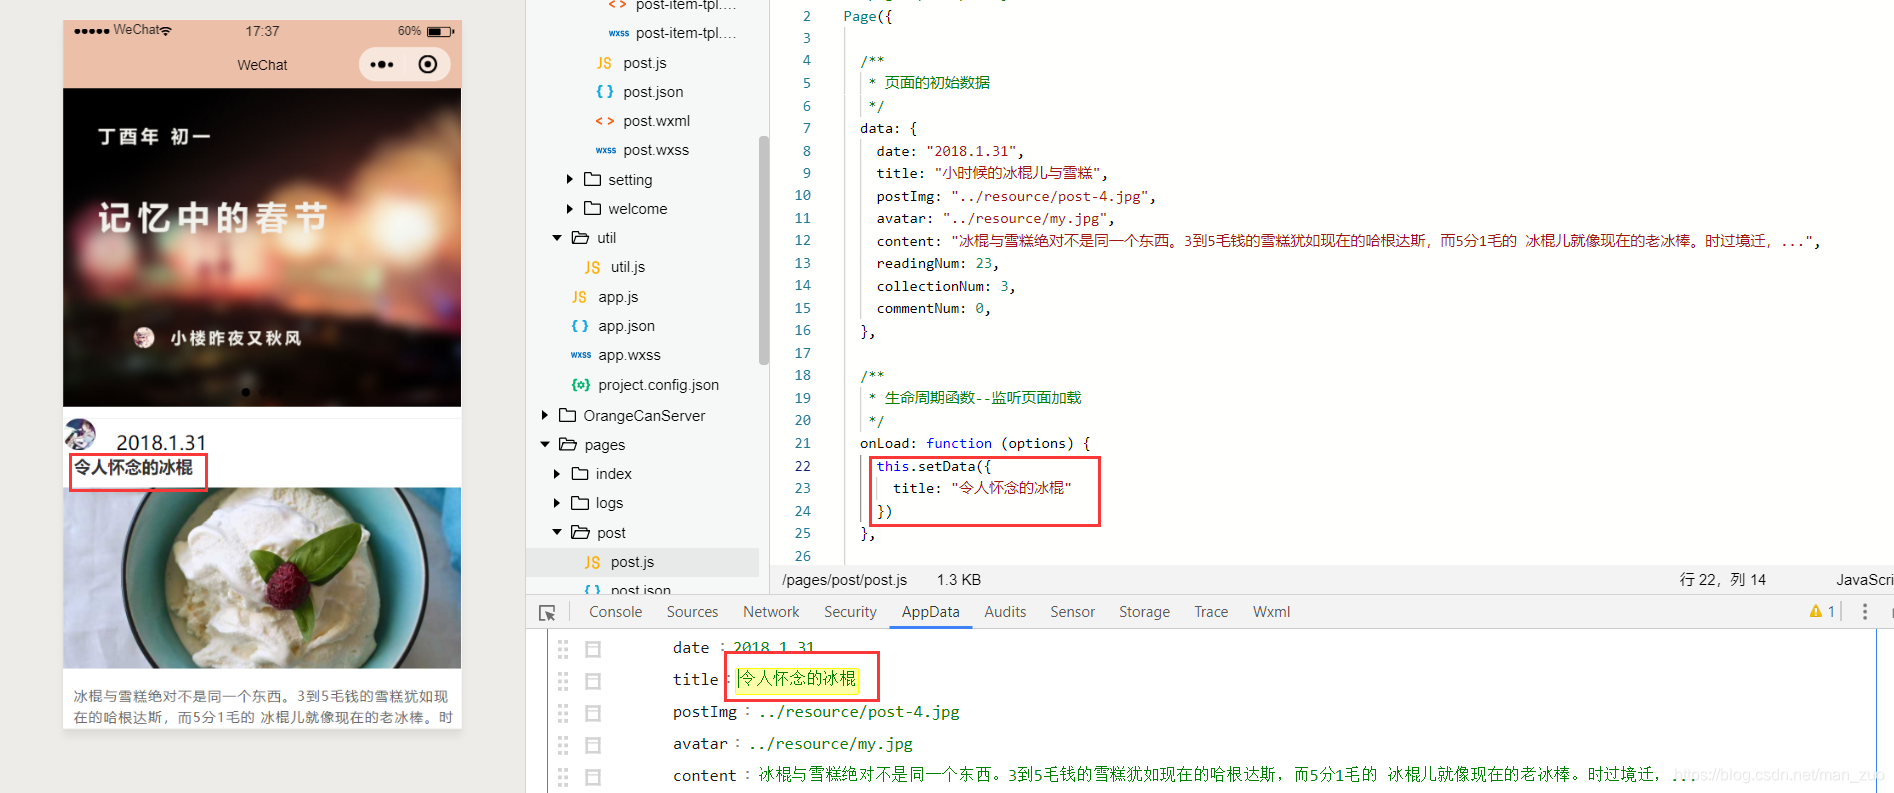
在上面这个例子中,在data对象里,title属性的值为"小时候的冰棍儿和雪糕",然后我们用了setData函数把title属性更新为"令人怀念的冰棍",同时其他属性的值保持不变.
我们还可以更进一步,把data里的属性全都放到setData函数里.
或者,把数据存到一个对象里,然后在setData函数里引用这个对象
 |
 |