QCustomPlot是一个用于绘图和数据可视化的Qt c++小部件。它没有进一步的依赖关系,并且有很好的文档。该绘图库专注于制作美观、出版物质量高的2D绘图、图形和图表,并为实时可视化应用程序提供高性能。
Setting up QCustomPlot
Getting QCustomPlot to work with your application is very easy:
•从官网下载最新版本
•像使用任何其他普通类文件一样,使用qcustomplot.h和qcustomplot.cpp文件Use the qcustomplot.h and qcustomplot.cpp file like any other ordinary class file
对于Qt使用者
1、Right click on the root entry of your project in the left sidebar and choose Add Existing Files...
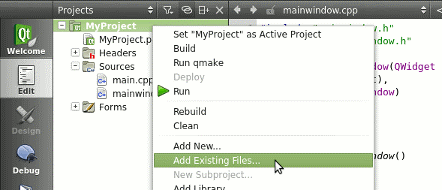
2、In the appearing file dialog, select the qcustomplot.h and qcustomplot.cpp files, to add them to your project. If this is done, your project structure and .pro file should look something like this:

如果您正在使用Qt 5.0以上版本,则需要将printsupport添加到.pro文件中的Qt变量中。在上面显示的例子中,这是在一个greaterThan(QT_MAJOR_VERSION, 4)条件之后完成的。这确保在使用较老的Qt版本时不添加打印支持(和小部件)。
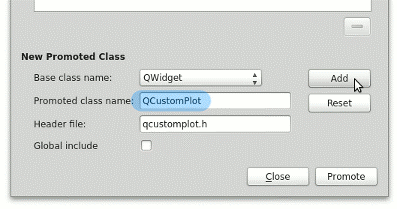
3、该项目现在可以使用QCustomPlot了。在表单的所需位置放置一个常规QWidget。右键点击,点击 Promote to...

在出现的对话框中,在提升类名旁边的输入字段中输入QCustomPlot。头文件旁边的输入应该自动填充正确的qcustomplot.h值。单击Add将QCustomPlot添加到提升类列表中,最后单击Promote将表单上的QWidget转换为QCustomPlot。
不会在QtCreator(或QtDesigner)中看到任何即时的可视化更改,但是在运行应用程序时,将看到一个带有轴线和网格线的空图。
4、本教程使用m_Plot作为指向QCustomPlot实例的指针。如果您在QtCreator中推广了小部件,那么您可能会通过ui->customPlot(或者您给小部件起的任何名称)访问相应的小部件。
在MainWindow.h文件中
#include "qcustomplot.h"
private:
    QCustomPlot *m_plot
5、您可以通过customPlot->addGraph()在图中创建一个新的图。然后给图分配一些数据点,例如通过customPlot->graph(0)->setData(..),例如两个QVector<double> for x and y (key and value)的形式。QCustomPlot使用术语键和值而不是x和y的原因是允许在分配哪个轴具有什么角色时具有更大的灵活性。所以如果你把左轴定义为"键轴",把底轴定义为"值轴",你就可以在图的左边画一个直立的图形。默认情况下,QCustomPlot小部件有四个轴:customPlot->xAxis、yAxis、xAxis2和类型为QCPAxis的yAxis2,分别对应于底部、左侧、顶部和右侧轴。它们的范围定义了当前可见的部分:customPlot->xAxis->setRange(- 1,1)。
// 为曲线产生数据:
QVector<double> x(101),y(101);
for(inti=0;i<101;++i)
{
x[i]=i/50.0- 1; // x goes from -1 to 1
y[i]=x[i]*x[i]; // let's plot a quadratic function
}
// create graph and assign data to it:
ui->qcustom->addGraph();
ui->qcustom->graph(0)->setData(x, y);
// give the axes some labels:
ui->qcustom->xAxis->setLabel("x");
ui->qcustom->yAxis->setLabel("y");
// set axes ranges, so we see all data:
ui->qcustom->xAxis->setRange(-1, 1);
ui->qcustom->yAxis->setRange(0, 1);
ui->qcustom->replot();
qcustom为ui界面上widget提升后的名字。
6、要对屏幕上的情节进行任何类型的更改,请调用customPlot->replot()。注意,当小部件调整大小和触发内置用户交互时,将自动发生重绘。这种用户交互包括用鼠标拖动轴范围和用鼠标滚轮缩放。
标号和标签是自动选择的,the axis ticker通常被轴利用。这是QCPAxisTicker类型的实例,可以通过xAxis->ticker()访问。您可以通过xAxis->ticker()->setTickCount(6)调整试图创建的标号的数量。默认的轴标记器非常适合于简单的数字显示,但是也有专门的类,例如时间跨度、日历日期、类别、pi(或其他符号单位)和对数轴。有关详细信息,请参阅QCPAxisTicker文档。
轴的刻度标签(数字)永远不会超出小部件边界,即使它们变得更宽。这是由于自动保证金计算,默认情况下是打开的。如果勾选标签和轴标签需要更多的空间,它会使轴矩形收缩。如果不希望自动确定边界,可以通过调用customPlot->axisRect()->setAutoMargins(QCP::msNone)禁用该行为。然后,您可以通过customPlot->axisRect()-> setmargin(..)手动调整页边距。