环境:
CentOS7 Elasticsearch-6.3.2 JDK8
准备:
JDK8 下载地址:http://www.oracle.com/technetwork/java/javase/downloads/jdk8-downloads-2133151.html
Elasticsearch-6.3.2下载地址: https://www.elastic.co/downloads/elasticsearch
安装:
jdk安装
<1>删除open jdk,没有的话则不需要
rpm -qa|grep java

rpm -e nodeps <name>
<2>解压jdk包
mkdir /usr/jdk
tar -xvf jdk-8u112-linux-x64.tar.gz /usr/jdk
32的JDK需要安装 glibc.i686
yum install glibc.i686
<3>配置环境变量
vim /etc/profile
保存退出,使更改配置生效
source /etc/profile
<4>查看jdk安装是否成功
java-version
如下图则OK

Elasticsearch安装
<1>解压elasticsearch安装包 (安装在 /opt/elasticsearch/elasticsearch-6.3.2/)
unzip elasticsearch-6.3.2.zip
<2>创建elasticsearch用户,root用户启动elasticsearch会失败
groupadd elsearch
useradd elsearch -g elsearch
chown -R elsearch:elsearch /opt/elasticsearch/elasticsearch-6.3.2/
<3>创建elasticsearch数据文件和日志文件

mkdir /data

chown -R elsearch:elsearch /data/

su  elsearch

mkdir -p es/data mkdir -p es/logs
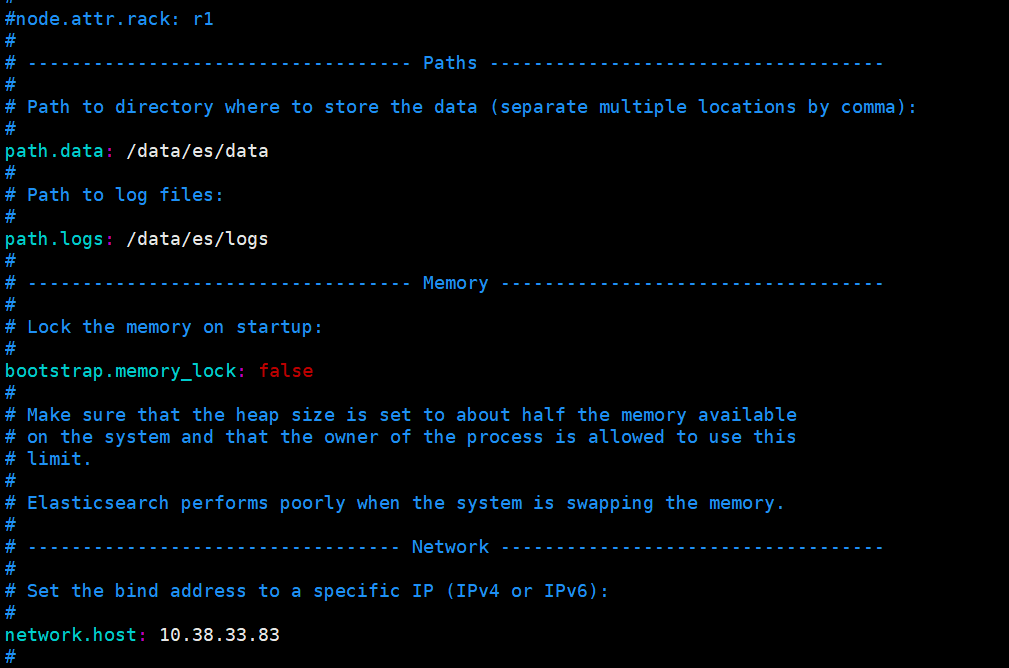
<4>修改配置文件elasticsearch.yml
<5>启动并查看,需要使用非root用户启动
[elsearch@imok bin]$ ./elasticsearch -d
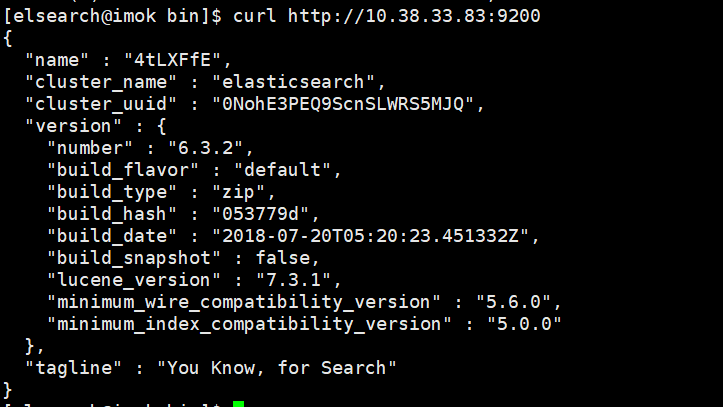
查看是否启动成功: curl http://自己配置的IP地址:9200/
如下图表示安装OK
安装Head插件
由于head插件本质上还是一个nodejs的工程,因此需要安装node,使用npm来安装依赖的包。
<1>安装Node.js
下载解压
wget https://nodejs.org/dist/v6.10.2/node-v6.10.2-linux-x64.tar.xz
xz –d node-v6.10.2-linux-x64.tar.xz
tar xvf node-v6.10.2-linux-x64.tar mv node-v6.10.2-linux-x64 /usr/local/node
配置并生效
vim /etc/profile
export NODE_HOME=/usr/local/node
export PATH=$PATH:$NODE_HOME/bin

source /etc/profile
查看版本验证
[elsearch@imok bin]$ node -v
v6.10.2
[elsearch@imok bin]$ npm -v 3.10.10
<2>下载head插件
如果未安装git ,则先安装git工具
yum install –y git

git clone https://github.com/mobz/elasticsearch-head.git
<3>安装grunt
cd elasticsearch-head
npm install -g grunt --registry=https://registry.npm.taobao.org
<4>安装插件
npm install
在elasticsearch-head目录下node_modules/grunt下如果没有grunt二进制程序,需要执行:
npm install grunt --save
<5>修改配置 elasticsearch-head下Gruntfile.js文件
修改connect配置节点
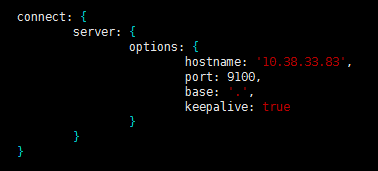
修改 _site/app.js 修改http://localhost:9200字段到本机ES端口与IP

<6>修改 elasticsearch配置文件
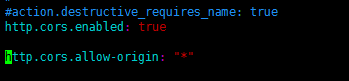
修改elasticsearch.yml文件加入以下内容:
# 是否支持跨域
http.cors.enabled: true

# *表示支持所有域名
http.cors.allow-origin: "*"
<7>启动head插件服务(后台运行)
/elasticsearch-head/node_modules/grunt/bin/grunt server &

<8>查看
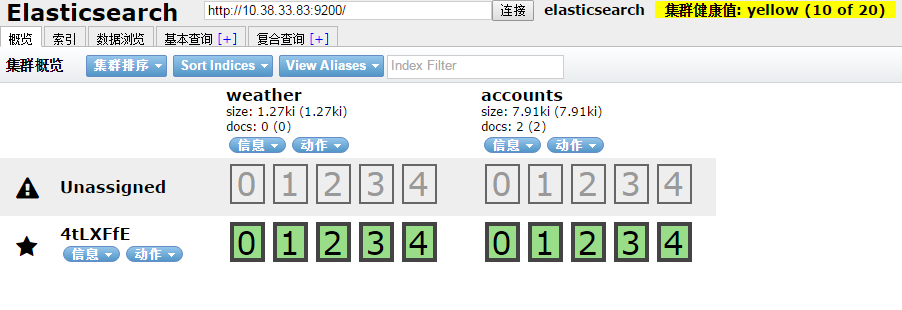
如下图说明安装OK
安装中文分词器
中文分词器的版本和elasticsearch的版本要一致。随笔中安装的是6.3.2版本
$ ./bin/elasticsearch-plugin install https://github.com/medcl/elasticsearch-analysis-ik/releases/download/v6.3.2/elasticsearch-analysis-ik-6.3.2.zip
安装OK后重启elasticsearch服务
安装过程遇到的问题:
[1]: max file descriptors [4096] for elasticsearch process is too low, increase to at least [65536]
解决:vim /etc/security/limits.conf ,在文件末尾添加以下参数 (* 要带上)
* soft nofile 65536

* hard nofile 131072

* soft nproc 2048

* hard nproc 4096
ulimit -n查看进程数
[2]: max virtual memory areas vm.max_map_count [65530] is too low, increase to at least [262144]
解决:修改 /etc/sysclt.conf配置
vi /etc/sysctl.conf
添加一下配置参数
vm.max_map_count=655360
执行命令
sysctl -p
重启elasticsearch服务即可。
参考:
https://www.cnblogs.com/hunttown/p/6723286.html
https://www.cnblogs.com/lizichao1991/p/7809156.html
环境:
CentOS7 Elasticsearch-6.3.2 JDK8
准备:
JDK8 下载地址:http://www.oracle.com/technetwork/java/javase/downloads/jdk8-downloads-2133151.html
Elasticsearch-6.3.2下载地址: https://www.elastic.co/downloads/elasticsearch
安装:
jdk安装
<1>删除open jdk,没有的话则不需要
rpm -qa|grep java

rpm -e nodeps <name>
<2>解压jdk包
mkdir /usr/jdk
tar -xvf jdk-8u112-linux-x64.tar.gz /usr/jdk
32的JDK需要安装 glibc.i686
yum install glibc.i686
<3>配置环境变量
vim /etc/profile
保存退出,使更改配置生效
source /etc/profile
<4>查看jdk安装是否成功
java-version
如下图则OK
Elasticsearch安装
<1>解压elasticsearch安装包 (安装在 /opt/elasticsearch/elasticsearch-6.3.2/)
unzip elasticsearch-6.3.2.zip
<2>创建elasticsearch用户,root用户启动elasticsearch会失败
groupadd elsearch
useradd elsearch -g elsearch
chown -R elsearch:elsearch /opt/elasticsearch/elasticsearch-6.3.2/
<3>创建elasticsearch数据文件和日志文件
mkdir /data

chown -R elsearch:elsearch /data/

su  elsearch

mkdir -p es/data mkdir -p es/logs
<4>修改配置文件elasticsearch.yml
<5>启动并查看,需要使用非root用户启动
[elsearch@imok bin]$ ./elasticsearch -d
查看是否启动成功: curl http://自己配置的IP地址:9200/
如下图表示安装OK
安装Head插件
由于head插件本质上还是一个nodejs的工程,因此需要安装node,使用npm来安装依赖的包。
<1>安装Node.js
下载解压
wget https://nodejs.org/dist/v6.10.2/node-v6.10.2-linux-x64.tar.xz
xz –d node-v6.10.2-linux-x64.tar.xz
tar xvf node-v6.10.2-linux-x64.tar mv node-v6.10.2-linux-x64 /usr/local/node
配置并生效
vim /etc/profile
export NODE_HOME=/usr/local/node
export PATH=$PATH:$NODE_HOME/bin

source /etc/profile
查看版本验证
[elsearch@imok bin]$ node -v
v6.10.2
[elsearch@imok bin]$ npm -v 3.10.10
<2>下载head插件
如果未安装git ,则先安装git工具
yum install –y git

git clone https://github.com/mobz/elasticsearch-head.git
<3>安装grunt
cd elasticsearch-head
npm install -g grunt --registry=https://registry.npm.taobao.org
<4>安装插件
npm install
在elasticsearch-head目录下node_modules/grunt下如果没有grunt二进制程序,需要执行:
npm install grunt --save
<5>修改配置 elasticsearch-head下Gruntfile.js文件
修改connect配置节点
修改 _site/app.js 修改http://localhost:9200字段到本机ES端口与IP
<6>修改 elasticsearch配置文件
修改elasticsearch.yml文件加入以下内容:
# 是否支持跨域
http.cors.enabled: true

# *表示支持所有域名
http.cors.allow-origin: "*"
<7>启动head插件服务(后台运行)
/elasticsearch-head/node_modules/grunt/bin/grunt server &
<8>查看
如下图说明安装OK
安装中文分词器
中文分词器的版本和elasticsearch的版本要一致。随笔中安装的是6.3.2版本
$ ./bin/elasticsearch-plugin install https://github.com/medcl/elasticsearch-analysis-ik/releases/download/v6.3.2/elasticsearch-analysis-ik-6.3.2.zip
安装OK后重启elasticsearch服务
安装过程遇到的问题:
[1]: max file descriptors [4096] for elasticsearch process is too low, increase to at least [65536]
解决:vim /etc/security/limits.conf ,在文件末尾添加以下参数 (* 要带上)
* soft nofile 65536

* hard nofile 131072

* soft nproc 2048

* hard nproc 4096
ulimit -n查看进程数
[2]: max virtual memory areas vm.max_map_count [65530] is too low, increase to at least [262144]
解决:修改 /etc/sysclt.conf配置
vi /etc/sysctl.conf
添加一下配置参数
vm.max_map_count=655360
执行命令
sysctl -p
重启elasticsearch服务即可。
参考:
https://www.cnblogs.com/hunttown/p/6723286.html
https://www.cnblogs.com/lizichao1991/p/7809156.html